介绍对程序进行无侵入的 CPU 和 堆内存(heap)Profiling,生成和查看火焰图。
最后介绍在运行时通过 pprof 工具对 Rust 程序进行动态 CPU 和内存分析的集成方案。
malloc 实现 #
tcmalloc 实现 #
gperftools 的 libprofiler.so 和 libtcmalloc.so 分别支持 CPU Profiling 和 Heap Profiling。
tcmalloc 是 Google 开源的 malloc 接口实现库,支持 Profiling 数据输出。
相关项目:https://github.com/gperftools/gperftools
jemalloc 实现 #
jemalloc 和 tcmalloc 类似,也是 malloc 接口的实现,可以通过程序编译时链接,或者运行时通过 LD_PRELOAD=/usr/lib/libjemalloc.so.2 环境变量进行动态注入。需要注意的是,使用的 libjemalloc.so.2 在编译时需要开启 profiling。
然后通过 MALLOC_CONF 环境变量来进行 heap profiling 控制:
export MALLOC_CONF="prof:true,prof_prefix:./jeprof.out,lg_prof_interval:30,lg_prof_sample:20"
- lg_prof_interval:每分配2^n字节内存,dump出一个heap文件。
- lg_prof_sample:每分配2^n字节内存,采样一次。默认为19,即512KB
jemalloc工具能够对malloc方法调用进行采样dump,生成dump文件后,可以进行分析得出内存分配的情况
sudo ./jeprof /opt/taobao/java/bin/java jeprof.out.651.2.i2.heap
更多参考:memory-jemalloc.md
包含两类项目库:
- tikv-jemallocator 和 tikv-jemalloc-ctl
- jemalloc 和 jemalloc_ctl
tikv-jemallocator 和 jemalloc 是 jemalloc 库的 Rust 绑定,可以作为 Rust 的 GlobalAllocator。
tikv-jemalloc-ctl 和 jemalloc_ctl 则提供了运行时的 jemalloc 动态控制的 Rust 封装,如开始和结束 heap profiling。
使用 tikv-jemallocator 和 tikv-jemalloc-ctl 的项目:https://github.com/polarsignals/rust-jemalloc-pprof
- 输出 pprof 格式的数据,可以用 pprof 查看分析。
使用 jemalloc 和 jemalloc_ctl 的项目:https://github.com/rust-lang/rust-analyzer/blob/master/crates/profile/src/memory_usage.rs#L26
wolfpld/tracy: 大一统的 CPU、Memory Profing 工具。 #
参考:
- https://www.zhihu.com/column/c_1911552193309435288
- Zed 使用 tracy 做 Task/Async profiling:https://github.com/zed-industries/zed/blob/main/docs/src/performance.md#taskasync-profiling
CPU Profiling 和火焰图 #
如下方案都是基于 perf 的 CPU Profiling 采集和火焰图分析,其中 samply 和 flamegraph-rs 是跨平台的采集工具。
- perf + Firefox Profiler: perf 采集和处理,导入 Firefox Profiler 展示;
- perf + FlameGraph (Perl):perf 采集和处理,使用 FlameGraph 工具(Perl)生成火焰图;
- perf + inferno(Rust):perf 采集和处理,使用 inferno(Rust 版本的 FlameGraph 实现)生成火焰图;
- perf + hotspot:perf 采集和处理,使用 hotspot 程序(只支持 Linux)GUI 展示;
- perf + pprof:perf 采集和处理,使用 pprof 程序命令行或 Web 展示;
- samply (Rust) + Firefox Profiler:跨平台,使用 Rust 实现的 samply 采集和处理,导入 Firefox Profiler 展示;
- flamegraph-rs + inferno:跨平台,使用 Rust 实现的 flamegraph-rs 采集和处理,使用 inferno(Rust)生成火焰图;
- wolfpld/tracy: 大一统的 CPU、Memory Profing 工具。
推荐使用跨平台的 6. samply (Rust) + Firefox Profiler 方案。
火焰图比较 #
perf.data 符号补全 #
如果生成的 perf.data 文件没有符号解析(如使用 release 构建时 binary 消除了 debuginfo 和符号表),则可以使用 perf 的 buildid-cache 和 inject 命令来从有符号表的 binary 来解析 perf.data 中的符号:
# Add the symbols to perf database
pref buildid-cache -v -a /path/to/my/newbinary  # newbinary 有符号表

# Resolve the symbols from the db
perf inject -i perf.data -o perf_with_symbols.data # 使用 db 中的符号表来解析 perf.data 中的符号, 结果写入新的 data 文件

# Install flamegraph
cargo install cargo-flamegraph

# Render the flamegraph
flamegraph --perfdata perf_with_symbols.data
参考: https://zed.dev/docs/development/linux#later
1. perf + Firefox Profiler #
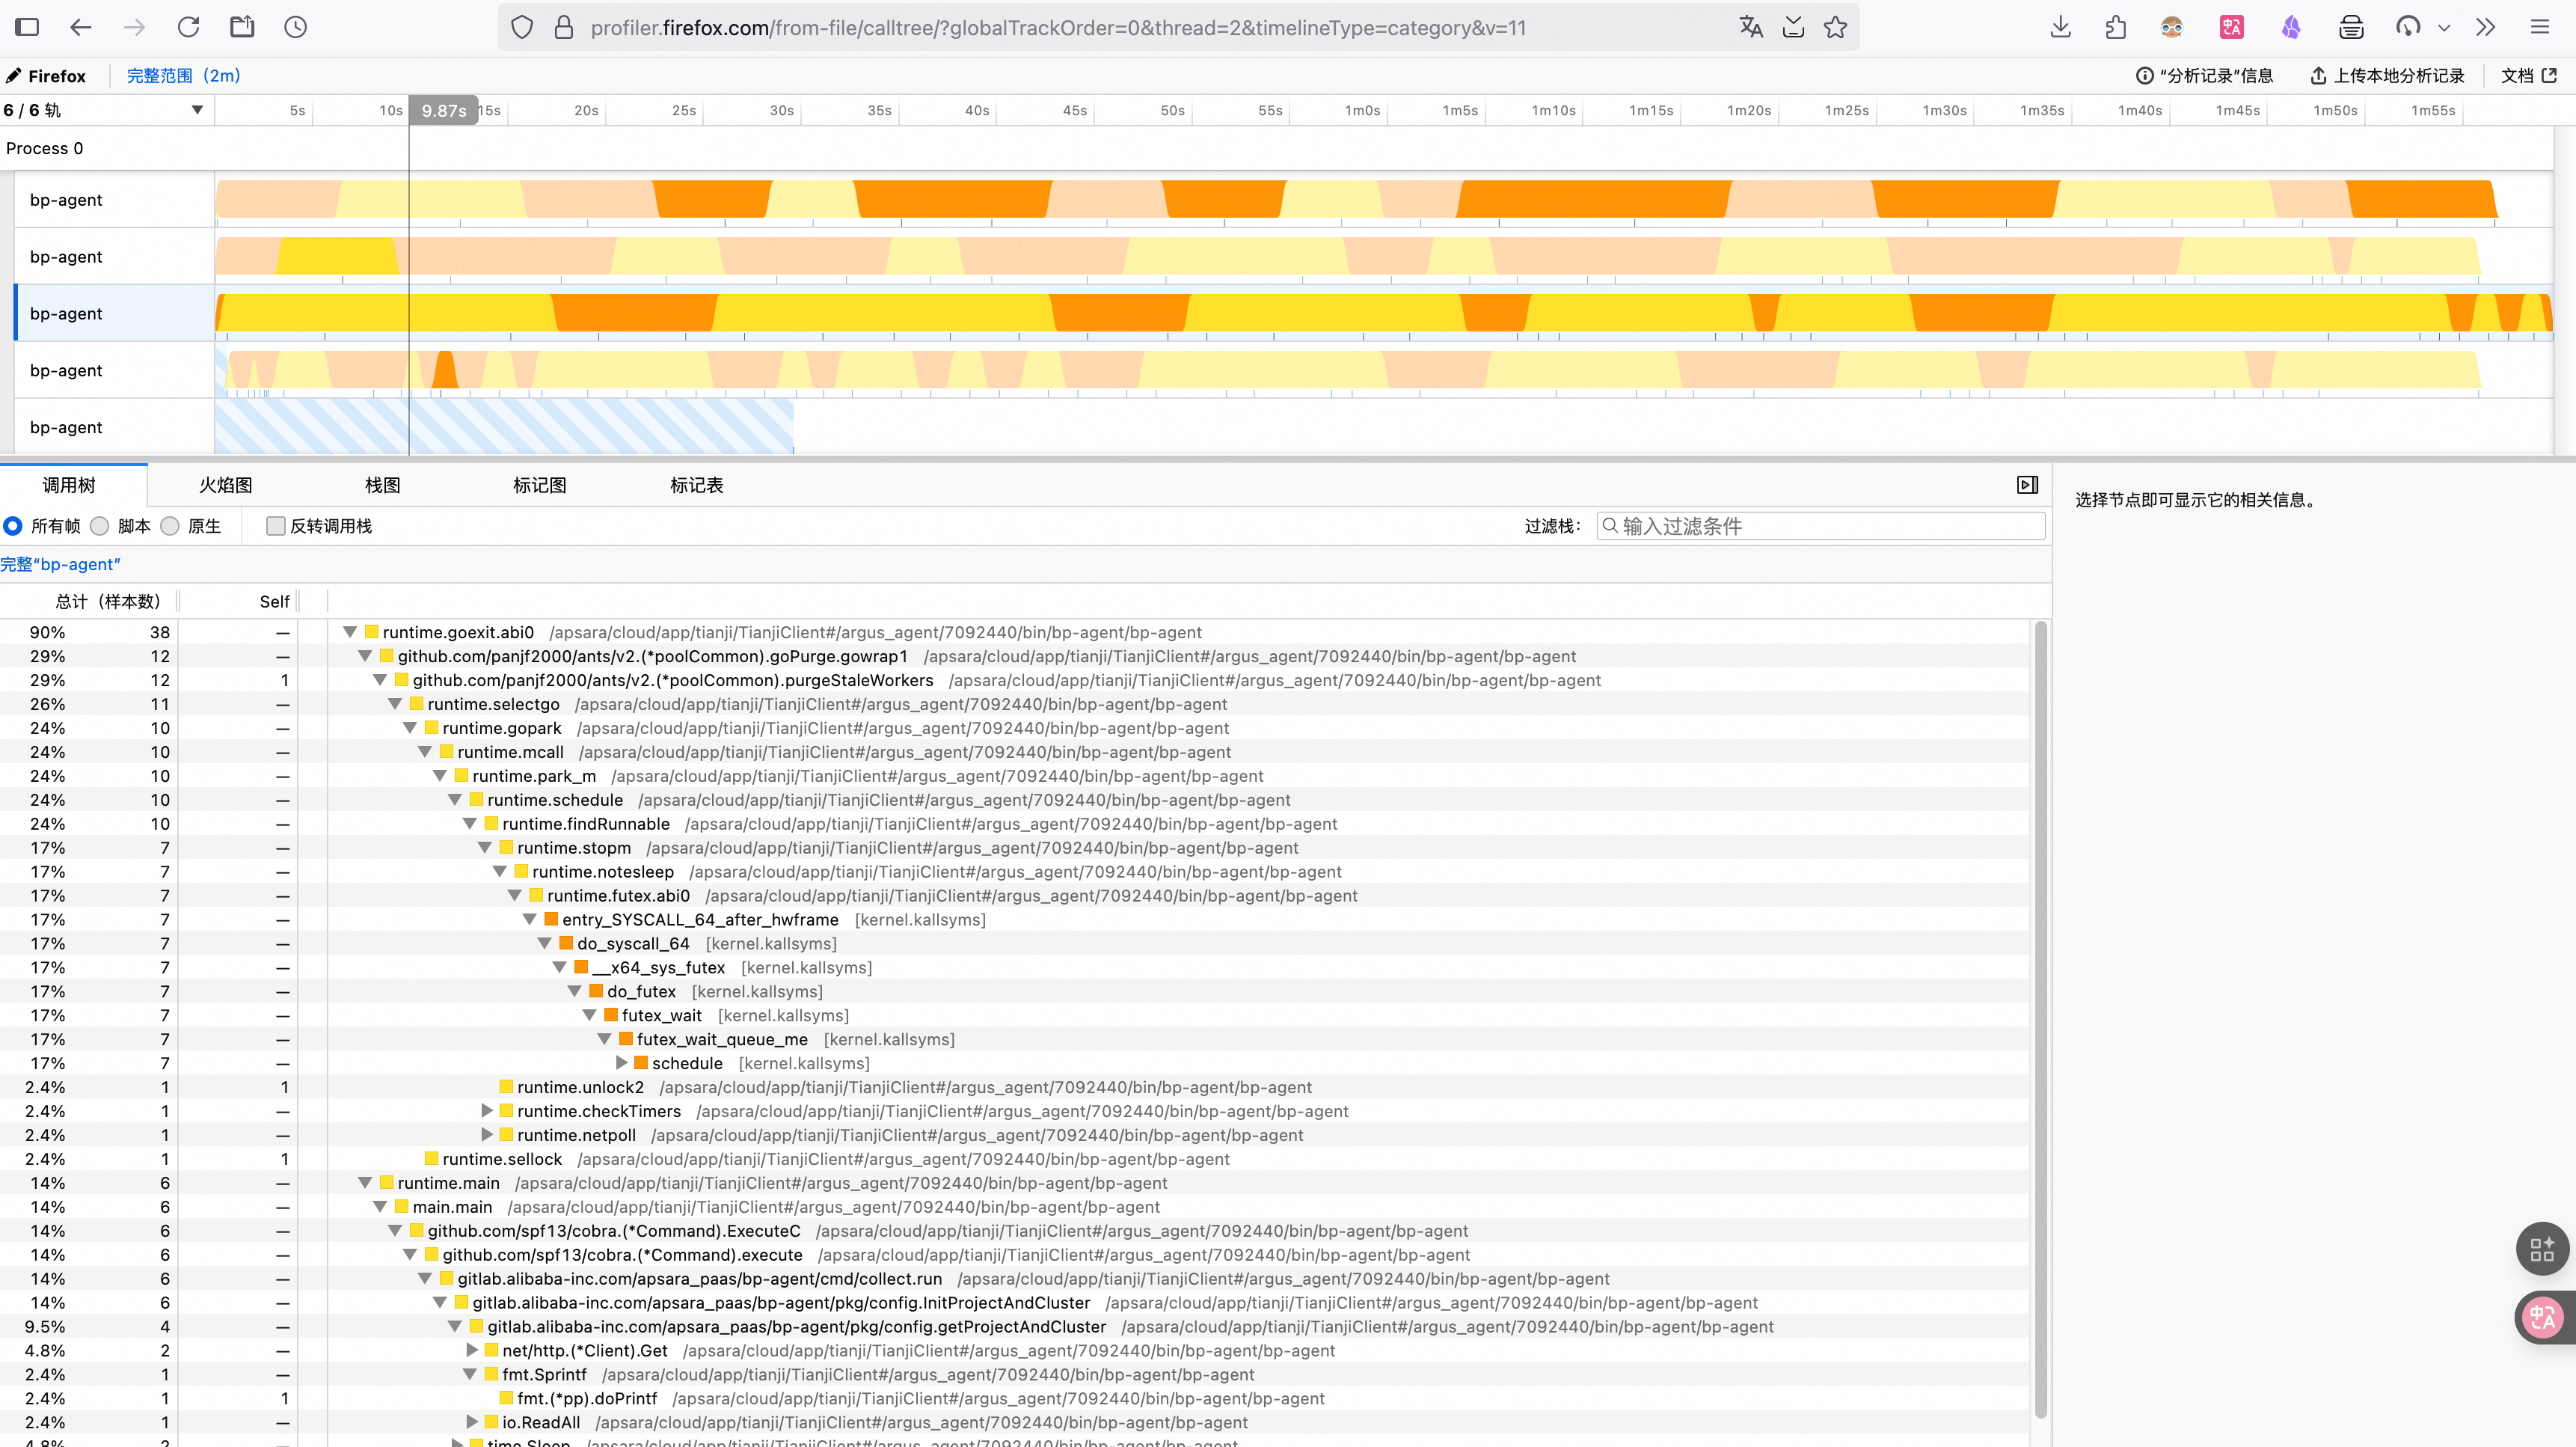
Firefox Profile 提供了在线查看 perf record 生成的 perf.data 数据文件的能力。
UI:https://profiler.firefox.com/
- -a:获得进程所有 CPU 核数据;
- -g:使用 DWARF 进行栈展开,如果 ELF 没有使用 FP 时需要该参数;
# 安装 profing 进程二进制的 debuginfo 包(略)

#perf record -a -F 999 -g -p 19309 sleep 120 >perf.data
Warning:
PID/TID switch overriding SYSTEM
[ perf record: Woken up 1 times to write data ]
[ perf record: Captured and wrote 0.071 MB perf.data (188 samples) ]

# 将 perf.data 转换为文本文件
$ perf script >perf.txt
$ head perf.txt
bp-agent 20608 5140019.602283:          1 cycles:ppp:
        ffffffff90067b76 native_write_msr+0x6 ([kernel.kallsyms])
        ffffffff9000c987 __intel_pmu_enable_all.constprop.26+0x47 ([kernel.kallsyms])
        ffffffff901dba3b __perf_event_task_sched_in+0x19b ([kernel.kallsyms])
        ffffffff900c440a finish_task_switch+0x13a ([kernel.kallsyms])
        ffffffff908446b7 __sched_text_start+0x3d7 ([kernel.kallsyms])
        ffffffff90844973 schedule+0x33 ([kernel.kallsyms])
        ffffffff90135e91 futex_wait_queue_me+0xc1 ([kernel.kallsyms])
        ffffffff90136ba6 futex_wait+0xf6 ([kernel.kallsyms])
        ffffffff901393cb do_futex+0x12b ([kernel.kallsyms])
将生成的 perf.txt 文件上传到 https://profiler.firefox.com/ 查看调用图:
2. perf + FlameGraph(Perl) #
除了系统整体性能分析外,一般展示特定进程的火焰图,所以在 perf record 时需要通过 -p 来指定进程 PID.
生成火焰图依赖 debuginfo 数据,需要采样的进程二进制以及依赖库如 libc,包含 .debug_XX 调试符号表或系统安装有对应的 debuginfo 包。
使用 perf script 来生成调用栈数据,然后重定向到 perl 脚本做进一步处理,生成火焰图:
perf record -F 99 -g --call-graph=dwarf -p 35775 -g -- sleep 10
perf report
perf script > out.perf

git clone https://github.com/brendangregg/FlameGraph
cd FlameGraph/
# 使用 ./stackcollapse-perf.pl 工具将 perf 数据转换
./stackcollapse-perf.pl  ../out.perf > out.folded
./flamegraph.pl out.folded > process.svg
open process.svg
对于 bpftrace 产生的采样数据,也可以使用 flamegraph 提供的转换工具进行可视化:
sudo bpftrace -e 'profile:hz:99 { @[kstack] = count(); }' > trace.data
cd FlameGraph
# 使用 stackcollapse-bpftrace.pl 工具进行转换
./stackcollapse-bpftrace.pl trace.data > trace.folded
./flamegraph.pl --inverted trace.folded > traceflamegraph.svg

# 也可以对 uprobe 指定的函数调用栈生成 tarce 数据,然后生成火焰图
$ grep libwebp /proc/25760/maps
7f7bc6af3000-7f7bc6af6000 r--p 00000000 09:01 38281904                   /usr/lib/x86_64-linux-gnu/libwebp.so.6.0.2
$ sudo bpftrace -e 'uprobe:/usr/lib/x86_64-linux-gnu/libwebp.so.6.0.2:* {time("%H:%M:%S "); printf("%s %d\n",comm,pid);}' | tee /tmp/libwebp.trace
3. perf + inferno(Rust) #
使用 perf record 来搜集数据,然后使用 inferno 来绘制 flamegraph 或 flamechart:
- inferno 是 flamegraph toolkit 的 Rust 版本。
# profiling 前需要先放开内核限制
echo '-1' | sudo tee /proc/sys/kernel/perf_event_paranoid

#https://github.com/zed-industries/zed/pull/8972/files
echo "Running perf on collab, collecting 30s of data..."

kubectl -n $environment exec -it deployments/collab -- perf record -p 1 -g -m 64 --call-graph dwarf -- sleep 30

run="collab-$environment-$(date -Iseconds)"
echo "Processing data and downloading to '$run.perf'..."

kubectl -n $environment exec -it deployments/collab -- perf --no-pager script > "$run.perf"

# inferno 是 Rust 版本的 https://github.com/brendangregg/FlameGraph 实现
# 参考:https://github.com/jonhoo/inferno?tab=readme-ov-file
which inferno-flamegraph 2>/dev/null || (echo "installing inferno..."; cargo install inferno)
inferno-collapse-perf "$run.perf" | inferno-flamegraph > "$run.svg"

open "$run.svg"
4. perf + hotspot #
https://github.com/KDAB/hotspot?tab=readme-ov-file#off-cpu-profiling
hotspot 是基于 perf 的 CPU Profiling 工具和 GUI 查看器。
hotspot 的目标是提供一个基于 perf 的类似于 KCachegrind GUI 查看工具。
hostspot 可以查看导入的 perf.data 文件数据,也可以直接执行或 attach 一个进程进行 perf record。
但 hotspot 只适合 linux 平台,所以更建议使用:
- Firefox Profiler + perf;
- Firefor Profiler + samply,samply 的优势是跨平台,Linux、MacOS、Windows 均支持。
hotspot 支持 off-CPU profiling。
Hotspot supports a very powerful way of doing wait-time analysis, or off-CPU profiling.
This analysis is based on kernel tracepoints in the linux scheduler. By recording that data, we can find the time delta during which a thread was not running on the CPU, but instead was off-CPU. There can be multiple reasons for that, all of which can be found using this technique:
synchronous I/O, e.g. via read() or write()
page faults, e.g. when accessing mmap()'ed file data
calls to nanosleep() or yield()
lock contention via futex() etc.
preemption
and probably many more
By leveraging kernel trace points in the scheduler, the overhead is pretty manageable and we only pay a price, when the process is actually getting switched out. Most notably we do not pay a price when e.g. a mutex lock operation can be handled directly in user-space.
To do off-CPU analysis with Hotspot, you need to record the data with a very specific command:
perf record \
    -e cycles \                             # on-CPU profiling
    -e sched:sched_switch --switch-events \ # off-CPU profiling
    --sample-cpu \                          # track on which core code is executed
    -m 8M \                                 # reduce chance of event loss
    --aio -z \                              # reduce disk-I/O overhead and data size
    --call-graph dwarf \                    # we definitely want backtraces
    <your application>
Alternatively, you can use the off-CPU check box in Hotspot’s integrated record page.
During the analysis, you can then switch between the “cycles” cost view for on-CPU data to the “off-CPU time” cost view for wait-time analysis. Often, you will want to change between both, e.g. to find places in your code which may require further parallelization (see also Amdahl’s law).
The “sched:sched_switch” cost will also be shown to you. But in my opinion that is less useful, as it only indicates the number of scheduler switches. The length of the time inbetween is often way more interesting to me - and that’s what is shown to you in the “off-CPU time” metric.
5. samply (Rust) + Firefox Profiler #
https://github.com/mstange/samply?tab=readme-ov-file
相比 perf profiling + brendangregg/FlameGraph 项目的各种 perl 脚本来生成火焰图,flamegraph-rs 提供的 cargo-flamegraph 或 flamegraph 命令可以直接运行程序,并生成火焰图,而不在依赖各种 perl 脚本和分布处理。
samply 是 flamegraph-rs 的进化版,可以直接生成 Firefox profiler Web UI 可以展示的数据格式。
samply 也支持 Linux、MacOS、Windows 三个平台:
echo '-1' | sudo tee /proc/sys/kernel/perf_event_paranoid

samply record ./my-application my-arguments
6. perf + pprof #
https://github.com/google/pprof/tree/main
pprof 用于分析和可视化 profing 数据,支持 CPU 调用分析、Heap 堆内存分配分析。
pprof 是用 go 开发的,是 gperftools 的升级版(perl 开发),语言无关的 profing 工具,可以单独安装和使用:
go install github.com/google/pprof@latest
pprof 可以从文件或通过 http/https 的 URL 直接读取分析信息。它的原生格式是一个 gzipped profile.proto 文件,但也可以接受由 gperftools 生成的一些旧格式。
google/perf_data_converter 项目提供的 perf_to_profile 命令可以用于将 perf.data 文件转换为 pprof 支持的 profile.proto 格式。
较新的 pprof 工具支持自动调用 perf_to_profile 命令来分析 perf.data 数据:
# https://github.com/google/perf_data_converter

# Profile a command using perf, for example:
perf record /bin/ls

# Recent versions of pprof will automatically invoke perf_to_profile:
pprof -web perf.data
7. flamegraph-rs + inferno #
flamegraph-rs: https://github.com/flamegraph-rs/flamegraph?tab=readme-ov-file
inferno:https://github.com/jonhoo/inferno,它是 Rust 版本的 https://github.com/brendangregg/FlameGraph 实现。
flamegraph-rs 支持多平台二进制的 cpu profiling,它内部使用 inferno 项目提供的 Rust 版本 FlameGraph 实现 :
- Linux: 使用 perf;
- MacOS:使用 xctrace;
- Windows:使用 blondie 或 dtrace
相比 perf profiling + brendangregg/FlameGraph 项目的各种 perl 脚本来生成火焰图,flamegraph-rs 提供的 cargo-flamegraph 或 flamegraph 命令可以直接运行程序,并生成火焰图,而不在依赖各种 perl 脚本和分布处理。
同时支持 Rust 项目集成,即直接通过 cargo flamegraph 命令来编译、运行和 Profing 程序。
# profiling 前需要先放开内核限制
echo '-1' | sudo tee /proc/sys/kernel/perf_event_paranoid

# Linux 系统安装 perf 工具。(略)

# Rust 项目集成,直接编译和运行二进制,并进行 CPU Profiling
cargo flamegraph

# Run your default target with no arguments
cargo flamegraph

# Run your default target with the arguments after --
cargo flamegraph -- arg1 arg2 arg3

# Run the specified bin target with arguments
cargo flamegraph -b mybin -- arg1 arg2 arg3

# Run your default target with arguments and save
# the results to a different filename
cargo flamegraph -o myoutput.svg -- arg1 arg2 arg3

# 任意二进制 profing 和生成火焰图
flamegraph -- /path/to/binary

# profing 正在运行的进程
flamegraph [-o my_flamegraph.svg] --pid 1337
堆内存 Profiling 和展示 #
- Valgrind DHAT + Firefox Profiler:使用 Valgrind 的 DHAT 工具采集数据,导入 Firefox Profiler 展示;
- Valgrind Callgrind + KCachegrind:使用 Valgrind 的 Callgrind 工具采集数据,使用 KCachegrind GUI 展示(只支持 Linux);
- gperftools + pprof: 使用静态链接或动态注入支持 heap profiling 的 libtcmalloc.so.4 库实现,性能比 Valgrind 更高,使用 pprof 分析;
- heaptrack/heaptrack_gui:heaptrack 用于数据采集(只支持 Linux,性能比 Valgrind 高),heaptrack_gui 用于 GUI 展示(支持 Linux、MacOS)
综合,推荐使用方案:3. gperftools + pprof 。
1. Valgrind DHAT + Firefox Profiler #
https://valgrind.org/docs/manual/dh-manual.html
Valgrind’s “Dynamic Heap Analysis Tool” DHAT
valgrind 有两种 heap 分析工具:
--tool=massif:https://valgrind.org/docs/manual/ms-manual.html
- 分析总的 heap 内存使用情况;
--tool=dhat:
- 能更详细的分析 heap 内存是由谁分配和使用。《=== 建议,更常用。
DHAT 用于统计和分析程序的堆内存分布情况,它是 valgrind 的一部分
sudo apt-get install valgrind
valgrind --tool=dhat ./my-program
上面的命令会生成一个 dhat.out.<pid> 文件,将它导入到 Firefox Profiler 进行可视化分析。
参考:
2. Valgrind Callgrind + KCachegrind #
https://kcachegrind.github.io/html/Home.html
Cachegrind 和 Callgrind 是 Valgrind 的两种 tools,支持 cache simulation and call-graph generation,并写入文件。
KCachegrind 是 Cachegrind/Callgrind 文件的可视化程序。
Another profiling tool is Cachegrind, part of Valgrind. It uses the processor
emulation of Valgrind to run the executable, and catches all memory accesses for the trace. The user program does not need to be recompiled; it can use shared libraries
and plugins, and the profile measuring doesn’t influence the trace results. The trace
includes the number of instruction/data memory accesses and 1st/2nd level cache
misses, and relates it to source lines and functions of the run program. A
disadvantage is the slowdown involved in the processor emulation, it’s around 50
times slower.
3. heaptrack #
https://github.com/KDE/heaptrack
- https://invent.kde.org/sdk/heaptrack/#comparison-to-valgrinds-massif
- https://milianw.de/blog/heaptrack-a-heap-memory-profiler-for-linux.html
heaptrack 的实现方式是给程序动态注入 libheaptrack.so,从而在运行过程中输出 heap 数据。
类似的实现方式是 Google gperftools 《=== 建议使用 gperftools,它的维护性更积极,pprof 社区生态更好。
而 Valgrind dhat 和 massif 是通过模拟 CPU 来运行程序,所以性能比较差。
heaptrack 由两部分组成:
- heaptrack:数据采集器,支持 Rust 程序 demangle;
- heaptrack_gui: 数据分析 GUI 程序;
- heaptrack_print: 终端展示程序;
alinux3 和 ubunut 软件源均包含 heaptrack:
#yum info heaptrack
Last metadata expiration check: 0:05:52 ago on Fri 10 Oct 2025 06:16:52 PM CST.
Available Packages
Name         : heaptrack
Version      : 1.2.0
Release      : 7.el8
Architecture : x86_64
Size         : 562 k
Source       : heaptrack-1.2.0-7.el8.src.rpm
Repository   : epel
Summary      : A heap memory profiler for Linux
URL          : https://cgit.kde.org/heaptrack.git/
License      : GPLv2+
Description  : Heaptrack traces all memory allocations and annotates these events with stack
             : traces.Dedicated analysis tools then allow you to interpret the heap memory
             : profile to:
             : - find hotspots that need to be optimized to reduce the memory footprint of your
             :   application
             : - find memory leaks, i.e. locations that allocate memory which is never
             :   deallocated
             : - find allocation hotspots, i.e. code locations that trigger a lot of memory
             :   allocation calls
             : - find temporary allocations, which are allocations that are directly followed
             :   by their deallocation
数据采集:
# 直接执行程序
heaptrack <your application and its parameters>

heaptrack output will be written to "/tmp/heaptrack.APP.PID.gz"
starting application, this might take some time...

...

heaptrack stats:
    allocations:            65
    leaked allocations:     60
    temporary allocations:  1

Heaptrack finished! Now run the following to investigate the data:

    heaptrack --analyze "/tmp/heaptrack.APP.PID.gz"


# 或者,采集正在运行的程序
heaptrack --pid $(pidof <your application>)

heaptrack output will be written to "/tmp/heaptrack.APP.PID.gz"
injecting heaptrack into application via GDB, this might take some time...
injection finished

...

Heaptrack finished! Now run the following to investigate the data:

    heaptrack --analyze "/tmp/heaptrack.APP.PID.gz"
heaptrack_print 和 heaptrack_gui: 都支持在 Linux 和 MacOS 系统上编译和运行。
heaptrack_print heaptrack.APP.PID.gz | less
对于 Rust 程序,Heaptrack 使用 rustc_demangle 外部库来 demangle,需要编译和安装该库到系统中。
# https://github.com/rust-lang/rustc-demangle

$ cargo build -p rustc-demangle-capi --release

# 头文件:crates/capi/include/rustc_demangle.h
# 库文件:target/release/librustc_demangle.a and target/release/librustc_demangle.so
对于 Rust 程序可以使用 cargo-heaptrack 来方便的进行编译测试:
$ sudo apt install heaptrack heaptrack-gui
$ cargo install cargo-heaptrack
# 运行测试
$ cargo heaptrack -b zed
当上述命令执行结束后,终端会输出一条命令运行 heaptrack_interpret ,用于将生成的 *.raw.zst 文件转换为 *.zst 文件,后者可以通过 heaptrack_gui 进行查看。
gperftools + pprof #
https://github.com/gperftools/gperftools
gperftools 的 libprofiler.so 和 libtcmalloc.so 分别支持 CPU Profiling 和 Heap Profiling。
tcmalloc 是 Google 开源的 malloc 接口实现库,支持 Profiling 数据输出。类似的还有 jemalloc 库。
gperftools 生成的 profiling 数据文件,可以通过 pprof 进行命令行、PDF、web 分析(pprof 是跨平台的)。
alinux3 软件源有 gperftools 包:
#yum install gperftools.x86_64

#rpm -qi gperftools.x86_64 |grep Source
Source RPM  : gperftools-2.7-9.el8.src.rpm

#rpm -ql gperftools-libs
/usr/lib/.build-id
/usr/lib/.build-id/03
/usr/lib/.build-id/03/a826e894296e8a834a7a5378821885acda325f
/usr/lib/.build-id/17
/usr/lib/.build-id/17/00677b96115d66836234a49fa7c1568979e3e2
/usr/lib/.build-id/2a
/usr/lib/.build-id/2a/f8a846581d5a62a36ebf5528ccd5a2484be464
/usr/lib/.build-id/2c
/usr/lib/.build-id/2c/61dab09d46c69147ec39b9cec0b5daed2fc101
/usr/lib/.build-id/7e
/usr/lib/.build-id/7e/ec65f2b4e39dbefad415e9640a631851a77ffa
/usr/lib/.build-id/d5
/usr/lib/.build-id/d5/555de1328238f4aea66a1d976f53665df81f90
/usr/lib64/libprofiler.so.0
/usr/lib64/libprofiler.so.0.4.18
/usr/lib64/libtcmalloc.so.4
/usr/lib64/libtcmalloc.so.4.5.3
/usr/lib64/libtcmalloc_and_profiler.so.4
/usr/lib64/libtcmalloc_and_profiler.so.4.5.3
/usr/lib64/libtcmalloc_debug.so.4
/usr/lib64/libtcmalloc_debug.so.4.5.3
/usr/lib64/libtcmalloc_minimal.so.4
/usr/lib64/libtcmalloc_minimal.so.4.5.3
/usr/lib64/libtcmalloc_minimal_debug.so.4
/usr/lib64/libtcmalloc_minimal_debug.so.4.5.3
alinux3 自带的 gperftools 版本较老,可以从 github 上 clone 最新的源码后自己编译使用。
两种使用方式:
-
编译时链接 -ltcmalloc 或 -lprofiler, 这样后续可以在程序运行过程中通过发送信号的方式、或通过 APIs 触发(内部调用 C++ profiling 函数, 如 HeapProfilerStart() and HeapProfilerStop())动态进行 profiling; 《== 适合于受控的 源码项目
-
运行时动态注入,通过 LD_PRELOAD 环境变量注入两个支持 profiling 的动态库,然后通过环境变量来开启 profiling。
注意:经过测试,如果在 linux 系统上生成 profiling 文件,但是在 MacOS 上分析、web 或 PDF 展示,都会有数据不全的问题,同时还有符号解析的问 题。所以建议在 Linux 上分析、生成 PDF 或 SVG。 https://users.rust-lang.org/t/pprof-wont-show-symbols/24241/3
CPU profiling #
参考:https://github.com/gperftools/gperftools/blob/master/docs/cpuprofile.adoc
#LD_PRELOAD=/usr/lib64/libprofiler.so  CPUPROFILE=find.cpu.prof find /
#pprof --pdf /usr/bin/find find.cpu.prof  >find.cpu.pdf
#open find.cpu.pdf

更复杂的示例:
export LD_PRELOAD=/usr/local/lib/libprofiler.so.0
export CPUPROFILE=a.out.prof
export CPUPROFILESIGNAL=12
export CPUPROFILE_FREQUENCY=100
export CPUPROFILE_REALTIME=1  # 默认是 ITIMER_PROF,设置该环境变量后切换为 ITIMER_REAL
export CPUPROFILE_TIMER_SIGNAL=34 # override SIGALRM used in REALTIME mode
export CPUPROFILE_PER_THREAD_TIMERS=1 # 使用 POSIX timer_create 来支持多线程 profiling: https://github.com/gperftools/gperftools/issues/690
./a.out &
export LD_PRELOAD=
注意:
// https://github.com/gperftools/gperftools/blob/119136d3c3c985fa45f5c8d95b1cf496659615dc/src/profile-handler.h#L45

/*
* This module manages the cpu profile timers and the associated interrupt
* handler. When enabled, all threads in the program are profiled.
*
* Any component interested in receiving a profile timer interrupt can do so by
* registering a callback. All registered callbacks must be async-signal-safe.
*
* Note: This module requires the sole ownership of the configured timer and
* signal. The timer defaults to ITIMER_PROF, can be changed to ITIMER_REAL by
* the environment variable CPUPROFILE_REALTIME, or is changed to a POSIX timer
* with CPUPROFILE_PER_THREAD_TIMERS. The signal defaults to SIGPROF/SIGALRM to
* match the choice of timer and can be set to an arbitrary value using
* CPUPROFILE_TIMER_SIGNAL with CPUPROFILE_PER_THREAD_TIMERS.
*/
默认 timer 是 ITIMER_PROF(对应 signal 是 SIGPROF),配置 CPUPROFILE_REALTIME=1 来切换为 ITIMER_REAL(对应 signal 是 SIGALRM),配置 CPUPROFILE_PER_THREAD_TIMERS 来切换为 POSIX timer(signal 通过 CPUPROFILE_TIMER_SIGNAL 来设置)。
如果要 profiling multi-threaded programs, 需要:
- 设置 CPUPROFILE_PER_THREAD_TIMERS=t;
- 确保程序动态链接了 librt 和 libpthread ;
- “register” your threads,或者使用 LD_PRELOAD 来动态注入 gperf-all-threads 项目生成的 so(不适合静态链接的程序)
参考:https://stackoverflow.com/a/46258383/19867059
https://github.com/gperftools/gperftools/issues/826
https://github.com/gperftools/gperftools/issues/708
Indeed, wall clock profiler is only able to profile one thread(默认的 ITIMER_PROF).
per-thread timers mode should help, but you’ll need to register threads as
they’re created. See https://github.com/alk/gperf-all-threads for one way to
automagically register threads. See also issue #708
Scrubbing. So indeed, when you give it CPUPROFILE_TIMER_SIGNAL you force it into
per-thread mode. And that mode requires you yo register threads or use that
gperf-all-threads thingy mentioned above. So either don’t do custom signal number or
do the other thing. I think as far this specific question we’re done here.
堆内存 profiling #
libtcmalloc.so 劫持了 malloc、calloc、realloc、new 等内存分配函数来实现,同时同构环境变量 HEAP_PROFILE_MMAP=true 还可以来统计 mmap、mremap 和 sbrk 的 profiling。
参考:https://github.com/gperftools/gperftools/blob/master/docs/heapprofile.adoc
对程序进行 heap profiling:
# 运行程序,动态注入 libtcmalloc,通过 HEAPPROFILE 环境变量来开启 heap profiling
#LD_PRELOAD=/usr/lib64/libtcmalloc.so.4 HEAPPROFILE=/tmp/mybin.hprof find /
#ls -l /tmp/mybin.hprof.000*
-rw-r--r-- 1 root root 15278 Oct 10 19:56 /tmp/mybin.hprof.0001.heap
-rw-r--r-- 1 root root 15279 Oct 10 19:56 /tmp/mybin.hprof.0002.heap
-rw-r--r-- 1 root root 15280 Oct 10 19:56 /tmp/mybin.hprof.0003.heap
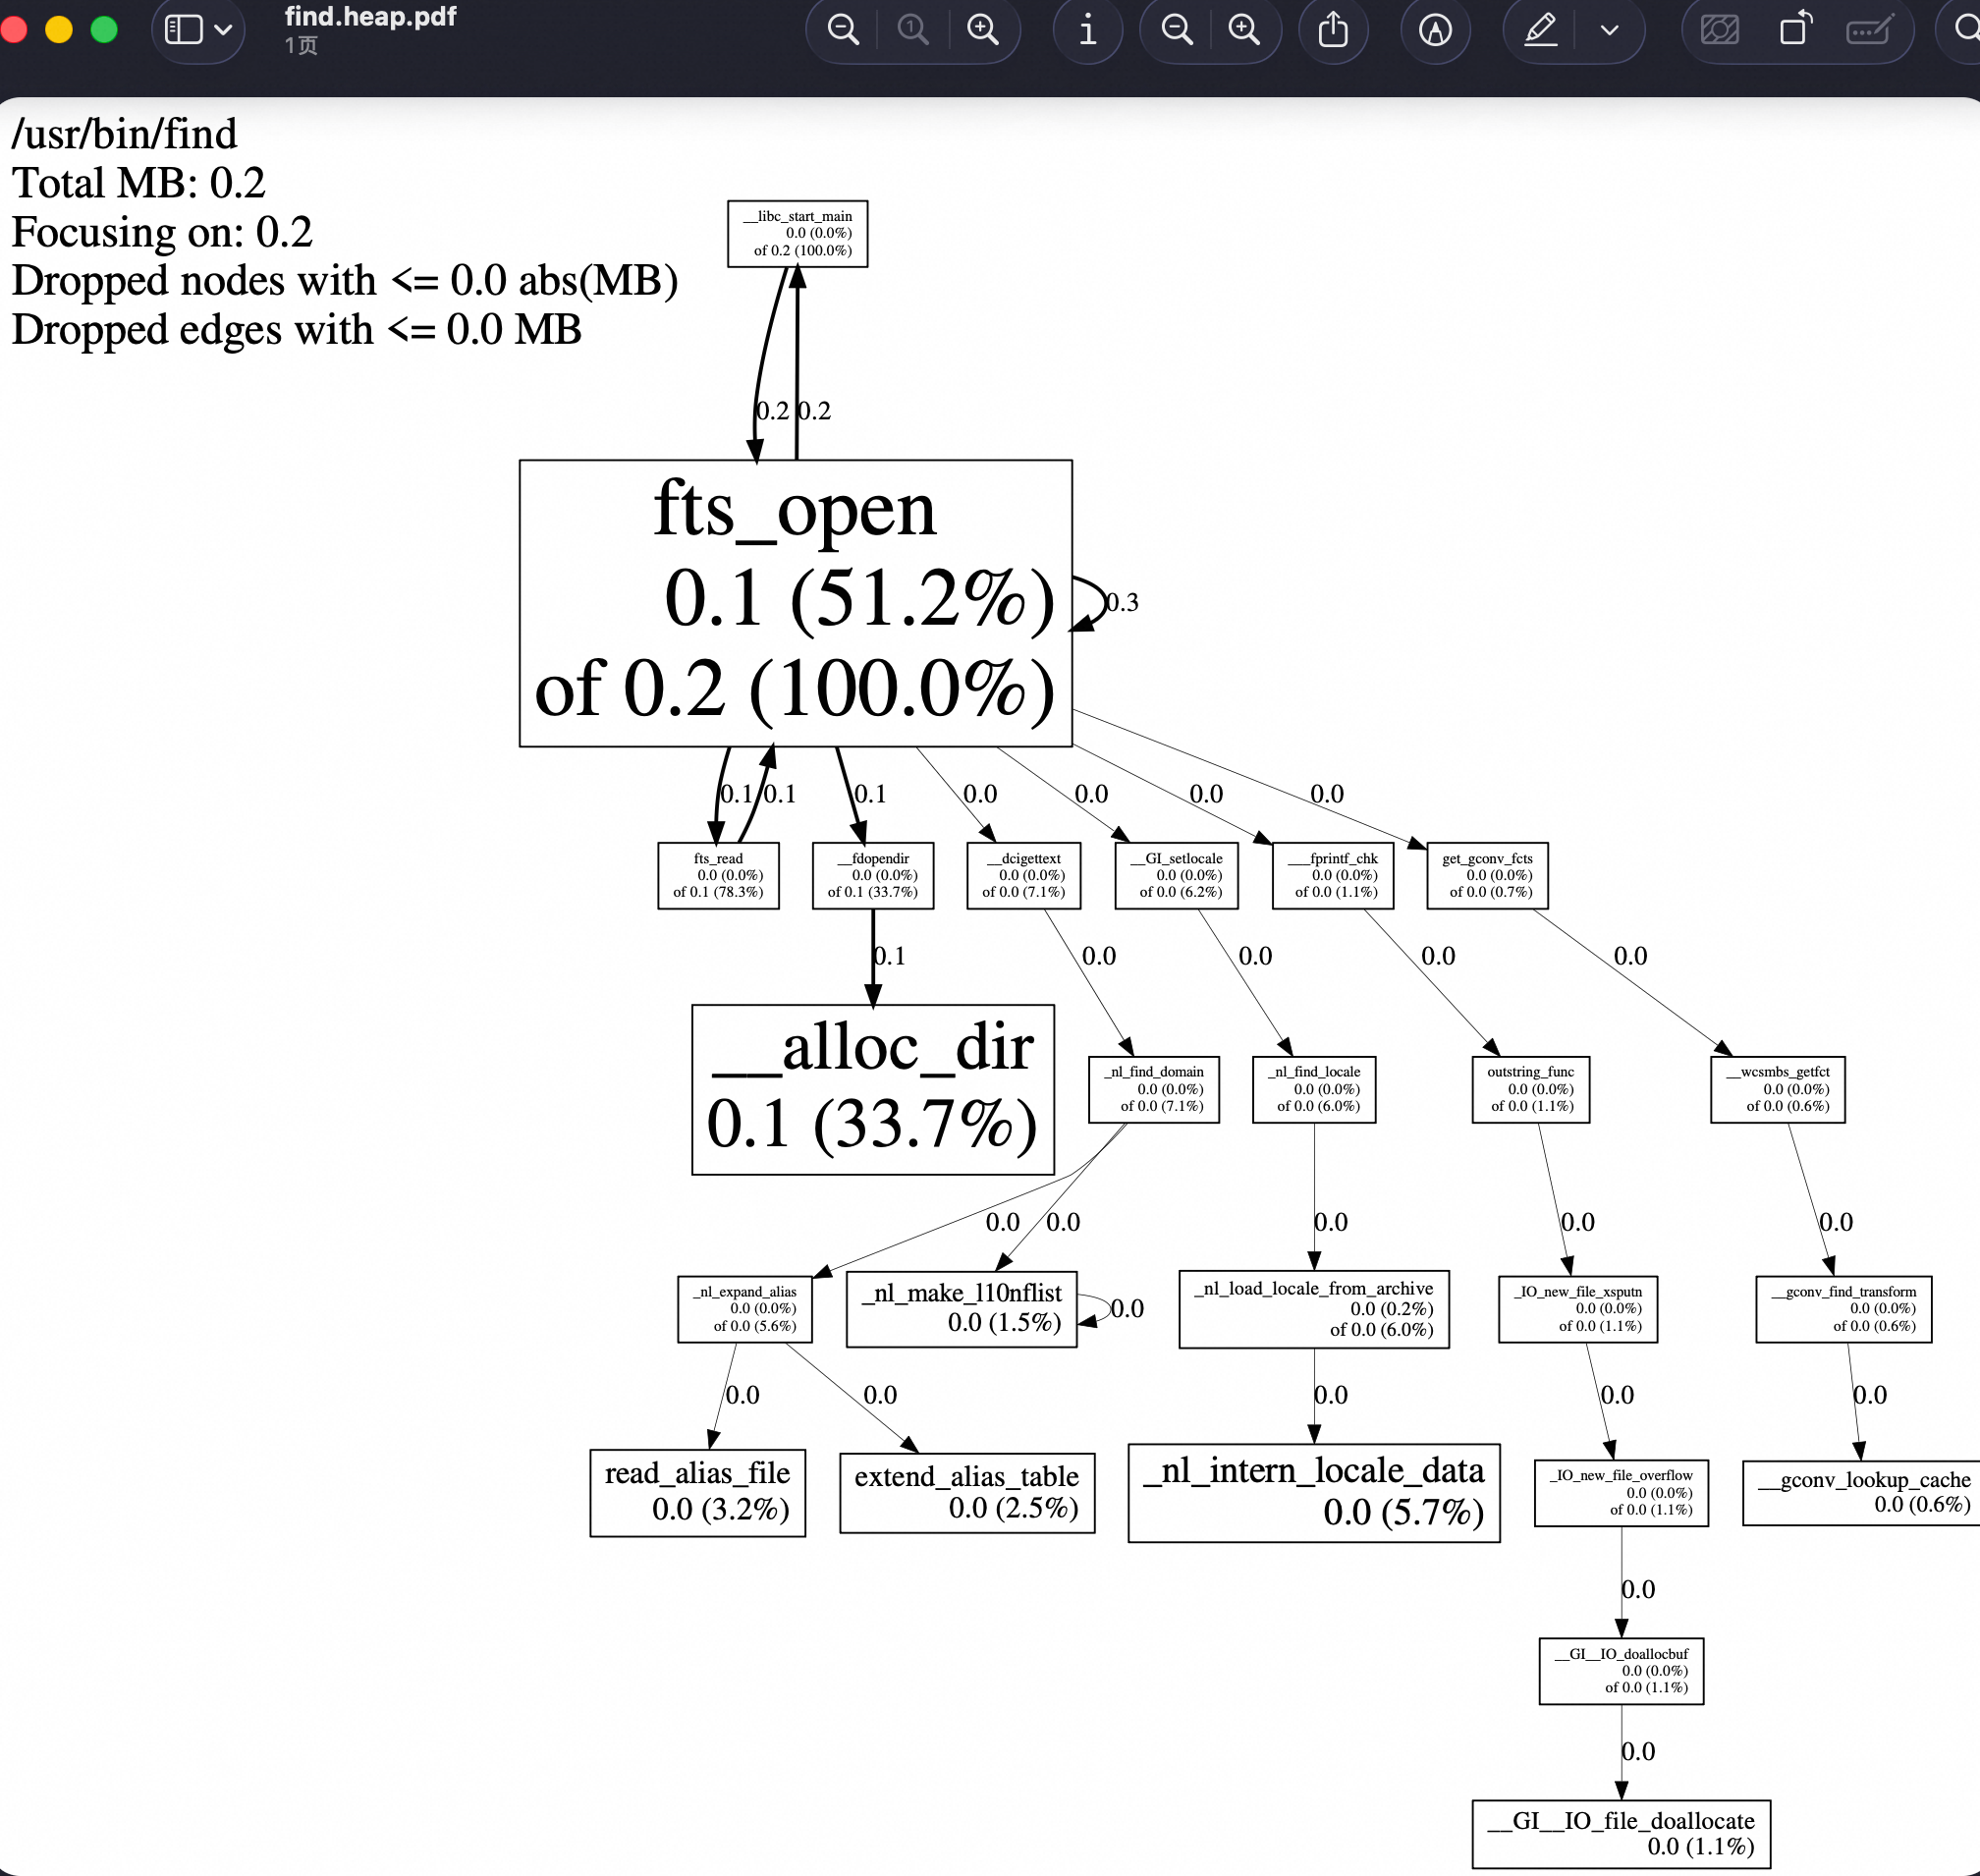
# 生成 PDF
#pprof --pdf /usr/bin/find /tmp/mybin.hprof.0003.heap /tmp/mybin.hprof.0002.heap /tmp/mybin.hprof.0001.heap > find.heap.pdf
# 查看 PDF
# open find.heap.pdf
Rust 程序的动态 CPU & 堆内存 Profiling 和展示 #
- tikv/pprof-rs + pprof: CPU Profiling
- polarsignals/rust-jemalloc-pprof + pprof:Heap Profiling
- killzoner/pprof-hyper-server + pprof: CPU & Heap Profiling,基于 pprof-rs 和 rust-jemalloc-pprof 实现。
- Rust dhat crate + Firefox Profiler: Heap Profiling
- rust-analyzer 项目的 profile crate:提供了基于 gperftools 的 CPU Profiling Rust 封装,也支持 Memory 总分配数量的统计;
参考:
1. tikv/pprof-rs + pprof #
https://github.com/tikv/pprof-rs
可以实现通过 API 调用 + 超时,来在 Rust 程序运行过程中动态生成 CPU Profiling 数据:
// First, get a guard to start profiling. Profiling will continue until this guard was dropped.
let guard = pprof::ProfilerGuardBuilder::default().frequency(1000).blocklist(&["libc", "libgcc", "pthread", "vdso"]).build().unwrap();

// During the profiling time, you can get a report with the guard.
if let Ok(report) = guard.report().build() {
    println!("report: {:?}", &report);
};
支持的 Features:
- cpp enables the cpp demangle.
- flamegraph enables the flamegraph report format.
- prost-codec enables the pprof protobuf report format through prost.
- protobuf-codec enables the pprof protobuf report format through protobuf crate.
- frame-pointer gets the backtrace through frame pointer. only available for nightly
当开启 protobuf feature 后,pprof-rs 可以输出 profile.proto 格式内容:
match guard.report().build() {
    Ok(report) => {
        let mut file = File::create("profile.pb").unwrap();
        let profile = report.pprof().unwrap();

        let mut content = Vec::new();
        profile.encode(&mut content).unwrap();
        file.write_all(&content).unwrap();

        println!("report: {}", &report);
    }
    Err(_) => {}
};
然后使用 google pprof 来可视化分析 profile.pb 文件数据:
~/go/bin/pprof -svg profile.pb
2. polarsignals/rust-jemalloc-pprof + pprof #
https://github.com/polarsignals/rust-jemalloc-pprof
Convert jemalloc heap profiles to pprof to understand memory usage, fix memory leaks, and fix OOM Kills.
Internally this library uses tikv-jemalloc-ctl to interact with jemalloc, so to use
it, you must use the jemalloc allocator via the tikv-jemallocator library.
Rust 集成示例:
// https://github.com/polarsignals/rust-jemalloc-pprof?tab=readme-ov-file
#[tokio::main]
async fn main() {
    let mut v = vec![];
    for i in 0..1000000 {
        v.push(i);
    }

    let app = axum::Router::new()
        .route("/debug/pprof/allocs", axum::routing::get(handle_get_heap));

    // run our app with hyper, listening globally on port 3000
    let listener = tokio::net::TcpListener::bind("0.0.0.0:3000").await.unwrap();
    axum::serve(listener, app).await.unwrap();
}

use axum::http::StatusCode;
use axum::response::IntoResponse;

pub async fn handle_get_heap() -> Result<impl IntoResponse, (StatusCode, String)> {
    let mut prof_ctl = jemalloc_pprof::PROF_CTL.as_ref().unwrap().lock().await;
    require_profiling_activated(&prof_ctl)?;
    let pprof = prof_ctl
        .dump_pprof()
        .map_err(|err| (StatusCode::INTERNAL_SERVER_ERROR, err.to_string()))?;
    Ok(pprof)
}

/// Checks whether jemalloc profiling is activated an returns an error response if not.
fn require_profiling_activated(prof_ctl: &jemalloc_pprof::JemallocProfCtl) -> Result<(), (StatusCode, String)> {
    if prof_ctl.activated() {
        Ok(())
    } else {
        Err((axum::http::StatusCode::FORBIDDEN, "heap profiling not activated".into()))
    }
}
然后使用 pprof 分析:
curl localhost:3000/debug/pprof/allocs > heap.pb.gz
pprof -http=:8080 heap.pb.gz
3. killzoner/pprof-hyper-server + pprof (all in one) #
https://github.com/killzoner/pprof-hyper-server
同时支持 CPU & heap profiling,需要重新编译二进制。
A minimal pprof server implementation using hyper without runtime dependency
go tool pprof --http=: http://localhost:6060/debug/pprof/profile # CPU profiling
go tool pprof --http=: http://localhost:6060/debug/pprof/allocs # memory profiling
基于两个项目:
- https://github.com/tikv/pprof-rs: used internally for CPU profiling.
- https://github.com/polarsignals/rust-jemalloc-pprof: used internally for memory profiling using Jemalloc allocator.
- 使用的是:tikv_jemallocator
类似的参考实现:
- https://github.com/apache/horaedb/blob/79627995477acdaeaf43bcd128fdc902f5fbeaad/src/components/profile/src/lib.rs
- https://github.com/apache/horaedb/pull/1627 # 还支持传入 second
4. Rust dhat crate + Firefox Profiler #
https://docs.rs/dhat/latest/dhat/
dhat crate 提供了 Rust 程序的 heap profiling 的功能,生成 DHAT 格式的数据(但是比 valgrind DHAT 性能更高,而且跨平台) 。
The heap profiling works by using a global allocator that wraps the system
allocator, tracks all heap allocations, and on program exit writes data to file so it
can be viewed with DHAT’s viewer. This corresponds to DHAT’s --mode=heap mode.
The ad hoc profiling is via a second mode of operation, where ad hoc events can be
manually inserted into a Rust program for aggregation and viewing. This corresponds
to DHAT’s --mode=ad-hoc mode.
Rust 程序集成该 crate 后,在运行退出时会生成一个 DHAT 格式的文件,可以导入到 Firefox Profiler 或 DHAT viewer 进行分析。
5. rust-analyzer 项目的 cpu + memory profling #
提供了基于 gperftools 的 CPU Profiling Rust 封装(也支持 Memory 总分配数量的统计) 和 基于 DHAT 的内存 profling:
- cpu profiling: https://github.com/rust-lang/rust-analyzer/tree/master/crates/profile
- dhat memory profiling: https://github.com/rust-lang/rust-analyzer/pull/20927
// https://github.com/rust-lang/rust-analyzer/blob/master/crates/profile/src/lib.rs

/// A wrapper around google_cpu_profiler.
///
/// Usage:
/// 1. Install gperf_tools (<https://github.com/gperftools/gperftools>), probably packaged with your Linux distro.
/// 2. Build with `cpu_profiler` feature.
/// 3. Run the code, the *raw* output would be in the `./out.profile` file.
/// 4. Install pprof for visualization (<https://github.com/google/pprof>).
/// 5. Bump sampling frequency to once per ms: `export CPUPROFILE_FREQUENCY=1000`
/// 6. Use something like `pprof -svg target/release/rust-analyzer ./out.profile` to see the results.
///
/// For example, here's how I run profiling on NixOS:
///
///
/// $ bat -p shell.nix
/// with import <nixpkgs> {};
/// mkShell {
///   buildInputs = [ gperftools ];
///   shellHook = ''
///     export LD_LIBRARY_PATH="${gperftools}/lib:"
///   '';
/// }
/// $ set -x CPUPROFILE_FREQUENCY 1000
/// $ nix-shell --run 'cargo test --release --package rust-analyzer --lib -- benchmarks::benchmark_integrated_highlighting --exact --nocapture'
/// $ pprof -svg target/release/deps/rust_analyzer-8739592dc93d63cb crates/rust-analyzer/out.profile > profile.svg
///
///
/// See this diff for how to profile completions:
///
/// <https://github.com/rust-lang/rust-analyzer/pull/5306>
6. hotpath #
https://github.com/pawurb/hotpath?tab=readme-ov-file
轻量级的,通过属性宏注释函数的方式,来收集和统计执行 Rust 函数的次数、时间,以及内存分配(通过自定义内存分配器方式)统计。

blog: https://pawelurbanek.com/rust-optimize-performance
cargo-criterion #
https://github.com/bheisler/cargo-criterion
cargo-criterion 是 Cargo 插件,它分析和报告 criterion.rs 生成的 benchmarks 数据。
注:tikv/pprof-rs 支持生成 cargo-criterion 数据。
它支持以 Charts 和 historical report 的方式展示 benchmark 结果。
需要先确保项目的 benchmark 使用 criterion.rs,然后使用 cargo criterion 来执行项目的 benchmark,收集和生成 reports:
# 安装
cargo install cargo-criterion

# Then you can use it to run your Criterion-rs benchmarks:
cargo criterion

# Generated reports will appear in target/criterion/reports.
criterion.rs #
https://github.com/bheisler/criterion.rs#quickstart
Criterion.rs 提供了执行 bench 任务时的耗时统计和可视化展示。
use criterion::{black_box, criterion_group, criterion_main, Criterion};
use mycrate::fibonacci;

pub fn criterion_benchmark(c: &mut Criterion) {
    c.bench_function("fib 20", |b| b.iter(|| fibonacci(black_box(20))));
}

criterion_group!(benches, criterion_benchmark);
criterion_main!(benches);
执行 cargo bench 的输出:
Running target/release/deps/example-423eedc43b2b3a93
Benchmarking fib 20
Benchmarking fib 20: Warming up for 3.0000 s
Benchmarking fib 20: Collecting 100 samples in estimated 5.0658 s (188100 iterations)
Benchmarking fib 20: Analyzing
fib 20                  time:   [26.029 us 26.251 us 26.505 us]
Found 11 outliers among 99 measurements (11.11%)
6 (6.06%) high mild
5 (5.05%) high severe
slope  [26.029 us 26.505 us] R^2            [0.8745662 0.8728027]
mean   [26.106 us 26.561 us] std. dev.      [808.98 ns 1.4722 us]
median [25.733 us 25.988 us] med. abs. dev. [234.09 ns 544.07 ns]
Criterion.rs 将 benchmarsk 结果保存到 target/criterion 目录,多次执行时,会显示多次运行期间统计数据的差异:
change: [-38.292% -37.342% -36.524%] (p = 0.00 < 0.05)
Performance has improved.
cargo-instruments #
https://github.com/cmyr/cargo-instruments
cargo-instruments 项目提供了名为 instruments 的 cargo 插件。
它依赖 MacOS 平台的 Xcode Instruments 来采集和创建 trace 文件(内部通过 dtrace 实现),支持如下采集类型:
built-in            abbrev
--------------------------
Activity Monitor
Allocations         (alloc)
Animation Hitches
App Launch
Core Data
Counters
Energy Log
File Activity       (io)
Game Performance
Leaks
Logging
Metal System Trace
Network
SceneKit
SwiftUI
System Trace        (sys)
Time Profiler       (time)
Zombies
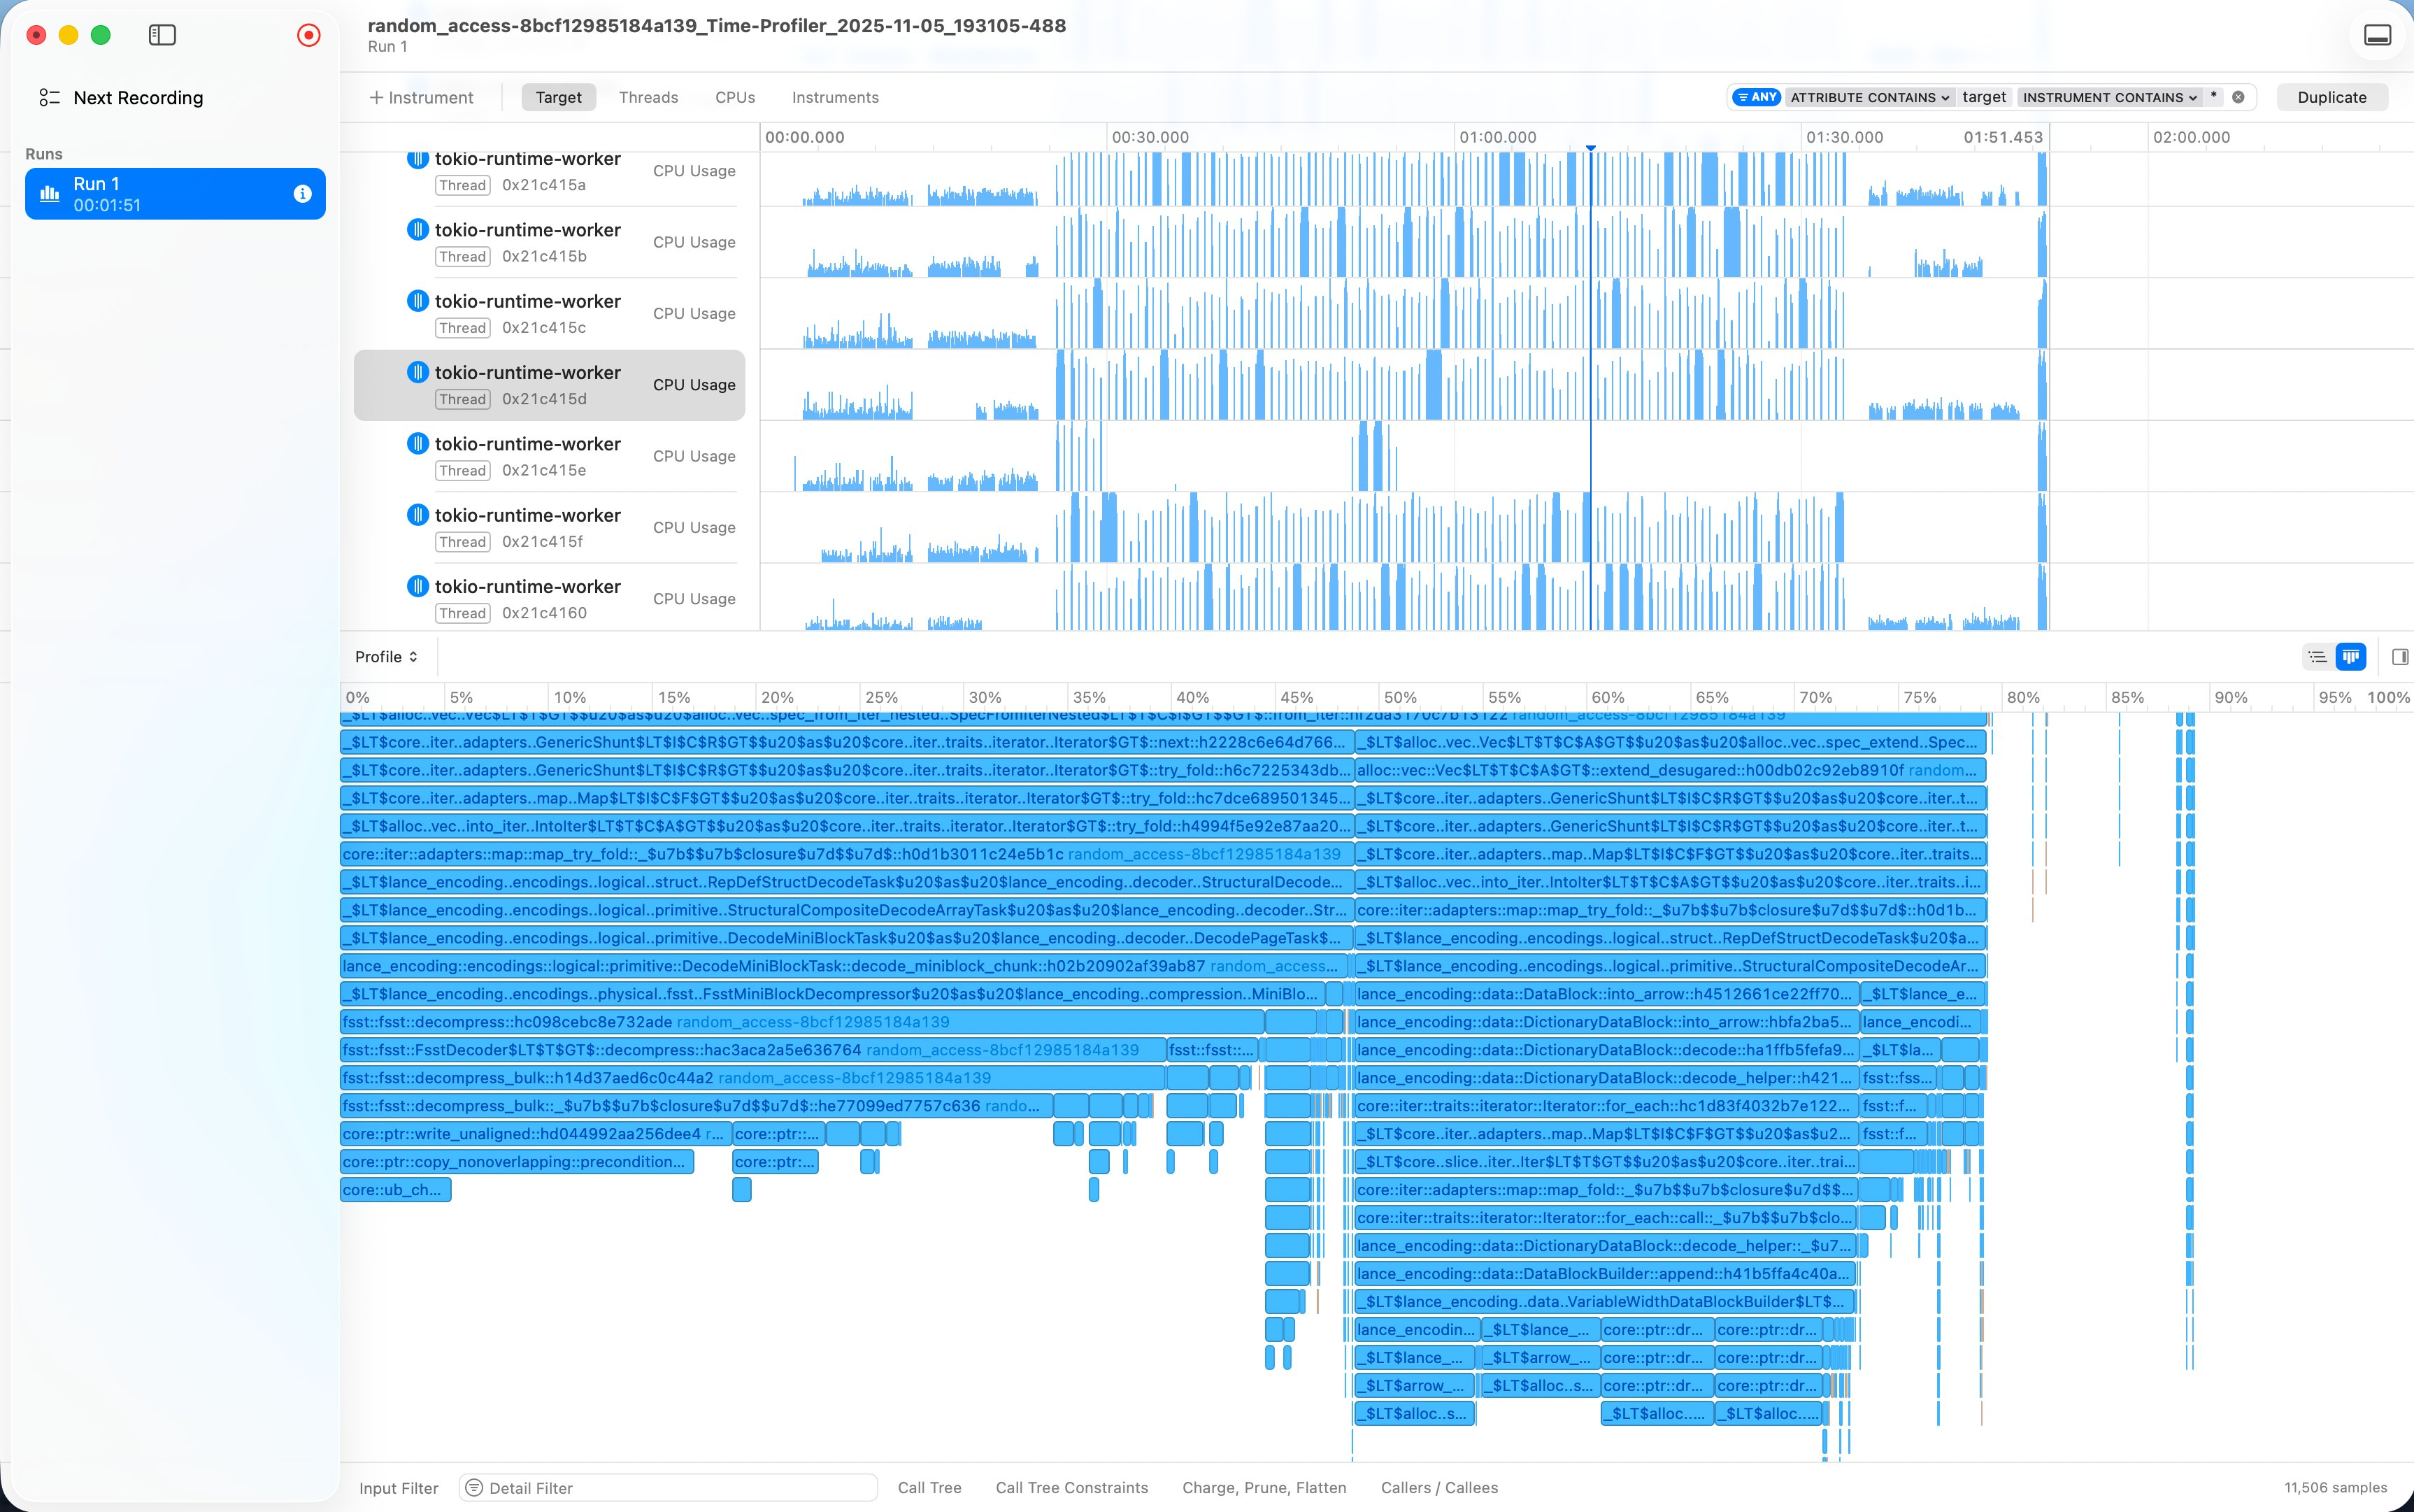
对于 Rust 项目,执行 cargo instruments 命令来运行程序并进行 trace 数据采集。
该 trace 文件内容类似于 Golang pprof trace 格式,包含了 timeline 展示的 CPU、Threads、Memory 分配、函数调用栈等信息。
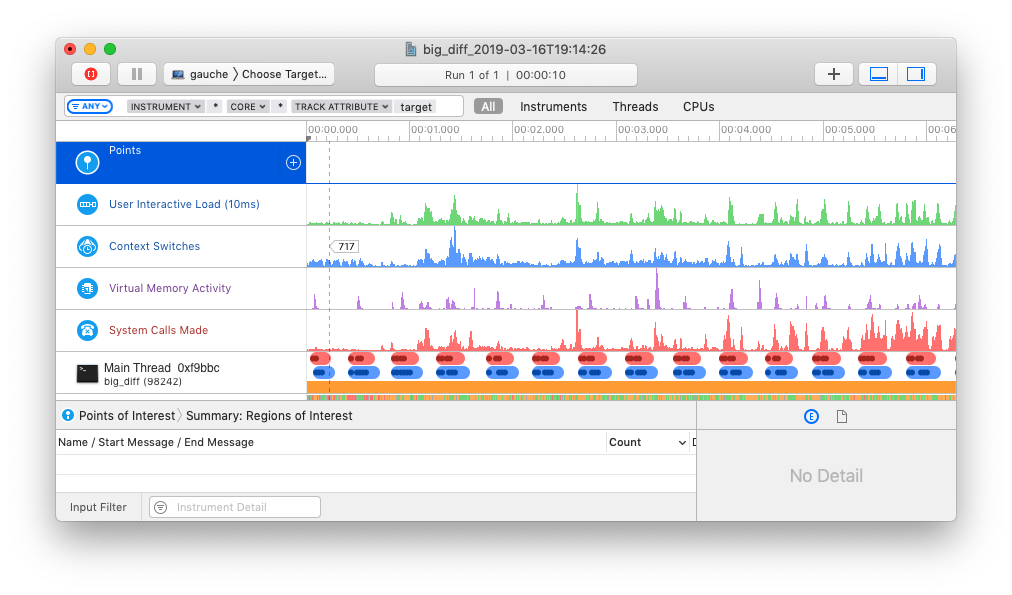
使用 cargo instruments 来调试 tokio-runtime:
参考 #
- Rust 的各种 profiling 集合:https://nnethercote.github.io/perf-book/profiling.html
- Linux perf Profiler UIs: https://www.markhansen.co.nz/profiler-uis/