这是我个人的 Rust ESP32 嵌入式开发相关的个人参考手册。
变更历史
2024-05-24 Fri 首次创建
1 esp-idf 安装 #
安装 ESP-IDF 到 ~/.espressif/ 目录,在安装前设置自定义的 IDF_TOOLS_PATH 环境变量来指定其他安装目录,
而且后续每次运行 esp-idf 前都需要设置该变量.
$ brew install cmake ninja dfu-util
$ brew install ccache # 可选, 加快构建速度
$ echo 'PATH=/opt/homebrew/opt/ccache/libexec:$PATH' >>~/.bashrc

# 确保系统是 python 3 版本且没有激活 venv,否则后续执行 install.sh 脚本会失败。
# 执行完 install.sh 脚本后,可以继续激活 venv。
$ which python3
/Users/alizj/.venv/bin//python3
$ source /Users/alizj/.venv/bin/activate && deactive
# 从 PATH 中临时删除 /Users/alizj/.venv/bin 目录。
$ export DIR_TO_REMOVE=/Users/alizj/.venv/bin
$ export PATH=$(echo $PATH | sed -e "s;:$DIR_TO_REMOVE;;" -e "s;$DIR_TO_REMOVE:;;" -e "s;$DIR_TO_REMOVE;;")

$ mkdir -p ~/esp
$ cd ~/esp
$ git clone --recursive https://github.com/espressif/esp-idf.git
$ git checkout -b v5.1.2 tags/v5.1.2 # 使用最新稳定版本
$ cd ~/esp/esp-idf

# python3 不支持 SOCKS5 代理,否则执行下面的 install.sh 脚本会出错。
$ enable_http_proxy
$ ./install.sh esp32s3  # esp32,esp32s2 等目标芯片, all 表示所有.
Detecting the Python interpreter
Checking "python3" ...
Python 3.12.3
"python3" has been detected
Checking Python compatibility
Installing ESP-IDF tools
Selected targets are: esp32s3
Current system platform: macos-arm64
Installing tools: xtensa-esp-elf-gdb, xtensa-esp-elf, riscv32-esp-elf, esp32ulp-elf, openocd-esp32, esp-rom-elfs
Skipping [email protected]_20240403 (already installed)
Skipping [email protected]_20240305 (already installed)
Skipping [email protected]_20240305 (already installed)
Skipping [email protected]_20240113 (already installed)
Skipping [email protected] (already installed)
Skipping esp-rom-elfs@20240305 (already installed)
Installing Python environment and packages
Creating a new Python environment in /Users/alizj/.espressif/python_env/idf5.4_py3.12_env
Downloading https://dl.espressif.com/dl/esp-idf/espidf.constraints.v5.4.txt
Destination: /Users/alizj/.espressif/espidf.constraints.v5.4.txt.tmp
Done
Installing Python packages
 Constraint file: /Users/alizj/.espressif/espidf.constraints.v5.4.txt
 Requirement files:
  - /Users/alizj/esp/esp-idf/tools/requirements/requirements.core.txt
Looking in indexes: https://pypi.org/simple, https://dl.espressif.com/pypi
Ignoring importlib_metadata: markers 'python_version < "3.8"' don't match your environment
Collecting setuptools (from -r /Users/alizj/esp/esp-idf/tools/requirements/requirements.core.txt (line 3))
。。。
All done! You can now run:

  . ./export.sh
安装的内容位于 ~/.espressif 目录下:
- openocd-esp32/
- esp32 fork 的 openocd 版本;
- riscv32-esp-elf/
- riscv32 交叉编译工具链;
- xtensa-esp-elf/
- xtensa 交叉编译工具链;
- xtensa-esp-elf-gdb/
- xtensa gdb 调试工具;
zj@a:~/esp/esp-idf$ ls -l ~/.espressif/
total 8.0K
drwxr-xr-x 8 alizj  256  5  5 11:31 dist/
-rw-r--r-- 1 alizj 2.8K  5  5 11:36 espidf.constraints.v5.4.txt
-rw-r--r-- 1 alizj  291  5  5 11:20 idf-env.json
drwxr-xr-x 3 alizj   96  5  5 11:36 python_env/
drwxr-xr-x 8 alizj  256  5  5 11:31 tools/
zj@a:~/esp/esp-idf$ ls -l ~/.espressif/dist/
total 297M
-rw-r--r-- 1 alizj 3.2M  5  5 11:31 esp-rom-elfs-20240305.tar.gz
-rw-r--r-- 1 alizj  16M  5  5 11:31 esp32ulp-elf-2.38_20240113-macos-arm64.tar.gz
-rw-r--r-- 1 alizj 2.3M  5  5 11:31 openocd-esp32-macos-arm64-0.12.0-esp32-20240318.tar.gz
-rw-r--r-- 1 alizj 131M  5  5 11:28 riscv32-esp-elf-13.2.0_20240305-aarch64-apple-darwin.tar.xz
-rw-r--r-- 1 alizj  96M  5  5 11:21 xtensa-esp-elf-13.2.0_20240305-aarch64-apple-darwin.tar.xz
-rw-r--r-- 1 alizj  36M  5  5 11:20 xtensa-esp-elf-gdb-14.2_20240403-aarch64-apple-darwin21.1.tar.gz
zj@a:~/esp/esp-idf$ ls -l ~/.espressif/tools/
total 0
drwxr-xr-x 3 alizj 96  5  5 11:31 esp-rom-elfs/
drwxr-xr-x 3 alizj 96  5  5 11:31 esp32ulp-elf/
drwxr-xr-x 3 alizj 96  5  5 11:31 openocd-esp32/
drwxr-xr-x 3 alizj 96  5  5 11:28 riscv32-esp-elf/
drwxr-xr-x 3 alizj 96  5  5 11:21 xtensa-esp-elf/
drwxr-xr-x 3 alizj 96  5  5 11:20 xtensa-esp-elf-gdb/
后续每次使用 esp-idf 前需要 source ~/esp/esp-idf/export.sh :
# export.sh 脚本不能移动位置,必须 source 使用。
zj@a:~/esp/esp-idf$ source ~/esp/esp-idf/export.sh
Detecting the Python interpreter
Checking "python3" ...
Python 3.12.3
"python3" has been detected
Checking Python compatibility
Checking other ESP-IDF version.
Adding ESP-IDF tools to PATH...
Checking if Python packages are up to date...
Constraint file: /Users/alizj/.espressif/espidf.constraints.v5.4.txt
Requirement files:
 - /Users/alizj/esp/esp-idf/tools/requirements/requirements.core.txt
Python being checked: /Users/alizj/.espressif/python_env/idf5.4_py3.12_env/bin/python
Python requirements are satisfied.
Added the following directories to PATH:
  /Users/alizj/esp/esp-idf/components/espcoredump
  /Users/alizj/esp/esp-idf/components/partition_table
  /Users/alizj/esp/esp-idf/components/app_update
  /Users/alizj/.espressif/tools/xtensa-esp-elf-gdb/14.2_20240403/xtensa-esp-elf-gdb/bin
  /Users/alizj/.espressif/tools/xtensa-esp-elf/esp-13.2.0_20240305/xtensa-esp-elf/bin
  /Users/alizj/.espressif/tools/riscv32-esp-elf/esp-13.2.0_20240305/riscv32-esp-elf/bin
  /Users/alizj/.espressif/tools/esp32ulp-elf/2.38_20240113/esp32ulp-elf/bin
  /Users/alizj/.espressif/tools/openocd-esp32/v0.12.0-esp32-20240318/openocd-esp32/bin
Done! You can now compile ESP-IDF projects.
Go to the project directory and run:

  idf.py build

zj@a:~/esp/esp-idf$ which xtensa-esp32s3-elf-gcc # 来源于 xtensa-esp-elf
/Users/alizj/.espressif/tools/xtensa-esp-elf/esp-13.2.0_20240305/xtensa-esp-elf/bin/xtensa-esp32s3-elf-gcc

zj@a:~/esp/esp-idf$ which xtensa-esp32s3-elf-gdb # 来源于 xtensa-esp-elf-gdb
/Users/alizj/.espressif/tools/xtensa-esp-elf-gdb/14.2_20240403/xtensa-esp-elf-gdb/bin/xtensa-esp32s3-elf-gdb

zj@a:~/esp/esp-idf$ ls ~/.espressif/
dist/                        espidf.constraints.v5.4.txt  idf-env.json                 python_env/                  tools/
zj@a:~/esp/esp-idf$ ls ~/.espressif/tools/
esp-rom-elfs/  esp32ulp-elf/  openocd-esp32/  riscv32-esp-elf/  xtensa-esp-elf/  xtensa-esp-elf-gdb/
zj@a:~/esp/esp-idf$ xtensa-esp32s3-elf-
xtensa-esp32s3-elf-addr2line   xtensa-esp32s3-elf-cc          xtensa-esp32s3-elf-gcc-13.2.0  xtensa-esp32s3-elf-gcov-dump   xtensa-esp32s3-elf-ld.bfd      xtensa-esp32s3-elf-ranlib
xtensa-esp32s3-elf-ar          xtensa-esp32s3-elf-cpp         xtensa-esp32s3-elf-gcc-ar      xtensa-esp32s3-elf-gcov-tool   xtensa-esp32s3-elf-lto-dump    xtensa-esp32s3-elf-readelf
xtensa-esp32s3-elf-as          xtensa-esp32s3-elf-elfedit     xtensa-esp32s3-elf-gcc-nm      xtensa-esp32s3-elf-gdb         xtensa-esp32s3-elf-nm          xtensa-esp32s3-elf-size
xtensa-esp32s3-elf-c++         xtensa-esp32s3-elf-g++         xtensa-esp32s3-elf-gcc-ranlib  xtensa-esp32s3-elf-gprof       xtensa-esp32s3-elf-objcopy     xtensa-esp32s3-elf-strings
xtensa-esp32s3-elf-c++filt     xtensa-esp32s3-elf-gcc         xtensa-esp32s3-elf-gcov        xtensa-esp32s3-elf-ld          xtensa-esp32s3-elf-objdump     xtensa-esp32s3-elf-strip
2 esp-idf 开发 #
ESP-IDF (Espressif IoT Development Framework) 开发者文档。
https://docs.espressif.com/projects/esp-idf/en/latest/esp32s3/api-guides/build-system.html
eps-idf 项目目录结构
- myProject/
             - CMakeLists.txt
             - sdkconfig
             - bootloader_components/ - boot_component/ - CMakeLists.txt
                                                        - Kconfig
                                                        - src1.c
             - components/ - component1/ - CMakeLists.txt
                                         - Kconfig
                                         - src1.c
                           - component2/ - CMakeLists.txt
                                         - Kconfig
                                         - src1.c
                                         - include/ - component2.h
             - main/       - CMakeLists.txt
                           - src1.c
                           - src2.c

             - build/
2.1 hello-world 示例 #
# 每次使用 esp-dif 前必须 source 安装路径中的 export.sh
zj@a:~$ source ~/esp/esp-idf/export.sh

zj@a:~/esp/esp-idf$ cd examples/get-started/hello_world/
zj@a:~/esp/esp-idf/examples/get-started/hello_world$ ls
CMakeLists.txt  README.md  main/  pytest_hello_world.py  sdkconfig.ci

# 清理项目已经存在的 sdkconfig 文件和 cmake build cache,生成新的 sdkconfig 文件
# idf.py --list-targets
zj@a:~/esp/esp-idf/examples/get-started/hello_world$ idf.py set-target esp32s3

# 配置项目,结果保存到 sdkconfig 文件
zj@a:~/esp/esp-idf/examples/get-started/hello_world$ idf.py menuconfig
Executing action: menuconfig
Running ninja in directory /Users/alizj/esp/esp-idf/examples/get-started/hello_world/build
Executing "ninja menuconfig"...
[0/1] cd /Users/alizj/esp/esp-idf/examples/get-started/hello_world/build && /Users/alizj/.espressif/pytho...DF_INIT_VERSION=5.4.0 --output config /Users/alizj/esp/esp-idf/examples/get-started/hello_world/sdkconfi
TERM environment variable is set to "xterm-256color"
Loaded configuration '/Users/alizj/esp/esp-idf/examples/get-started/hello_world/sdkconfig'
No changes to save (for '/Users/alizj/esp/esp-idf/examples/get-started/hello_world/sdkconfig')

# 构建
zj@a:~/esp/esp-idf/examples/get-started/hello_world$ idf.py build
[998/1000] Generating binary image from built executable
esptool.py v4.8.dev3
Creating esp32s3 image...
Merged 3 ELF sections
Successfully created esp32s3 image.
Generated /Users/alizj/esp/esp-idf/examples/get-started/hello_world/build/hello_world.bin
[999/1000] cd /Users/alizj/esp/esp-idf/examples/get-started/hello_world/build/esp-idf/esptool_py && /User...table/partition-table.bin /Users/alizj/esp/esp-idf/examples/get-started/hello_world/build/hello_world.bi
hello_world.bin binary size 0x35a00 bytes. Smallest app partition is 0x100000 bytes. 0xca600 bytes (79%) free.

Project build complete. To flash, run:
idf.py flash
or
idf.py -p PORT flash
or
python -m esptool --chip esp32s3 -b 460800 --before default_reset --after hard_reset write_flash --flash_mode dio --flash_size 2MB --flash_freq 80m 0x0 build/bootloader/bootloader.bin 0x8000 build/partition_table/partition-table.bin 0x10000 build/hello_world.bin
or from the "/Users/alizj/esp/esp-idf/examples/get-started/hello_world/build" directory
python -m esptool --chip esp32s3 -b 460800 --before default_reset --after hard_reset write_flash "@flash_args"
烧写到设备 Flash:
- USB 串口:linux: /dev/ttyUSB0, macOS: /dev/cu.*
- 烧写了三个文件(起始地址分区表中定义):
- 0x0 build/bootloader/bootloader.bin
- 0x8000 build/partition_table/partition-table.bin
- 0x10000 build/hello_world.bin
# flash 命令自动 build 和 flash:
$ idf.py -p PORT flash

# 监控串口输出
$ idf.py -p <PORT> monitor
Running idf_monitor in directory [...]/esp/hello_world/build
Executing "python [...]/esp-idf/tools/idf_monitor.py -b 115200 [...]/esp/hello_world/build/hello_world.elf"...
--- idf_monitor on <PORT> 115200 ---
--- Quit: Ctrl+] | Menu: Ctrl+T | Help: Ctrl+T followed by Ctrl+H ---
ets Jun  8 2016 00:22:57

rst:0x1 (POWERON_RESET),boot:0x13 (SPI_FAST_FLASH_BOOT)
ets Jun  8 2016 00:22:57
...

# 一条命令完成 build/flash/monitor
idf.py -p PORT flash monitor

# 上面的 idf.py flash 命令等效为如下 esptool 命令, 可见烧写了三个 bin 文件, 并分别指定了它们在 FALSH
# 中的起始地址,这些地址在项目根目录下的 partitions.csv 文件配置,或使用默认的分区表。
python -m esptool --chip esp32s3 -b 460800 --before default_reset --after hard_reset write_flash --flash_mode dio --flash_size 2MB --flash_freq 80m 0x0 build/bootloader/bootloader.bin 0x8000 build/partition_table/partition-table.bin 0x10000 build/hello_world.bin
除了使用 c/c++ 原生方式使用 esp-idf 外,在进行 Rust 和 c/++ 混合编程时(如 cargo generate esp-rs/esp-idf-template cmake) 时也使用 esp-idf 的开发、构建和烧写工具 idf.py:
2.2 添加依赖 #
IDF Component 是 esp-idf 项目依赖的 cmake 组件模块, cmake 自动从 git repo 或 component registry 下载安装到项目中.
- The ESP-IDF component registry: https://components.espressif.com/
- 参考文档: https://docs.espressif.com/projects/esp-idf/en/latest/esp32s3/api-guides/tools/idf-component-manager.html
- https://docs.espressif.com/projects/idf-component-manager/en/latest/
# 为项目添加 Component 依赖
idf.py add-dependency "espressif/esp_jpeg^1.0.5~2"

# 或者从这个 Componet 创建一个 example project
idf.py create-project-from-example "espressif/esp_jpeg^1.0.5~2:get_started"
在项目 main component 的 idf_component.yml 文件中添加 Registry 或 git 或本地目录的组件:
- idf_component.yml 指定了该 Component 依赖的其它 Component, 可以使用 idf.py create-manifest 命令创建该文件, 当该文件发生变更时需要运行
idf.py reconfigure命令来更新 CMake 文件. - 添加 Component 依赖:
idf.py add-dependency DEPENDENCY, 如 idf.py add-dependency “espressif/esp_jpeg^1.0.5~2” - 更新依赖:
idf.py update-dependencies
# https://docs.espressif.com/projects/esp-idf/en/latest/esp32/api-guides/tools/idf-component-manager.html
dependencies:
  # Define a dependency from the registry (https://components.espressif.com/component/example/cmp)
  example/cmp: ">=1.0.0"
  # Define a dependency from a Git repository
  test_component:
    path: test_component
    git: ssh://[email protected]/user/components.git
  # Define local dependency with relative path
  some_local_component:
    path: ../../projects/component

# 为项目添加 esp-box BSP
# BSP 为开发版提供了高层的抽象封装和初始化, 仓库: https://github.com/espressif/esp-bsp;
idf.py add-dependency esp-box
Component 可以手动下载到本地, 目录结构如下:
zj@a:~/Downloads/espressif_esp_jpeg_1.0.5_2$ ls -l
total 40K
-rw-r--r-- 1 alizj  270 11 28 13:09 CMakeLists.txt
-rw-r--r-- 1 alizj 2.3K 11 28 13:09 Kconfig
-rw-r--r-- 1 alizj 4.5K 11 28 13:09 README.md
drwxr-xr-x 3 alizj   96 11 28 13:10 examples/
-rw-r--r-- 1 alizj  173 11 28 13:10 idf_component.yml
drwxr-xr-x 3 alizj   96 11 28 13:10 include/
-rw-r--r-- 1 alizj 7.5K 11 28 13:09 jpeg_decoder.c
-rw-r--r-- 1 alizj  12K 11 28 13:09 license.txt
drwxr-xr-x 7 alizj  224 11 28 13:10 test/
drwxr-xr-x 5 alizj  160 11 28 13:10 tjpgd/

zj@a:~/Downloads/espressif_esp_jpeg_1.0.5_2$ cat idf_component.yml
dependencies:
  idf:
    version: '>=4.4'
description: 'JPEG Decoder: TJpgDec'
url: https://github.com/espressif/idf-extra-components/tree/master/esp_jpeg/
version: 1.0.5~2

zj@a:~/Downloads/espressif_esp_jpeg_1.0.5_2$ cat CMakeLists.txt
set(sources "jpeg_decoder.c")
set(includes "include")

# Compile only when cannot use ROM code
if(NOT CONFIG_JD_USE_ROM)
    list(APPEND sources "tjpgd/tjpgd.c")
    list(APPEND includes "tjpgd")
endif()

idf_component_register(SRCS ${sources} INCLUDE_DIRS ${includes})


zj@a:~/Downloads/espressif_esp_jpeg_1.0.5_2$ cat Kconfig
menu "JPEG Decoder"

    config JD_USE_ROM
        bool "Use TinyJPG Decoder from ROM"
        depends on IDF_TARGET_ESP32 || IDF_TARGET_ESP32C3 || IDF_TARGET_ESP32C6 || IDF_TARGET_ESP32S3
        default y
        help
            By default, Espressif SoCs use TJpg decoder implemented in ROM code.
            If this feature is disabled, new configuration of TJpg decoder can be used.
            Refer to REAME.md for more details.

    config JD_SZBUF
        int "Size of stream input buffer"
        depends on !JD_USE_ROM
        default 512

    config JD_FORMAT
        int
        depends on !JD_USE_ROM
        default 0 if JD_FORMAT_RGB888
        default 1 if JD_FORMAT_RGB565

        choice
            prompt "Output pixel format"
            depends on !JD_USE_ROM
            default JD_FORMAT_RGB888
            help
                Output format is selected at runtime.

        config JD_FORMAT_RGB888
            bool "Support RGB565 and RGB888 output (16-bit/pix and 24-bit/pix)"
        config JD_FORMAT_RGB565
            bool "Support RGB565 output (16-bit/pix)"
        endchoice

    config JD_USE_SCALE
        bool "Enable descaling"
        depends on !JD_USE_ROM
        default y
        help
            If scaling is enabled, size of output image can be lowered during decoding.

    config JD_TBLCLIP
        bool "Use table conversion for saturation arithmetic"
        depends on !JD_USE_ROM
        default y
        help
            Use table conversion for saturation arithmetic. A bit faster, but increases 1 KB of code size.

    config JD_FASTDECODE
        int
        depends on !JD_USE_ROM
        default 0 if JD_FASTDECODE_BASIC
        default 1 if JD_FASTDECODE_32BIT
        default 2 if JD_FASTDECODE_TABLE

        choice
            prompt "Optimization level"
            depends on !JD_USE_ROM
            default JD_FASTDECODE_32BIT

        config JD_FASTDECODE_BASIC
            bool "Basic optimization. Suitable for 8/16-bit MCUs"
        config JD_FASTDECODE_32BIT
            bool "+ 32-bit barrel shifter. Suitable for 32-bit MCUs"
        config JD_FASTDECODE_TABLE
            bool "+ Table conversion for huffman decoding (wants 6 << HUFF_BIT bytes of RAM)"
        endchoice
endmenu
zj@a:~/Downloads/espressif_esp_jpeg_1.0.5_2$
2.3 sdkconfig #
esp-idf-kconfig 使用 kconfig provides a compile-time project configuration mechanism and offers
configuration options of several types. Kconfig files specify dependencies between options, default
values of options, the way options are grouped together, etc.
可以使用命令 idf.py menuconfig 来对项目 kconfig 进行配置, 它读取和写入配置到项目根目录的 sdkconfig
文件中, 然后 esp-idf 构建系统会将这些参数写入 build/sdkconfig.h 头文件中, 这样项目其他位置就可以读取到他们.
开发者也可以定义 sdkconfig.defaults 文件, 然后手动维护其中的配置, esp-idf 构建系统不会修改该文件(构建系统只会管理 sdkconfig 文件), 这样可以将该文件纳入版本管理.
- 可以使用
idf.py save-defconfig命令来创建 sdkconfig.defaults 文件. - 可以在 main component 的 CMakeLists.txt 文件中通过
SDKCONFIG_DEFAULTS变量来指定多个分号分割的 sdkconfig.defaults 文件路径; - Target 相关的 defaults 配置:
sdkconfig.defaults.TARGET_NAME, 如 sdkconfig.defaults.esp32s3;
一旦有了 sdkconfig.defaults 文件, 构建系统就会忽略 sdkconfig 文件, 而是根据 sdkconfig.defaults 文件的配置创建出 sdkconfig 文件.
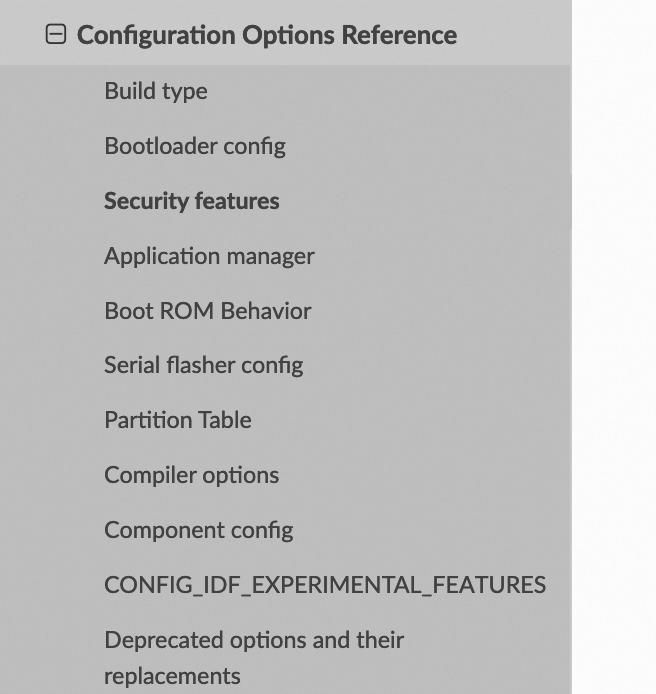
sdkconfig 配置参数列表: Configuration Options Reference
3 工具 #
3.1 idf.py #
命令列表:
- add-dependency: 向 manifest 文件添加依赖,后续构建时自动下载;
- reconfigure: 重新运行 cmake 命令,当 manifest 文件发生变更后需要执行该命令;
- set-target:设置项目使用的芯片类型,会重建 sdkconfig 文件;
- idf.py –list-targets 列出所有支持的芯片类型;
- save-defconfig:生成缺省的 sdkconfig.defaults 文件;
- menuconfig:运行 TUI 界面的项目配置程序;
- clean/fullclean:清理 build 目录中的输出文件或整个 build 目录;
- erase-flash/erase-otadata: 擦除整个 FLASH 或只 erase otadata 分区;
- flash:烧写所有 binary(一般包括 binary、app、ota 等);
- app/app-flash:只构建和烧写 app binary;
- bootloader/bootloader-flash:只构建和烧写 bootloader binary;
- dfu/dfu-flash:只构建和烧写 DFU binary;
- partition-table/partition-table-flash:只构建和烧写分区表 binary;
- monitor:监视串口输出;
  add-dependency               Add dependency to the manifest file.
  all                          Aliases: build. Build the project.
  app                          Build only the app.
  app-flash                    Flash the app only.
  bootloader                   Build only bootloader.
  bootloader-flash             Flash bootloader only.
  build-system-targets         Print list of build system targets.
  clang-check                  run clang-tidy check under current folder, write the output into "warnings.txt"
  clang-html-report            generate html report to "html_report" folder by reading "warnings.txt" (may take a few minutes). This feature requires extra dependency "codereport". Please install this by running "pip install codereport"
  clean                        Delete build output files from the build directory.
  confserver                   Run JSON configuration server.
  coredump-debug               Create core dump ELF file and run GDB debug session with this file.
  coredump-info                Print crashed task’s registers, callstack, list of available tasks in the system, memory regions and contents of memory stored in core dump (TCBs and stacks)
  create-component             Create a new component.
  create-manifest              Create manifest for specified component.
  create-project               Create a new project.
  create-project-from-example  Create a project from an example.
  delete-version               (Deprecated) Deprecated! New CLI command: "compote component delete". Delete specified version of the
                               component from the component registry.
  dfu                          Build the DFU binary
  dfu-flash                    Flash the DFU binary
  dfu-list                     List DFU capable devices
  docs                         Open web browser with documentation for ESP-IDF
  efuse-common-table           Generate C-source for IDF's eFuse fields.
  efuse-custom-table           Generate C-source for user's eFuse fields.
  encrypted-app-flash          Flash the encrypted app only.
  encrypted-flash              Flash the encrypted project.
  erase-flash                  Erase entire flash chip.
  erase-otadata                Erase otadata partition.
  flash                        Flash the project.
  fullclean                    Delete the entire build directory contents.
  gdb                          Run the GDB.
  gdbgui                       GDB UI in default browser.
  gdbtui                       GDB TUI mode.
  menuconfig                   Run "menuconfig" project configuration tool.
  monitor                      Display serial output.
  openocd                      Run openocd from current path
  pack-component               (Deprecated) Deprecated! New CLI command: "compote component pack". Create component archive and store it
                               in the dist directory.
  partition-table              Build only partition table.
  partition-table-flash        Flash partition table only.
  post-debug                   Utility target to read the output of async debug action and stop them.
  python-clean                 Delete generated Python byte code from the IDF directory
  read-otadata                 Read otadata partition.
  reconfigure                  Re-run CMake.
  save-defconfig               Generate a sdkconfig.defaults with options different from the default ones
  set-target                   Set the chip target to build.
  show-efuse-table             Print eFuse table.
  size                         Print basic size information about the app.
  size-components              Print per-component size information.
  size-files                   Print per-source-file size information.
  uf2                          Generate the UF2 binary with all the binaries included
  uf2-app                      Generate an UF2 binary for the application only
  update-dependencies          Update dependencies of the project
  upload-component             (Deprecated) Deprecated! New CLI command: "compote component upload". Upload component to the component
                               registry. If the component doesn't exist in the registry it will be created automatically.
  upload-component-status      (Deprecated) Deprecated! New CLI command: "compote component upload-status". Check the component uploading
                               status by the job ID.
3.2 查看 bin 文件内容 esptool.py image_info #
查看 app image 内容: https://docs.espressif.com/projects/esp-idf/en/latest/esp32s3/api-reference/system/app_image_format.html
esptool.py --chip esp32s3 image_info build/app.bin
esptool.py v2.3.1
Image version: 1
Entry point: 40080ea4
13 segments

Segment 1: len 0x13ce0 load 0x3f400020 file_offs 0x00000018 SOC_DROM
Segment 2: len 0x00000 load 0x3ff80000 file_offs 0x00013d00 SOC_RTC_DRAM
Segment 3: len 0x00000 load 0x3ff80000 file_offs 0x00013d08 SOC_RTC_DRAM
Segment 4: len 0x028e0 load 0x3ffb0000 file_offs 0x00013d10 DRAM
Segment 5: len 0x00000 load 0x3ffb28e0 file_offs 0x000165f8 DRAM
Segment 6: len 0x00400 load 0x40080000 file_offs 0x00016600 SOC_IRAM
Segment 7: len 0x09600 load 0x40080400 file_offs 0x00016a08 SOC_IRAM
Segment 8: len 0x62e4c load 0x400d0018 file_offs 0x00020010 SOC_IROM
Segment 9: len 0x06cec load 0x40089a00 file_offs 0x00082e64 SOC_IROM
Segment 10: len 0x00000 load 0x400c0000 file_offs 0x00089b58 SOC_RTC_IRAM
Segment 11: len 0x00004 load 0x50000000 file_offs 0x00089b60 SOC_RTC_DATA
Segment 12: len 0x00000 load 0x50000004 file_offs 0x00089b6c SOC_RTC_DATA
Segment 13: len 0x00000 load 0x50000004 file_offs 0x00089b74 SOC_RTC_DATA
Checksum: e8 (valid)
Validation Hash: 407089ca0eae2bbf83b4120979d3354b1c938a49cb7a0c997f240474ef2ec76b (valid)
查看 Bootloader Image Format:
esptool.py --chip esp32s3 image_info build/bootloader/bootloader.bin --version 2

File size: 26576 (bytes)

ESP32 image header
==================
Image version: 1
Entry point: 0x40080658
Segments: 4
Flash size: 2MB
Flash freq: 40m
Flash mode: DIO

ESP32 extended image header
===========================
WP pin: 0xee
Flash pins drive settings: clk_drv: 0x0, q_drv: 0x0, d_drv: 0x0, cs0_drv: 0x0, hd_drv: 0x0, wp_drv: 0x0
Chip ID: 0
Minimal chip revision: v0.0, (legacy min_rev = 0)
Maximal chip revision: v3.99

Segments information
====================
Segment   Length   Load addr   File offs  Memory types
-------  -------  ----------  ----------  ------------
    1  0x01bb0  0x3fff0030  0x00000018  BYTE_ACCESSIBLE, DRAM, DIRAM_DRAM
    2  0x03c90  0x40078000  0x00001bd0  CACHE_APP
    3  0x00004  0x40080400  0x00005868  IRAM
    4  0x00f2c  0x40080404  0x00005874  IRAM

ESP32 image footer
==================
Checksum: 0x65 (valid)
Validation hash: 6f31a7f8512f26f6bce7c3b270f93bf6cf1ee4602c322998ca8ce27433527e92 (valid)

Bootloader information
======================
Bootloader version: 1
ESP-IDF: v5.1-dev-4304-gcb51a3b-dirty
Compile time: Mar 30 2023 19:14:17
3.3 nvs 分区 bin 文件创建工具:nvs_partition_gen.py #
# https://docs.espressif.com/projects/esp-idf/en/latest/esp32s3/api-reference/storage/nvs_partition_gen.html
# python nvs_partition_gen.py [-h] {generate,generate-key,encrypt,decrypt} ...
python nvs_partition_gen.py generate sample_singlepage_blob.csv sample.bin 0x3000
4 esp-rs 安装 #
参考: https://esp-rs.github.io/book/introduction.https
[BROKEN LINK: html://github.com/esp-rs/esp-idf-template?tab=readme-ov-file#prerequisites]: 不需要手动安装 esp-idf,后续创建的 std 类型应用的 build.rs 会自动下载和安装 esp-idf。
# 提供 cargo generate 子命令
cargo install cargo-generate

# A tool that forwards linker arguments to the actual linker that is also given as an argument to
# ldproxy
cargo install ldproxy

# A tool that simplifies installing and maintaining the components required to develop Rust
# applications for the Xtensa and RISC-V architectures.
cargo install espup

brew install libuv  # espflash 依赖
cargo install espflash
cargo install cargo-espflash # Optional,将 espflash 作为 cargo 的子命令来使用
espup 可以同时安装和维护 Xtensa and RISC-V architectures 的工具链,包括 esp fork 的 rust,GCC 和LLVM 等。espup 是 rust 开发的工具,取代了 rust-build 项目。
# 清理旧版本
zj@a:~/esp$ espup uninstall
[info]: Uninstalling the Espressif Rust ecosystem
[info]: Uninstalling Xtensa LLVM
[info]: Uninstalling GCC
[info]: Uninstalling Xtensa Rust toolchain
[info]: Uninstallation successfully completed!
zj@a:~/esp$ rm -rf  ~/.rustup/toolchains/*

# espup 是 Rust 程序,不会执行 python 代码,所以支持 socks 代理。开启代理,加快下载
zj@a:~/esp$ enable_socks_proxy
# 安装 ESP32 的 Rust toolchain。
zj@a:~/esp$ espup install -l debug
。。。
[debug]: Creating export file
[info]: Installation successfully completed!

        To get started, you need to set up some environment variables by running: '. /Users/alizj/export-esp.sh'
        This step must be done every time you open a new terminal.
            See other methods for setting the environment in https://esp-rs.github.io/book/installation/riscv-and-xtensa.html#3-set-up-the-environment-variables

zj@a:~$ cat ~/export-esp.sh
# 修改 export-esp.sh 脚本,删除 python venv 路径,防止后续 cargo build 安装 esp-idf 报错。
export DIR_TO_REMOVE=/Users/alizj/.venv/bin
PATH=$(echo "$PATH" | sed -e "s;:$DIR_TO_REMOVE;;" -e "s;$DIR_TO_REMOVE:;;" -e "s;$DIR_TO_REMOVE;;")

# 解决 Mac M1 cargo build 报错的问题:https://github.com/rust-lang/cc-rs/issues/1005
CRATE_CC_NO_DEFAULTS=1

# cargo build 过程中按照 esp-idf python venv 时不支持 SOCKS 代理,故切换为 HTTP 代理。
enable_http_proxy

export LIBCLANG_PATH="/Users/alizj/.rustup/toolchains/esp/xtensa-esp32-elf-clang/esp-16.0.4-20231113/esp-clang/lib"
export PATH="/Users/alizj/.rustup/toolchains/esp/xtensa-esp-elf/esp-13.2.0_20230928/xtensa-esp-elf/bin:$PATH"
为了方便使用,将 ~/export-esp.sh 脚本 mv 到 ~/esp 目录,同时添加两个 alias:
zj@a:~/esp$ mv ~/export-esp.sh ~/esp/
zj@a:~/esp$ grep esp ~/.bashrc
alias export_idf='. $HOME/esp/esp-idf/export.sh'
alias export_esp='. $HOME/esp/export-esp.sh'
espup 安装的内容位于 ~/.espup 目录下(rustc 编译器本身是依赖 LLVM 的):
- Espressif Rust fork with support for Espressif targets
- nightly toolchain with support for RISC-V targets
- LLVM fork with support for Xtensa targets
- GCC toolchain that links the final binary
# 安装了两个 toolchain,分别是 nightly-x86_64-apple-darwin 和 esp
# nightly-x86_64-apple-darwin 是 rust 官方工具链,支持 riscv32xx 和 x86_64-apple-darwin 等 4 个 targets
# 其中 riscv32xx 是 esp32-c3 系列 RISC-V CPU 类型。
zj@a:~/esp$ rustup show
Default host: aarch64-apple-darwin
rustup home:  /Users/alizj/.rustup

installed toolchains
--------------------

stable-aarch64-apple-darwin (default) # 标准工具链
nightly-aarch64-apple-darwin
esp # 自定义 esp 工具链

active toolchain
----------------

stable-aarch64-apple-darwin (default)
rustc 1.78.0 (9b00956e5 2024-04-29)

# espup 安装的 esp 工具链, esp 为 channel 名称
zj@a:~/esp$ ls -l ~/.rustup/toolchains/esp/
total 0
drwxr-xr-x 12 alizj 384  5  5 12:12 bin/ # esp fork 的 rust 交叉编译工具链
drwxr-xr-x  3 alizj  96  5  5 12:12 etc/
drwxr-xr-x  5 alizj 160  5  5 12:13 lib/
drwxr-xr-x  3 alizj  96  5  5 12:12 libexec/
drwxr-xr-x  5 alizj 160  5  5 12:12 share/
drwxr-xr-x  3 alizj  96  5  5 12:11 xtensa-esp-elf/ # esp fork 的支持 xtensa CPU 的 gcc 等工具链
drwxr-xr-x  3 alizj  96  5  5 12:11 xtensa-esp32-elf-clang/ # esp fork 的 clang LLVM 工具链

# esp fork 的 rust 交叉编译工具链
zj@a:~/esp$ ls -l ~/.rustup/toolchains/esp/bin/
total 63M
-rwxr-xr-x 1 alizj  30M  5  5 12:12 cargo*
-rwxr-xr-x 1 alizj 1.2M  5  5 12:12 cargo-clippy*
-rwxr-xr-x 1 alizj 1.6M  5  5 12:12 cargo-fmt*
-rwxr-xr-x 1 alizj  11M  5  5 12:12 clippy-driver*
-rwxr-xr-x 1 alizj  980  5  5 12:12 rust-gdb*
-rwxr-xr-x 1 alizj 2.2K  5  5 12:12 rust-gdbgui*
-rwxr-xr-x 1 alizj 1.1K  5  5 12:12 rust-lldb*
-rwxr-xr-x 1 alizj 584K  5  5 12:12 rustc*
-rwxr-xr-x 1 alizj  12M  5  5 12:12 rustdoc*
-rwxr-xr-x 1 alizj 7.1M  5  5 12:12 rustfmt*

zj@a:~/docs$ ls -l ~/.rustup/toolchains/esp/bin/
total 59M
-rwxr-xr-x 1 zhangjun  28M  2  8 14:51 cargo*
-rwxr-xr-x 1 zhangjun 1.1M  2  8 14:51 cargo-clippy*
-rwxr-xr-x 1 zhangjun 1.6M  2  8 14:51 cargo-fmt*
-rwxr-xr-x 1 zhangjun  11M  2  8 14:51 clippy-driver*
lrwxr-xr-x 1 zhangjun   80  2  8 16:58 rust-analyzer -> /Users/zhangjun/.rustup/toolchains/nightly-x86_64-apple-darwin/bin/rust-analyzer*  # 链接到官方工具链的 rust-analyzer
-rwxr-xr-x 1 zhangjun  980  2  8 14:50 rust-gdb*
-rwxr-xr-x 1 zhangjun 2.2K  2  8 14:50 rust-gdbgui*
-rwxr-xr-x 1 zhangjun 1.1K  2  8 14:50 rust-lldb*
-rwxr-xr-x 1 zhangjun 664K  2  8 14:50 rustc*
-rwxr-xr-x 1 zhangjun  11M  2  8 14:50 rustdoc*
-rwxr-xr-x 1 zhangjun 6.9M  2  8 14:51 rustfmt*

# esp rustc 支持 x86_64/arm64/riscv64/xtensa-esp32s3-espidf/xtensa-esp32s3-none-elf target
# 后续可以在项目的 rust-toolchain.toml 和 .cargo/config.toml 中指定使用 esp channel 和对应的 target。
zj@a:~/docs$  ~/.rustup/toolchains/esp/bin/rustc --print target-list |grep -E 'xtensa|riscv'
riscv32gc-unknown-linux-gnu
riscv32gc-unknown-linux-musl
riscv32i-unknown-none-elf
riscv32im-unknown-none-elf
riscv32imac-esp-espidf
riscv32imac-unknown-none-elf
riscv32imac-unknown-xous-elf
riscv32imc-esp-espidf
riscv32imc-unknown-none-elf
riscv64-linux-android
riscv64gc-unknown-freebsd
riscv64gc-unknown-fuchsia
riscv64gc-unknown-hermit
riscv64gc-unknown-linux-gnu
riscv64gc-unknown-linux-musl
riscv64gc-unknown-netbsd
riscv64gc-unknown-none-elf
riscv64gc-unknown-openbsd
riscv64imac-unknown-none-elf
xtensa-esp32-espidf
xtensa-esp32-none-elf
xtensa-esp32s2-espidf
xtensa-esp32s2-none-elf
xtensa-esp32s3-espidf  # esp idf target,即 std 应用
xtensa-esp32s3-none-elf # none-elf 为 non_std 应用
xtensa-esp8266-none-elf

# 后续使用 cargo generate esp-rs/esp-idf-template cargo 来生成 std 应用,
# esp32 rust 项目通过 rust-toolchain.toml 和 .cargo/config.toml 来选择 channel 和 target
zj@a:~/docs$ cat ~/codes/esp32/esp-demo2/myesp/rust-toolchain.toml
[toolchain]
channel = "esp"  # ~/.rustup/toolchains/ 下的目录名称,这里使用 esp toolchain

zj@a:~/codes/esp32/esp-demo2/myesp$ cat .cargo/config.toml
[build]
target = "xtensa-esp32s3-espidf"  # 要构建的 target,这里使用链接 esp-idf 的 target

[target.xtensa-esp32s3-espidf]  # target 对应的配置
linker = "ldproxy" # 位于 ~/.cargo/bin/
# runner = "espflash --monitor" # Select this runner for espflash v1.x.x
runner = "espflash flash --monitor" # Select this runner for espflash v2.x.x
rustflags = [ "--cfg",  "espidf_time64"] # Extending time_t for ESP IDF 5: https://github.com/esp-rs/rust/issues/110

zj@a:~/esp$ ls -l  ~/.espup/
total 0
lrwxr-xr-x 1 alizj 92  5  5 12:11 esp-clang -> /Users/alizj/.rustup/toolchains/esp/xtensa-esp32-elf-clang/esp-16.0.4-20231113/esp-clang/lib/

# ~/esp/export-esp.sh 脚本将 LIBCLANG_PATH 环境便利指向 esp fork 的 LLVM 目录,这样后续 rustc 在编译时自动
# 链接 esp 的版本。(rustc 依赖 LLVM)。
zj@a:~/esp$ ls -l  /Users/alizj/.rustup/toolchains/esp/xtensa-esp32-elf-clang/esp-16.0.4-20231113/esp-clang/lib/
total 117M
drwxr-xr-x 3 alizj  96  5  5 12:11 clang/
-rw-r--r-- 1 alizj 50M 11 14 23:46 libLLVM.dylib
-rw-r--r-- 1 alizj 44M 11 14 23:46 libclang-cpp.dylib
-rw-r--r-- 1 alizj 24M 11 14 23:46 libclang.dylib

zj@a:~/esp$ cd ~/.rustup/toolchains/esp/xtensa-esp-elf/esp-13.2.0_20230928/xtensa-esp-elf/bin/
zj@a:~/.rustup/toolchains/esp/xtensa-esp-elf/esp-13.2.0_20230928/xtensa-esp-elf/bin$ ls -l *esp32s3*
-rwxr-xr-x 1 alizj 361K  9 29  2023 xtensa-esp32s3-elf-addr2line*
-rwxr-xr-x 1 alizj 361K  9 29  2023 xtensa-esp32s3-elf-ar*
-rwxr-xr-x 1 alizj 361K  9 29  2023 xtensa-esp32s3-elf-as*
-rwxr-xr-x 1 alizj 361K  9 29  2023 xtensa-esp32s3-elf-c++*
-rwxr-xr-x 1 alizj 361K  9 29  2023 xtensa-esp32s3-elf-c++filt*
-rwxr-xr-x 1 alizj 361K  9 29  2023 xtensa-esp32s3-elf-cc*
-rwxr-xr-x 1 alizj 361K  9 29  2023 xtensa-esp32s3-elf-cpp*
-rwxr-xr-x 1 alizj 361K  9 29  2023 xtensa-esp32s3-elf-elfedit*
-rwxr-xr-x 1 alizj 361K  9 29  2023 xtensa-esp32s3-elf-g++*
-rwxr-xr-x 1 alizj 361K  9 29  2023 xtensa-esp32s3-elf-gcc*
-rwxr-xr-x 1 alizj 361K  9 29  2023 xtensa-esp32s3-elf-gcc-13.2.0*
-rwxr-xr-x 1 alizj 361K  9 29  2023 xtensa-esp32s3-elf-gcc-ar*
-rwxr-xr-x 1 alizj 361K  9 29  2023 xtensa-esp32s3-elf-gcc-nm*
-rwxr-xr-x 1 alizj 361K  9 29  2023 xtensa-esp32s3-elf-gcc-ranlib*
-rwxr-xr-x 1 alizj 361K  9 29  2023 xtensa-esp32s3-elf-gcov*
-rwxr-xr-x 1 alizj 361K  9 29  2023 xtensa-esp32s3-elf-gcov-dump*
-rwxr-xr-x 1 alizj 361K  9 29  2023 xtensa-esp32s3-elf-gcov-tool*
-rwxr-xr-x 1 alizj 361K  9 29  2023 xtensa-esp32s3-elf-gprof*
-rwxr-xr-x 1 alizj 361K  9 29  2023 xtensa-esp32s3-elf-ld*
-rwxr-xr-x 1 alizj 361K  9 29  2023 xtensa-esp32s3-elf-ld.bfd*
-rwxr-xr-x 1 alizj 361K  9 29  2023 xtensa-esp32s3-elf-lto-dump*
-rwxr-xr-x 1 alizj 361K  9 29  2023 xtensa-esp32s3-elf-nm*
-rwxr-xr-x 1 alizj 361K  9 29  2023 xtensa-esp32s3-elf-objcopy*
-rwxr-xr-x 1 alizj 361K  9 29  2023 xtensa-esp32s3-elf-objdump*
-rwxr-xr-x 1 alizj 361K  9 29  2023 xtensa-esp32s3-elf-ranlib*
-rwxr-xr-x 1 alizj 361K  9 29  2023 xtensa-esp32s3-elf-readelf*
-rwxr-xr-x 1 alizj 361K  9 29  2023 xtensa-esp32s3-elf-size*
-rwxr-xr-x 1 alizj 361K  9 29  2023 xtensa-esp32s3-elf-strings*
-rwxr-xr-x 1 alizj 361K  9 29  2023 xtensa-esp32s3-elf-strip*
zj@a:~/.rustup/toolchains/esp/xtensa-esp-elf/esp-13.2.0_20230928/xtensa-esp-elf/bin$

# export-esp.sh 将该 bin 目录添加 PATH 前面
zj@a:~$ cd esp/
zj@a:~/esp$  ls ~/.rustup/toolchains/esp/xtensa-esp-elf/esp-*/xtensa-esp-elf/xtensa-esp-elf/bin/
ar*  as*  ld*  ld.bfd*  nm*  objcopy*  objdump*  ranlib*  readelf*  strip*

# 这些工具是 crosstool-NG 的 esp 版本
zj@a:~/docs$  ~/.rustup/toolchains/esp/xtensa-esp-elf/esp-13.2.0_20230928/xtensa-esp-elf/xtensa-esp-elf/bin/ld --version
GNU ld (crosstool-NG esp-13.2.0_20230928) 2.41
Copyright (C) 2023 Free Software Foundation, Inc.
# 它们支持 elf32-xtensa target
zj@a:~/docs$  ~/.rustup/toolchains/esp/xtensa-esp-elf/esp-13.2.0_20230928/xtensa-esp-elf/xtensa-esp-elf/bin/ld --help |grep supp
                              Enable support of non-contiguous memory regions
/Users/zhangjun/.rustup/toolchains/esp/xtensa-esp-elf/esp-13.2.0_20230928/xtensa-esp-elf/xtensa-esp-elf/bin/ld: supported targets: elf32-xtensa-le elf32-xtensa-be elf32-little elf32-big srec symbolsrec verilog tekhex binary ihex plugin
/Users/zhangjun/.rustup/toolchains/esp/xtensa-esp-elf/esp-13.2.0_20230928/xtensa-esp-elf/xtensa-esp-elf/bin/ld: supported emulations: elf32xtensa
后续每次使用 rust esp 时都需要 source ~/esp/export-esp.sh 环境变量:
zj@a:~/docs$ cat ~/esp/export-esp.sh
export DIR_TO_REMOVE=/Users/alizj/.venv/bin
PATH=$(echo "$PATH" | sed -e "s;:$DIR_TO_REMOVE;;" -e "s;$DIR_TO_REMOVE:;;" -e "s;$DIR_TO_REMOVE;;")

# 解决 Mac M1 cargo build 报错的问题:https://github.com/rust-lang/cc-rs/issues/1005
export CRATE_CC_NO_DEFAULTS=1

# cargo build 过程中按照 esp-idf python venv 时不支持 SOCKS 代理,故切换为 HTTP 代理。
enable_http_proxy

export LIBCLANG_PATH="/Users/alizj/.rustup/toolchains/esp/xtensa-esp32-elf-clang/esp-16.0.4-20231113/esp-clang/lib"
export PATH="/Users/alizj/.rustup/toolchains/esp/xtensa-esp-elf/esp-13.2.0_20230928/xtensa-esp-elf/bin:$PATH"
更新工具链:
zj@a:~/esp$ enable_socks_proxy
zj@a:~/esp$ espup update
[info]: Updating the Espressif Rust ecosystem
[info]: Checking Rust installation
[info]: Installing GCC (xtensa-esp-elf)
[warn]: Previous installation of LLVM exists in: '/Users/alizj/.rustup/toolchains/esp/xtensa-esp32-elf-clang/esp-16.0.4-20231113'. Reusing this installation
[info]: Installing RISC-V Rust targets ('riscv32imc-unknown-none-elf', 'riscv32imac-unknown-none-elf' and 'riscv32imafc-unknown-none-elf') for 'nightly' toolchain
[warn]: Previous installation of GCC exists in: '/Users/alizj/.rustup/toolchains/esp/xtensa-esp-elf/esp-13.2.0_20230928'. Reusing this installation
[info]: Creating symlink between '/Users/alizj/.rustup/toolchains/esp/xtensa-esp32-elf-clang/esp-16.0.4-20231113/esp-clang/lib' and '/Users/alizj/.espup/esp-clang'
[warn]: Previous installation of Xtensa Rust 1.77.0.0 exists in: '/Users/alizj/.rustup/toolchains/esp'. Reusing this installation
[info]: Update successfully completed!

        To get started, you need to set up some environment variables by running: '. /Users/alizj/export-esp.sh'
        This step must be done every time you open a new terminal.
        See other methods for setting the environment in https://esp-rs.github.io/book/installation/riscv-and-xtensa.html#3-set-up-the-environment-variables
esp 是 espup 安装的自定义 toolchain,不能直接安装 rust-analyzer, 需要建一个软链接:
zj@a:~$ rustup component add rust-analyzer
info: downloading component 'rust-analyzer'
info: installing component 'rust-analyzer'

zj@a:~/docs$ ls -l ~/.rustup/toolchains/stable-aarch64-apple-darwin/bin/
total 96M
-rwxr-xr-x 1 alizj  27M  5  5 12:11 cargo*
-rwxr-xr-x 1 alizj 1.1M  5  5 12:11 cargo-clippy*
-rwxr-xr-x 1 alizj 1.5M  5  5 12:11 cargo-fmt*
-rwxr-xr-x 1 alizj  11M  5  5 12:11 clippy-driver*
-rwxr-xr-x 1 alizj  39M  5  5 12:30 rust-analyzer*
-rwxr-xr-x 1 alizj  980  5  5 12:11 rust-gdb*
-rwxr-xr-x 1 alizj 2.2K  5  5 12:11 rust-gdbgui*
-rwxr-xr-x 1 alizj 1.1K  5  5 12:11 rust-lldb*
-rwxr-xr-x 1 alizj 626K  5  5 12:11 rustc*
-rwxr-xr-x 1 alizj  11M  5  5 12:11 rustdoc*
-rwxr-xr-x 1 alizj 6.3M  5  5 12:11 rustfmt*

zj@a:~/docs$ ln -sf ~/.rustup/toolchains/stable-aarch64-apple-darwin/bin/rust-analyzer ~/.rustup/toolchains/esp/bin/rust-analyzer
编译安装 esp-rs/rust 项目提供的 rust-analyer(可选):
# 源码编译
./configure --experimental-targets=Xtensa --release-channel=nightly --enable-extended
  --tools=clippy,cargo,rustfmt --enable-lld
# 可以在 --tools 中指定 rust-analyzer 来编译安装 esp32 使用的 rust-analyzer
5 开发应用 #
ESP32 的 Rust 应用分为两种类型:
- 使用 std 库:可以使用 Rust 标准库的各种类型和特性,如 Vec/HashMap/Box,heap、thread/Mutex 等;
- 使用 core 库(non_std ),bare metal 开发;
Github 的 esp-rs 组织中的各库命名管理:
- esp- 开头:是 non_std 类型,如 esp-hal;
- esp-idf- 开头:是 std 类型,如 esp-idf-hal;
对于 std 类型应用,cargo build 时会下载和编译依赖的 C/C++ esp-idf 库。
Rust 官方编译器提供了对 RISC-V target 的 Tier2 支持,可以直接向官方 rustc 添加对应 target:
rustup toolchain install nightly --component rust-src

# For no_std (bare-metal) applications
rustup target add riscv32imc-unknown-none-elf # For ESP32-C2 and ESP32-C3
rustup target add riscv32imac-unknown-none-elf # For ESP32-C6 and ESP32-H2

# For std applications
# Since this target is currently Tier 3,
# riscv32imc-esp-espidf 和 riscv32imac-esp-espidf
对于 ESP32-S3 使用 xtensa 处理器,ESP32 fork 了 Rust 编译器工具链,需要通过 espup 来安装 esp channel:
# esp rustc 支持 x86_64/arm64/riscv64/xtensa-esp32s3-espidf/xtensa-esp32s3-none-elf target
# 后续可以在项目的 rust-toolchain.toml 和 .cargo/config.toml 中指定使用 esp channel 和对应的 target。
zj@a:~/docs$  ~/.rustup/toolchains/esp/bin/rustc --print target-list |grep -E 'xtensa|riscv'
riscv32gc-unknown-linux-gnu
riscv32gc-unknown-linux-musl
riscv32i-unknown-none-elf
riscv32im-unknown-none-elf
riscv32imac-esp-espidf
riscv32imac-unknown-none-elf
riscv32imac-unknown-xous-elf
riscv32imc-esp-espidf
riscv32imc-unknown-none-elf
riscv64-linux-android
riscv64gc-unknown-freebsd
riscv64gc-unknown-fuchsia
riscv64gc-unknown-hermit
riscv64gc-unknown-linux-gnu
riscv64gc-unknown-linux-musl
riscv64gc-unknown-netbsd
riscv64gc-unknown-none-elf
riscv64gc-unknown-openbsd
riscv64imac-unknown-none-elf
xtensa-esp32-espidf
xtensa-esp32-none-elf
xtensa-esp32s2-espidf
xtensa-esp32s2-none-elf
xtensa-esp32s3-espidf  # espidf 后缀的 target 为使用 eps-idf 的 std 应用
xtensa-esp32s3-none-elf # none-elf 后缀的 target 为不使用 esp-idf 的 non_std 应用
xtensa-esp8266-none-elf
推荐使用 cargo generate template 来创建 std/non_std 应用: std 应用:
- cargo generate esp-rs/esp-idf-template cargo
- 纯 Rust 应用(cargo-frst);
- cargo generate esp-rs/esp-idf-template cmake
- 混合 Rust and C/C++ in a traditional ESP-IDF idf.py;
non_std 应用:
- cargo generate esp-rs/esp-template
注意:
- 除了构建 cmake 应用外,构建纯 Rust 的 std 或 non_std 应用都只需 source ~/esp/export-esp.sh 脚本即可,
不能同时source ~/esp/esp-idf/v5.2.1/export.sh, 否则会构建失败。 - 开发 Rust ESP32 应用时,需要先确定是使用 std 还是 non_std 类型,然后选择对应的 crate 库,而不是混合使用两种类型的库。
- std 应用可以使用 non_std 的库,但是反过来
non_std 应用只应该使用 non_std 的库。
- std 应用可以使用 non_std 的库,但是反过来
关于 std/non_std 应用的参考材料:
5.1 std 应用 #
esp-idf 是 C/C++ 开发的,运行 FreeRTOS 操作系统,为 Rust std 提供了 newlib enviroment 实现(~/.rustup/toolchains/esp 目录),这样 std 应用可以使用 Rust 标准库的各种类型和特性,如 Vec/HashMap/Box,net,heap 内存分配、thread/Mutex 等;
Rust std 应用与 esp-idf 之间的 3 种互操作方式(这些 std 库惯例是 esp-idf- 开头):
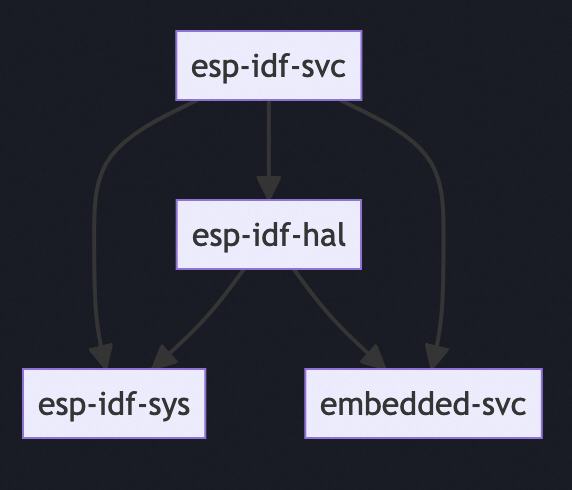
esp-idf-syscrate:esp-idf 的 unsafe binding,Givesraw (unsafe) accessto drivers, Wi-Fi and more.esp-idf-svccrate:esp-idf 的 safe binding,抽象层次更高,实现了 embedded-svc trait。esp-idf-halcrate:实现了embedded-haltrait,支持 async,底层也是基于 esp-idf;
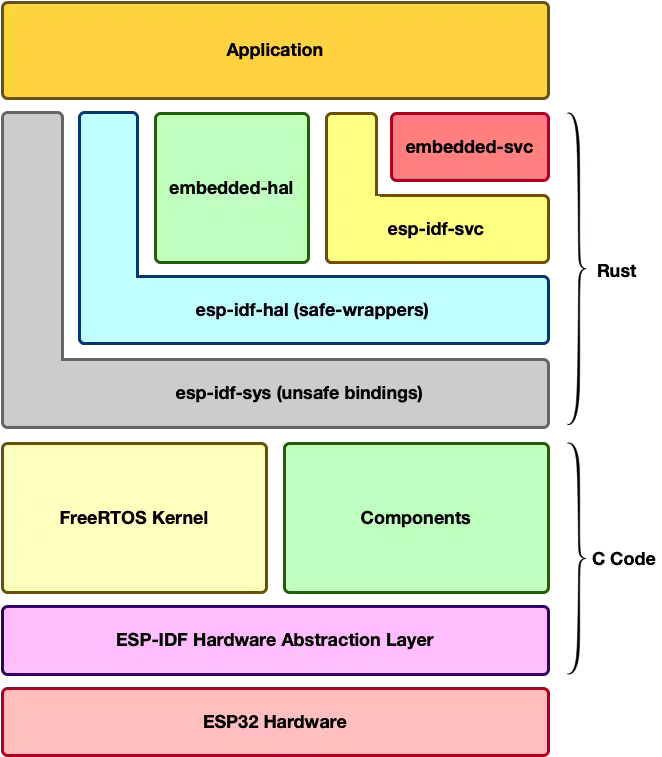
它们之间的层次关系: esp-idf-svc -> esp-idf-hal -> esp-idf-sys(esp-idf 的 Rust binding).
embedded-hal 和 embedded-svc 是 Rust embedded workgroup 定义的厂商中立的嵌入式规范.
编译 esp-idf-sys 时, build.rs 会会自动下载/安装/配置/编译和链接 esp-idf 库,安装到 $ESP_IDF_TOOLS_INSTALL_DIR 位置,默认为 by 项目的 .embuild/espressif 目录。
esp-idf-sys 默认启用 esp-idf 所有的 Component(静态库的形式) ,这样可以后续直接链接他们(后续也可以通过 esp_idf_components, $ESP_IDF_COMPONENTS 来配置)。
esp-idf-sys 也支持添加本地和远程的 C/C++ Component,在构建 esp-idf-sys 时自动使用 bindgen 将它封装为 Rust 接口,后续自动链接到可执行程序中。(参考后文)。
对于 std 应用, 核心是使用 esp-idf-sys 和它绑定链接到的 C/C++ 库 esp-idf.
- 构建的 target 是
xtensa-esp32s3-espidf, 而 non_std 应用的 target 是xtensa-esp32s3-none-elf
如果 esp-idf-hal 不满足需求(如缺少一些 esp32 的寄存器的操作),可以使用 esp-rs/esp-pacs 下的
esp32s3
create, 它是使用 svd2rust 工具来基于芯片的 svd 自动生成的库。
https://apollolabsblog.hashnode.dev/the-embedded-rust-esp-development-ecosystem
使用 esp-rs/esp-idf-template 模板来创建 std 应用:
- 在编译 esp-idf-sys 时自动下载和安装 esp-idf 框架到项目的 .embuild/espressif/esp-idf 目录下;
- 可以配置项目的 .cargo/config.toml 文件, 添加 env ESP_IDF_TOOLS_INSTALL_DIR = “global” 来使用全局
~/.espressif/下的 esp-idf 工具链(建议). - sdkconfig.defaults 文件为 esp-idf 的缺省参数提供 override 参数如 stack size, log level;
zj@a:~/codes/esp32/$ cargo generate esp-rs/esp-idf-template cargo
⚠️   Favorite `esp-rs/esp-idf-template` not found in config, using it as a git repository: https://github.com/esp-rs/esp-idf-template.git
🔧   project-name: myesp ...
🔧   Generating template ...
✔ 🤷   Which MCU to target? · esp32s3
✔ 🤷   Configure advanced template options? · true
✔ 🤷   Enable STD support? · true
✔ 🤷   Configure project to use Dev Containers (VS Code and GitHub Codespaces)? · false
✔ 🤷   Configure project to support Wokwi simulation with Wokwi VS Code extension? · false
✔ 🤷   Add CI files for GitHub Action? · false
✔ 🤷   ESP-IDF version (master = UNSTABLE) · v5.1
🔧   Moving generated files into: `/Users/zhangjun/codes/esp32/esp-demo2/myesp`...
🔧   Initializing a fresh Git repository
✨   Done! New project created /Users/zhangjun/codes/esp32/esp-demo2/myesp
zj@a:~/codes/esp32/$ cd myesp

# 修改 .cargo/config.toml 文件中的 ESP_IDF_VERSION 为最新版本,内容如下:
zj@a:~/codes/esp32/myesp$ cat .cargo/config.toml
[build]
target = "xtensa-esp32s3-espidf"  # 要构建的 target,这里使用链接 esp-idf 的 target

[target.xtensa-esp32s3-espidf]  # target 对应的配置
linker = "ldproxy" # 位于 ~/.cargo/bin/
# runner = "espflash --monitor" # Select this runner for espflash v1.x.x
runner = "espflash flash --monitor" # Select this runner for espflash v2.x.x
rustflags = [ "--cfg",  "espidf_time64"] # Extending time_t for ESP IDF 5: https://github.com/esp-rs/rust/issues/110

[unstable]
build-std = ["std", "panic_abort"]  # 构建和使用 std(对于 no_std 是 core)

[env]  # 被 embuild 使用的环境变量
MCU="esp32s3"
# Note: this variable is not used by the pio builder (`cargo build --features pio`)
ESP_IDF_VERSION = "v5.2.1"
# 使用全局 ~/.espressif/ 工具链,默认是 by 项目 workspace 的。
ESP_IDF_TOOLS_INSTALL_DIR = "global"

# sdkconfig.defaults 为 esp-idf 的配置参数文件
zj@a:~/docs$ cat ~/code/esp32/std/myespv2/sdkconfig.defaults
# Rust often needs a bit of an extra main task stack size compared to C (the default is 3K)
CONFIG_ESP_MAIN_TASK_STACK_SIZE=8000

# Use this to set FreeRTOS kernel tick frequency to 1000 Hz (100 Hz by default).
# This allows to use 1 ms granuality for thread sleeps (10 ms by default).
#CONFIG_FREERTOS_HZ=1000

# Workaround for https://github.com/espressif/esp-idf/issues/7631
#CONFIG_MBEDTLS_CERTIFICATE_BUNDLE=n
#CONFIG_MBEDTLS_CERTIFICATE_BUNDLE_DEFAULT_FULL=n


# esp32 rust 项目通过 rust-toolchain.toml 来选择 channel 和 target
zj@a:~/code/esp32/myespv2$ cat rust-toolchain.toml
[toolchain]
channel = "esp"  # ~/.rustup/toolchains/ 下的目录名称,这里使用 esp toolchain

# 使用 embuild crate 来安装和构建 esp-idf framework
# 对于 non_std 应用,不依赖 esp-idf, 故不需要 build.rs .
zj@a:~/code/esp32/myespv2$ cat build.rs
fn main() {
    embuild::espidf::sysenv::output();
}

zj@a:~/code/esp32/std/myesp$ cat Cargo.toml
[package]
name = "myesp"
version = "0.1.0"
authors = ["alizj"]
edition = "2021"
resolver = "2"
rust-version = "1.71"

[profile.release]
opt-level = "s"

[profile.dev]
debug = true    # Symbols are nice and they don't increase the size on Flash
opt-level = "z"

[features]
# 缺省 features:重点是包含 std 和 esp-idf-svc/native
# esp-idf-svc/native 指的是 native 平台类型,除此之外还有 pio 平台类型。
default = ["std", "embassy", "esp-idf-svc/native"]
# std 包含 alloc 和 esp-idf-svc/std
std = ["alloc", "esp-idf-svc/binstart", "esp-idf-svc/std"]
# alloc 依赖 esp-idf-svc/alloc
alloc = ["esp-idf-svc/alloc"]
# embassy 也仅依赖 esp-idf-svc
embassy = ["esp-idf-svc/embassy-sync", "esp-idf-svc/critical-section", "esp-idf-svc/embassy-time-driver"]
# 总结:cargo gen 通过模板创建的 std 应用仅依赖 std 和 esp-idf-svc

pio = ["esp-idf-svc/pio"]
nightly = ["esp-idf-svc/nightly"]
experimental = ["esp-idf-svc/experimental"]

[dependencies]
# 通过 log 打印日志,esp-idf-svc 提供了 log 的具体实现
log = { version = "0.4", default-features = false }
# std 类型的 crate
esp-idf-svc = { version = "0.48", default-features = false }

[build-dependencies] # build.rs 编译脚本的依赖
embuild = "0.31.3"   # build.rs 依赖 embuild


zj@a:~/code/esp32/std/myespv4$ cat src/main.rs
fn main() {
    // It is necessary to call this function once. Otherwise some patches to the runtime
    // implemented by esp-idf-sys might not link properly. See https://github.com/esp-rs/esp-idf-template/issues/71
    esp_idf_svc::sys::link_patches();

    // Bind the log crate to the ESP Logging facilities
    esp_idf_svc::log::EspLogger::initialize_default();

    log::info!("Hello, world!");
}
cargo generate 和 cargo build 的结果:
# 构建项目:每次构建前都需要先 source ~/esp/export-esp.sh 脚本。# 不能启用 python env,不能使用
# socks 代理,需要设置环境变量。

# 构建 std 应用时,不能 source source ~/esp/esp-idf/v5.2.1/export.sh 文件,否则会构建失败。
zj@a:~/code/esp32/myesp$ source ~/esp/export-esp.sh
zj@a:~/code/esp32/myesp$ cargo build

# by workspace 安装的 esp-idf 到 .embuild/espressif/ 目录
zj@a:~/code/esp32/myespv2$ ls -l .embuild/espressif/
total 4.0K
drwxr-xr-x 6 alizj  192  5  5 14:54 dist/
drwxr-xr-x 3 alizj   96  5  5 14:49 esp-idf/
-rw-r--r-- 1 alizj 2.8K  5  5 14:51 espidf.constraints.v5.2.txt
drwxr-xr-x 3 alizj   96  5  5 14:51 python_env/
drwxr-xr-x 6 alizj  192  5  5 14:54 tools/

# dist 下载的内容被解压到 .embuild/espressif/tools/ 目录
zj@a:~/code/esp32/myespv2$ ls -l .embuild/espressif/dist/
total 193M
-rw-r--r-- 1 alizj  70M  5  5 14:52 cmake-3.24.0-macos-universal.tar.gz
-rw-r--r-- 1 alizj  15M  5  5 14:54 esp32ulp-elf-2.35_20220830-macos-arm64.tar.gz
-rw-r--r-- 1 alizj 271K  5  5 14:52 ninja-mac-v1.11.1.zip
-rw-r--r-- 1 alizj  96M  5  5 14:51 xtensa-esp-elf-13.2.0_20230928-aarch64-apple-darwin.tar.xz # 交叉编译工具链

zj@a:~/code/esp32/myespv2$ ls -l .embuild/espressif/tools/
total 0
drwxr-xr-x 3 alizj 96  5  5 14:52 cmake/
drwxr-xr-x 3 alizj 96  5  5 14:54 esp32ulp-elf/ # ULP (Ultra-Low-Powered)
drwxr-xr-x 3 alizj 96  5  5 14:52 ninja/
drwxr-xr-x 3 alizj 96  5  5 14:51 xtensa-esp-elf/

# esp-idf framework,被安装到 python_env/ 目录
zj@a:~/code/esp32/myespv2$ ls -l .embuild/espressif/esp-idf/v5.2.1/
total 172K
-rw-r--r--  1 alizj  12K  5  5 14:49 CMakeLists.txt
-rw-r--r--  1 alizj 4.2K  5  5 14:49 COMPATIBILITY.md
-rw-r--r--  1 alizj 4.3K  5  5 14:49 COMPATIBILITY_CN.md
-rw-r--r--  1 alizj  314  5  5 14:49 CONTRIBUTING.md
-rw-r--r--  1 alizj  25K  5  5 14:49 Kconfig
-rw-r--r--  1 alizj  12K  5  5 14:49 LICENSE
-rw-r--r--  1 alizj 8.9K  5  5 14:49 README.md
-rw-r--r--  1 alizj 8.8K  5  5 14:49 README_CN.md
-rw-r--r--  1 alizj  532  5  5 14:49 SECURITY.md
-rw-r--r--  1 alizj 3.7K  5  5 14:49 SUPPORT_POLICY.md
-rw-r--r--  1 alizj 3.4K  5  5 14:49 SUPPORT_POLICY_CN.md
-rw-r--r--  1 alizj  721  5  5 14:49 add_path.sh
drwxr-xr-x 81 alizj 2.6K  5  5 14:49 components/
-rw-r--r--  1 alizj  12K  5  5 14:49 conftest.py
drwxr-xr-x 15 alizj  480  5  5 14:49 docs/
drwxr-xr-x 22 alizj  704  5  5 14:49 examples/
-rw-r--r--  1 alizj 3.9K  5  5 14:49 export.bat
-rw-r--r--  1 alizj 3.7K  5  5 14:49 export.fish
-rw-r--r--  1 alizj 3.5K  5  5 14:49 export.ps1
-rw-r--r--  1 alizj 8.0K  5  5 14:49 export.sh
-rw-r--r--  1 alizj 1.8K  5  5 14:49 install.bat
-rwxr-xr-x  1 alizj  971  5  5 14:49 install.fish*
-rw-r--r--  1 alizj  982  5  5 14:49 install.ps1
-rwxr-xr-x  1 alizj 1004  5  5 14:49 install.sh*
-rw-r--r--  1 alizj  889  5  5 14:49 pytest.ini
-rw-r--r--  1 alizj 2.0K  5  5 14:49 sdkconfig.rename
-rw-r--r--  1 alizj  530  5  5 14:49 sonar-project.properties
drwxr-xr-x 47 alizj 1.5K  5  5 14:51 tools/
zj@a:~/code/esp32/myespv2$

zj@a:~/code/esp32/myesp$ ls target/
CACHEDIR.TAG  debug/  xtensa-esp32s3-espidf/
zj@a:~/code/esp32/myesp$ ls -l target/xtensa-esp32s3-espidf/debug/
total 11M
-rw-r--r--   1 alizj  21K  5  5 14:45 bootloader.bin # bootloader
drwxr-xr-x  18 alizj  576  5  5 14:39 build/
drwxr-xr-x 178 alizj 5.6K  5  5 14:45 deps/
drwxr-xr-x   2 alizj   64  5  5 14:39 examples/
drwxr-xr-x   3 alizj   96  5  5 14:45 incremental/
-rwxr-xr-x   1 alizj  11M  5  5 14:45 myesp*  # 二进制程序
-rw-r--r--   1 alizj  153  5  5 14:45 myesp.d
-rw-r--r--   1 alizj 3.0K  5  5 14:45 partition-table.bin # 分区表
zj@a:~/code/esp32/myesp$ file target/xtensa-esp32s3-espidf/debug/myesp
target/xtensa-esp32s3-espidf/debug/myesp: ELF 32-bit LSB executable, Tensilica Xtensa, version 1 (SYSV), statically linked, with debug_info, not stripped
构建失败的解决办法:
- cargo clen 清理 target 目录;
- 手动清理 .embuild 目录;
- 不能启用 socks 代理;
- 不能开启 python venv;
zj@a:~/code/esp32/myesp$ cargo clean
zj@a:~/code/esp32/myesp$ rm -rf .embuild/
zj@a:~/code/esp32/myesp$ ls
Cargo.lock  Cargo.toml  build.rs  rust-toolchain.toml  sdkconfig.defaults  src/
zj@a:~/code/esp32/myesp$ cargo build

# cargo build 会安装 esp-idf,期间会安装 python venv 和按照 python 包。所以,不能使用 python 不支持
# 的 socks 代理,也不能启用 python env。
zj@a:~/code/esp32/$ enable_http_proxy
zj@a:~/code/esp32/$ export DIR_TO_REMOVE=/Users/alizj/.venv/bin
zj@a:~/code/esp32/$ export PATH=$(echo $PATH | sed -e "s;:$DIR_TO_REMOVE;;" -e "s;$DIR_TO_REMOVE:;;" -e "s;$DIR_TO_REMOVE;;")

# 如果是 Mac M1 笔记本,需要给 cargo build 添加环境变量 CRATE_CC_NO_DEFAULTS=1,否则会构建失败,报错:
# xtensa-esp-elf-gcc: error: unrecognized command-line option '--target=xtensa-esp32s3-espidf'
# 参考:https://github.com/rust-lang/cc-rs/issues/1005
zj@a:~/code/esp32/$ export CRATE_CC_NO_DEFAULTS=1
开发参考:
- https://docs.esp-rs.org/std-training/01_intro.html
- https://github.com/esp-rs/std-training
- https://github.com/danclive/esp-examples/tree/main
5.2 esp-idf-sys 配置和 extra_components #
使用 cargo build 构建基于 eps-idf-sys 的 std 应用时, build.rs 构建脚本执行的 embuild crate 会下载 esp-idf 库,bindgen 生成 Rust 接口,将编译后的 component 静态库链接到 Rust 可执行程序。
- Rust 习惯使用 xx-sys 来命名其他语言 xx 项目的 Rust wrapper,所以 esp-idf-sys 是 C 项目 esp-idf 的 Rust wrapper。
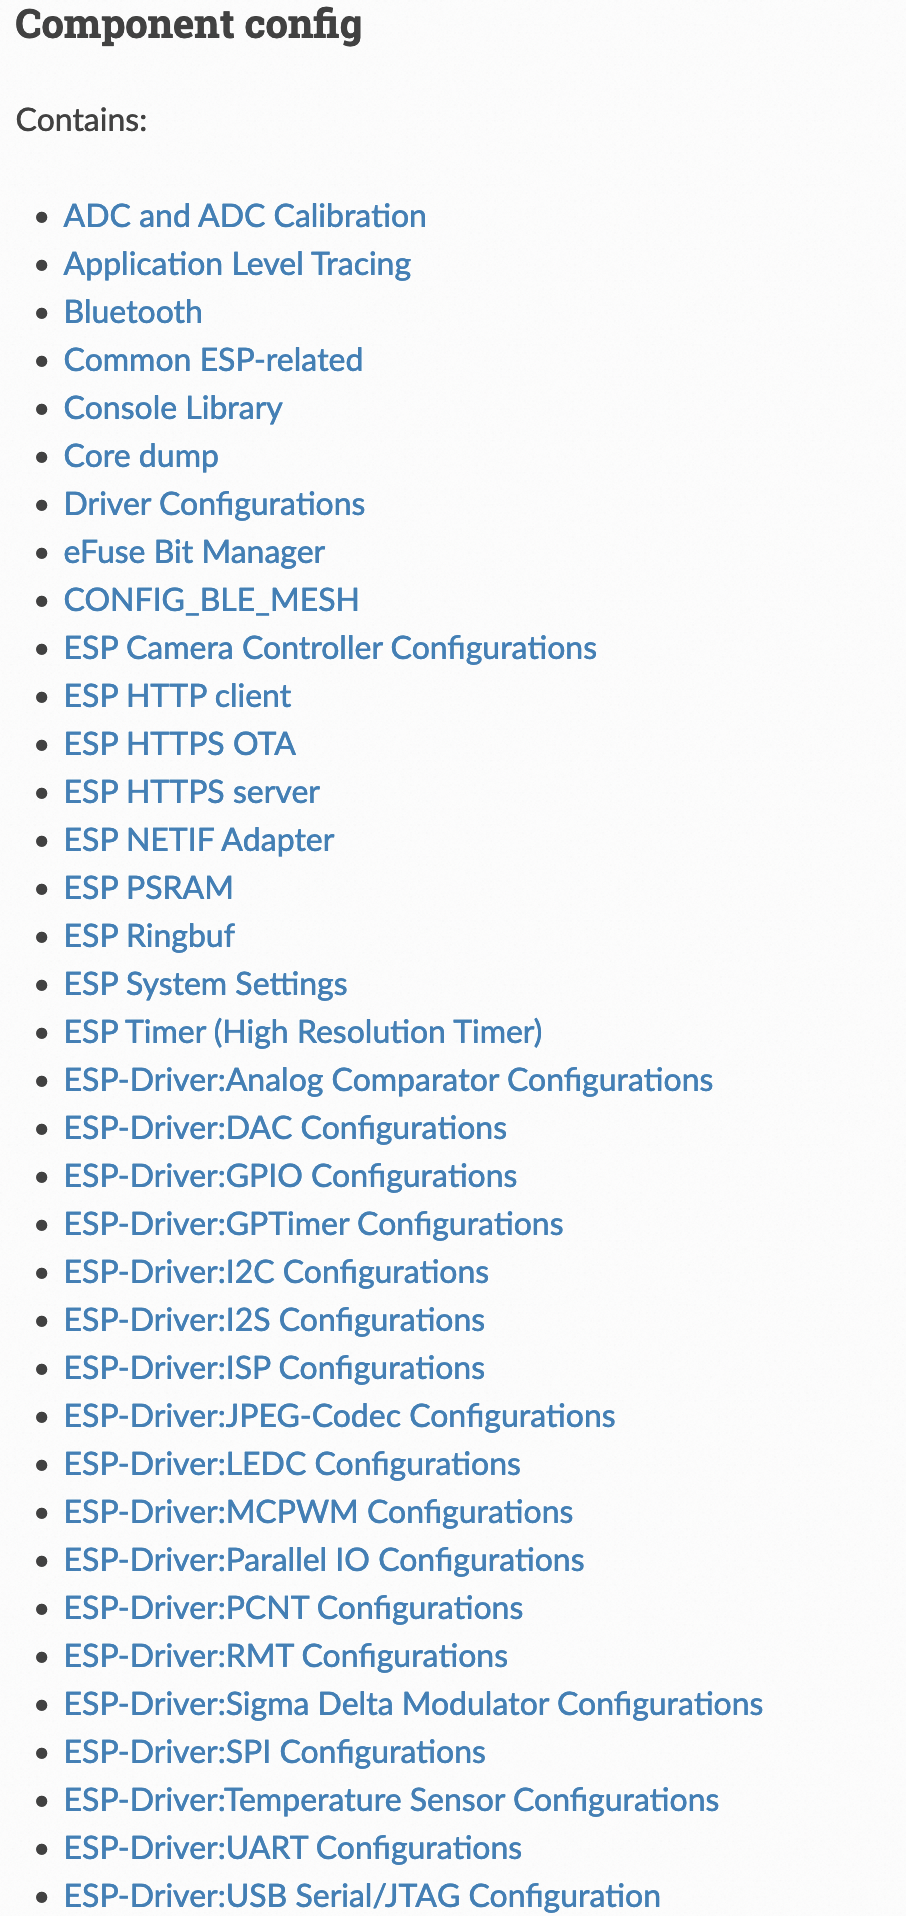
esp-idf 内置了大量 component,同时社区和 component registry 上还有大量其他 component 可供使用。
内置 component 的 bindgen 由 esp-idf-sys 的 bindings.h 头文件定义: https://github.com/esp-rs/esp-idf-sys/blob/master/src/include/esp-idf/bindings.h
esp-idf-sys 默认启用了 所有内置 component ,并且可以链接到 Rust 可执行程序。可以通过配置
esp_idf_components, $ESP_IDF_COMPONENTS 来指定要链接的 esp-idf 内置 component 列表。
[esp32-camera-binding 0.1.0] cargo:rustc-link-arg=esp-idf/esp_common/libesp_common.a
[esp32-camera-binding 0.1.0] cargo:rustc-link-arg=esp-idf/esp_timer/libesp_timer.a
[esp32-camera-binding 0.1.0] cargo:rustc-link-arg=esp-idf/app_trace/libapp_trace.a
[esp32-camera-binding 0.1.0] cargo:rustc-link-arg=esp-idf/esp_event/libesp_event.a
[esp32-camera-binding 0.1.0] cargo:rustc-link-arg=esp-idf/nvs_flash/libnvs_flash.a
[esp32-camera-binding 0.1.0] cargo:rustc-link-arg=esp-idf/esp_phy/libesp_phy.a
[esp32-camera-binding 0.1.0] cargo:rustc-link-arg=esp-idf/vfs/libvfs.a
[esp32-camera-binding 0.1.0] cargo:rustc-link-arg=esp-idf/lwip/liblwip.a
[esp32-camera-binding 0.1.0] cargo:rustc-link-arg=esp-idf/esp_netif/libesp_netif.a
[esp32-camera-binding 0.1.0] cargo:rustc-link-arg=esp-idf/wpa_supplicant/libwpa_supplicant.a
[esp32-camera-binding 0.1.0] cargo:rustc-link-arg=esp-idf/esp_coex/libesp_coex.a
[esp32-camera-binding 0.1.0] cargo:rustc-link-arg=esp-idf/esp_wifi/libesp_wifi.a
[esp32-camera-binding 0.1.0] cargo:rustc-link-arg=esp-idf/unity/libunity.a
[esp32-camera-binding 0.1.0] cargo:rustc-link-arg=esp-idf/cmock/libcmock.a
[esp32-camera-binding 0.1.0] cargo:rustc-link-arg=esp-idf/console/libconsole.a
[esp32-camera-binding 0.1.0] cargo:rustc-link-arg=esp-idf/http_parser/libhttp_parser.a
[esp32-camera-binding 0.1.0] cargo:rustc-link-arg=esp-idf/esp-tls/libesp-tls.a
[esp32-camera-binding 0.1.0] cargo:rustc-link-arg=esp-idf/esp_adc/libesp_adc.a
[esp32-camera-binding 0.1.0] cargo:rustc-link-arg=esp-idf/esp_eth/libesp_eth.a
[esp32-camera-binding 0.1.0] cargo:rustc-link-arg=esp-idf/esp_gdbstub/libesp_gdbstub.a
[esp32-camera-binding 0.1.0] cargo:rustc-link-arg=esp-idf/esp_hid/libesp_hid.a
[esp32-camera-binding 0.1.0] cargo:rustc-link-arg=esp-idf/tcp_transport/libtcp_transport.a
[esp32-camera-binding 0.1.0] cargo:rustc-link-arg=esp-idf/esp_http_client/libesp_http_client.a
[esp32-camera-binding 0.1.0] cargo:rustc-link-arg=esp-idf/esp_http_server/libesp_http_server.a
[esp32-camera-binding 0.1.0] cargo:rustc-link-arg=esp-idf/esp_https_ota/libesp_https_ota.a
[esp32-camera-binding 0.1.0] cargo:rustc-link-arg=esp-idf/esp_lcd/libesp_lcd.a
[esp32-camera-binding 0.1.0] cargo:rustc-link-arg=esp-idf/protobuf-c/libprotobuf-c.a
[esp32-camera-binding 0.1.0] cargo:rustc-link-arg=esp-idf/protocomm/libprotocomm.a
[esp32-camera-binding 0.1.0] cargo:rustc-link-arg=esp-idf/esp_local_ctrl/libesp_local_ctrl.a
[esp32-camera-binding 0.1.0] cargo:rustc-link-arg=esp-idf/espcoredump/libespcoredump.a
[esp32-camera-binding 0.1.0] cargo:rustc-link-arg=esp-idf/wear_levelling/libwear_levelling.a
[esp32-camera-binding 0.1.0] cargo:rustc-link-arg=esp-idf/sdmmc/libsdmmc.a
[esp32-camera-binding 0.1.0] cargo:rustc-link-arg=esp-idf/fatfs/libfatfs.a
[esp32-camera-binding 0.1.0] cargo:rustc-link-arg=esp-idf/json/libjson.a
[esp32-camera-binding 0.1.0] cargo:rustc-link-arg=esp-idf/mqtt/libmqtt.a
[esp32-camera-binding 0.1.0] cargo:rustc-link-arg=esp-idf/nvs_sec_provider/libnvs_sec_provider.a
[esp32-camera-binding 0.1.0] cargo:rustc-link-arg=esp-idf/perfmon/libperfmon.a
[esp32-camera-binding 0.1.0] cargo:rustc-link-arg=esp-idf/spiffs/libspiffs.a
[esp32-camera-binding 0.1.0] cargo:rustc-link-arg=esp-idf/touch_element/libtouch_element.a
[esp32-camera-binding 0.1.0] cargo:rustc-link-arg=esp-idf/usb/libusb.a
[esp32-camera-binding 0.1.0] cargo:rustc-link-arg=esp-idf/wifi_provisioning/libwifi_provisioning.a
[esp32-camera-binding 0.1.0] cargo:rustc-link-arg=esp-idf/main/libmain.a
[esp32-camera-binding 0.1.0] cargo:rustc-link-arg=esp-idf/esp32-camera/libesp32-camera.a
[esp32-camera-binding 0.1.0] cargo:rustc-link-arg=esp-idf/app_trace/libapp_trace.a
[esp32-camera-binding 0.1.0] cargo:rustc-link-arg=esp-idf/app_trace/libapp_trace.a
[esp32-camera-binding 0.1.0] cargo:rustc-link-arg=esp-idf/cmock/libcmock.a
[esp32-camera-binding 0.1.0] cargo:rustc-link-arg=esp-idf/unity/libunity.a
[esp32-camera-binding 0.1.0] cargo:rustc-link-arg=esp-idf/esp_hid/libesp_hid.a
[esp32-camera-binding 0.1.0] cargo:rustc-link-arg=esp-idf/esp_lcd/libesp_lcd.a
[esp32-camera-binding 0.1.0] cargo:rustc-link-arg=esp-idf/esp_local_ctrl/libesp_local_ctrl.a
[esp32-camera-binding 0.1.0] cargo:rustc-link-arg=esp-idf/espcoredump/libespcoredump.a
[esp32-camera-binding 0.1.0] cargo:rustc-link-arg=esp-idf/fatfs/libfatfs.a
[esp32-camera-binding 0.1.0] cargo:rustc-link-arg=esp-idf/wear_levelling/libwear_levelling.a
[esp32-camera-binding 0.1.0] cargo:rustc-link-arg=esp-idf/sdmmc/libsdmmc.a
[esp32-camera-binding 0.1.0] cargo:rustc-link-arg=esp-idf/mqtt/libmqtt.a
[esp32-camera-binding 0.1.0] cargo:rustc-link-arg=esp-idf/nvs_sec_provider/libnvs_sec_provider.a
[esp32-camera-binding 0.1.0] cargo:rustc-link-arg=-u
[esp32-camera-binding 0.1.0] cargo:rustc-link-arg=nvs_sec_provider_include_impl
[esp32-camera-binding 0.1.0] cargo:rustc-link-arg=esp-idf/perfmon/libperfmon.a
[esp32-camera-binding 0.1.0] cargo:rustc-link-arg=esp-idf/spiffs/libspiffs.a
[esp32-camera-binding 0.1.0] cargo:rustc-link-arg=esp-idf/touch_element/libtouch_element.a
[esp32-camera-binding 0.1.0] cargo:rustc-link-arg=esp-idf/usb/libusb.a
[esp32-camera-binding 0.1.0] cargo:rustc-link-arg=esp-idf/wifi_provisioning/libwifi_provisioning.a
[esp32-camera-binding 0.1.0] cargo:rustc-link-arg=esp-idf/protocomm/libprotocomm.a
[esp32-camera-binding 0.1.0] cargo:rustc-link-arg=esp-idf/console/libconsole.a
[esp32-camera-binding 0.1.0] cargo:rustc-link-arg=esp-idf/protobuf-c/libprotobuf-c.a
[esp32-camera-binding 0.1.0] cargo:rustc-link-arg=esp-idf/json/libjson.a
[esp32-camera-binding 0.1.0] cargo:rustc-link-arg=esp-idf/xtensa/libxtensa.a
[esp32-camera-binding 0.1.0] cargo:rustc-link-arg=esp-idf/esp_ringbuf/libesp_ringbuf.a
[esp32-camera-binding 0.1.0] cargo:rustc-link-arg=esp-idf/efuse/libefuse.a
[esp32-camera-binding 0.1.0] cargo:rustc-link-arg=esp-idf/esp_mm/libesp_mm.a
[esp32-camera-binding 0.1.0] cargo:rustc-link-arg=esp-idf/driver/libdriver.a
[esp32-camera-binding 0.1.0] cargo:rustc-link-arg=esp-idf/esp_pm/libesp_pm.a
[esp32-camera-binding 0.1.0] cargo:rustc-link-arg=esp-idf/mbedtls/libmbedtls.a
[esp32-camera-binding 0.1.0] cargo:rustc-link-arg=esp-idf/esp_bootloader_format/libesp_bootloader_format.a
[esp32-camera-binding 0.1.0] cargo:rustc-link-arg=esp-idf/esp_app_format/libesp_app_format.a
[esp32-camera-binding 0.1.0] cargo:rustc-link-arg=esp-idf/bootloader_support/libbootloader_support.a
[esp32-camera-binding 0.1.0] cargo:rustc-link-arg=esp-idf/esp_partition/libesp_partition.a
[esp32-camera-binding 0.1.0] cargo:rustc-link-arg=esp-idf/app_update/libapp_update.a
[esp32-camera-binding 0.1.0] cargo:rustc-link-arg=esp-idf/spi_flash/libspi_flash.a
[esp32-camera-binding 0.1.0] cargo:rustc-link-arg=esp-idf/pthread/libpthread.a
[esp32-camera-binding 0.1.0] cargo:rustc-link-arg=esp-idf/esp_system/libesp_system.a
[esp32-camera-binding 0.1.0] cargo:rustc-link-arg=esp-idf/esp_rom/libesp_rom.a
[esp32-camera-binding 0.1.0] cargo:rustc-link-arg=esp-idf/hal/libhal.a
[esp32-camera-binding 0.1.0] cargo:rustc-link-arg=esp-idf/log/liblog.a
[esp32-camera-binding 0.1.0] cargo:rustc-link-arg=esp-idf/heap/libheap.a
[esp32-camera-binding 0.1.0] cargo:rustc-link-arg=esp-idf/soc/libsoc.a
[esp32-camera-binding 0.1.0] cargo:rustc-link-arg=esp-idf/esp_hw_support/libesp_hw_support.a
[esp32-camera-binding 0.1.0] cargo:rustc-link-arg=esp-idf/freertos/libfreertos.a
[esp32-camera-binding 0.1.0] cargo:rustc-link-arg=esp-idf/newlib/libnewlib.a
[esp32-camera-binding 0.1.0] cargo:rustc-link-arg=esp-idf/cxx/libcxx.a
[esp32-camera-binding 0.1.0] cargo:rustc-link-arg=esp-idf/esp_common/libesp_common.a
[esp32-camera-binding 0.1.0] cargo:rustc-link-arg=esp-idf/esp_timer/libesp_timer.a
[esp32-camera-binding 0.1.0] cargo:rustc-link-arg=esp-idf/esp_event/libesp_event.a
[esp32-camera-binding 0.1.0] cargo:rustc-link-arg=esp-idf/nvs_flash/libnvs_flash.a
[esp32-camera-binding 0.1.0] cargo:rustc-link-arg=esp-idf/esp_phy/libesp_phy.a
[esp32-camera-binding 0.1.0] cargo:rustc-link-arg=esp-idf/vfs/libvfs.a
[esp32-camera-binding 0.1.0] cargo:rustc-link-arg=esp-idf/lwip/liblwip.a
[esp32-camera-binding 0.1.0] cargo:rustc-link-arg=esp-idf/esp_netif/libesp_netif.a
[esp32-camera-binding 0.1.0] cargo:rustc-link-arg=esp-idf/wpa_supplicant/libwpa_supplicant.a
[esp32-camera-binding 0.1.0] cargo:rustc-link-arg=esp-idf/esp_coex/libesp_coex.a
[esp32-camera-binding 0.1.0] cargo:rustc-link-arg=esp-idf/esp_wifi/libesp_wifi.a
[esp32-camera-binding 0.1.0] cargo:rustc-link-arg=esp-idf/http_parser/libhttp_parser.a
[esp32-camera-binding 0.1.0] cargo:rustc-link-arg=esp-idf/esp-tls/libesp-tls.a
[esp32-camera-binding 0.1.0] cargo:rustc-link-arg=esp-idf/esp_adc/libesp_adc.a
[esp32-camera-binding 0.1.0] cargo:rustc-link-arg=esp-idf/esp_eth/libesp_eth.a
[esp32-camera-binding 0.1.0] cargo:rustc-link-arg=esp-idf/esp_gdbstub/libesp_gdbstub.a
[esp32-camera-binding 0.1.0] cargo:rustc-link-arg=esp-idf/tcp_transport/libtcp_transport.a
[esp32-camera-binding 0.1.0] cargo:rustc-link-arg=esp-idf/esp_http_client/libesp_http_client.a
[esp32-camera-binding 0.1.0] cargo:rustc-link-arg=esp-idf/esp_http_server/libesp_http_server.a
[esp32-camera-binding 0.1.0] cargo:rustc-link-arg=esp-idf/esp_https_ota/libesp_https_ota.a
[esp32-camera-binding 0.1.0] cargo:rustc-link-arg=esp-idf/mbedtls/mbedtls/library/libmbedtls.a
[esp32-camera-binding 0.1.0] cargo:rustc-link-arg=esp-idf/mbedtls/mbedtls/library/libmbedcrypto.a
[esp32-camera-binding 0.1.0] cargo:rustc-link-arg=esp-idf/mbedtls/mbedtls/library/libmbedx509.a
[esp32-camera-binding 0.1.0] cargo:rustc-link-arg=esp-idf/mbedtls/mbedtls/3rdparty/everest/libeverest.a
[esp32-camera-binding 0.1.0] cargo:rustc-link-arg=esp-idf/mbedtls/mbedtls/3rdparty/p256-m/libp256m.a
[esp32-camera-binding 0.1.0] cargo:rustc-link-arg=/Users/alizj/code/esp32/std/.embuild/espressif/esp-idf/v5.2.1/components/esp_wifi/lib/esp32s3/libcore.a
[esp32-camera-binding 0.1.0] cargo:rustc-link-arg=/Users/alizj/code/esp32/std/.embuild/espressif/esp-idf/v5.2.1/components/esp_wifi/lib/esp32s3/libespnow.a
[esp32-camera-binding 0.1.0] cargo:rustc-link-arg=/Users/alizj/code/esp32/std/.embuild/espressif/esp-idf/v5.2.1/components/esp_wifi/lib/esp32s3/libmesh.a
[esp32-camera-binding 0.1.0] cargo:rustc-link-arg=/Users/alizj/code/esp32/std/.embuild/espressif/esp-idf/v5.2.1/components/esp_wifi/lib/esp32s3/libnet80211.a
[esp32-camera-binding 0.1.0] cargo:rustc-link-arg=/Users/alizj/code/esp32/std/.embuild/espressif/esp-idf/v5.2.1/components/esp_wifi/lib/esp32s3/libpp.a
[esp32-camera-binding 0.1.0] cargo:rustc-link-arg=/Users/alizj/code/esp32/std/.embuild/espressif/esp-idf/v5.2.1/components/esp_wifi/lib/esp32s3/libsmartconfig.a
[esp32-camera-binding 0.1.0] cargo:rustc-link-arg=/Users/alizj/code/esp32/std/.embuild/espressif/esp-idf/v5.2.1/components/esp_wifi/lib/esp32s3/libwapi.a
[esp32-camera-binding 0.1.0] cargo:rustc-link-arg=/Users/alizj/code/esp32/std/.embuild/espressif/esp-idf/v5.2.1/components/xtensa/esp32s3/libxt_hal.a
[esp32-camera-binding 0.1.0] cargo:rustc-link-arg=-u
[esp32-camera-binding 0.1.0] cargo:rustc-link-arg=esp_app_desc
[esp32-camera-binding 0.1.0] cargo:rustc-link-arg=-u
[esp32-camera-binding 0.1.0] cargo:rustc-link-arg=pthread_include_pthread_impl
[esp32-camera-binding 0.1.0] cargo:rustc-link-arg=-u
[esp32-camera-binding 0.1.0] cargo:rustc-link-arg=pthread_include_pthread_cond_var_impl
[esp32-camera-binding 0.1.0] cargo:rustc-link-arg=-u
[esp32-camera-binding 0.1.0] cargo:rustc-link-arg=pthread_include_pthread_local_storage_impl
[esp32-camera-binding 0.1.0] cargo:rustc-link-arg=-u
[esp32-camera-binding 0.1.0] cargo:rustc-link-arg=pthread_include_pthread_rwlock_impl
[esp32-camera-binding 0.1.0] cargo:rustc-link-arg=-u
[esp32-camera-binding 0.1.0] cargo:rustc-link-arg=pthread_include_pthread_semaphore_impl
[esp32-camera-binding 0.1.0] cargo:rustc-link-arg=-u
[esp32-camera-binding 0.1.0] cargo:rustc-link-arg=ld_include_highint_hdl
[esp32-camera-binding 0.1.0] cargo:rustc-link-arg=-u
[esp32-camera-binding 0.1.0] cargo:rustc-link-arg=start_app
[esp32-camera-binding 0.1.0] cargo:rustc-link-arg=-u
[esp32-camera-binding 0.1.0] cargo:rustc-link-arg=start_app_other_cores
[esp32-camera-binding 0.1.0] cargo:rustc-link-arg=-u
[esp32-camera-binding 0.1.0] cargo:rustc-link-arg=__ubsan_include
[esp32-camera-binding 0.1.0] cargo:rustc-link-arg=-Wl,--wrap=longjmp
[esp32-camera-binding 0.1.0] cargo:rustc-link-arg=-u
[esp32-camera-binding 0.1.0] cargo:rustc-link-arg=__assert_func
[esp32-camera-binding 0.1.0] cargo:rustc-link-arg=-Wl,--undefined=FreeRTOS_openocd_params
[esp32-camera-binding 0.1.0] cargo:rustc-link-arg=-u
[esp32-camera-binding 0.1.0] cargo:rustc-link-arg=app_main
[esp32-camera-binding 0.1.0] cargo:rustc-link-arg=-lc
[esp32-camera-binding 0.1.0] cargo:rustc-link-arg=-lm
[esp32-camera-binding 0.1.0] cargo:rustc-link-arg=-u
[esp32-camera-binding 0.1.0] cargo:rustc-link-arg=newlib_include_heap_impl
[esp32-camera-binding 0.1.0] cargo:rustc-link-arg=-u
[esp32-camera-binding 0.1.0] cargo:rustc-link-arg=newlib_include_syscalls_impl
[esp32-camera-binding 0.1.0] cargo:rustc-link-arg=-u
[esp32-camera-binding 0.1.0] cargo:rustc-link-arg=newlib_include_pthread_impl
[esp32-camera-binding 0.1.0] cargo:rustc-link-arg=-u
[esp32-camera-binding 0.1.0] cargo:rustc-link-arg=newlib_include_assert_impl
[esp32-camera-binding 0.1.0] cargo:rustc-link-arg=-Wl,--wrap=_Unwind_SetEnableExceptionFdeSorting
[esp32-camera-binding 0.1.0] cargo:rustc-link-arg=-Wl,--wrap=__register_frame_info_bases
[esp32-camera-binding 0.1.0] cargo:rustc-link-arg=-Wl,--wrap=__register_frame_info
[esp32-camera-binding 0.1.0] cargo:rustc-link-arg=-Wl,--wrap=__register_frame
[esp32-camera-binding 0.1.0] cargo:rustc-link-arg=-Wl,--wrap=__register_frame_info_table_bases
[esp32-camera-binding 0.1.0] cargo:rustc-link-arg=-Wl,--wrap=__register_frame_info_table
[esp32-camera-binding 0.1.0] cargo:rustc-link-arg=-Wl,--wrap=__register_frame_table
[esp32-camera-binding 0.1.0] cargo:rustc-link-arg=-Wl,--wrap=__deregister_frame_info_bases
[esp32-camera-binding 0.1.0] cargo:rustc-link-arg=-Wl,--wrap=__deregister_frame_info
[esp32-camera-binding 0.1.0] cargo:rustc-link-arg=-Wl,--wrap=_Unwind_Find_FDE
[esp32-camera-binding 0.1.0] cargo:rustc-link-arg=-Wl,--wrap=_Unwind_GetGR
[esp32-camera-binding 0.1.0] cargo:rustc-link-arg=-Wl,--wrap=_Unwind_GetCFA
[esp32-camera-binding 0.1.0] cargo:rustc-link-arg=-Wl,--wrap=_Unwind_GetIP
[esp32-camera-binding 0.1.0] cargo:rustc-link-arg=-Wl,--wrap=_Unwind_GetIPInfo
[esp32-camera-binding 0.1.0] cargo:rustc-link-arg=-Wl,--wrap=_Unwind_GetRegionStart
[esp32-camera-binding 0.1.0] cargo:rustc-link-arg=-Wl,--wrap=_Unwind_GetDataRelBase
[esp32-camera-binding 0.1.0] cargo:rustc-link-arg=-Wl,--wrap=_Unwind_GetTextRelBase
[esp32-camera-binding 0.1.0] cargo:rustc-link-arg=-Wl,--wrap=_Unwind_SetIP
[esp32-camera-binding 0.1.0] cargo:rustc-link-arg=-Wl,--wrap=_Unwind_SetGR
[esp32-camera-binding 0.1.0] cargo:rustc-link-arg=-Wl,--wrap=_Unwind_GetLanguageSpecificData
[esp32-camera-binding 0.1.0] cargo:rustc-link-arg=-Wl,--wrap=_Unwind_FindEnclosingFunction
[esp32-camera-binding 0.1.0] cargo:rustc-link-arg=-Wl,--wrap=_Unwind_Resume
[esp32-camera-binding 0.1.0] cargo:rustc-link-arg=-Wl,--wrap=_Unwind_RaiseException
[esp32-camera-binding 0.1.0] cargo:rustc-link-arg=-Wl,--wrap=_Unwind_DeleteException
[esp32-camera-binding 0.1.0] cargo:rustc-link-arg=-Wl,--wrap=_Unwind_ForcedUnwind
[esp32-camera-binding 0.1.0] cargo:rustc-link-arg=-Wl,--wrap=_Unwind_Resume_or_Rethrow
[esp32-camera-binding 0.1.0] cargo:rustc-link-arg=-Wl,--wrap=_Unwind_Backtrace
[esp32-camera-binding 0.1.0] cargo:rustc-link-arg=-Wl,--wrap=__cxa_call_unexpected
[esp32-camera-binding 0.1.0] cargo:rustc-link-arg=-Wl,--wrap=__gxx_personality_v0
[esp32-camera-binding 0.1.0] cargo:rustc-link-arg=-u
[esp32-camera-binding 0.1.0] cargo:rustc-link-arg=__cxa_guard_dummy
[esp32-camera-binding 0.1.0] cargo:rustc-link-arg=-lstdc++
[esp32-camera-binding 0.1.0] cargo:rustc-link-arg=esp-idf/pthread/libpthread.a
[esp32-camera-binding 0.1.0] cargo:rustc-link-arg=esp-idf/newlib/libnewlib.a
[esp32-camera-binding 0.1.0] cargo:rustc-link-arg=-lgcc
[esp32-camera-binding 0.1.0] cargo:rustc-link-arg=esp-idf/cxx/libcxx.a
[esp32-camera-binding 0.1.0] cargo:rustc-link-arg=-u
[esp32-camera-binding 0.1.0] cargo:rustc-link-arg=__cxx_fatal_exception
[esp32-camera-binding 0.1.0] cargo:rustc-link-arg=-u
[esp32-camera-binding 0.1.0] cargo:rustc-link-arg=include_esp_phy_override
[esp32-camera-binding 0.1.0] cargo:rustc-link-arg=-lphy
[esp32-camera-binding 0.1.0] cargo:rustc-link-arg=-lbtbb
[esp32-camera-binding 0.1.0] cargo:rustc-link-arg=esp-idf/esp_phy/libesp_phy.a
[esp32-camera-binding 0.1.0] cargo:rustc-link-arg=-lphy
[esp32-camera-binding 0.1.0] cargo:rustc-link-arg=-lbtbb
[esp32-camera-binding 0.1.0] cargo:rustc-link-arg=esp-idf/esp_phy/libesp_phy.a
[esp32-camera-binding 0.1.0] cargo:rustc-link-arg=-lphy
[esp32-camera-binding 0.1.0] cargo:rustc-link-arg=-lbtbb
[esp32-camera-binding 0.1.0] cargo:rustc-link-arg=-u
[esp32-camera-binding 0.1.0] cargo:rustc-link-arg=vfs_include_syscalls_impl
也可以为 esp-idf-sys 添加 外部额外的 component ,让 esp-idf-sys bindgen 它的头文件,并进行编译和链接。
- bindgen 为 C 生成的 Rust 接口会放到 esp-idf-sys module 中共 Rust 程序使用。
esp-idf-sys crate 提供了一些影响 esp-idf bindgen、编译构建的配置参数和 .cargo/config.tom 环境变量,参考:
- https://github.com/esp-rs/esp-idf-sys/blob/master/BUILD-OPTIONS.md
- https://docs.esp-rs.org/esp-idf-svc/esp_idf_sys/index.html
各 esp-idf-sys 配置参数有环境变量和 metadata 两种方式(环境变量的优先级更高):
- 在 .cargo/config.toml 中配置 env 环境变量、rusts flags;
- 在 Cargo.toml 中为 [package.metadata.esp-idf-sys] section 添加配置参数;
如果项目 crate package 位于 workspace 中,则:
- 上面 .cargo/config.toml 为 workspace 根目录下的目录和配置;
- [package.metadata.esp-idf-sys] 位于项目 crate package 的 Cargo.toml 文件中;
- 如果 workspace 没有 root package,则称为 virtual workspace,这时需要在 workspace 的 .cargo/config.toml 中通过环境变量 ESP_IDF_SYS_ROOT_CRATE 来指定项目 crate package 名称,否则编译 esp-idf-sys 时不会编译和 bindgen 额外的 component。
通过项目 crate package 的 Cargo.toml [package.metadata.esp-idf-sys] 配置:
- 必须在先在 workspace 的 .cargo/config.toml 中配置环境变量 ESP_IDF_SYS_ROOT_CRATE 指向本 crate,下面的配置才生效。
[package.metadata.esp-idf-sys]
esp_idf_tools_install_dir = "global"
esp_idf_sdkconfig = "sdkconfig"
esp_idf_sdkconfig_defaults = ["sdkconfig.defaults", "sdkconfig.defaults.ble"]
# native builder only
esp_idf_version = "branch:release/v4.4"
esp_idf_components = ["pthread"]
通过 cargo/config.toml 中的 env 配置: 环境变量列表
- esp_idf_sdkconfig_defaults, $ESP_IDF_SDKCONFIG_DEFAULTS: 默认为 sdkconfig.defaults;
- esp_idf_sdkconfig, $ESP_IDF_SDKCONFIG: 默认为 sdkconfig
- esp_idf_tools_install_dir, $ESP_IDF_TOOLS_INSTALL_DIR, 可选值为:
- workspace(缺省),默认为 <crate-workspace-dir>/.embuild/espressif;
- out - the tooling will be installed or used inside esp-idf-sys’s build output directory, and
will be deleted when
cargo cleanis invoked; global(建议)- the tooling will be installed or used in its standard directory (~/.platformio for PlatformIO, and~/.espressiffor the native ESP-IDF toolset);- custom:<dir> - the tooling will be installed or used in the directory specified by <dir>. If this directory is a relative location, it is assumed to be relative to the workspace directory;
- idf_path, $IDF_PATH (native builder only): A path to a user-provided local clone of the esp-idf, that will be used instead of the one downloaded by the build script.
- esp_idf_version, $ESP_IDF_VERSION (native builder only) : The version used for the esp-idf, can be one of the following
- mcu, $MCU: The MCU name (i.e. esp32, esp32s2, esp32s3 esp32c3, esp32c2, esp32h2, esp32c5, esp32c6, esp32p4).
- esp_idf_components, $ESP_IDF_COMPONENTS (native builder only) : Defaults to
all componentsbeing built.- esp-idf 的 component 列表参考 esp-idf components 目录 ;
添加 extral component 示例:
# 在 workspace 的 members 列表里添加待创建的 crate package 目录名称
zj@a:~/code/esp32/std$ cat Cargo.toml
[workspace]
resolver = "2"
members = [
  "myesp",
  "myespv2",
  "myespv3",
  "myespv4",
  "esp32-camera-binding" # 待创建的 create package 目录名称
]
#...

# 由于 workspace 的 Cargo.toml 中没有配置 [package], 即该 workspace 没有默认的 root crate, 它是一个
# virtual workspace.
#
# 对于 virtual workspace, 必须在 workspace 的 .cargo/config.toml 文件中, 通过环境变量
# ESP_IDF_SYS_ROOT_CRATE="esp32-camera-binding" 来指定 root crate, 如 esp32-camera-binding.
zj@a:~/code/esp32/std$ cat .cargo/config.toml
[env]
ESP_IDF_SYS_ROOT_CRATE="esp32-camera-binding" # 关键! 否则编译 esp32-camera-binding 时不会进行 bindgen 转换.


# 创建上面定义的 esp32-camera-binding std 项目
zj@a:~/code/esp32/std$ cargo generate esp-rs/esp-idf-template cargo
zj@a:~/code/esp32/std$ cd esp32-camera-binding/

# clone 要 bindgen 的 esp-idf component 项目到本地
zj@a:~/code/esp32/std/esp32-camera-binding$ git clone [email protected]:espressif/esp32-camera.git
zj@a:~/code/esp32/std/esp32-camera-binding$ ls
Cargo.toml  bindings.h  build.rs  esp32-camera/  src/

# 创建一个 bindings.h 文件,内容为 bindgen 要转换的 component 头文件列表,
# 可以查看项目目录中头文件名称。
zj@a:~/code/esp32/std/esp32-camera-binding$ cat bindings.h
#include "esp_camera.h"

# 配置刚创建的 package 的 Cargo.toml 文件,添加 [[package.metadata.esp-idf-sys.extra_components]]
# 这样在编译 esp-idf-sys 时,会自动使用 bindgen 将 bindings.h 中的头文件生成到 esp-idf-sys 的 module 中,
# 同时也会编译该 component 为静态库,后续可以链接到 Rust 可执行程序中。
zj@a:~/code/esp32/std/esp32-camera-binding$ cat Cargo.toml
[package]
name = "esp32-camera-binding"
version = "0.1.0"
authors = ["alizj"]
edition = "2021"
resolver = "2"
rust-version = "1.71"

[profile.release]
opt-level = "s"

[profile.dev]
debug = true
opt-level = "z"

[features]
default = ["std", "embassy", "esp-idf-svc/native", "esp-idf-sys/native"]

pio = ["esp-idf-svc/pio"]
std = ["alloc", "esp-idf-svc/binstart", "esp-idf-svc/std"]
alloc = ["esp-idf-svc/alloc"]
nightly = ["esp-idf-svc/nightly"]
experimental = ["esp-idf-svc/experimental"]
embassy = ["esp-idf-svc/embassy-sync", "esp-idf-svc/critical-section", "esp-idf-svc/embassy-time-driver"]

[dependencies]
log = { version = "0.4", default-features = false }
esp-idf-svc = { version = "0.48", default-features = false }
esp-idf-sys = { version = "0.34.1"} # 添加 esp-idf-sys 依赖
esp-idf-hal = { version = "0.43.1"}

[build-dependencies]
embuild = "0.31.3"

# esp-idf-sys 的构建脚本 embuild 在编译 esp-idf C 时使用的配置参数.
#
# 通过在 crate package 的 Cargo.toml 文件, 而非 workspace 级别的 .cargo/config.toml 的环境变量来配置,
# 可以更灵活和个性化.
#
# 下面的 package.metadata.esp-idf-sys 只能在 root crate 中配置才能生效, 而 root crate 的配置方式有两种:
# 1. 在 workspace 的 Cargo.toml 中配置的 [package] 称为 root crate;
# 2. 否则, 需要在 workspace 的 .cargo/config.toml 中用环境变量配置 ESP_IDF_SYS_ROOT_CRATE 配置 root crate 如 "esp32-camera-binding".
[package.metadata.esp-idf-sys]
esp_idf_tools_install_dir = "workspace"
esp_idf_sdkconfig = "sdkconfig" # 相对于 workspace 目录
esp_idf_sdkconfig_defaults = ["sdkconfig.defaults", "sdkconfig.defaults.esp32s3"] # 相对于 workspace 目录
#esp_idf_components = ["pthread"]
# native builder only
esp_idf_version = "v5.2.1"

[[package.metadata.esp-idf-sys.extra_components]]  # 为 esp-idf-sys 添加额外的 C component
component_dirs = [ "esp32-camera" ]  # 本地 component 目录列表
bindings_header = "bindings.h"  # bindgen 头文件,内容为 component 的头文件
bindings_module = "camera"  # bindgen 转换后的 Rust 代码所属的 esp-idf-sys module
zj@a:~/code/esp32/std/esp32-camera-binding$
上面是手动将 component 下载到本地,还可以添加 ESP-IDF component registry 中的 remote component ,这时
esp-idf 会自动下载到本地。
[package.metadata.esp-idf-sys.extra_components.0.remote_component]
# The name of the remote component. Corresponds to a key in the dependencies of
# `idf_component.yml`.
name = "component_name"
# The version of the remote component. Corresponds to the `version` field of the
# `idf_component.yml`.
version = "1.2"
# A git url that contains this remote component. Corresponds to the `git`
# field of the `idf_component.yml`.
#
# This field is optional.
git = "https://github.com/espressif/esp32-camera.git"

# A path to the component.
# Corresponds to the `path` field of the `idf_component.yml`.
#
# Note: This should not be used for local components, use
# `component_dirs` of extra components instead.
#
# This field is optional.
path = "path/to/component"

# A url to a custom component registry. Corresponds to the `service_url`
# field of the `idf_component.yml`.
#
# This field is optional.
service_url = "https://componentregistry.company.com"
remote component 示例:
zj@a:~/code/esp32/std/esp32-camera-binding$ cat Cargo.toml
[package]
name = "esp32-camera-binding"
version = "0.1.0"
authors = ["alizj"]
edition = "2021"
resolver = "2"
rust-version = "1.71"

[profile.release]
opt-level = "s"

[profile.dev]
debug = true    # Symbols are nice and they don't increase the size on Flash
opt-level = "z"


[features]
default = ["std", "embassy", "esp-idf-svc/native", "esp-idf-sys/native"]
pio = ["esp-idf-svc/pio"]
std = ["alloc", "esp-idf-svc/binstart", "esp-idf-svc/std"]
alloc = ["esp-idf-svc/alloc"]
nightly = ["esp-idf-svc/nightly"]
experimental = ["esp-idf-svc/experimental"]
embassy = ["esp-idf-svc/embassy-sync", "esp-idf-svc/critical-section", "esp-idf-svc/embassy-time-driver"]

[dependencies]
log = { version = "0.4", default-features = false }
esp-idf-svc = { version = "0.48" }
esp-idf-sys = { version = "0.34.1"}
esp-idf-hal = { version = "0.43.1"}
embedded-svc = "0.21"
anyhow = "1"
base64 = "0.13.0"

[build-dependencies]
embuild = "0.31.3"

# esp-idf-sys 的构建脚本 embuild 在编译 esp-idf C 时使用的配置参数.
#
# 通过在 crate package 的 Cargo.toml 文件, 而非 workspace 级别的 .cargo/config.toml 的环境变量来配置,
# 可以更灵活和个性化.
#
# 下面的 package.metadata.esp-idf-sys 只能在 root crate 中配置才能生效, 而 root crate 的配置方式有两种:
# 1. 在 workspace 的 Cargo.toml 中配置的 [package] 称为 root crate;
# 2. 否则, 需要在 workspace 的 .cargo/config.toml 中用环境变量配置 ESP_IDF_SYS_ROOT_CRATE 配置 root crate 如 "esp32-camera-binding".
[package.metadata.esp-idf-sys]
esp_idf_tools_install_dir = "workspace"
esp_idf_sdkconfig = "sdkconfig" # 相对于 workspace 目录
esp_idf_sdkconfig_defaults = ["sdkconfig.defaults", "sdkconfig.defaults.esp32s3"] # 相对于 workspace 目录
#esp_idf_components = ["pthread"]
# native builder only
esp_idf_version = "v5.2.1"

# 对于 virtual workspace 类型, 必须在 .cargo/config.toml 中配置 ESP_IDF_SYS_ROOT_CRATE 来指定 root crate package.
#esp_idf_sys_root_crate="esp32-camera-binding"

[[package.metadata.esp-idf-sys.extra_components]]
component_dirs = "esp32-camera"  # 本地 component
bindings_header = "bindings.h"
bindings_module = "camera"

[[package.metadata.esp-idf-sys.extra_components]]
remote_component = { name = "espressif/button", version = "3.2.0"} # 远程 ESP-IDF component registry
bindings_header = "bindings.h"
bindings_module = "button"
zj@a:~/code/esp32/std/esp32-camera-binding$

zj@a:~/code/esp32/std/esp32-camera-binding$ cat bindings.h  # 两个 component 的头文件
#include "esp_camera.h"
#include "iot_button.h"
cargo build 会自动将 component 下载到本地,然后进行 bindgen 和链接:
zj@a:~/code/esp32/std/esp32-camera-binding$ ls -l ../target/xtensa-esp32s3-espidf/debug/build/esp-idf-sys-7b038a52fa416f70/out
total 5.3M
-rw-r--r--  1 alizj 1.4K  7 24  2006 CMakeLists.txt
-rw-r--r--  1 alizj 5.2M  5 24 12:36 bindings.rs  # eps-idf-sys 所有 component Rust 接口绑定
drwxr-xr-x 36 alizj 1.2K  5 24 12:36 build/
-rw-r--r--  1 alizj 2.6K  5 24 12:36 esp-idf-build.json
-rw-r--r--  1 alizj  147  5 24 12:36 gen-sdkconfig.defaults
drwxr-xr-x  5 alizj  160  5 24 12:35 main/
drwxr-xr-x  4 alizj  128  5 24 12:35 managed_components/ # 自动下载到本地的 remote component 目录
-rw-r--r--  1 alizj  62K  5 24 12:36 sdkconfig

zj@a:~/code/esp32/std/esp32-camera-binding$ ls -l ../target/xtensa-esp32s3-espidf/debug/build/esp-idf-sys-7b038a52fa416f70/out/managed_components/
total 0
drwxr-xr-x 16 alizj 512  5 24 12:35 espressif__button/  # button
drwxr-xr-x 19 alizj 608  5 24 12:35 espressif__cmake_utilities/
zj@a:~/code/esp32/std/esp32-camera-binding$ ls -l ../target/xtensa-esp32s3-espidf/debug/build/esp-idf-sys-7b038a52fa416f70/out/managed_components/espressif__button/
total 84K
-rw-r--r-- 1 alizj 2.4K  1  9 16:34 CHANGELOG.md
-rw-r--r-- 1 alizj  487  1  9 16:34 CMakeLists.txt
-rw-r--r-- 1 alizj 1.8K  1  9 16:34 Kconfig
-rw-r--r-- 1 alizj 1.7K  1  9 16:34 README.md
-rw-r--r-- 1 alizj  12K  1  9 16:34 button_adc.c
-rw-r--r-- 1 alizj 2.6K  1  9 16:34 button_gpio.c
-rw-r--r-- 1 alizj 2.0K  1  9 16:34 button_matrix.c
drwxr-xr-x 3 alizj   96  1  9 16:34 examples/
-rw-r--r-- 1 alizj  440  1  9 16:34 idf_component.yml
drwxr-xr-x 6 alizj  192  1  9 16:34 include/
-rw-r--r-- 1 alizj  30K  1  9 16:34 iot_button.c
-rw-r--r-- 1 alizj  12K  1  9 16:34 license.txt
drwxr-xr-x 8 alizj  256  1  9 16:34 test_apps/

zj@a:~/code/esp32/std/esp32-camera-binding$ grep -A 3 'pub mod camera' ../target/xtensa-esp32s3-espidf/debug/build/esp-idf-sys-7b038a52fa416f70/out/bindings.rs
pub mod camera {
    /* automatically generated by rust-bindgen 0.63.0 */

    #[repr(C)]
zj@a:~/code/esp32/std/esp32-camera-binding$ grep -A 3 'pub mod button' ../target/xtensa-esp32s3-espidf/debug/build/esp-idf-sys-7b038a52fa416f70/out/bindings.rs
pub mod button {
    /* automatically generated by rust-bindgen 0.63.0 */

    #[repr(C)]
为了加快 cargo build 速率,避免每次都重新编译构建 esp-idf,建议使用的 .cargo/config.toml 示例配置(在项目执行 cargo build 命令来进行验证):
[build]
target = "xtensa-esp32s3-espidf"
# 使用 sccache 来调用 rustc 编译器, 有利用缓存加快构建速度.
# 先安装 sccache: cargo install sccache --locked
rustc-wrapper = "/opt/homebrew/bin/sccache"

[target.xtensa-esp32s3-espidf]
linker = "ldproxy"
# runner = "espflash --monitor" # Select this runner for espflash v1.x.x
runner = "espflash flash --monitor" # Select this runner for espflash v2.x.x

# 以下是使用 rustc 构建 esp-rs/esp-idf-sys 时传递的参数
# https://github.com/esp-rs/esp-idf-sys/blob/master/BUILD-OPTIONS.md This is a flag for the libc
# crate that uses 64-bits (instead of 32-bits) for time_t. This must be set for ESP-IDF 5.0 and
# above and must be unset for lesser versions.
rustflags = [ "--cfg",  "espidf_time64"] # Extending time_t for ESP IDF 5: https://github.com/esp-rs/rust/issues/110
# https://github.com/esp-rs/esp-idf-sys/blob/master/BUILD-OPTIONS.md
# 等效于: -Zbuild-std=std,panic_abort
# Required for std support. Rust does not provide std libraries for ESP32 targets since they are tier-2/-3.
[unstable]
build-std = ["std", "panic_abort"]

# cargo 调用命令时使用的环境变量
# 参考:https://github.com/esp-rs/esp-idf-sys/blob/master/BUILD-OPTIONS.md#esp-idf-configuration
[env]
MCU="esp32s3"
# Note: this variable is not used by the pio builder (`cargo build --features pio`)
# 最新 esp-idf 版本:https://github.com/espressif/esp-idf/releases
ESP_IDF_VERSION = "v5.2.q"

# 使用全局 ~/.espressif/ 工具链,默认是 by 项目 workspace 的。
ESP_IDF_TOOLS_INSTALL_DIR = "global"
sccache 统计信息:
zj@a:~/code/esp32/myespv3$ sccache --show-stats
Compile requests                      0
Compile requests executed             0
Cache hits                            0
Cache misses                          0
Cache timeouts                        0
Cache read errors                     0
Forced recaches                       0
Cache write errors                    0
Compilation failures                  0
Cache errors                          0
Non-cacheable compilations            0
Non-cacheable calls                   0
Non-compilation calls                 0
Unsupported compiler calls            0
Average cache write               0.000 s
Average compiler                  0.000 s
Average cache read hit            0.000 s
Failed distributed compilations       0
Cache location                  Local disk: "/Users/alizj/Library/Caches/Mozilla.sccache"
Use direct/preprocessor mode?   yes
Version (client)                0.7.7
Max cache size                       10 GiB
参考:
- esp-rs/std-trainning: Embedded Rust Trainings for Espressif
- https://github.com/ivmarkov/rust-esp32-std-demo%EF%BC%9A Rust on ESP32 STD demo app
- https://apollolabsblog.hashnode.dev/series/esp32-std-embedded-rust%EF%BC%9A 强烈推荐。
- https://github.com/apollolabsdev/ESP32C3
5.3 no_std 应用 #
no_std 应用是 bare-metal 实现,不依赖 esp-idf 及其提供的 FreeRTOS 操作系统和 Rust std 标注库,而是使用 std 的一个子集 core 库,core 库不支持 heap 内存分配和线程。当前支持 HAL/WIFI/BLE/ESP-NOW/Backtrace/Storage 等。
- no_std
不依赖于C/C++ 开发的 esp-idf 及其提供的 FreeRTOS 操作系统环境,而是基于 esp-pacs/esp-hal 开发的 xtensa-esp32s3-none-elf 应用。 - esp-alloc crate 为 no_std 提供了 heap 内存分配的支持;例子: esp-examples/alloc
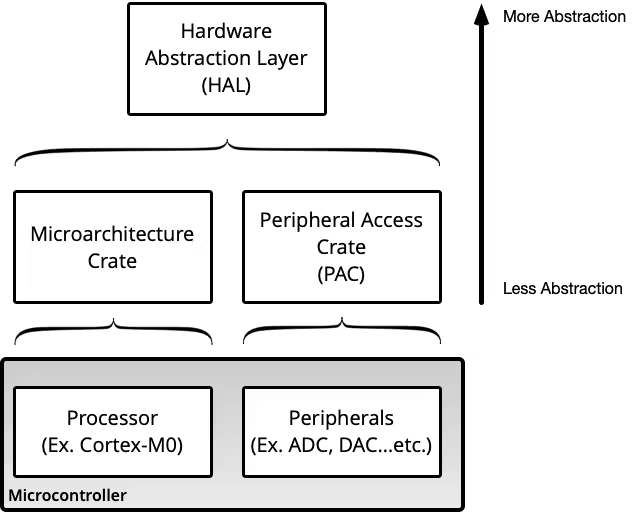
no_std 相关的库:
-
esp-pacs: Peripheral access crates,是根据处理的 SVD 描述文件生成的 Peripheral Access Crates (PACs) ,它是低级的处理器寄存器定义 unsafe 封装。理论上可以直接基于 esp-pacs 开发 no_std 应用,但是因为层次太低级,开发效率不高,所以一般使用 esp-hal 等高层封装来开发。 -
esp-hal: Hardware abstraction layer. async traits from the various packages in theembedded-halrepository.- 相比 esp-pacs crate,esp-hal 是高层次的封装,一般实现了 embedded-hal 和 async trait,底层基于 esp-pacs;
- esp-hal 为 embassy 提供了实现,可以通过 embassy async task 来实现
并发任务。 - 2024.03.08 发布的
0.16.0 版本开始,将以前芯片相关的 esp32-hal, esp32c3-hal 等 crate 合并为一个单独的 esp-hal crate。使用时在 features 中指定 CPU 类型,如:
esp-hal = { version = "0.17.0", features = [ "esp32s3" ] }
说明:esp-pacs 和 esp-hal 是 no_std 应用开发的基础。
-
esp-wifi: Wi-Fi, BLE and ESP-NOW support -
esp-alloc:Simple heap allocator. This allocator is built on top of the phil-opp/linked-list-allocator crate, which does most of the heavy lifting. While it’s often advisable to avoid allocations in such limited environments, there are scenarios when an allocator is still required and/or desirable. -
esp-println:print!, println!. esp-println allows for printing over UART, USB Serial JTAG, or RTT without any required dependencies. 实现 log crate 的 trait,用于打印日志到串口; -
esp-backtrace: Exception and panic handlers. As the name implies, esp-backtraceenables backtracesin no_std applications. It additionally providesa panic handler and exception handler, both behind features. This crate makes debugging issues much easier.- 为了正确显示 panic 的行号和函数符号,需要确保在 release profile 中配置
debug = true参数(dev profile 缺省是该值)。
- 为了正确显示 panic 的行号和函数符号,需要确保在 release profile 中配置
-
esp-storage: Embedded-storage traits to access unencrypted flash memory -
esp-ieee802154: Low-level IEEE802.15.4 driver for the ESP32-C6 and ESP32-H2 -
esp-openthread: A bare-metal Thread implementation using esp-ieee802154- 这里的 thread 不是线程,而是一个为低功耗物联网(IEEE 802.15.4-2006 WPAN)设备设计的基于 IPv6 的网络协议。参考: https://openthread.io/guides/thread-primer?hl=zh-cn
对比:
- std 的 esp-idf-hal 实现了 embeded-hal 和 async trait,底层基于 C/C++ esp-idf;
- no_std 的 esp-hal 实现了 embeded-hal 和 async trait,底层基于 esp-pacs;
其他开源的 no_std 库(embedded-* 是 Rust 嵌入式工作组或社区提供的 no_std 应用项目):
- embedded-graphics :: Embedded-graphics is a 2D graphics library that is focused on memory constrained embedded devices.
- embedded-layout ::Simple layout/alignment functions
- embedded-text :: TextBox with text alignment options
embassy 是支持 async 的 no_std 库。
- embassy 为嵌入式 Rust 提供了一个 async task 的 embassy-executor 实现,有两种实现方式:
- 多线程模式:在 ESP32-S3 芯片上可以实现并发执行异步任务的多线程实现。
- 中断模式:如单核芯片上实现并发;
- thread aware executor on multicore systems;
- 并发异步任务示例: https://github.com/esp-rs/esp-hal/blob/main/examples/src/bin/embassy_multicore.rs
- embassy 开发举例: https://blog.theembeddedrustacean.com/series/rust-embassy
- https://github.com/apollolabsdev/ESP32C3/tree/41efd9d1bbdf8d2e071332af610bae0515407d07/embassy_examples
使用 esp-rs/esp-template 模板来快速创建 no_std 类型项目:
- 为了在 panic 时打印代码行和符号,需要在 release profile 中添加配置
debug = 2 # 2/full/true:full debug info, 虽然二进制包含 debuginfo,但是烧写时会被去掉,并不会增加 flash app 体积。
# 创建一个 NO-STD Bare-Metal 项目, 自定义是否使用 WiFi/Bluetooth/ESP-NOW via the esp-wifi crate;
zj@a:~/code/esp32$ cargo generate esp-rs/esp-template

zj@a:~/code/esp32/non_std$ cat myesp-nonstd/Cargo.toml
[package]
name = "myesp-nonstd"
version = "0.1.0"
authors = ["alizj"]
edition = "2021"
license = "MIT OR Apache-2.0"

[dependencies]
# esp-has 是 no_std 类型 crate, features 中指定了 CPU 类型
esp-hal = { version = "0.17.0", features = [ "esp32s3" ] }

# bare-metal 环境下,当程序 panic 时打印调用栈
esp-backtrace = { version = "0.11.0", features = [
    "esp32s3",
    "exception-handler",
    "panic-handler",
    "println",
] }
# esp-println 启用 log feature 后,为 log 提供具体的实现
esp-println = { version = "0.9.0", features = ["esp32s3", "log"] }
# 向终端打印日志。esp_println 提供了 log 的具体实现
log = { version = "0.4.20" }

[profile.dev]
# Rust debug is too slow.  For debug builds always builds with some optimization
opt-level = "s" # optimize for binary size

# dev profile 的 debug 参数默认为 2,表示 full debug info,
# release profile 的 debug 参数默认为 0,表示关闭 debug info;

[profile.release]
codegen-units = 1 # LLVM can perform better optimizations using a single thread
debug = 2 # 2/full/true:full debug info, 虽然二进制包含 debuginfo,但是烧写时会被去掉,所以不会增加 flash app 体积
debug-assertions = false
incremental = false
lto = 'fat'
opt-level = 's'
overflow-checks = false

zj@a:~/code/esp32/myesp-nonstd$ cat rust-toolchain.toml
[toolchain]
channel = "esp" # 使用 esp channel 工具链

zj@a:~/code/esp32/myesp-nonstd$ cat .cargo/config.toml
[target.xtensa-esp32s3-none-elf]
runner = "espflash flash --monitor"  # cargo run 会烧录 flash 和读终端日志

[env]
ESP_LOGLEVEL="INFO"

[build]
rustflags = [
  "-C", "link-arg=-nostartfiles",
]

target = "xtensa-esp32s3-none-elf" # 使用不链接 esp-idf 的 none-elf 工具链

[unstable]
build-std = ["core"]  # 使用 core 库而非 std 库!

# no_std 应用需要声明 no_std 和 no_main 宏,这样编译器才不会导入 std 库。
# #![no_std] 告诉编译器不导入和链接 libstd 库。
# #![no_main] 告诉编译器不使用标准的 main 接口,而是使用 esp 提供的 main 入口。
zj@a:~/code/esp32/non_std$ cat myesp-nonstd/src/main.rs
#![no_std]
#![no_main]

# in a bare-metal environment, we need a panic handler that runs if a panic occurs in code There are
# a few different crates you can use (e.g panic-halt) but esp-backtrace provides an implementation
# that prints _the address of a backtrace_ - together with espflash these addresses can get decoded
# into source code locations
use esp_backtrace as _;

use esp_hal::{clock::ClockControl, peripherals::Peripherals, prelude::*, delay::Delay};

#[entry]
fn main() -> ! {
    let peripherals = Peripherals::take();
    let system = peripherals.SYSTEM.split();

    let clocks = ClockControl::max(system.clock_control).freeze();
    let delay = Delay::new(&clocks);

    esp_println::logger::init_logger_from_env();

    loop {
        log::info!("Hello world!");
        delay.delay(500.millis());
    }
}


zj@a:~/code/esp32$ cd myesp-nonstd/
zj@a:~/code/esp32/myesp-nonstd$ source ~/esp/export-esp.sh
# 构建,只使用 --release profile
zj@a:~/code/esp32/myesp-nonstd$ cargo build --release
# cargo 会运行 espflash 来烧写 binary
zj@a:~/code/esp32/myesp-nonstd$ cargo run
no_std 构建结果 只有二进制 myesp-nonstd, 不包含构建 std 应用时生成的 bootloader.bin 和
partition-table.bin:
zj@a:~/code/esp32/non_std$ ls -l target/xtensa-esp32s3-none-elf/debug/
total 2.0M
drwxr-xr-x  27 alizj  864  5  9 12:20 build/
drwxr-xr-x 338 alizj  11K  5 10 15:27 deps/
drwxr-xr-x   2 alizj   64  5  8 15:06 examples/
drwxr-xr-x   5 alizj  160  5  9 12:21 incremental/
-rwxr-xr-x   1 alizj 2.0M  5 10 15:27 myesp-nonstd*
-rw-r--r--   1 alizj  194  5  8 15:06 myesp-nonstd.d
参考:
- 官方文档:Embedded Rust (no_std) on Espressif
- 官方 non_std 示例: https://github.com/esp-rs/no_std-training
- https://apollolabsblog.hashnode.dev/series/esp32c3-embedded-rust-hal 强烈推荐。
- https://github.com/apollolabsdev/ESP32C3
- Bare-Metal Rust on ESP32: A Brief Overview
- https://apollolabsblog.hashnode.dev/the-embedded-rust-esp-development-ecosystem
5.4 cmake 应用 #
esp-idf 支持链接 C/C++ 或 Rust 编写的 component,而使用 cargo generate esp-rs/esp-idf-template cmake 来创建 Rust + C/C++ 混合风格的 std 或 non_std 应用,该应用使用安装的 ~/esp/esp-idf/v5.2.1/ 中的 idf.py 和 cmake 来构建。
- Rust 代码作为一个 component 来集成:components/rust-xxx;
- Rust Component 目录的 CMakeLists.txt 文件会调用 cargo build 来将 Rust 代码编译为 esp-idf C 库可以调用的静态库。
- 该 Rust Compoent 可以是 std 或 non_std 类型。由于 idf.py 已经提供了 esp-idf 库,所以 Rust 代码的 build.rs 不会向 std 应用那样 by 项目下载、编译和链接新的 esp-idf 库,而是直接链接 idf.py 所在的 esp-idf 库。
默认创建启用 HAL( esp-idf-svc)的 std 应用。
Rust cmake 读取和使用的参数:
- RUST_DEPS
- CONFIG_IDF_TARGET_ARCH_RISCV
- SDKCONFIG
- IDF_PATH
使用 cargo generate esp-rs/esp-idf-template cmake 创建应用:
- components/rust-mycmake/CMakeLists.txt 文件封装了构建该 Rust component 的 cargo 命令和参数(没有了
.cargo/config.toml 配置,相当于替换了该文件的功能):
- Rust target:xtensa-esp32s3-espidf
- Rust flags: –cfg espidf_time64
- 与 std 默认启用所有 esp-idf components 相比,cmake 项目默认只启用了很少的几个 components,需要在
components/rust-{{project-name}}/CMakeLists.txt 文件中设置
RUST_DEPS来启用 Rust 依赖的 component;
构建前需要 同时 source esp-idf 的 export.h 和 export-esp.sh。构建命令是 idf.py build 而非 cargo
build;
# 创建项目,默认是 std 应用
zj@a:~/code/esp32$ cargo generate esp-rs/esp-idf-template cmake
⚠️   Favorite `esp-rs/esp-idf-template` not found in config, using it as a git repository: https://github.com/esp-rs/esp-idf-template.git
🤷   Project Name: mycmake
🔧   Destination: /Users/alizj/code/esp32/mycmake ...
🔧   project-name: mycmake ...
🔧   Generating template ...
✔ 🤷   Configure advanced template options? · true
✔ 🤷   Rust toolchain (beware: nightly works only for riscv MCUs!) · esp
✔ 🤷   Enable HAL support? · true
✔ 🤷   Enable STD support? · true
🔧   Moving generated files into: `/Users/alizj/code/esp32/mycmake`...
🔧   Initializing a fresh Git repository
✨   Done! New project created /Users/alizj/code/esp32/mycmake
zj@a:~/code/esp32$ ls

zj@a:~/code/esp32/mycmake$ ls
CMakeLists.txt  components/  diagram.json  main/  sdkconfig.defaults  wokwi.toml
zj@a:~/code/esp32/mycmake$ ls main/
CMakeLists.txt  main.c

# Rust 代码作为一个 component 来集成
zj@a:~/code/esp32/mycmake$ ls components/rust-mycmake/
CMakeLists.txt  Cargo.toml  build.rs  placeholder.c  rust-toolchain.toml  src/
zj@a:~/code/esp32/mycmake$ ls components/rust-mycmake/src/
lib.rs

# Rust componet 的 CMakeLists.txt 文件封装了构建该 Rust 代码的 cargo 命令和配置参数。
zj@a:~/code/esp32/mycmake/components/rust-mycmake$ cat CMakeLists.txt
# If this component depends on other components - be it ESP-IDF or project-specific ones - enumerate those in the double-quotes below, separated by spaces
# Note that pthread should always be there, or else STD will not work
set(RUST_DEPS "pthread" "driver" "vfs")
# Here's a non-minimal, reasonable set of ESP-IDF components that one might want enabled for Rust:
#set(RUST_DEPS "pthread" "esp_http_client" "esp_http_server" "espcoredump" "app_update" "esp_serial_slave_link" "nvs_flash" "spi_flash" "esp_adc_cal" "mqtt")

idf_component_register(
    SRCS "placeholder.c"
    INCLUDE_DIRS ""
    PRIV_REQUIRES "${RUST_DEPS}"
)

if(CONFIG_IDF_TARGET_ARCH_RISCV)
    if (CONFIG_IDF_TARGET_ESP32C6 OR CONFIG_IDF_TARGET_ESP32C5 OR CONFIG_IDF_TARGET_ESP32H2)
        set(RUST_TARGET "riscv32imac-esp-espidf")
    else ()
        set(RUST_TARGET "riscv32imc-esp-espidf")
    endif()
elseif(CONFIG_IDF_TARGET_ESP32)
    set(RUST_TARGET "xtensa-esp32-espidf")
elseif(CONFIG_IDF_TARGET_ESP32S2)
    set(RUST_TARGET "xtensa-esp32s2-espidf")
elseif(CONFIG_IDF_TARGET_ESP32S3)
    set(RUST_TARGET "xtensa-esp32s3-espidf")
else()
    message(FATAL_ERROR "Unsupported target ${CONFIG_IDF_TARGET}")
endif()

if(CMAKE_BUILD_TYPE STREQUAL "Debug")
    set(CARGO_BUILD_TYPE "debug")
    set(CARGO_BUILD_ARG "")
else()
    set(CARGO_BUILD_TYPE "release")
    set(CARGO_BUILD_ARG "--release")
endif()


set(CARGO_BUILD_STD_ARG -Zbuild-std=std,panic_abort)


if(IDF_VERSION_MAJOR GREATER "4")
set(ESP_RUSTFLAGS "--cfg espidf_time64")
endif()

set(CARGO_PROJECT_DIR "${CMAKE_CURRENT_LIST_DIR}")
set(CARGO_BUILD_DIR "${CMAKE_CURRENT_BINARY_DIR}")
set(CARGO_TARGET_DIR "${CARGO_BUILD_DIR}/target")

set(RUST_INCLUDE_DIR "${CARGO_TARGET_DIR}")
set(RUST_STATIC_LIBRARY "${CARGO_TARGET_DIR}/${RUST_TARGET}/${CARGO_BUILD_TYPE}/librust_mycmake.a")

# if this component uses CBindGen to generate a C header, uncomment the lines below and adjust the header name accordingly
#set(RUST_INCLUDE_HEADER "${RUST_INCLUDE_DIR}/RustApi.h")
#set_source_files_properties("${RUST_INCLUDE_HEADER}" PROPERTIES GENERATED true)

idf_build_get_property(sdkconfig SDKCONFIG)
idf_build_get_property(idf_path IDF_PATH)

ExternalProject_Add(
    project_rust_mycmake
    PREFIX "${CARGO_PROJECT_DIR}"
    DOWNLOAD_COMMAND ""
    CONFIGURE_COMMAND ${CMAKE_COMMAND} -E env
        cargo clean --target ${RUST_TARGET} --target-dir ${CARGO_TARGET_DIR}
    USES_TERMINAL_BUILD true
    BUILD_COMMAND ${CMAKE_COMMAND} -E env
        CARGO_CMAKE_BUILD_INCLUDES=$<TARGET_PROPERTY:${COMPONENT_LIB},INCLUDE_DIRECTORIES>
        CARGO_CMAKE_BUILD_LINK_LIBRARIES=$<TARGET_PROPERTY:${COMPONENT_LIB},LINK_LIBRARIES>
        CARGO_CMAKE_BUILD_SDKCONFIG=${sdkconfig}
        CARGO_CMAKE_BUILD_ESP_IDF=${idf_path}
        CARGO_CMAKE_BUILD_COMPILER=${CMAKE_C_COMPILER}
        RUSTFLAGS=${ESP_RUSTFLAGS}
        MCU=${CONFIG_IDF_TARGET}
        cargo build --target ${RUST_TARGET} --target-dir ${CARGO_TARGET_DIR} ${CARGO_BUILD_ARG} ${CARGO_BUILD_STD_ARG}
    INSTALL_COMMAND ""
    BUILD_ALWAYS TRUE
    TMP_DIR "${CARGO_BUILD_DIR}/tmp"
    STAMP_DIR "${CARGO_BUILD_DIR}/stamp"
    DOWNLOAD_DIR "${CARGO_BUILD_DIR}"
    SOURCE_DIR "${CARGO_PROJECT_DIR}"
    BINARY_DIR "${CARGO_PROJECT_DIR}"
    INSTALL_DIR "${CARGO_BUILD_DIR}"
    BUILD_BYPRODUCTS
        "${RUST_INCLUDE_HEADER}"
        "${RUST_STATIC_LIBRARY}"
)

add_prebuilt_library(library_rust_mycmake "${RUST_STATIC_LIBRARY}" PRIV_REQUIRES "${RUST_DEPS}")
add_dependencies(library_rust_mycmake project_rust_mycmake)

target_include_directories(${COMPONENT_LIB} PUBLIC "${RUST_INCLUDE_DIR}")
target_link_libraries(${COMPONENT_LIB} PRIVATE library_rust_mycmake)

# 配置了 crate-type 为 staticlib,故会被编译为 esp-idf 可以链接的 C 库
zj@a:~/code/esp32/mycmake/components/rust-mycmake$ cat Cargo.toml
[package]
name = "rust-mycmake"
version = "0.1.0"
authors = ["alizj"]
edition = "2021"
resolver = "2"
rust-version = "1.71"

[lib]
crate-type = ["staticlib"]

[profile.release]
opt-level = "s"

[profile.dev]
debug = true # Symbols are nice and they don't increase the size on Flash
opt-level = "z"
[features]
default = ["std", "embassy", "esp-idf-svc/native"]

pio = ["esp-idf-svc/pio"]
std = ["alloc", "esp-idf-svc/std"]
alloc = ["esp-idf-svc/alloc"]
nightly = ["esp-idf-svc/nightly"]
experimental = ["esp-idf-svc/experimental"]
embassy = ["esp-idf-svc/embassy-sync", "esp-idf-svc/critical-section", "esp-idf-svc/embassy-time-driver"]

[dependencies]
log = { version = "0.4", default-features = false }
esp-idf-svc = { version = "0.48", default-features = false }

[build-dependencies]
embuild = "0.31.3"

zj@a:~/code/esp32/mycmake/components/rust-mycmake$ cat build.rs
fn main() {
    embuild::espidf::sysenv::output();
}

zj@a:~/code/esp32/mycmake/components/rust-mycmake$ cat placeholder.c
/* Hello World Example

   This example code is in the Public Domain (or CC0 licensed, at your option.)

   Unless required by applicable law or agreed to in writing, this
   software is distributed on an "AS IS" BASIS, WITHOUT WARRANTIES OR
   CONDITIONS OF ANY KIND, either express or implied.
*/

/* This is an empty source file to force the build of a CMake library that
   can participate in the CMake dependency graph. This placeholder library
   will depend on the actual library generated by external Rust build.
*/

# 使用 esp toolchain
zj@a:~/code/esp32/mycmake/components/rust-mycmake$ cat rust-toolchain.toml
[toolchain]
channel = "esp"

# 编译为 staticlib,可以被 C 库调用的 Rust 代码
zj@a:~/code/esp32/mycmake/components/rust-mycmake$ cat src/lib.rs
#[no_mangle]
extern "C" fn rust_main() -> i32 {
    // It is necessary to call this function once. Otherwise some patches to the runtime
    // implemented by esp-idf-sys might not link properly. See https://github.com/esp-rs/esp-idf-template/issues/71
    esp_idf_svc::sys::link_patches();

    // Bind the log crate to the ESP Logging facilities
    esp_idf_svc::log::EspLogger::initialize_default();

    log::info!("Hello, world!");
    42
}

zj@a:~/code/esp32/mycmake/components/rust-mycmake$

# main.c 中调用 Rust 的 rust_main() 函数代码
zj@a:~/code/esp32/mycmake$ cat main/main.c
/* Hello World Example

   This example code is in the Public Domain (or CC0 licensed, at your option.)

   Unless required by applicable law or agreed to in writing, this
   software is distributed on an "AS IS" BASIS, WITHOUT WARRANTIES OR
   CONDITIONS OF ANY KIND, either express or implied.
*/
#include <stdio.h>

extern int rust_main(void);

void app_main(void) {
    printf("Hello world from C!\n");

    int result = rust_main();

    printf("Rust returned code: %d\n", result);
}

# 构建前需要 source esp-idf 的 export.h 和 export-esp.sh
zj@a:~/code/esp32/mycmake$ source ~/esp/esp-idf/v5.2.1/export.sh   # esp idf
zj@a:~/code/esp32/mycmake$ source ~/export-esp.sh   # esp rs,因为后续会 build Rust component

#idf.py set-target [esp32|esp32s2|esp32s3|esp32c2|esp32c3|esp32c6|esp32h2]
zj@a:~/code/esp32/mycmake$ idf.py build
Executing action: all (aliases: build)
Running ninja in directory /Users/alizj/code/esp32/mycmake/build
Executing "ninja all"...
[0/9] Performing build step for 'project_rust_mycmake'    Finished release [optimized] target(s) in 0.25s
[1/1] cd /Users/alizj/code/esp32/mycmake/build/bootloader/esp-idf/esptool_py && /Users/alizj/.espressif/p...izes.py --offset 0x8000 bootloader 0x1000 /Users/alizj/code/esp32/mycmake/build/bootloader/bootloader.bi
Bootloader binary size 0x6860 bytes. 0x7a0 bytes (7%) free.
[3/3] cd /Users/alizj/code/esp32/mycmake/build/esp-idf/esptool_py && /Users/alizj/.espressif/python_env/i...esp32/mycmake/build/partition_table/partition-table.bin /Users/alizj/code/esp32/mycmake/build/mycmake.bi
mycmake.bin binary size 0x5b770 bytes. Smallest app partition is 0x100000 bytes. 0xa4890 bytes (64%) free.

Project build complete. To flash, run:
 idf.py flash
or
 idf.py -p PORT flash
or
 python -m esptool --chip esp32 -b 460800 --before default_reset --after hard_reset write_flash --flash_mode dio --flash_size 2MB --flash_freq 40m 0x1000 build/bootloader/bootloader.bin 0x8000 build/partition_table/partition-table.bin 0x10000 build/mycmake.bin
or from the "/Users/alizj/code/esp32/mycmake/build" directory
 python -m esptool --chip esp32 -b 460800 --before default_reset --after hard_reset write_flash "@flash_args"

# 构建的产物位于 build 目录下
zj@a:~/code/esp32/mycmake$ ls
CMakeLists.txt  build/  components/  diagram.json  main/  sdkconfig  sdkconfig.defaults  wokwi.toml
zj@a:~/code/esp32/mycmake$ ls build/
CMakeCache.txt  bootloader-flash_args  compile_commands.json  flash_app_args         flash_project_args     ldgen_libraries     mycmake.elf*                project_description.json
CMakeFiles/     bootloader-prefix/     config/                flash_args             flasher_args.json      ldgen_libraries.in  mycmake.map                 project_elf_src_esp32.c
app-flash_args  build.ninja            config.env             flash_args.in          kconfigs.in            log/                partition-table-flash_args  x509_crt_bundle.S
bootloader/     cmake_install.cmake    esp-idf/               flash_bootloader_args  kconfigs_projbuild.in  mycmake.bin         partition_table/

# Flash
idf.py -p /dev/ttyUSB0 flash

# Monitor
idf.py -p /dev/ttyUSB0 monitor
参考:
5.5 cargo workspace #
在 ~/code/esp32 下创建 std/non_std 两个目录,分别作为 std 和 non_std 应用的 workspace 目录, 之所以区分他们是因为 workspace 目录下的 .cargo/config.toml 文件配置不同:
- std workspace:创建 Cargo.toml,从一个 std 应用目录拷贝.cargo/config.toml/rust-toolchain.toml/sdkconfig.defaults 文件;
- non_std workspace: 创建 Cargo.toml,从一个 non_std 应用目录拷贝.cargo/config.toml/rust-toolchain.toml/sdkconfig.defaults 文件;
std workspace:
- .cargo/config.toml 中设置最新的 ESP_IDF_VERSION = “v5.2.1”,没有指定 ESP_IDF_TOOLS_INSTALL_DIR = “global”,这样会在 workspace 目录下的 .embuild 中保存一份。
zj@a:~/code/esp32/std$ cat Cargo.toml
[workspace]
resolver = "2" # 没有指定 workspace 的 root package 时必须要指定该参数
members = [  # std 应用目录列表
  "myesp",
  "myespv2",
  "myespv3",
]

exclude = [ # 排除的目录列表
  "mycmake",
  "old",
]

[profile.release]
opt-level = "s"

[profile.dev]
debug = true    # Symbols are nice and they don't increase the size on Flash
opt-level = "z"
zj@a:~/code/esp32/std$
zj@a:~/code/esp32/std$ cat .cargo/config.toml
[build]
target = "xtensa-esp32s3-espidf"

[target.xtensa-esp32s3-espidf]
linker = "ldproxy"
# runner = "espflash --monitor" # Select this runner for espflash v1.x.x
runner = "espflash flash --monitor" # Select this runner for espflash v2.x.x
rustflags = [ "--cfg",  "espidf_time64"] # Extending time_t for ESP IDF 5: https://github.com/esp-rs/rust/issues/110

[unstable]
build-std = ["std", "panic_abort"]

[env]
MCU="esp32s3"
# Note: this variable is not used by the pio builder (`cargo build --features pio`)
ESP_IDF_VERSION = "v5.2.1"
ESP_IDF_SDKCONFIG_DEFAULTS = { value = "sdkconfig.defaults", relative = true }

zj@a:~/code/esp32/std$ cat rust-toolchain.toml
[toolchain]
channel = "esp"
non_std workspace:
zj@a:~/code/esp32/non_std$ cat Cargo.toml
[workspace]
resolver = "2"
members = [
  "myesp-nonstd"
]

[profile.dev]
# Rust debug is too slow.
# For debug builds always builds with some optimization
opt-level = "s"

[profile.release]
codegen-units = 1 # LLVM can perform better optimizations using a single thread
debug = 2
debug-assertions = false
incremental = false
lto = 'fat'
opt-level = 's'
overflow-checks = false

zj@a:~/code/esp32/non_std$ cat .cargo/config.toml
[target.xtensa-esp32s3-none-elf]
runner = "espflash flash --monitor"


[env]
ESP_LOGLEVEL="INFO"

[build]
rustflags = [
  "-C", "link-arg=-nostartfiles",
]

target = "xtensa-esp32s3-none-elf"

[unstable]
build-std = ["core"]

zj@a:~/code/esp32/non_std$ cat rust-toolchain.toml
[toolchain]
channel = "esp"
zj@a:~/code/esp32/non_std$
新增应用:
- 在对应的 std/non_std 目录下使用 cargo generate 模板来创建应用。
- 然后将应用名称添加到 members 列表中;
构建应用:
- 在 std/non_std workspace 根目录下: cargo build -p app1
- 在特定应用目录,如 std/myespv2 目录下: cargo build # 只构建当前应用
当应用位于 workspace 中(members 列表中) 时,cargo build 不再读取应用目录中的 下列文件,而是都使用
workspaces 目录下的对应文件。
- rust-toolchain.toml
- .cargo/config.toml
- sdkconfig.defaults 和 sdkconfig.defaults.esp32s3 # 相对与 workspace 目录。
但是应用目录下的 Cargo.toml 和 build.rs 还是必须的,分别指定各应用自身的依赖和构建脚本。
6 debug #
ESP32-S3 开发版一般有两个 USB 接口,一般标记为 UART 和 USB,后者是支持 USB-Serial-JTAG 调试的接口,该接口包含两个 USB 设备:
- USB-CDC-ACM:PC 识别为 USB 串口设备,可以用于下载固件和打印芯片输出的日志;
- JTAG 设备:可以被用来进行 JTAG 调试;
查看 MaxcOS USE-Serial-JTAG 设备信息:
zj@a:~/docs$ system_profiler SPUSBDataType | grep -A 11 "USB JTAG"
        USB JTAG/serial debug unit:

          Product ID: 0x1001
          Vendor ID: 0x303a
          Version: 1.01
          Serial Number: 3C:84:27:04:FE:18
          Speed: Up to 12 Mb/s
          Manufacturer: Espressif
          Location ID: 0x02100000 / 2
          Current Available (mA): 500
          Current Required (mA): 500
          Extra Operating Current (mA): 0
对应的设备名称为 /dev/tty.usbmodem* 或 /dev/cu.usbmodem*:
zj@a:~/docs$ ls -l /dev/*.usbmodem*
crw-rw-rw- 1 root 9, 11  5 10 21:38 /dev/cu.usbmodem2101
crw-rw-rw- 1 root 9, 10  5 10 20:16 /dev/tty.usbmodem2101

zj@a:~/docs$ espflash board-info
[2024-05-10T13:38:06Z INFO ] Detected 2 serial ports
[2024-05-10T13:38:06Z INFO ] Ports which match a known common dev board are highlighted
[2024-05-10T13:38:06Z INFO ] Please select a port
[2024-05-10T13:38:19Z INFO ] Serial port: '/dev/cu.usbmodem2101'
[2024-05-10T13:38:19Z INFO ] Connecting...
[2024-05-10T13:38:21Z INFO ] Using flash stub
Chip type:         esp32s3 (revision v0.2)
Crystal frequency: 40 MHz
Flash size:        16MB
Features:          WiFi, BLE
MAC address:       3c:84:27:04:fe:18

# 使用 probe-rs 工具
zj@a:~/docs$ probe-rs info
Probing target via JTAG

 WARN probe_rs::probe::espusbjtag: More than one TAP detected, defaulting to tap0
No DAP interface was found on the connected probe. ARM-specific information cannot be printed.
Error while reading RISC-V info: Connected target is not a RISC-V device.
Xtensa Chip:
  IDCODE: 00120034e5
    Version:      1
    Part:         8195
    Manufacturer: 626 (Tensilica)

Probing target via SWD

Error identifying target using protocol SWD: Probe does not support SWD

zj@a:~/docs$
由于 ESP32-S3 自带 USB-Serial-JTAG Controller,故不需要单独的外接 debug probe 硬件来进行烧写或调试。确认方法:
cargo espflash board-info
# or
espflash board-info
ESP32-S3 支持使用 probe-rs 或 ESP32 fork 的 OpenCDC 进行 JTAG 调试。
probe-rs 是一个使用 JTAG 接口进行芯片 flash 烧写和调试的工具,支持 RISC-V/ARM/Xtensor。
安装 probe-rs 和相关工具:
zj@a:~/docs$ cargo install probe-rs --features cli
   Installed package `probe-rs v0.23.0` (executables `cargo-embed`, `cargo-flash`, `probe-rs`)
probe-rs 最重要的是 run 命令,可以集成到 cargo run 中:.cargo/config.toml
[target.<architecture-triple>]
runner = 'probe-rs run --chip esp32s3'
Now you can execute cargo run in your project as you would for any native binaries and you will
receive RTT and defmt logs in that very same console as if you wrote to standard out.
- It makes it possible to
flash, start and print logsfrom your target with a simple cargo run.
probe-rs attach works exactly like probe-rs run except that it does not issue a reset and does not flash the target on connecting to preserve the currently running state. This is great for inspecting
a target - where you might not even have knowledge of the firmware - without altering its state.
probe-rs 实现了 DAP 协议,可以直接在 VS Code 中调试代码。
probe-rs 和 DAP 集成: https://probe.rs/docs/tools/debugger/
- 下载 probe-vs 的 vs-code 插件:页面右侧 Resouces 下的 Download Extension https://marketplace.visualstudio.com/items?itemName=probe-rs.probe-rs-debugger
- 解压 vsix 文件到 emacs 目录,参考: https://github.com/svaante/dape
- 配置 dape;
7 Partition Tables #
https://docs.espressif.com/projects/esp-idf/en/latest/esp32s3/api-guides/partition-tables.html
A single ESP32-S3’s flash can contain multiple apps, as well as many different kinds of data
(calibration data, filesystems, parameter storage, etc). For this reason a partition table is
flashed to (default offset) 0x8000 in the flash.
- 前 0x8000 空间分给 second stage bootloader 代码使用了。
默认分区表给应用的 flash 空间是 1M,如果超过了编译会警告,需要在烧写是指定 flash size。
The partition table length is 0xC00 bytes, as we allow a maximum of 95 entries. An MD5 checksum,
used for checking the integrity of the partition table at runtime, is appended after the table
data. Thus, the partition table occupies an entire flash sector, which size is 0x1000 (4 KB). As a
result, any partition following it must be at least located at (default offset) + 0x1000.
Each entry in the partition table has a name (label), type (app, data, or something else), subtype and the offset in flash where the partition is loaded.
The simplest way to use the partition table is to open the project configuration menu ( idf.py menuconfig ) and choose one of the simple predefined partition tables under
CONFIG_PARTITION_TABLE_TYPE:
- “Single factory app, no OTA”
2 “Factory app, two OTA definitions”
In both cases the factory app is flashed at offset 0x10000. If you execute idf.py partition-table
then it will print a summary of the partition table.
使用 idf.py menuconfig 来配置 CONFIG_PARTITION_TABLE_TYPE 变量, 指定内置的分区表类型:
- 内置两种类型分区表:“Single factory app, no OTA”, “Factory app, two OTA definitions”;
- 完全自定义 CSV 分区表;
使用 idf.py partition-table 来显示分区表内容. 使用 gen_esp32part.py 工具来将 CSV 分区表转换为烧写到 FLASH 的 bin 格式。
7.1 Built-in Partition Tables #
Here is the summary printed for the “Single factory app, no OTA” configuration:
# ESP-IDF Partition Table
# Name,   Type, SubType, Offset,  Size, Flags
nvs,      data, nvs,     0x9000,  0x6000,
phy_init, data, phy,     0xf000,  0x1000,
factory,  app,  factory, 0x10000, 1M,
At a 0x10000 (64 KB) offset in the flash is the app labelled “factory”. The bootloader will run
this app by default.
There are also two data regions defined in the partition table for storing NVS library partition and PHY init data.
Here is the summary printed for the “Factory app, two OTA definitions” configuration:
# ESP-IDF Partition Table
# Name,   Type, SubType, Offset,  Size, Flags
nvs,      data, nvs,     0x9000,  0x4000,
otadata,  data, ota,     0xd000,  0x2000,
phy_init, data, phy,     0xf000,  0x1000,
factory,  app,  factory, 0x10000,  1M,
ota_0,    app,  ota_0,   0x110000, 1M,
ota_1,    app,  ota_1,   0x210000, 1M,
There are now three app partition definitions. The type of the factory app (at 0x10000) and the
next two “OTA” apps are all set to “app”, but their subtypes are different.
There is also a new “otadata” slot, which holds the data for OTA updates. The bootloader
consults this data in order to know which app to execute. If “ota data” is empty, it will
execute the factory app.
7.2 Creating Custom Tables #
If you choose "Custom partition table CSV" in menuconfig then you can also enter the name of a CSV
file (in the project directory ) to use for your partition table. The CSV file can describe any
number of definitions for the table you need.
The CSV format is the same format as printed in the summaries shown above. However, not all fields are required in the CSV. For example, here is the “input” CSV for the OTA partition table:
# Name,   Type, SubType,  Offset,   Size,  Flags
nvs,      data, nvs,      0x9000,  0x4000
otadata,  data, ota,      0xd000,  0x2000
phy_init, data, phy,      0xf000,  0x1000
factory,  app,  factory,  0x10000,  1M
ota_0,    app,  ota_0,    ,         1M
ota_1,    app,  ota_1,    ,         1M
nvs_key,  data, nvs_keys, ,        0x1000
Whitespace between fields is ignored, and so is any line starting with # (comments).
Each non-comment line in the CSV file is a partition definition.
The “Offset” field for each partition is empty. The gen_esp32part.py tool fills in each blank
offset, starting after the partition table and making sure each partition is aligned correctly.
7.3 Generating Binary Partition Table #
The partition table which is flashed to the ESP32 is in a binary format, not CSV. The tool
partition_table/gen_esp32part.py is used to convert between CSV and binary formats .
If you configure the partition table CSV name in the project configuration (idf.py menuconfig) and
then build the project or run idf.py partition-table, this conversion is done as part of the build
process.
To convert CSV to Binary manually:
python gen_esp32part.py input_partitions.csv binary_partitions.bin
To convert binary format back to CSV manually:
python gen_esp32part.py binary_partitions.bin input_partitions.csv
To display the contents of a binary partition table on stdout (this is how the summaries displayed when running idf.py partition-table are generated:
python gen_esp32part.py binary_partitions.bin
7.4 Partition Size Checks #
The ESP-IDF build system will automatically check if generated binaries fit in the available partition space , and will fail with an error if a binary is too large.
Currently these checks are performed for the following binaries:
Bootloader binarymust fit in space before partition table (see Bootloader Size).App binaryshould fit in at least one partition of type “app”. If the app binary does not fit in any app partition,the build will fail. If it only fits in some of the app partitions, a warning is printed about this.
Although the build process will fail if the size check returns an error, the binary files are still generated and can be flashed (although they may not work if they are too large for the available
space.)
7.5 Flashing the Partition Table #
idf.py partition-table-flash: will flash the partition table with esptool.py.idf.py flash: Willflash everythingincluding the partition table.
A manual flashing command is also printed as part of idf.py partition-table output.
Note that updating the partition table does not erase data that may have been stored according to
the old partition table. You can use idf.py erase-flash (or esptool.py erase_flash) to erase the
entire flash contents.
7.6 Partition Tool (parttool.py) #
The component partition_table provides a tool parttool.py for performing partition-related
operations on a target device. The following operations can be performed using the tool:
reading a partition and saving the contents to a file (read_partition)
writing the contents of a file to a partition (write_partition)
erasing a partition (erase_partition)
retrieving info such as name, offset, size and flag (“encrypted”) of a given partition (get_partition_info)
The tool can either be imported and used from another Python script or invoked from shell script for users wanting to perform operation programmatically. This is facilitated by the tool’s Python API and command-line interface, respectively.
# Erase partition with name 'storage'
parttool.py --port "/dev/ttyUSB1" erase_partition --partition-name=storage

# Read partition with type 'data' and subtype 'spiffs' and save to file 'spiffs.bin'
parttool.py --port "/dev/ttyUSB1" read_partition --partition-type=data --partition-subtype=spiffs --output "spiffs.bin"

# Write to partition 'factory' the contents of a file named 'factory.bin'
parttool.py --port "/dev/ttyUSB1" write_partition --partition-name=factory --input "factory.bin"

# Print the size of default boot partition
parttool.py --port "/dev/ttyUSB1" get_partition_info --partition-boot-default --info size
8 nvs #
位于 FLASH 中的一个特殊分区,使用 data type 和 nvs subtype,可以用来保存少量的 K=V 数据,数据来源于项目的 CSV 文件。可以使用工具 nvs_partition_gen.py 来从 CSV 文件创出可以烧写到 FLASH 的 bin 文件。
Non-Volatile Storage Library: https://docs.espressif.com/projects/esp-idf/en/latest/esp32s3/api-reference/storage/nvs_flash.html
Non-volatile storage (NVS) library is designed to store key-value pairs in flash. This section
introduces some concepts used by NVS.
Currently, NVS uses a portion of main flash memory through the esp_partition API. The library uses
all the partitions with data type and nvs subtype. The application can choose to use the partition
with the label nvs through the nvs_open() API function or any other partition by specifying its name
using the nvs_open_from_partition() API function.
Future versions of this library may have other storage backends to keep data in another flash chip (SPI or I2C), RTC, FRAM, etc.
NVS Partition Generator Utility
This utility helps generate NVS partition binary files which can be flashed separately on a dedicated partition via a flashing utility. Key-value pairs to be flashed onto the partition can be
provided via a CSV file. For more details, please refer to NVS Partition Generator Utility.
key,type,encoding,value     <-- column header
namespace_name,namespace,,  <-- First entry should be of type "namespace"
key1,data,u8,1
key2,file,string,/path/to/file
运行分区工具:
# https://docs.espressif.com/projects/esp-idf/en/latest/esp32s3/api-reference/storage/nvs_partition_gen.html
# python nvs_partition_gen.py [-h] {generate,generate-key,encrypt,decrypt} ...
python nvs_partition_gen.py generate sample_singlepage_blob.csv sample.bin 0x3000
Instead of calling the nvs_flash/nvs_partition_generator/nvs_partition_gen.py tool manually, the
creation of the partition binary files can also be done directly from CMake using the function
nvs_create_partition_image :
nvs_create_partition_image(<partition> <csv> [FLASH_IN_PROJECT] [DEPENDS dep dep dep ...])
If FLASH_IN_PROJECT is not specified, the image will still be generated, but you will have to flash
it manually using idf.py <partition>-flash (e.g., if your partition name is nvs, then use idf.py
nvs-flash).
nvs_create_partition_image must be called from one of the component CMakeLists.txt files. Currently, only non-encrypted partitions are supported.
9 espflash #
espflash 是固件烧录和终端监视工具,基于 esptool.py.
参考: https://github.com/esp-rs/espflash/tree/main/espflash#installation
cargo-espflash vs espflash: cargo-espflash 是作为 cargo 的一个子命令来运行的,如 cargo espflash, 它支持 cargo 的 –bin/–expample 参数来快速指定 bin 和 example binary 名称。而 espflash 是一个单独工具,需要指定 bin 文件的具体路径:
MCU=esp32c3 cargo espflash flash --target riscv32imc-esp-espidf --example ledc_simple --monitor
cargo espflash flash --example=blinky --monitor

espflash flash target/debug/myapp --monitor
espflash 使用 USB 串口(linux: /dev/ttyUSB0, macOS: /dev/cu.*) 来烧录芯片的 Flash,它会检查项目的依赖是否包含 esp-idf-sys 来判断是那种类型的应用,然后 自动烧写不同的文件 :
- 对于 std 应用,会烧写三个文件:应用 binary,bootloader.bin,partition-table.bin;
- bootloader.bin,partition-table.bin 是 esp-idf-sys build script 生成的。
- 对于 no_std 应用,只烧写一个 elf 格式的应用 binary;
zj@a:~/codes/esp32$ espflash --help
A command-line tool for flashing Espressif devices

Usage: espflash <COMMAND>

Commands:
  board-info       Print information about a connected target device
  completions      Generate completions for the given shell
  erase-flash      Erase Flash entirely
  erase-parts      Erase specified partitions
  erase-region     Erase specified region
  flash            Flash an application in ELF format to a connected target device
  monitor          Open the serial monitor without flashing the connected target device
  partition-table  Convert partition tables between CSV and binary format
  save-image       Generate a binary application image and save it to a local disk
  write-bin        Write a binary file to a specific address in a target device's flash
  help             Print this message or the help of the given subcommand(s)

Options:
  -h, --help     Print help
  -V, --version  Print version
zj@a:~/codes/esp32$
cargo run: 在项目的 .cargo/config.toml 中添加如下内容, 然后就可以执行 cargo run 来 flash 和 monitor 应用:
[target.'cfg(any(target_arch = "riscv32", target_arch = "xtensa"))']
runner = "espflash flash --baud=921600 --monitor"
espflash 配置文件 espflash.toml:
[connection]
serial = "/dev/ttyUSB0"
baudrate = 460800
bootloader = "path/to/custom/bootloader.bin"
partition_table = "path/to/custom/partition-table.bin"

[flash]
mode = "qio"
size = "8MB"
frequency = "80MHz"
espflash.toml 文件位置:
- 项目目录(Cargo.toml 所在目录);
- workspace 根目录;
- $HOME/Library/Application Support/rs.esp.espflash/espflash.toml
monitor 日志格式:espflash 的 flash 和 monitor 子命令支持 -L/–log-format 参数指定日志格式:
serial: Default logging formatdefmt: Uses [defmt] logging framework. With logging format, logging strings have framing bytes to indicate that they are defmt messages.- 一般是在 no_std 应用中使用,需要和 esp-println crate 联合使用。
Establishing a serial connection with the ESP32-S3 target device could be done using USB-to-UART bridge or USB peripheral supported in ESP32-S3. For the ESP32-S3, the USB peripheral is available,
allowing you to flash the binaries without the need for an external USB-to-UART bridge.
If you are flashing for the first time, you need to get the ESP32-S3 into the download mode
manually. To do so, press and hold the BOOT button and then press the RESET button once. After that
release the BOOT button.
在线下载固件和烧写:esp-launchpad,它使用 USB-Serial-JTAG 接口, 例如在线下载和 烧写 esp-box 固件
- 如果烧写了 USB-OTG 应用(如摄像头),则可能不能找到设备,这时可以按住 BOOT 按钮的同时按 RST 按钮将芯片至于 download 模式,这时芯片内 USB PHY 会连接 USB-Serial-JTAG Controller。
probe-rs:
- embassy 使用 probe-rs 来烧写和调试:
10 probe-rs #
zj@a:~/code/slint/examples$ ls -l /dev/*usbmodem*
crw-rw-rw- 1 root 9, 9  5 11 17:38 /dev/cu.usbmodem2101
crw-rw-rw- 1 root 9, 8  5 11 17:38 /dev/tty.usbmodem2101

zj@a:~/code/slint/examples$ probe-rs  list
The following debug probes were found:
[0]: ESP JTAG (VID: 303a, PID: 1001, Serial: 3C:84:27:04:FE:18, EspJtag)

zj@a:~/code/slint/examples$ probe-rs  info
Probing target via JTAG

 WARN probe_rs::probe::espusbjtag: More than one TAP detected, defaulting to tap0
No DAP interface was found on the connected probe. ARM-specific information cannot be printed.
Error while reading RISC-V info: Connected target is not a RISC-V device.
Xtensa Chip:
  IDCODE: 00120034e5
    Version:      1
    Part:         8195
    Manufacturer: 626 (Tensilica)

Probing target via SWD

Error identifying target using protocol SWD: Probe does not support SWD


zj@a:~/code/slint/examples$ probe-rs  chip list  |grep esp
esp32c6
        esp32c6
esp32s2
        esp32s2
esp32h2
        esp32h2
esp32s3
        esp32s3
esp32
        esp32-3.3v
esp32c2
        esp32c2
esp32c3
        esp32c3
esp32c6_lp
        esp32c6_lp

zj@a:~/code/slint/examples$ probe-rs  chip info esp32s3
esp32s3
Cores (1):
    - cpu0 (Xtensa)
NVM: 0x00000000..0x04000000 (64.00 MiB)
RAM: 0x3fc88000..0x3fcf0000 (416.00 KiB)
RAM: 0x3fcf0000..0x3fd00000 (64.00 KiB)
RAM: 0x40370000..0x40378000 (32.00 KiB)
RAM: 0x40378000..0x403e0000 (416.00 KiB)
NVM: 0x42000000..0x44000000 (32.00 MiB)
NVM: 0x3c000000..0x3e000000 (32.00 MiB)
11 defmt #
defmt 也是一种 no_std 应用的 logging framework,它将 ESP32 芯片中应用打印的日志延迟到 host server 上格式化,从而降低 ESP32 芯片应用的内存开销。
ESP32 no_std book 的 defmt 例子: https://docs.esp-rs.org/no_std-training/03_7_defmt.html
对于 ESP32 no_std 应用来说, esp-println, esp-backtrace and espflash/cargo-espflash provide mechanisms to use defmt :
- espflash has support for different logging formats, one of them being defmt.
- espflash requires framming bytes as when using defmt it also needs to print non-defmt
messages, like the bootloader prints. It’s important to note that other defmt-enabled tools
like probe-rs won’t be able to parse these messages due to the extra framing bytes. Uses
rzcobs encoding
- espflash requires framming bytes as when using defmt it also needs to print non-defmt
messages, like the bootloader prints. It’s important to note that other defmt-enabled tools
like probe-rs won’t be able to parse these messages due to the extra framing bytes. Uses
- esp-println has a defmt-espflash feature, which adds framming bytes so espflash knows that is a defmt message.
- esp-backtrace has a defmt feature that
uses defmt loggingto print panic and exception handler messages.
在代码里使用 defmt::println!() 等宏来打印日子! If you want to use any of the logging macros like info, debug
- Enable the log feature of esp-println
- When building the app, set DEFMT_LOG level.
defmt-rtt:Transmit defmt log messages over the RTT (Real-Time Transfer) protocol https://github.com/knurling-rs/defmt/tree/main/firmware/defmt-rtt
embassy 依赖于 defmt 和 defmt-rtt:
- https://embassy.dev/book/dev/project_structure.html
- https://embassy.dev/book/dev/basic_application.html
12 报错 #
- 在 esp-idf-template 生成的模板项目中执行 cargo build 报错:
- https://github.com/esp-rs/esp-idf-template/issues/165
  Using managed esp-idf repository: RemoteSdk { repo_url: None, git_ref: Tag("v5.1.2") }
  Using esp-idf v5.1.2 at '/Users/zhangjun/codes/esp32/esp-demo/.embuild/espressif/esp-idf/v5.1.2'
  ERROR: /Users/zhangjun/codes/esp32/esp-demo/.embuild/espressif/espidf.constraints.v5.1.txt doesn't exist. Perhaps you've forgotten to run the install scripts. Please check the installation guide for more information.
  CMake Error at /Users/zhangjun/codes/esp32/esp-demo/.embuild/espressif/esp-idf/v5.1.2/tools/cmake/build.cmake:363 (message):
    Some Python dependencies must be installed.  Check above message for
    details.
  Call Stack (most recent call first):
    /Users/zhangjun/codes/esp32/esp-demo/.embuild/espressif/esp-idf/v5.1.2/tools/cmake/build.cmake:498 (__build_check_python)
    /Users/zhangjun/codes/esp32/esp-demo/.embuild/espressif/esp-idf/v5.1.2/tools/cmake/project.cmake:547 (idf_build_process)
    CMakeLists.txt:28 (project)


  thread 'main' panicked at /Users/zhangjun/.cargo/registry/src/index.crates.io-6f17d22bba15001f/cmake-0.1.50/src/lib.rs:1098:5:

  command did not execute successfully, got: exit status: 1

  build script failed, must exit now
  note: run with `RUST_BACKTRACE=1` environment variable to display a backtrace
解决办法:
cargo clean && rm -rf .embuild && cargo build
- 报错: Missing dependencies for SOCKS support.
  来自 https://github.com/ThrowTheSwitch/Unity
   * branch            7d2bf62b7e6afaf38153041a9d53c21aeeca9a25 -> FETCH_HEAD
  ERROR: Could not install packages due to an OSError: Missing dependencies for SOCKS support.

  WARNING: There was an error checking the latest version of pip.
  Error: Command '['/Users/zhangjun/codes/esp32/esp-demo/.embuild/espressif/python_env/idf5.1_py3.12_env/bin/python3', '-m', 'pip', 'install', '--upgrade', 'pip']' returned non-zero exit status 1.
  Traceback (most recent call last):
    File "/Users/zhangjun/codes/esp32/esp-demo/.embuild/espressif/esp-idf/v5.1.2/tools/idf_tools.py", line 2687, in <module>
      main(sys.argv[1:])
    File "/Users/zhangjun/codes/esp32/esp-demo/.embuild/espressif/esp-idf/v5.1.2/tools/idf_tools.py", line 2679, in main
      action_func(args)
    File "/Users/zhangjun/codes/esp32/esp-demo/.embuild/espressif/esp-idf/v5.1.2/tools/idf_tools.py", line 2098, in action_install_python_env
      subprocess.check_call([sys.executable, '-m', 'venv',
    File "/Users/zhangjun/.pyenv/versions/3.12.1/lib/python3.12/subprocess.py", line 413, in check_call
      raise CalledProcessError(retcode, cmd)
  subprocess.CalledProcessError: Command '['/Users/zhangjun/.pyenv/versions/3.12.1/bin/python3', '-m', 'venv', '--clear', '--upgrade-deps', '/Users/zhangjun/codes/esp32/esp-demo/.embuild/espressif/python_env/idf5.1_py3.12_env']' returned non-zero exit status 1.
  Error: Could not install esp-idf

  Caused by:
      command 'env -u IDF_PYTHON_ENV_PATH -u MSYSTEM IDF_TOOLS_PATH="/Users/zhangjun/codes/esp32/esp-demo/.embuild/espressif" "python3" "/Users/zhangjun/codes/esp32/esp-demo/.embuild/espressif/esp-idf/v5.1.2/tools/idf_tools.py" "--idf-path" "/Users/zhangjun/codes/esp32/esp-demo/.embuild/espressif/esp-idf/v5.1.2" "--non-interactive" "install-python-env"' exited with non-zero status code 1
zj@a:~/codes/esp32/esp-demo$
解决办法: 不使用 socks5 代理, 而是使用 https/http 代理:
# 将下列内容添加到 ~/esp/export.sh 和 ~/esp/export-esp.sh 中
export all_proxy="http://192.168.3.2:1080" ALL_PROXY="http://192.168.3.2:1080"

# 在 ~/.bashrc 中添加如下内容, 用于手动切换:
alias enable_http_proxy='export all_proxy="http://192.168.3.2:1080" ALL_PROXY="http://192.168.3.2:1080"'
alias enable_socks_proxy='export all_proxy="socks5h://192.168.3.2:1080" ALL_PROXY="socks5h://192.168.3.2:1080"'
alias disable_proxy='unset all_proxy ALL_PROXY'
-
rust-analyzer 报错,不能正常解析和补全。解决办法:
zj@a:~/codes/esp32/esp-demo2/myesp$ cd zj@a:~$ rustup component add rust-analyzer info: downloading component 'rust-analyzer' info: installing component 'rust-analyzer' zj@a:~$ ls -l ~/.rustup/toolchains/ esp/ nightly-x86_64-apple-darwin/ zj@a:~$ ls -l ~/.rustup/toolchains/nightly-x86_64-apple-darwin/bin/ total 95M -rwxr-xr-x 1 zhangjun 29M 2 8 14:48 cargo* -rwxr-xr-x 1 zhangjun 1.1M 2 8 14:48 cargo-clippy* -rwxr-xr-x 1 zhangjun 1.5M 2 8 14:49 cargo-fmt* -rwxr-xr-x 1 zhangjun 11M 2 8 14:48 clippy-driver* -rwxr-xr-x 1 zhangjun 36M 2 8 16:57 rust-analyzer* -rwxr-xr-x 1 zhangjun 980 2 8 14:48 rust-gdb* -rwxr-xr-x 1 zhangjun 2.2K 2 8 14:49 rust-gdbgui* -rwxr-xr-x 1 zhangjun 1.1K 2 8 14:48 rust-lldb* -rwxr-xr-x 1 zhangjun 598K 2 8 14:49 rustc* -rwxr-xr-x 1 zhangjun 11M 2 8 14:49 rustdoc* -rwxr-xr-x 1 zhangjun 6.6M 2 8 14:49 rustfmt* zj@a:~$ ln -sf ~/.rustup/toolchains/nightly-x86_64-apple-darwin/bin/rust-analyzer ~/.rustup/toolchains/esp/bin/rust-analyzer z -
报错:warning: [email protected]: could not identify the root crate and `ESP_IDF_SYS_ROOT_CRATE` not specified
- 这是因为同时 source 了 export.sh 和 export-esp.sh,当构建纯 Rust std/non_std 应用时,只需要 source export-esp.sh 即可。
zj@a:~/code/esp32/std$ source ~/esp/esp-idf/v5.2.1/export.sh
zj@a:~/code/esp32/std$ source ~/esp/export-esp.sh

zj@a:~/code/esp32/std$ cargo build
warning: profiles for the non root package will be ignored, specify profiles at the workspace root:
package:   /Users/alizj/code/esp32/std/myesp/Cargo.toml
workspace: /Users/alizj/code/esp32/std/Cargo.toml
warning: profiles for the non root package will be ignored, specify profiles at the workspace root:
package:   /Users/alizj/code/esp32/std/myespv2/Cargo.toml
workspace: /Users/alizj/code/esp32/std/Cargo.toml
warning: profiles for the non root package will be ignored, specify profiles at the workspace root:
package:   /Users/alizj/code/esp32/std/myespv3/Cargo.toml
workspace: /Users/alizj/code/esp32/std/Cargo.toml
warning: profiles for the non root package will be ignored, specify profiles at the workspace root:
package:   /Users/alizj/code/esp32/std/myespv4/Cargo.toml
workspace: /Users/alizj/code/esp32/std/Cargo.toml
Compiling esp-idf-sys v0.34.1
The following warnings were emitted during compilation:

warning: [email protected]: could not identify the root crate and `ESP_IDF_SYS_ROOT_CRATE` not specified

error: failed to run custom build command for `esp-idf-sys v0.34.1`

Caused by:
process didn't exit successfully: `/Users/alizj/code/esp32/std/target/debug/build/esp-idf-sys-eac13132720836e4/build-script-build` (exit status: 101)
  --- stdout
  cargo:rerun-if-env-changed=ESP_IDF_TOOLS_INSTALL_DIR
  cargo:rerun-if-env-changed=ESP_IDF_SDKCONFIG
  cargo:rerun-if-env-changed=ESP_IDF_SDKCONFIG_DEFAULTS
  cargo:rerun-if-env-changed=MCU
13 examples #
13.1 按键消抖 #
背景介绍: 控制 GPIO 输入 - 按键实验
http://www.labbookpages.co.uk/electronics/debounce.html#soft
https://www.ganssle.com/debouncing-pt2.htm
Rust 软件解耦库: https://docs.rs/debouncr/latest/debouncr/
- 示例代码: https://dev.to/theembeddedrustacean/esp32-embedded-rust-at-the-hal-uart-serial-communication-1ig4 https://github.com/apollolabsdev/ESP32C3/tree/41efd9d1bbdf8d2e071332af610bae0515407d07/no_std_examples/uart/src
使用按键的时候,通常情况下需要进行消抖。
什么是按键消抖?该实验中所用开关为机械弹性开关,当机械触点断开、闭合时,由于机械触点的弹性作用,一个按键开关在闭合时不会马上稳定地接通,在断开时也不会一下子断开。因而在闭合及断开的瞬间均伴随有一连串的抖动,为了不产生这种现象而作的措施就是按键消抖。按键的抖动对于人类来说是感觉不到的,但对单片机来说,则是完全可以感应到的,而且还是一个很漫长的过程,因为单片机处理的速度在微秒级, 而按键抖动的时间至少在毫秒级 。
一次按键动作的电平波形如下图。存在抖动现象, 其前后沿抖动时间一般在 5ms~10ms 之间 。由于单片机运行速度非常快,刚按下的时候会检测到低电平判断按键被按下。但是由于按键存在抖动,单片机在此时也会检测到高电平,误以为松开按键,紧接着又检测到低电平,判断到按键被按下。周而复始,在 5-10ms 内可能会出现很多次按下的动作,每一次按键的动作判断的次数都不相同。
这种抖动可能会影响程序误判,造成严重后果,一般我们采用两种方式对按键进行消抖:
- 硬件消抖,硬件消抖的典型做法是:采用 R-S 触发器或 RC 积分电路。
- 软件消抖,通常我们会使用软件延时 10ms 来消抖。
例如,当按键按下后,引脚为低电平;所以首先读取引脚电平,若引脚为低电平,则延时 10ms 后再次读取引脚电平,若为低电平,则证明按键已按下。硬件方法一般用在对按键操作过程比较严格,且按键数量较少的场合,而按键数量较多时,通常采用软件消抖。
值得一提的是,对于复杂且多任务的单片机系统来说,若简单地采用 循环指令来实现软件延时 ,则会浪费CPU宝贵的时间资源,大大降低系统的实时性,所以,更好的做法是 利用定时中断服务程序 或利用标志位的方法来实现软件消抖。
与输出不同的是,设置输入引脚时,我们需要配置上拉或下拉电阻,目的是确定某个状态电路中的高电平或低电平。上、下拉电阻的作用是提高电路稳定性,避免引起误动作。按键如果不通过电阻上拉到高电平,那么在上电瞬间可能就发生误动作,因为在上电瞬间单片机的引脚电平是不确定的,上拉电阻的存在保证了其引脚处于高电平状态,而不会发生误动作。
import time
from machine import Pin


# 创建按键输入引脚类,如果引脚的一端接 Vcc,则设置下拉电阻;如果一端接的是 GND,则配置上拉电阻。
pin_button = Pin(14, Pin.IN, Pin.PULL_DOWN)
# 定义 LED 输出引脚
pin_led = Pin(2, Pin.OUT)

# 判断 LED 的状态是否改变过
status = 0
while True:
    # 按键消抖
    if pin_button.value() == 1:
        # 睡眠 10ms,如果依然为高电平,说明抖动已消失。
        time.sleep_ms(10)  # 高效的实现方式是使用定时器中断!这样,CPU 可以干其他事
        # 延时 10ms 后,如果依然为高电平,并且 LED 的状态没有改变
        if pin_button.value() == 1 and status == 0:
            pin_led.value(not pin_led.value())
            # led 的状态发生了变化,即使我持续按着按键,LED 的状态也不应该改变。
            status = 1
        # 按键松开,记录 LED 状态的变量也需要响应的改变。
        elif pin_button.value() == 0:
            status = 0
硬件中断例子:
# https://docs.geeksman.com/esp32/MicroPython/15.esp32-micropython-interrupt.html

import time
from machine import Pin

button = Pin(14, Pin.IN, Pin.PULL_DOWN)

led = Pin(2, Pin.OUT)

# 定义 button 的外部中断函数
def button_irq(button):
    time.sleep_ms(80)
    if button.value() == 1:
        led.value(not led.value())

button.irq(button_irq, Pin.IRQ_RISING)
定时器中断:
# https://docs.geeksman.com/esp32/MicroPython/16.esp32-micropython-timer.html
import time
from machine import Pin, Timer


# 定义 Pin 控制引脚
led_1 = Pin(2, Pin.OUT)
led_2 = Pin(4, Pin.OUT)

# 定义定时器中断的回调函数
def timer_irq(timer_pin):
    led_1.value(not led_1.value())

# 定义定时器
timer = Timer(0)
# 初始化定时器
timer.init(period=500, mode=Timer.PERIODIC, callback=timer_irq)


while True:
    led_2.value(not led_2.value())
    time.sleep(1)
Being a hardware sort of bloke I would simply put a capacitor across the push button. It’s not too critical but a 0.1uF usually does the trick. That way you solve the problem at source.
- How to de-bounce a switch using CMOS & TTL : http://www.all-electric.com/schematic/debounce.htm
I think this solution would depend on what your entire circuit looks like. Without a pre-specified R
part of the RC filter, the timescale of your capacitor’s discharge (e.g. microseconds) could
potentially be much shorter than the timescale over which the button bounces
(e.g. milliseconds). Just something to watch out for.
#define BOUNCE_DURATION 20   // define an appropriate bounce time in ms for your switches

volatile unsigned long bounceTime=0; // variable to hold ms count to debounce a pressed switch

void intHandler(){
// this is the interrupt handler for button presses
// it ignores presses that occur in intervals less then the bounce time
  if (abs(millis() - bounceTime) > BOUNCE_DURATION)
  {
     // Your code here to handle new button press ?
     bounceTime = millis();  // set whatever bounce time in ms is appropriate
 }
}
中断处理按键: https://docs.esp-rs.org/std-training/04_4_1_interrupts.html
In this exercise we are using notifications, which only give the latest value, so if the interrupt
is triggered multiple times before the value of the notification is read, you will only be able to
read the latest one. Queues, on the other hand, allow receiving multiple values. See
esp_idf_hal::task::queue::Queue for more details.
使用 queue 的例子: https://blog.csdn.net/xh870189248/article/details/80524714
esp-iot-solution 提供的 button componet: https://github.com/espressif/esp-iot-solution/tree/master/components/button
- 对应的文档: https://docs.espressif.com/projects/espressif-esp-iot-solution/zh_CN/latest/input_device/button.html
使用 5ms 扫描周期的定时器任务实现的:
- 5ms 定时器任务的 callback 函数中执行 debound 和按键判断;
iot_button_create:
- button_create_com
- esp_timer_start_periodic
// https://github.com/espressif/esp-iot-solution/blob/master/components/button/iot_button.c#L397
button_handle_t iot_button_create(const button_config_t *config)
{
    ESP_LOGI(TAG, "IoT Button Version: %d.%d.%d", BUTTON_VER_MAJOR, BUTTON_VER_MINOR, BUTTON_VER_PATCH);
    BTN_CHECK(config, "Invalid button config", NULL);

    esp_err_t ret = ESP_OK;
    button_dev_t *btn = NULL;
    uint16_t long_press_time = 0;
    uint16_t short_press_time = 0;
    long_press_time = TIME_TO_TICKS(config->long_press_time, LONG_TICKS);
    short_press_time = TIME_TO_TICKS(config->short_press_time, SHORT_TICKS);
    switch (config->type) {
    case BUTTON_TYPE_GPIO: {
        const button_gpio_config_t *cfg = &(config->gpio_button_config);
        ret = button_gpio_init(cfg);
        BTN_CHECK(ESP_OK == ret, "gpio button init failed", NULL);

	    // 创建一个 Button,底层是创建一个周期触发的 esp_timer task 并指定了 callback 函数 button_cb
        btn = button_create_com(cfg->active_level, button_gpio_get_key_level, (void *)cfg->gpio_num, long_press_time, short_press_time);
#if CONFIG_GPIO_BUTTON_SUPPORT_POWER_SAVE
        if (cfg->enable_power_save) {
            btn->enable_power_save = cfg->enable_power_save;
	        // 如果是 Power Save 模式,则为 GPIO 引脚启用中断 和 handler:button_power_save_isr_handler
            button_gpio_set_intr(cfg->gpio_num, cfg->active_level == 0 ? GPIO_INTR_LOW_LEVEL : GPIO_INTR_HIGH_LEVEL, button_power_save_isr_handler, (void *)cfg->gpio_num);
        }
#endif
    } break;
    // ...
    btn->type = config->type;
    if (!btn->enable_power_save) {
	    // 启用 esp_itmer 周期定时器,(扫描)周期为 TICKS_INTERVAL,他来自于配置项 BUTTON_PERIOD_TIME_MS
	    // https://github.com/espressif/esp-iot-solution/blob/master/components/button/Kconfig
	    // 默认 5ms,这个值要小于硬件抖动的周期,因为后续按它的倍数来进行去抖计数。
        esp_timer_start_periodic(g_button_timer_handle, TICKS_INTERVAL * 1000U);
        g_is_timer_running = true;
    }
    return (button_handle_t)btn;
}

// Power Save ISR 也是通过启动周期 esp_timer 定时器任务
#if CONFIG_GPIO_BUTTON_SUPPORT_POWER_SAVE
static void IRAM_ATTR button_power_save_isr_handler(void* arg)
{
    if (!g_is_timer_running) {
        esp_timer_start_periodic(g_button_timer_handle, TICKS_INTERVAL * 1000U);
        g_is_timer_running = true;
    }
    button_gpio_intr_control((int)arg, false);
}
#endif
button_create_com: 创建一个 定时器任务 button_timer, 传入 callback button_cb:
- esp-idf 通过 FreeRTOS 运行一个 high-priority esp_timer task 线程,它被 ISR 周期唤醒,然后执行 callback;
- 另外,也可以定义 esp_timer 使用 ISR 中断来执行 callback;参考:
static button_dev_t *button_create_com(uint8_t active_level, uint8_t (*hal_get_key_state)(void *hardware_data), void *hardware_data, uint16_t long_press_ticks, uint16_t short_press_ticks)
{
    BTN_CHECK(NULL != hal_get_key_state, "Function pointer is invalid", NULL);

    button_dev_t *btn = (button_dev_t *) calloc(1, sizeof(button_dev_t));
    // ...
    if (!g_button_timer_handle) {
	    // https://docs.espressif.com/projects/esp-idf/en/latest/esp32/api-reference/system/esp_timer.html#structures
        esp_timer_create_args_t button_timer = {0};
        button_timer.arg = NULL;
        button_timer.callback = button_cb; // 回调函数
        button_timer.dispatch_method = ESP_TIMER_TASK; // Dispatch callback from task or ISR,这里使用 task
        button_timer.name = "button_timer";
        esp_timer_create(&button_timer, &g_button_timer_handle); // 只是创建,并没有指定时间,后续 esp_timer_start_* 来指定
    }

    return btn;
}
esp_timer 定时器任务执行的 callback 函数:button_cb -> button_handler
// https://github.com/espressif/esp-iot-solution/blob/master/components/button/iot_button.c#L293C1-L320C2
static void button_cb(void *args)
{
    button_dev_t *target;
    /*!< When all buttons enter the BUTTON_NONE_PRESS state, the system enters low-power mode */
#if CONFIG_GPIO_BUTTON_SUPPORT_POWER_SAVE
    bool enter_power_save_flag = true;
#endif
    for (target = g_head_handle; target; target = target->next) {
        button_handler(target); // 核心:执行 button_handler 函数,进行按键处理

#if CONFIG_GPIO_BUTTON_SUPPORT_POWER_SAVE
        if (!(target->enable_power_save && target->debounce_cnt == 0 && target->event == BUTTON_NONE_PRESS)) {
            enter_power_save_flag = false;
        }
#endif
    }
#if CONFIG_GPIO_BUTTON_SUPPORT_POWER_SAVE
    if (enter_power_save_flag) {
        /*!< Stop esp timer for power save */
        esp_timer_stop(g_button_timer_handle);
        g_is_timer_running = false;
        for (target = g_head_handle; target; target = target->next) {
            if (target->type == BUTTON_TYPE_GPIO && target->enable_power_save) {
                button_gpio_intr_control((int)(target->hardware_data), true);
            }
        }
    }
#endif
}
button_handler:Button driver core function, driver state machine.
- 按键驱动的核心函数,使用状态机来进行按键去抖、用户既按键事件生成和调用用户注册的按键事件回调函数。
- DEBOUNCE_TICKS 来源于配置 CONFIG_BUTTON_DEBOUNCE_TICKS,表示 BUTTON_PERIOD_TIME_MS(默认 5ms) 的次数,默认为 2 即去抖时间为 10ms。
// https://github.com/espressif/esp-iot-solution/blob/master/components/button/iot_button.c#L293C1-L320C2

/**
  * @brief  Button driver core function, driver state machine.
  */
static void button_handler(button_dev_t *btn)
{
	// 读取 GPIO 引脚的电平
    uint8_t read_gpio_level = btn->hal_button_Level(btn->hardware_data);

    /** ticks counter working.. */
    if ((btn->state) > 0) { // btn->state 初始值为 3
        btn->ticks++;
    }

    /**< button debounce handle */
    // 记录引脚电平发生变化的 持续 次数,默认为 2,对应连续 10ms 处于按下的电平
    if (read_gpio_level != btn->button_level) {
        if (++(btn->debounce_cnt) >= DEBOUNCE_TICKS) {
            btn->button_level = read_gpio_level;
            btn->debounce_cnt = 0;
        }
    } else {
	    // 如果引脚电平没有发生变化,或者正好位于抖动的高电平,则去抖计数归零,
	    // 总的效果是:
	    // 1. 引脚电平发生变化,连续两次检测都是低电平,则使用该引脚电平;
	    // 2. 第一次引脚电平发生变化,但是第二次检测到没有变化(如正好处于抖动峰值),这时抖动计数归零,从头开始计数。
	   // 3. 按键抖动结束后,持续稳定的低电平持续时间一般是 180ms 左右,所以只要按下肯定有机会被识别。
        btn->debounce_cnt = 0;
    }

    /** State machine */
    switch (btn->state) {
    case 0:
	    // 按键按下
        if (btn->button_level == btn->active_level) {
            btn->event = (uint8_t)BUTTON_PRESS_DOWN;
            CALL_EVENT_CB(BUTTON_PRESS_DOWN);
            btn->ticks = 0;
            btn->repeat = 1;
            btn->state = 1;
        } else {
            btn->event = (uint8_t)BUTTON_NONE_PRESS;
        }
        break;

    case 1:
	    // 按键松开
        if (btn->button_level != btn->active_level) {
            btn->event = (uint8_t)BUTTON_PRESS_UP;
            CALL_EVENT_CB(BUTTON_PRESS_UP);
            btn->ticks = 0;
            btn->state = 2;
        } else if (btn->ticks > btn->long_press_ticks) {
		// 按键按下,且 ticks 大于 long_press_ticks,表示长按。
            btn->event = (uint8_t)BUTTON_LONG_PRESS_START;
            btn->state = 4;
            /** Calling callbacks for BUTTON_LONG_PRESS_START */
            uint16_t ticks_time = iot_button_get_ticks_time(btn);
            if (btn->cb_info[btn->event] && btn->count[0] == 0) {
                if (abs(ticks_time - (btn->long_press_ticks * TICKS_INTERVAL)) <= TOLERANCE && btn->cb_info[btn->event][btn->count[0]].event_data.long_press.press_time == (btn->long_press_ticks * TICKS_INTERVAL)) {
                    do {
                        btn->cb_info[btn->event][btn->count[0]].cb(btn, btn->cb_info[btn->event][btn->count[0]].usr_data);
                        btn->count[0]++;
                        if (btn->count[0] >= btn->size[btn->event]) {
                            break;
                        }
                    } while (btn->cb_info[btn->event][btn->count[0]].event_data.long_press.press_time == btn->long_press_ticks * TICKS_INTERVAL);
                }
            }
        }
        break;

    case 2:
	    // 按键被按下,状态 state 切换到 3,ticks 清零
        if (btn->button_level == btn->active_level) {
            btn->event = (uint8_t)BUTTON_PRESS_DOWN;
            CALL_EVENT_CB(BUTTON_PRESS_DOWN);
            btn->event = (uint8_t)BUTTON_PRESS_REPEAT;
            btn->repeat++;
            CALL_EVENT_CB(BUTTON_PRESS_REPEAT); // repeat hit
            btn->ticks = 0;
            btn->state = 3;
        } else if (btn->ticks > btn->short_press_ticks) {
		// 按键松开且 ticks 大于 press_ticks, 则状态 state 切换到 0,
		// 否则 state 一直处于 3
            if (btn->repeat == 1) {
                btn->event = (uint8_t)BUTTON_SINGLE_CLICK;
                CALL_EVENT_CB(BUTTON_SINGLE_CLICK);
            } else if (btn->repeat == 2) {
                btn->event = (uint8_t)BUTTON_DOUBLE_CLICK;
                CALL_EVENT_CB(BUTTON_DOUBLE_CLICK); // repeat hit
            }

            btn->event = (uint8_t)BUTTON_MULTIPLE_CLICK;

            /** Calling the callbacks for MULTIPLE BUTTON CLICKS */
            for (int i = 0; i < btn->size[btn->event]; i++) {
                if (btn->repeat == btn->cb_info[btn->event][i].event_data.multiple_clicks.clicks) {
                    do {
                        btn->cb_info[btn->event][i].cb(btn, btn->cb_info[btn->event][i].usr_data);
                        i++;
                        if (i >= btn->size[btn->event]) {
                            break;
                        }
                    } while (btn->cb_info[btn->event][i].event_data.multiple_clicks.clicks == btn->repeat);
                }
            }

            btn->event = (uint8_t)BUTTON_PRESS_REPEAT_DONE;
            CALL_EVENT_CB(BUTTON_PRESS_REPEAT_DONE); // repeat hit
            btn->repeat = 0;
            btn->state = 0;
        }

        break;

    case 3:
	    // btn->button_level 是从引脚读取的电平值,和有效电平不一致时,表示按键处于 release 状态
	    // 故调用 BUTTON_PRESS_UP 回调。
        if (btn->button_level != btn->active_level) {
            btn->event = (uint8_t)BUTTON_PRESS_UP;
            CALL_EVENT_CB(BUTTON_PRESS_UP);
            // SHORT_TICKS 的值是 CONFIG_BUTTON_SHORT_PRESS_TIME_MS /TICKS_INTERVAL,180/5 = 36
            if (btn->ticks < SHORT_TICKS) {
                btn->ticks = 0;
                btn->state = 2; //repeat press
            } else {
                btn->state = 0;
            }
        }
        break;

    case 4:
	    // 一直按下
        if (btn->button_level == btn->active_level) {
            //continue hold trigger
            if (btn->ticks >= (btn->long_press_hold_cnt + 1) * SERIAL_TICKS + btn->long_press_ticks) {
                btn->event = (uint8_t)BUTTON_LONG_PRESS_HOLD;
                btn->long_press_hold_cnt++;
                CALL_EVENT_CB(BUTTON_LONG_PRESS_HOLD);

                /** Calling callbacks for BUTTON_LONG_PRESS_START based on press_time */
                uint16_t ticks_time = iot_button_get_ticks_time(btn);
                if (btn->cb_info[BUTTON_LONG_PRESS_START]) {
                    button_cb_info_t *cb_info = btn->cb_info[BUTTON_LONG_PRESS_START];
                    uint16_t time = cb_info[btn->count[0]].event_data.long_press.press_time;
                    if (btn->long_press_ticks * TICKS_INTERVAL > time) {
                        for (int i = btn->count[0] + 1; i < btn->size[BUTTON_LONG_PRESS_START]; i++) {
                            time = cb_info[i].event_data.long_press.press_time;
                            if (btn->long_press_ticks * TICKS_INTERVAL <= time) {
                                btn->count[0] = i;
                                break;
                            }
                        }
                    }
                    if (btn->count[0] < btn->size[BUTTON_LONG_PRESS_START] && abs(ticks_time - time) <= TOLERANCE) {
                        do {
                            cb_info[btn->count[0]].cb(btn, cb_info[btn->count[0]].usr_data);
                            btn->count[0]++;
                            if (btn->count[0] >= btn->size[BUTTON_LONG_PRESS_START]) {
                                break;
                            }
                        } while (time == cb_info[btn->count[0]].event_data.long_press.press_time);
                    }
                }

                /** Updating counter for BUTTON_LONG_PRESS_UP press_time */
                if (btn->cb_info[BUTTON_LONG_PRESS_UP]) {
                    button_cb_info_t *cb_info = btn->cb_info[BUTTON_LONG_PRESS_UP];
                    uint16_t time = cb_info[btn->count[1] + 1].event_data.long_press.press_time;
                    if (btn->long_press_ticks * TICKS_INTERVAL > time) {
                        for (int i = btn->count[1] + 1; i < btn->size[BUTTON_LONG_PRESS_UP]; i++) {
                            time = cb_info[i].event_data.long_press.press_time;
                            if (btn->long_press_ticks * TICKS_INTERVAL <= time) {
                                btn->count[1] = i;
                                break;
                            }
                        }
                    }
                    if (btn->count[1] + 1 < btn->size[BUTTON_LONG_PRESS_UP] && abs(ticks_time - time) <= TOLERANCE) {
                        do {
                            btn->count[1]++;
                            if (btn->count[1] + 1 >= btn->size[BUTTON_LONG_PRESS_UP]) {
                                break;
                            }
                        } while (time == cb_info[btn->count[1] + 1].event_data.long_press.press_time);
                    }
                }
            }
        } else { //releasd

            btn->event = BUTTON_LONG_PRESS_UP;

            /** calling callbacks for BUTTON_LONG_PRESS_UP press_time */
            if (btn->cb_info[btn->event] && btn->count[1] >= 0) {
                button_cb_info_t *cb_info = btn->cb_info[btn->event];
                do {
                    cb_info[btn->count[1]].cb(btn, cb_info[btn->count[1]].usr_data);
                    if (!btn->count[1]) {
                        break;
                    }
                    btn->count[1]--;
                } while (cb_info[btn->count[1]].event_data.long_press.press_time == cb_info[btn->count[1] + 1].event_data.long_press.press_time);

                /** Reset the counter */
                btn->count[1] = -1;
            }
            /** Reset counter */
            if (btn->cb_info[BUTTON_LONG_PRESS_START]) {
                btn->count[0] = 0;
            }

            btn->event = (uint8_t)BUTTON_PRESS_UP;
            CALL_EVENT_CB(BUTTON_PRESS_UP);
            btn->state = 0; //reset
            btn->long_press_hold_cnt = 0;
        }
        break;
    }
}
14 LCD 中英文字体制作 esp32rust #
一个 LCD 小游戏: https://github.com/georgik/esp32-spooky-maze-game/blob/main/esp32-s3-usb-otg/src/main.rs
- 使用的是 mipidsi::Builder::st7789,需要修改为 st7735s,支持按键。
- xtensa-esp32s3-none-elf non_std 应用。
另外一个 LCD 项目样例: https://github.com/georgik/esp32-rust-multi-target-template/blob/main/esp32-s3-usb-otg/src/main.rs
ESP Display Interface with SPI and DMA: https://github.com/georgik/esp-display-interface-spi-dma/blob/main/README.md
其他字体: https://github.com/olikraus/u8g2
embedded-graphics 支持 BDF 和 MonoFont 字体:
- 优先选择 BDF 字体, 特别是是中英文混合显示场景, MonoFont 由于中英文等宽, 会导致英文字体显示间距过大.
- 优先选择 embedded-graphics/bdf 方案.
The draw method for text drawables returns the position of the next character. This can be used to
combine text with different character styles on a single line of text.
// https://docs.rs/embedded-graphics/latest/embedded_graphics/text/index.html#examples
// Create a small and a large character style.
let small_style = MonoTextStyle::new(&FONT_6X10, Rgb565::WHITE);
let large_style = MonoTextStyle::new(&FONT_10X20, Rgb565::WHITE);

// Draw the first text at (20, 30) using the small character style.
let next = Text::new("small ", Point::new(20, 30), small_style).draw(&mut display)?;

// Draw the second text after the first text using the large character style.
let next = Text::new("large", next, large_style).draw(&mut display)?;
14.1 embedded-graphics/bdf #
https://github.com/embedded-graphics/bdf/tree/master
该库可以从 bdf 字体文件中生成 embedded-graphics 能使用的:
- BDF Font:需要配合使用 embedded-graphics/bdf/eg-bdf 库中提供的 BdfFont/BdfGlyph/BdfTextStyle 类型;
- MonoFont:embedded-graphics 可以直接导入使用;
先使用 otf2bdf 工具将 TTF(truetype font) 字体转换为 BDF(Bitmap Distribution Format) 类型:
- 对于 X11 使用的 pcf 字体格式,使用 pcf2bdf 工具将它转换为 bdf 格式;
- 转换时 -p 参数指定生成的 BDF 字体大小;
brew install otf2bdf
otf2bdf  -p 12 -r 75 -o LXGWWenKai_Regular.bdf  ~/Library/Fonts/LXGWWenKai-Regular.ttf
然后使用 eg-font-converter lib 来生成 BDF 或 MonoFont 字体:
- 两者都至少包含 2 个文件: bitmap data 文件(.data) 和需要 include!() 到引用的 rs 文件;
- MonoFont 的 bitmap 文件是从 png 图片生成的, 故 MonoFont 还会生成 png 文件;
生成 BDF 字体示例:
// /Users/zhangjun/codes/rust/bdf/eg-font-converter/src/bin/my-bdf-font.rs
zj@a:~/codes/rust/bdf/eg-font-converter$ mkdir output
zj@a:~/codes/rust/bdf/eg-font-converter$ ls
Cargo.lock  Cargo.toml  output/  src/  tests/
zj@a:~/codes/rust/bdf/eg-font-converter$ cat src/bin/my-bdf-font.rs
use eg_font_converter::{FontConverter};

// 中文 unicode 字体范围: https://en.wikipedia.org/wiki/CJK_Unified_Ideographs_(Unicode_block)
// 使用 .glyphs() 来指定要生成的字符范围
fn main() {
    let font = FontConverter::new("/Users/zhangjun/docs/LXGWWenKai_Regular.bdf", "BDF_LXGWWenKai_Regular_FONT")
        //.glyphs('a'..='z')
        .glyphs('\u{0000}'..='\u{007F}') // ASCII
        .glyphs('\u{4E00}'..='\u{9FFF}') // 常用中文字体范围
        .glyphs('\u{2E80}'..='\u{2EF3}') // 常见繁体字范围
        .missing_glyph_substitute('?') // 替代字符
        .convert_eg_bdf()
        .unwrap();
    font.save("output/").unwrap();  // 结果写入 output 目录下, 存入 new(bdf_file, name) 的 小写 name.rs 文件中.
}

// 运行该程序
zj@a:~/codes/rust/bdf/eg-font-converter$ cargo run --bin my-bdf-font
    Finished `dev` profile [unoptimized + debuginfo] target(s) in 0.32s
     Running `/Users/zhangjun/codes/rust/bdf/target/debug/my-bdf-font`

zj@a:~/codes/rust/bdf/eg-font-converter$ ls output/
bdf_lxgwwenkai_regular_font.data  bdf_lxgwwenkai_regular_font.rs
zj@a:~/codes/rust/bdf/eg-font-converter$ ls -l output/
total 4.7M
-rw-r--r-- 1 zhangjun 310K  2 17 15:34 bdf_lxgwwenkai_regular_font.data
-rw-r--r-- 1 zhangjun 4.4M  2 17 15:34 bdf_lxgwwenkai_regular_font.rs
zj@a:~/codes/rust/bdf/eg-font-converter$ head -20 output/bdf_lxgwwenkai_regular_font.rs
const BDF_LXGWWenKai_Regular_FONT: ::eg_bdf::BdfFont = {
    const fn rect(
        x: i32,
        y: i32,
        width: u32,
        height: u32,
    ) -> ::embedded_graphics::primitives::Rectangle {
        ::embedded_graphics::primitives::Rectangle::new(
            ::embedded_graphics::geometry::Point::new(x, y),
            ::embedded_graphics::geometry::Size::new(width, height),
        )
    }
    ::eg_bdf::BdfFont {
        data: include_bytes!("bdf_lxgwwenkai_regular_font.data"),
        replacement_character: 63usize,
        ascent: 12u32,
        descent: 3u32,
        glyphs: &[
            BdfGlyph {
                character: '\0',
zj@a:~/codes/rust/bdf/eg-font-converter$
使用:
zj@a:~/codes/rust/bdf/eg-font-converter$ cp output/bdf_lxgwwenkai_regular_font.* ~/codes/esp32/st7735-lcd-examples/esp32c3-examples/src/

# 添加本地依赖
gzj@a:~/codes/esp32/st7735-lcd-examples/esp32c3-examples$ grep eg Cargo.toml
eg-bdf = { path = "../../../rust/bdf/eg-bdf/" } // clone https://github.com/embedded-graphics/bdf 的本地目录
代码举例:
use eg_bdf::{BdfGlyph, BdfTextStyle};

include!("./bdf_lxgwwenkai_regular_font.rs");

fn main() {
    let text = "Happy\u{AD}Loong\u{AD}Year!\
      Happy Hacking!\
      Happy Loong Year!\u{A0}新年快乐!\u{A0}-from Rust ESP32";
    let bdf_style = BdfTextStyle::new(&BDF_LXGWWenKai_Regular_FONT, Rgb565::WHITE);
    let textbox_style = TextBoxStyleBuilder::new()
      .line_height(LineHeight::Pixels(12)) // 字体高度与生成 otf2bdf  -p 12 一致
      .alignment(HorizontalAlignment::Justified)
      .paragraph_spacing(0)
      .build();
    let mut bounds = Rectangle::new(Point::new(0, 0), Size::new(128, 160));
    let mut text_box = TextBox::with_textbox_style(text, bounds, bdf_style, textbox_style);
    let next = text_box.draw(&mut display).unwrap();
}
15 LCD #
参考文档:
https://www.makerfabs.com/esp32-3-5-inch-tft-touch-capacitive-with-camera.html
LCD 和 Touch 一般集成在一块屏幕上(部分 Touch 还支持固定的触摸按钮),所以 esp-idf 提供了 lcd_panel 对象来综合管理 LCD 和 Touch。
常用 LCD 接口:
- SPI:1 bit 数据线,LCD 需要支持 GRAM;
- QSPI(Quad-SPI):4 bit 数据线,LCD 或 MCU 需要支持 GRAM;
- I80 或称 I8080(DBI): 8/16 bit 数据线,基于 I80 总线协议,
LCD 需要支持 GRAM; - RGB(DPI):8/16/18/24 bit 数据线,LCD 不需要支持 GRAM,
一般和 3线 SPI 共用。- Camera 一般也使用 RGB 接口,包含 HSYNC/VSYNC 信号,所以在 esp-idf 库中 module 为 lcd_camera.
- MIPI-DSI:1/2/3/4 bit 串行接口,使用高速差分信号和 D-PHY 收发器(类似于 USB),目前只有 ESP32-P4 支持。属于传输速率最快的接口
https://docs.espressif.com/projects/esp-iot-solution/en/latest/display/lcd/lcd_guide.html
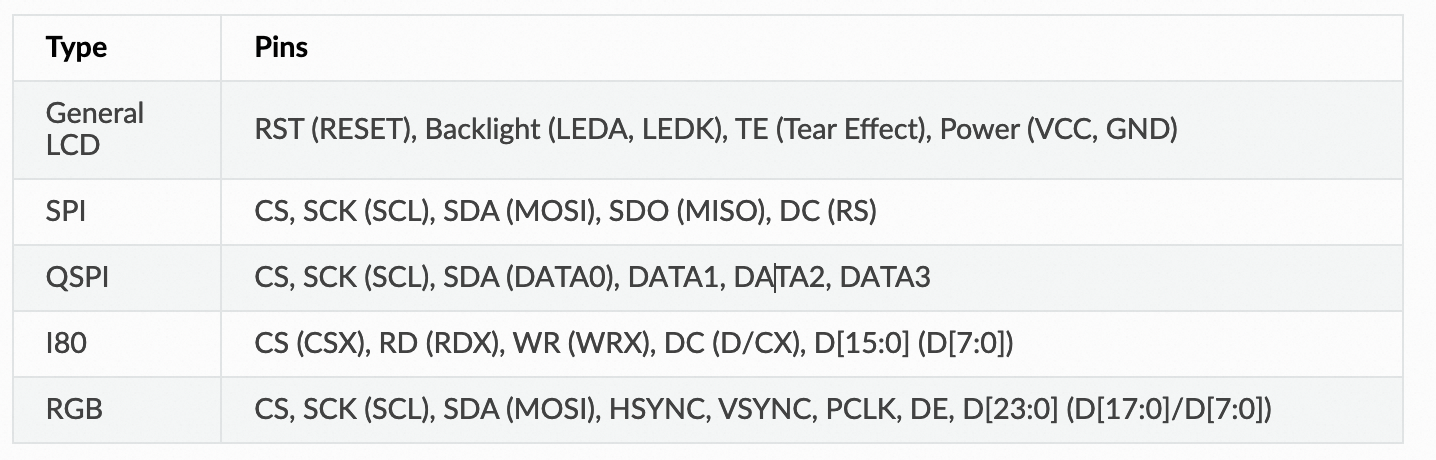
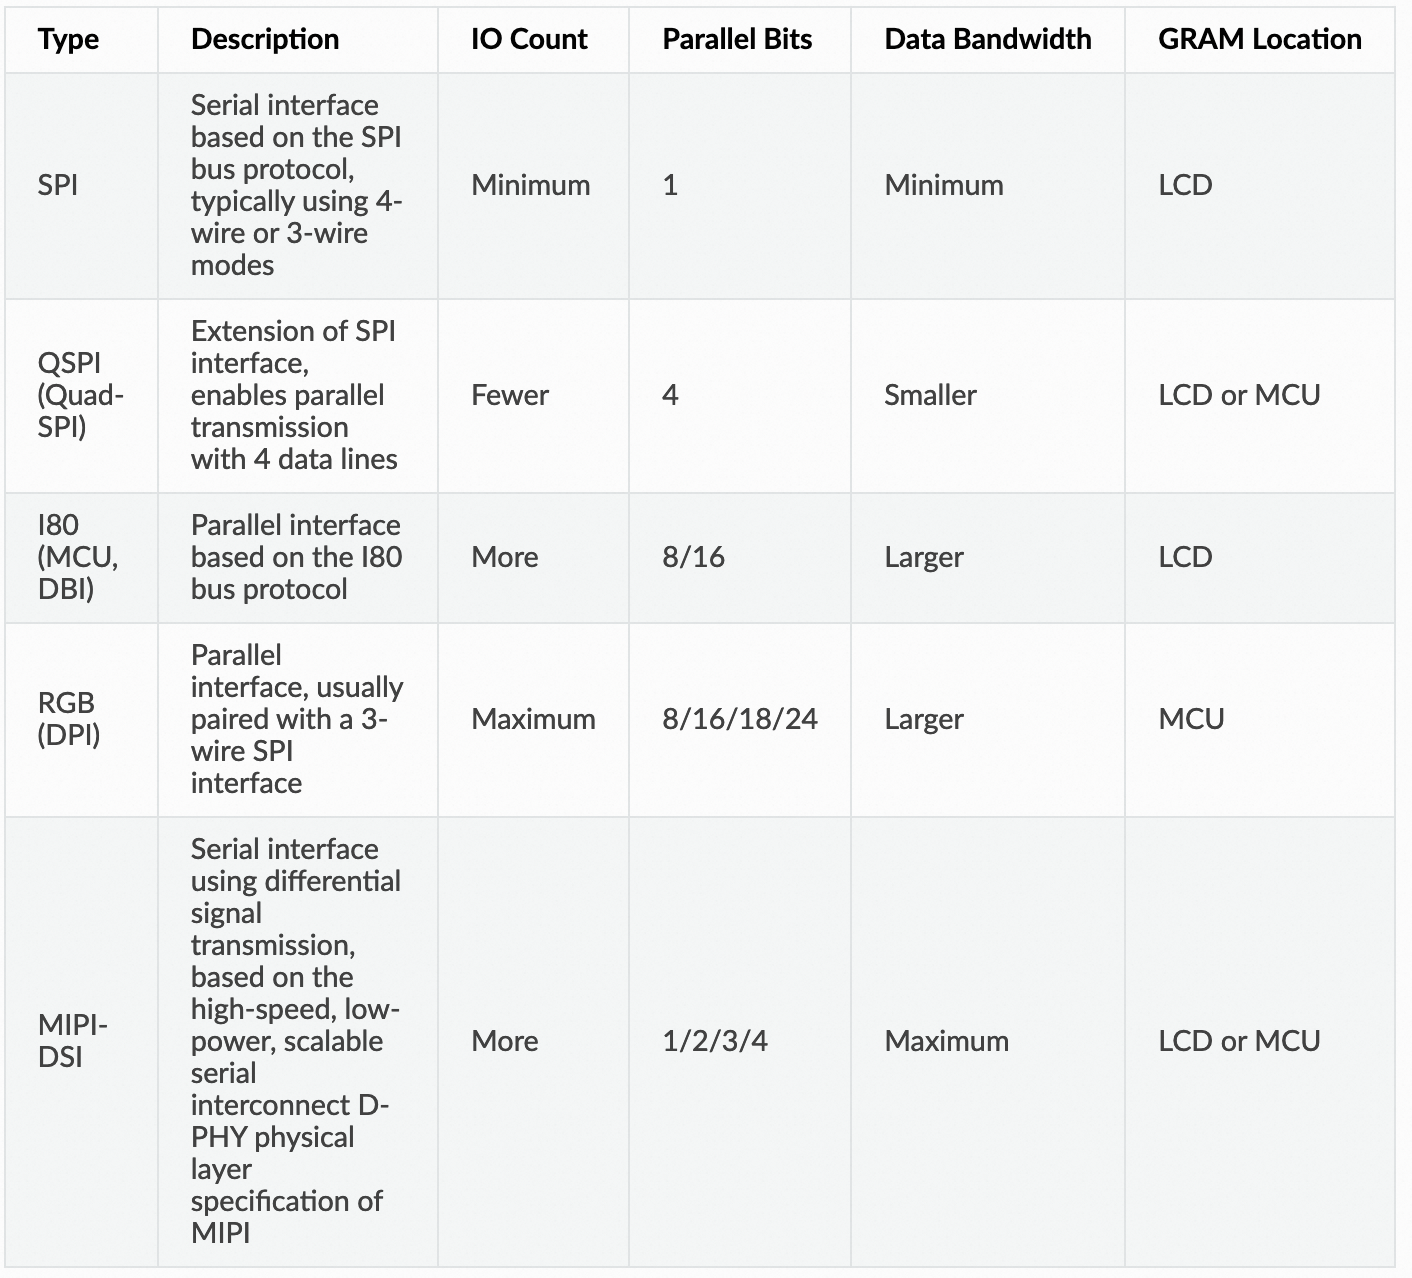
esp-idf/examples/peripherals/lcd/ 目录包含这些接口的 LCD 驱动:
- i2c_oled:一般是小型的 OLED LCD 屏幕使用 I2C;
- i80_controller:Intel 8080 interfaced
- mipi_dsi:最高效的串行接口;
- rgb_panel
- spi_lcd_touch
- tjpgd :JPEG 软解压库;
esp-iot-solution/examples/display/lcd/ 目录也包含一些 LCD 例子:
- lcd_with_te
- qspi_with_ram
- qspi_without_ram
- rgb_avoid_tearing
- rgb_lcd_8bit
15.1 LCD 显示的 RGB888, RGB565 等格式的 raw picture #
像素格式主要分为 YUV 和 RGB 两种大类:
- YUV422: 也称为 YCbCr:Y 亮度,U/Cb:蓝色浓度,V/Cr:红色浓度;
- 为了节省带宽 YUV frame 一般使用采样,如 YUV422 表示 2:1的水平取样,垂直完全采样;
- RGB888:也称 24-bit RGB,各使用 8bit 来表示 red/green/blue;
- RGB666: 也称 18-bit RGB
- RGB565:也称 16-bit RGB,5 bits for the red channel, 6 bits for the green channel, and 5 bits for the blue channel. 相比 RGB888,更节省资源;
YUV 和 RGB 之间可以相互转换。
LCD 一般使用 RGB 像素格式,而且是比较节省空间的 16-bit 的 RGB565 像素格式:
- camera 可以直接产生 RGB565 数据,可以直接在 LCD 显示;
- bmp/png/jpeg 等图片格式,需要将像素转换为 RGB565 后才能供 LCD 显示;
需要将 JPEG 解码或 bmp 中的像素数据转换为 RGB888, RGB565 等格式的 raw picture 后,LCD 才能直接显示。
或者使用 LVGL 提供的在线转换工具: https://lvgl.io/tools/imageconverter
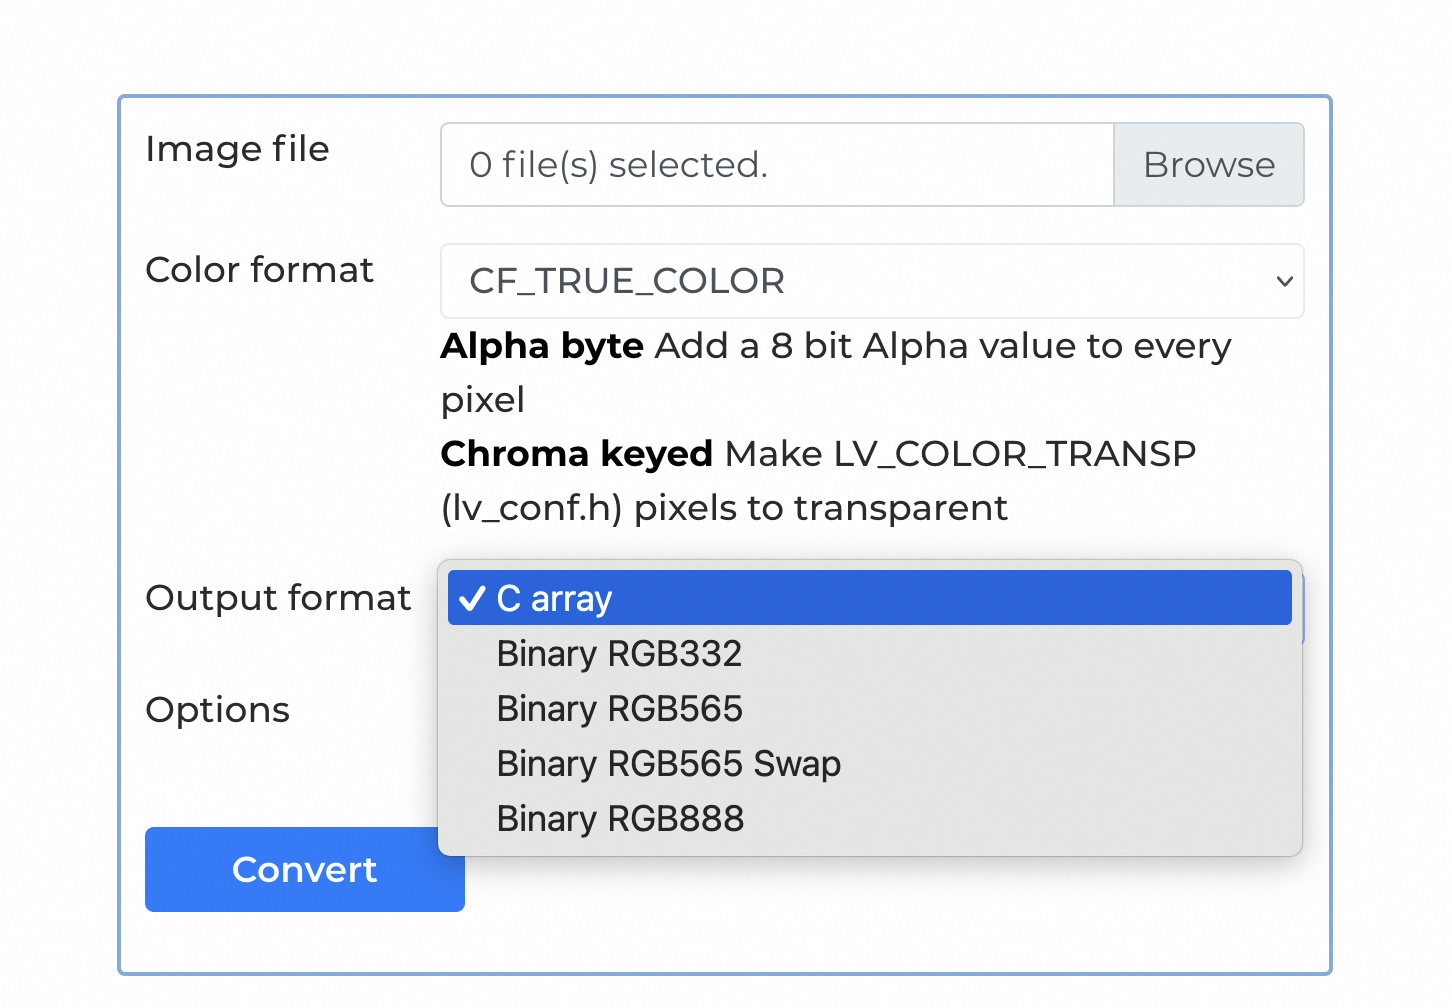
可以使用 OpenCV 库来显示 raw data picutre:
# https://github.com/espressif/esp-idf/blob/master/examples/peripherals/jpeg/jpeg_decode/open_raw_picture.py

# SPDX-FileCopyrightText: 2024 Espressif Systems (Shanghai) CO LTD
# SPDX-License-Identifier: Unlicense OR CC0-1.0
import argparse

import cv2 as cv
import numpy as np
from numpy.typing import NDArray


def open_picture(path):  # type: (str) -> list[int]
    with open(path, 'rb') as f:
        data = f.read()
        f.close()
    new_data = [int(x) for x in data]
    return new_data


def picture_show_rgb888(data, h, w):  # type: (list[int], int, int) -> None
    data = np.array(data).reshape(h, w, 3).astype(np.uint8)
    cv.imshow('data', data)
    cv.waitKey()


def picture_show_rgb565(data, h, w):  # type: (list[int], int, int) -> None

    new_data = [0] * ((len(data) // 2) * 3)
    for i in range(len(data)):
        if i % 2 != 0:
            new_data[3 * (i - 1) // 2 + 2] = (data[i] & 0xf8)
            new_data[3 * (i - 1) // 2 + 1] |= (data[i] & 0x7) << 5
        else:
            new_data[3 * i // 2] = (data[i] & 0x1f) << 3
            new_data[3 * i // 2 + 1] |= (data[i] & 0xe0) >> 3

    new_data = np.array(new_data).reshape(h, w, 3).astype(np.uint8)
    cv.imshow('data', new_data)
    cv.waitKey()


def picture_show_gray(data, h, w):  # type: (list[int], int, int) -> None
    new_data = np.array(data).reshape(h, w, 1).astype(np.uint8)
    cv.imshow('data', new_data)
    cv.waitKey()


def convert_YUV_to_RGB(Y, U, V):  # type: (NDArray, NDArray, NDArray) -> tuple[NDArray, NDArray, NDArray]
    B = np.clip(Y + 1.7790 * (U - 128), 0, 255).astype(np.uint8)
    G = np.clip(Y - 0.3455 * (U - 128) - 0.7169 * (V - 128), 0, 255).astype(np.uint8)
    R = np.clip(Y + 1.4075 * (V - 128), 0, 255).astype(np.uint8)

    return B, G, R


def picture_show_yuv420(data, h, w):  # type: (list[int], int, int) -> None
    new_u = [0] * (h * w)
    new_v = [0] * (h * w)
    new_y = [0] * (h * w)

    for i in range(int(h * w * 1.5)):
        is_even_row = ((i // (w * 1.5)) % 2 == 0)
        if is_even_row:
            if (i % 3 == 0):
                new_u[(i // 3) * 2] = data[i]
                new_u[(i // 3) * 2 + 1] = data[i]
        else:
            if (i % 3 == 0):
                new_u[(i // 3) * 2] = new_u[int((i - (w * 1.5)) // 3) * 2]
                new_u[(i // 3) * 2 + 1] = new_u[int((i - (w * 1.5)) // 3) * 2 + 1]

    for i in range(int(h * w * 1.5)):
        if (i // (w * 1.5)) % 2 != 0 and (i % 3 == 0):
            idx = (i // 3) * 2
            new_v[idx] = data[i]
            new_v[idx + 1] = data[i]

    for i in range(int(h * w * 1.5)):
        if (i // (w * 1.5)) % 2 == 0 and (i % 3 == 0):
            idx = (i // 3) * 2
            new_v[idx] = new_v[int((i + (w * 1.5)) // 3) * 2]
            new_v[idx + 1] = new_v[int((i + (w * 1.5)) // 3) * 2 + 1]

    new_y = [data[i] for i in range(int(h * w * 1.5)) if i % 3 != 0]

    Y = np.array(new_y)
    U = np.array(new_u)
    V = np.array(new_v)

    B, G, R = convert_YUV_to_RGB(Y, U, V)
    # Merge channels
    new_data = np.stack((B, G, R), axis=-1)
    new_data = np.array(new_data).reshape(h, w, 3).astype(np.uint8)

    # Display the image
    cv.imshow('data', new_data)
    cv.waitKey()


def picture_show_yuv422(data, h, w):  # type: (list[int], int, int) -> None
    # Reshape the input data to a 2D array
    data_array = np.array(data).reshape(h, w * 2)

    # Separate Y, U, and V channels
    Y = data_array[:, 1::2]
    U = data_array[:, 0::4].repeat(2, axis=1)
    V = data_array[:, 2::4].repeat(2, axis=1)

    # Convert YUV to RGB
    B, G, R = convert_YUV_to_RGB(Y, U, V)

    # Merge channels
    new_data = np.stack((B, G, R), axis=-1)

    # Display the image
    cv.imshow('data', new_data)
    cv.waitKey()


def picture_show_yuv444(data, h, w):  # type: (list[int], int, int) -> None
    # Reshape the input data to a 2D array
    data_array = np.array(data).reshape(h, w * 3)

    # Separate Y, U, and V channels
    Y = data_array[:, 2::3]
    U = data_array[:, 1::3]
    V = data_array[:, 0::3]

    # Convert YUV to RGB
    B, G, R = convert_YUV_to_RGB(Y, U, V)

    # Merge channels
    new_data = np.stack((B, G, R), axis=-1)

    # Display the image
    cv.imshow('data', new_data)
    cv.waitKey()


def main():  # type: () -> None
    parser = argparse.ArgumentParser(description='which mode need to show')

    parser.add_argument(
        '--pic_path',
        type=str,
        help='What is the path of your picture',
        required=True)

    parser.add_argument(
        '--pic_type',
        type=str,
        help='What type you want to show',
        required=True,
        choices=['rgb565', 'rgb888', 'gray', 'yuv422', 'yuv420', 'yuv444'])

    parser.add_argument(
        '--height',
        type=int,
        help='the picture height',
        default=480)

    parser.add_argument(
        '--width',
        type=int,
        help='the picture width',
        default=640)

    args = parser.parse_args()

    height = args.height
    width = args.width

    data = open_picture(args.pic_path)
    if (args.pic_type == 'rgb565'):
        picture_show_rgb565(data, height, width)
    elif (args.pic_type == 'rgb888'):
        picture_show_rgb888(data, height, width)
    elif (args.pic_type == 'gray'):
        picture_show_gray(data, height, width)
    elif (args.pic_type == 'yuv420'):
        picture_show_yuv420(data, height, width)
    elif (args.pic_type == 'yuv422'):
        picture_show_yuv422(data, height, width)
    elif (args.pic_type == 'yuv444'):
        picture_show_yuv444(data, height, width)
    else:
        print('This type is not supported in this script!')


if __name__ == '__main__':
    main()
15.2 显示 png 图片 #
使用如下 python 代码将 png 图片转换为 raw RGB 565 format:
#!/usr/bin/python

import sys
from PIL import Image

if len(sys.argv) == 3:
    # print "\nReading: " + sys.argv[1]
    out = open(sys.argv[2], "wb")
elif len(sys.argv) == 2:
    out = sys.stdout
else:
    print "Usage: png2fb.py infile [outfile]"
    sys.exit(1)

im = Image.open(sys.argv[1])

if im.mode == "RGB":
    pixelSize = 3
elif im.mode == "RGBA":
    pixelSize = 4
else:
    sys.exit('not supported pixel mode: "%s"' % (im.mode))

pixels = im.tostring()
pixels2 = ""
for i in range(0, len(pixels) - 1, pixelSize):
    pixels2 += chr(ord(pixels[i + 2]) >> 3 | (ord(pixels[i + 1]) << 3 & 0xe0))
    pixels2 += chr(ord(pixels[i]) & 0xf8 | (ord(pixels[i + 1]) >> 5 & 0x07))
out.write(pixels2)
out.close()
15.3 显示 bmp 图片 #
bmp 图片是未经压缩的像素 bit 文件,包含 header + 像素数据,不需要解压缩和转码,可以直接读取,转换为 RGB 565 格式:
// https://github.com/Makerfabs/Project_Touch-Screen-Camera/blob/master/example/SD2TFT/SD2TFT.ino#L205

int print_img(fs::FS &fs, String filename)
{
    SPI_ON_SD;
    File f = fs.open(filename);
    if (!f)
    {
        Serial.println("Failed to open file for reading");
        return 0;
    }

    f.seek(54);
    int X = 480;
    int Y = 320;
    uint8_t RGB[3 * X];
    for (int row = 0; row < Y; row++)
    {
        f.seek(54 + 3 * X * row);
        f.read(RGB, 3 * X);
        SPI_OFF_SD;
        SPI_ON_TFT;
        for (int col = 0; col < X; col++)
        {
            tft.drawPixel(col, row, tft.color565(RGB[col * 3 + 2], RGB[col * 3 + 1], RGB[col * 3]));
        }
        SPI_OFF_TFT;
        SPI_ON_SD;
    }

    f.close();
    SPI_OFF_SD;
    return 0;
}
15.4 显示 jpeg 图片 #
JPEG 是压缩图片格式,在 LCD 显示前需要先对其进行解压缩和解码,转换为 LCD 上显示的 RGB 像素数据(raw picture),如 JPEG_RAW_TYPE_RGB565_BE:
// https://github.com/espressif/esp-box/blob/master/examples/usb_camera_lcd_display/main/main.c#L56

// 将 JPEG 解码为 JPEG_RAW_TYPE_RGB565_BE 输出格式
static jpeg_error_t esp_jpeg_decoder_one_picture(uint8_t *input_buf, int len, uint8_t *output_buf)
{
    esp_err_t ret = ESP_OK;
    // Generate default configuration
    jpeg_dec_config_t config = DEFAULT_JPEG_DEC_CONFIG();
    config.output_type = JPEG_RAW_TYPE_RGB565_BE;
    // Empty handle to jpeg_decoder
    jpeg_dec_handle_t jpeg_dec = NULL;

    // Create jpeg_dec
    jpeg_dec = jpeg_dec_open(&config);

    // Create io_callback handle
    jpeg_dec_io_t *jpeg_io = calloc(1, sizeof(jpeg_dec_io_t));
    if (jpeg_io == NULL)
    {
        return ESP_FAIL;
    }

    // Create out_info handle
    jpeg_dec_header_info_t *out_info = calloc(1, sizeof(jpeg_dec_header_info_t));
    if (out_info == NULL)
    {
        return ESP_FAIL;
    }
    // Set input buffer and buffer len to io_callback
    jpeg_io->inbuf = input_buf;
    jpeg_io->inbuf_len = len;

    // Parse jpeg picture header and get picture for user and decoder
    ret = jpeg_dec_parse_header(jpeg_dec, jpeg_io, out_info);
    if (ret < 0)
    {
        goto _exit;
    }

    jpeg_io->outbuf = output_buf;
    int inbuf_consumed = jpeg_io->inbuf_len - jpeg_io->inbuf_remain;
    jpeg_io->inbuf = input_buf + inbuf_consumed;
    jpeg_io->inbuf_len = jpeg_io->inbuf_remain;

    // Start decode jpeg raw data
    ret = jpeg_dec_process(jpeg_dec, jpeg_io);
    if (ret < 0)
    {
        goto _exit;
    }

_exit:
    // Decoder deinitialize
    jpeg_dec_close(jpeg_dec);
    free(out_info);
    free(jpeg_io);
    return ret;
}


static void _camera_display(uint8_t *lcd_buffer)
{
    bsp_display_lock(0);
    // 使用 LVGL 显示解码后的 JPEG 数据
    lv_canvas_set_buffer(camera_canvas, lcd_buffer, current_width, current_height, LV_IMG_CF_TRUE_COLOR);
    lv_label_set_text_fmt(label, "#FF0000 %d*%d#", current_width, current_height);
    bsp_display_unlock();
}


static void camera_frame_cb(uvc_frame_t *frame, void *ptr)
{
    ESP_LOGI(TAG, "uvc callback! frame_format = %d, seq = %" PRIu32 ", width = %" PRIu32 ", height = %" PRIu32 ", length = %u, ptr = %d",
             frame->frame_format, frame->sequence, frame->width, frame->height, frame->data_bytes, (int)ptr);
    if (current_width != frame->width || current_height != frame->height)
    {
        current_width = frame->width;
        current_height = frame->height;
        adaptive_jpg_frame_buffer(current_width * current_height * 2);
    }

    esp_jpeg_decoder_one_picture((uint8_t *)frame->data, frame->data_bytes, jpg_frame_buf); // 解码 JPEG
    _camera_display(jpg_frame_buf); // 显示
    vTaskDelay(pdMS_TO_TICKS(1));
}
上面代码使用的 esp_jpeg 软件解码库
JPEG Decoder: TJpgDec -Tiny JPEG Decompressor
- Output Pixel Format: RGB888, RGB565
- Scaling Ratio: 1/1, 1/2, 1/4 or 1/8 Selectable on Decompression
另一个 LCD tjpgd example:This example shows how to decode a jpeg image and display it on an SPI-interfaced LCD, and rotates the image periodically.
// https://github.com/espressif/esp-idf/blob/master/examples/peripherals/lcd/tjpgd/main/decode_image.c

//Decode the embedded image into pixel lines that can be used with the rest of the logic.
esp_err_t decode_image(uint16_t **pixels)
{
    *pixels = NULL;
    esp_err_t ret = ESP_OK;

    //Alocate pixel memory. Each line is an array of IMAGE_W 16-bit pixels; the `*pixels` array itself contains pointers to these lines.
    *pixels = calloc(IMAGE_H * IMAGE_W, sizeof(uint16_t));
    ESP_GOTO_ON_FALSE((*pixels), ESP_ERR_NO_MEM, err, TAG, "Error allocating memory for lines");

    //JPEG decode config
    esp_jpeg_image_cfg_t jpeg_cfg = {
        .indata = (uint8_t *)image_jpg_start,
        .indata_size = image_jpg_end - image_jpg_start,
        .outbuf = (uint8_t*)(*pixels),
        .outbuf_size = IMAGE_W * IMAGE_H * sizeof(uint16_t),
        .out_format = JPEG_IMAGE_FORMAT_RGB565,
        .out_scale = JPEG_IMAGE_SCALE_0,
        .flags = {
            .swap_color_bytes = 1,
        }
    };

    //JPEG decode
    esp_jpeg_image_output_t outimg;
    esp_jpeg_decode(&jpeg_cfg, &outimg);

    ESP_LOGI(TAG, "JPEG image decoded! Size of the decoded image is: %dpx x %dpx", outimg.width, outimg.height);

    return ret;
err:
    //Something went wrong! Exit cleanly, de-allocating everything we allocated.
    if (*pixels != NULL) {
        free(*pixels);
    }
    return ret;
}
对于 JPEG 解码生成的可以 LCD 显示的 RGB888, RGB565 等格式的 raw picture, 可以使用 OpenCV 库来显示:
# https://github.com/espressif/esp-idf/blob/master/examples/peripherals/jpeg/jpeg_decode/open_raw_picture.py

# SPDX-FileCopyrightText: 2024 Espressif Systems (Shanghai) CO LTD
# SPDX-License-Identifier: Unlicense OR CC0-1.0
import argparse

import cv2 as cv
import numpy as np
from numpy.typing import NDArray


def open_picture(path):  # type: (str) -> list[int]
    with open(path, 'rb') as f:
        data = f.read()
        f.close()
    new_data = [int(x) for x in data]
    return new_data


def picture_show_rgb888(data, h, w):  # type: (list[int], int, int) -> None
    data = np.array(data).reshape(h, w, 3).astype(np.uint8)
    cv.imshow('data', data)
    cv.waitKey()


def picture_show_rgb565(data, h, w):  # type: (list[int], int, int) -> None

    new_data = [0] * ((len(data) // 2) * 3)
    for i in range(len(data)):
        if i % 2 != 0:
            new_data[3 * (i - 1) // 2 + 2] = (data[i] & 0xf8)
            new_data[3 * (i - 1) // 2 + 1] |= (data[i] & 0x7) << 5
        else:
            new_data[3 * i // 2] = (data[i] & 0x1f) << 3
            new_data[3 * i // 2 + 1] |= (data[i] & 0xe0) >> 3

    new_data = np.array(new_data).reshape(h, w, 3).astype(np.uint8)
    cv.imshow('data', new_data)
    cv.waitKey()


def picture_show_gray(data, h, w):  # type: (list[int], int, int) -> None
    new_data = np.array(data).reshape(h, w, 1).astype(np.uint8)
    cv.imshow('data', new_data)
    cv.waitKey()


def convert_YUV_to_RGB(Y, U, V):  # type: (NDArray, NDArray, NDArray) -> tuple[NDArray, NDArray, NDArray]
    B = np.clip(Y + 1.7790 * (U - 128), 0, 255).astype(np.uint8)
    G = np.clip(Y - 0.3455 * (U - 128) - 0.7169 * (V - 128), 0, 255).astype(np.uint8)
    R = np.clip(Y + 1.4075 * (V - 128), 0, 255).astype(np.uint8)

    return B, G, R


def picture_show_yuv420(data, h, w):  # type: (list[int], int, int) -> None
    new_u = [0] * (h * w)
    new_v = [0] * (h * w)
    new_y = [0] * (h * w)

    for i in range(int(h * w * 1.5)):
        is_even_row = ((i // (w * 1.5)) % 2 == 0)
        if is_even_row:
            if (i % 3 == 0):
                new_u[(i // 3) * 2] = data[i]
                new_u[(i // 3) * 2 + 1] = data[i]
        else:
            if (i % 3 == 0):
                new_u[(i // 3) * 2] = new_u[int((i - (w * 1.5)) // 3) * 2]
                new_u[(i // 3) * 2 + 1] = new_u[int((i - (w * 1.5)) // 3) * 2 + 1]

    for i in range(int(h * w * 1.5)):
        if (i // (w * 1.5)) % 2 != 0 and (i % 3 == 0):
            idx = (i // 3) * 2
            new_v[idx] = data[i]
            new_v[idx + 1] = data[i]

    for i in range(int(h * w * 1.5)):
        if (i // (w * 1.5)) % 2 == 0 and (i % 3 == 0):
            idx = (i // 3) * 2
            new_v[idx] = new_v[int((i + (w * 1.5)) // 3) * 2]
            new_v[idx + 1] = new_v[int((i + (w * 1.5)) // 3) * 2 + 1]

    new_y = [data[i] for i in range(int(h * w * 1.5)) if i % 3 != 0]

    Y = np.array(new_y)
    U = np.array(new_u)
    V = np.array(new_v)

    B, G, R = convert_YUV_to_RGB(Y, U, V)
    # Merge channels
    new_data = np.stack((B, G, R), axis=-1)
    new_data = np.array(new_data).reshape(h, w, 3).astype(np.uint8)

    # Display the image
    cv.imshow('data', new_data)
    cv.waitKey()


def picture_show_yuv422(data, h, w):  # type: (list[int], int, int) -> None
    # Reshape the input data to a 2D array
    data_array = np.array(data).reshape(h, w * 2)

    # Separate Y, U, and V channels
    Y = data_array[:, 1::2]
    U = data_array[:, 0::4].repeat(2, axis=1)
    V = data_array[:, 2::4].repeat(2, axis=1)

    # Convert YUV to RGB
    B, G, R = convert_YUV_to_RGB(Y, U, V)

    # Merge channels
    new_data = np.stack((B, G, R), axis=-1)

    # Display the image
    cv.imshow('data', new_data)
    cv.waitKey()


def picture_show_yuv444(data, h, w):  # type: (list[int], int, int) -> None
    # Reshape the input data to a 2D array
    data_array = np.array(data).reshape(h, w * 3)

    # Separate Y, U, and V channels
    Y = data_array[:, 2::3]
    U = data_array[:, 1::3]
    V = data_array[:, 0::3]

    # Convert YUV to RGB
    B, G, R = convert_YUV_to_RGB(Y, U, V)

    # Merge channels
    new_data = np.stack((B, G, R), axis=-1)

    # Display the image
    cv.imshow('data', new_data)
    cv.waitKey()


def main():  # type: () -> None
    parser = argparse.ArgumentParser(description='which mode need to show')

    parser.add_argument(
        '--pic_path',
        type=str,
        help='What is the path of your picture',
        required=True)

    parser.add_argument(
        '--pic_type',
        type=str,
        help='What type you want to show',
        required=True,
        choices=['rgb565', 'rgb888', 'gray', 'yuv422', 'yuv420', 'yuv444'])

    parser.add_argument(
        '--height',
        type=int,
        help='the picture height',
        default=480)

    parser.add_argument(
        '--width',
        type=int,
        help='the picture width',
        default=640)

    args = parser.parse_args()

    height = args.height
    width = args.width

    data = open_picture(args.pic_path)
    if (args.pic_type == 'rgb565'):
        picture_show_rgb565(data, height, width)
    elif (args.pic_type == 'rgb888'):
        picture_show_rgb888(data, height, width)
    elif (args.pic_type == 'gray'):
        picture_show_gray(data, height, width)
    elif (args.pic_type == 'yuv420'):
        picture_show_yuv420(data, height, width)
    elif (args.pic_type == 'yuv422'):
        picture_show_yuv422(data, height, width)
    elif (args.pic_type == 'yuv444'):
        picture_show_yuv444(data, height, width)
    else:
        print('This type is not supported in this script!')


if __name__ == '__main__':
    main()
除了软件解码外,esp32p4(目前只有该信号 MCU 支持) 也提供了 JPEG 的硬件编码和解码: https://docs.espressif.com/projects/esp-idf/en/latest/esp32p4/api-reference/peripherals/jpeg.html
- 硬件 jpeg decode (*.jpg -> *.rgb,如 RGB888, RGB565)
- 硬件 jpeg encode (*.rgb -> *.jpg)
对应的 ESP32 JPEG 硬件 codec engine driver: https://github.com/espressif/esp-idf/tree/master/components/esp_driver_jpeg
其他 jpeg encode:
- https://github.com/bitbank2/JPEGENC
- https://github.com/tobozo/ESP32-Raytracer/tree/master
-
https://github.com/espressif/esp-adf-libs/blob/master/esp_codec/include/codec/esp_jpeg_enc.h
- 没有提供 C 源代码,只提供了头文件和 lib 库;
15.5 显示 gif 图片 #
使用 Rust tinygif 库和系统定时器来显示 GIF 图片:
// https://github.com/MabezDev/mkey/blob/main/firmware/src/main.rs
let image =
        tinygif::Gif::<Rgb565>::from_slice(include_bytes!("../Ferris-240x240.gif")).unwrap();
    let mut start = SystemTimer::now();
    let mut frames = 0;
    loop {
        for frame in image.frames() {
            let frame = Image::with_center(
                &frame,
                Point::new(WIDTH as i32 / 2, (HEIGHT as i32 / 2) - 40),
            );
            frame.draw(pixels).unwrap();

            // TE_READY won't get set until we mark that we're ready to flush a buffer
            critical_section::with(|cs| {
                TE_READY.store(false, Ordering::SeqCst);
                TE.borrow_ref_mut(cs).as_mut().unwrap().clear_interrupt();
            });
            // wait for next sync
            while !TE_READY.load(Ordering::SeqCst) {}

            let pixels = unsafe {
                core::slice::from_raw_parts(
                    pixels.data().as_ptr() as *const u8,
                    pixels.data().len(),
                )
            };
            let now = SystemTimer::now();
            lcd_fill(&mut spi, pixels);
            log::trace!(
                "Time to fill display: {}ms",
                (SystemTimer::now() - now) / (SystemTimer::TICKS_PER_SECOND / 1024)
            );
            frames += 1;
            let now = SystemTimer::now();
            if now.wrapping_sub(start) > SystemTimer::TICKS_PER_SECOND {
                start = now;
                log::info!("FPS: {}", frames);
                frames = 0;
            }
        }
    }
15.6 使用 LVGL 显示图片 #
https://docs.lvgl.io/8.2/widgets/core/img.html
Images are the basic object to display images from flash (as arrays) or from files. Images can display symbols (LV_SYMBOL_…) too.
Using the Image decoder interface custom image formats can be supported as well.
Image source:To provide maximum flexibility, the source of the image can be:
- a variable in code (a C array with the pixels).
- a file stored externally (e.g. on an SD card).
- a text with Symbols.
To set the source of an image, use lv_img_set_src(img, src).
To generate a pixel array from a PNG, JPG or BMP image, use the Online image converter tool and set
the converted image with its pointer: lv_img_set_src(img1, &converted_img_var); To make the variable
visible in the C file, you need to declare it with LV_IMG_DECLARE(converted_img_var).
To use external files, you also need to convert the image files using the online converter tool but now you should select the binary output format. You also need to use LVGL’s file system module and register a driver with some functions for the basic file operation. Go to the File system to learn more. To set an image sourced from a file, use lv_img_set_src(img, “S:folder1/my_img.bin”).
You can also set a symbol similarly to Labels. In this case, the image will be rendered as text according to the font specified in the style. It enables to use of light-weight monochrome “letters” instead of real images. You can set symbol like lv_img_set_src(img1, LV_SYMBOL_OK).
15.7 通过 embeded-graphics 显示图片 #
15.8 使用 slint 显示图片 #
参考:
- https://github.com/opsnull/rust-slint-opencv
- https://releases.slint.dev/1.5.1/docs/rust/slint/struct.image
对于 Rust, 使用 image crate 可以将各种照片转换称 RGBA8 格式:
let mut cat_image = image::open("cat.png").expect("Error loading cat image").into_rgba8();
Integration with OpenCV #2480: https://github.com/slint-ui/slint/discussions/2480
You would basically need to convert the pixel into SharedPixelBuffer and use the slint::Image
constructor to convert it to an image. Then you can use a property to pass that image to the slint
view.
export component View {
   in property <image> img <=> i.source;
   i := Image { }
}
15.9 LCD 播放视频 #
LCD 播放视频是通过连续播放静态图片来实现的,每张图片为一个 frame,播放图片的速率为 FPS。
影响 LCD FPS 快慢的因素:
- rendering:处理器生成一帧数据 image 数据的过程;
- transmission:处理其通过物理接口发送给 LCD 的速率,称为 interface frame rate;
- display:LCD 显示一帧图片的速率,称为 screen refresh rate;
interface 和 screen refresh rate 的关系:
- For LCDs with SPI/I80 interfaces, the screen refresh rate is determined by the
LCD driver ICand can typically be set by sending specific commands, such as the ST7789 command FRCTRL2 (C6h). - For LCDs with RGB interfaces, the screen refresh rate is determined by
the main controllerand isequivalent tothe interface frame rate.
RGB 接口是微控制器 driver 控制的数据发送&传输;
16 Touch #
在实际应用中,电阻触摸屏必须在使用前进行校准,而电容触摸屏则一般由控制芯片完成该工作,无需额外的校准步骤。驱动中已经集成了电阻触摸屏的校准算法,校准过程使用了三个点来校准,用一个点来验证,当最后验证的误差大于某个阈值将导致校准失败,然后自动重新进行校准,直到校准成功。
调用校准函数 calibration_run() 将会在屏幕上开始校准的过程,校准完成后,参数将 保存在 NVS 中用于下次启动,避免每次使用前的重复校准。
触摸屏按下:不论是电阻还是电容触摸屏,通常的触摸屏控制芯片会有一个用于 通知触摸事件的中断引脚 。但是驱动中没有使用该信号,一方面是因为对于有屏幕的应用需要尽量节省出 IO 给其他外设;另一方面是触摸控制器给出的该信号 不如程序通过寄存器数据判断的准确性高 。对于电阻触摸屏来说,判断按下的依据是 Z 方向的压力大于配置的阈值;对于电容触摸屏则是判断至少有一个触摸点存在。
触摸屏的旋转:触摸屏具有与显示屏一样的 8 个方向 ,定义在 touch_panel_dir_t 中。这里的旋转是通过软件换算来实现的,通常把二者的方向设置为相同。但这并不是一成不变的,例如:在使用电容触摸屏时,有可能触摸屏固有的方向与显示屏原始显示方向不一致,如果简单的将这两个方向设置为相同后,将无法正确的点击屏幕内容,这时需要根据实际情况调整。
触摸屏的分辨率设置也是很重要的,因为触摸屏旋转后的换算依赖于触摸屏的宽和高分辨率大小,设置不当将无法得到正确的旋转效果。
电阻触摸:需要校正;
电容触摸:不需要校正,支持多点触摸,而且有些支持固定速率的触摸按钮。
NS2009 电阻触摸:提供 press + position 功能; FT6X36: 电容触摸:只能提供 position 功能;
初始化:
// https://docs.espressif.com/projects/espressif-esp-iot-solution/zh_CN/latest/input_device/touch_panel.html#id5
touch_panel_driver_t touch; // a touch panel driver

i2c_config_t i2c_conf = {
    .mode = I2C_MODE_MASTER,
    .sda_io_num = 35,
    .sda_pullup_en = GPIO_PULLUP_ENABLE,
    .scl_io_num = 36,
    .scl_pullup_en = GPIO_PULLUP_ENABLE,
    .master.clk_speed = 100000,
};
i2c_bus_handle_t i2c_bus = i2c_bus_create(I2C_NUM_0, &i2c_conf);

touch_panel_config_t touch_cfg = {
    .interface_i2c = {
        .i2c_bus = i2c_bus,
        .clk_freq = 100000,
        .i2c_addr = 0x38,
    },
    .interface_type = TOUCH_PANEL_IFACE_I2C,
    .pin_num_int = -1,
    .direction = TOUCH_DIR_LRTB,
    .width = 800,
    .height = 480,
};

/* Initialize touch panel controller FT5x06 */
touch_panel_find_driver(TOUCH_PANEL_CONTROLLER_FT5X06, &touch);
touch.init(&touch_cfg);

/* start to run calibration */
touch.calibration_run(&lcd, false);
获取触摸屏是否按下及其触点坐标:
touch_panel_points_t points;
touch.read_point_data(&points);
int32_t x = points.curx[0];
int32_t y = points.cury[0];
if(TOUCH_EVT_PRESS == points.event) {
    ESP_LOGI(TAG, "Pressed, Touch point at (%d, %d)", x, y);
}
ESP32 Flappy Bird: https://github.com/Makerfabs/Project_ESP32-Flappy-Bird/tree/master
- LCD 3.5 inch Amorphous-TFT-LCD (Thin Film Transistor Liquid Crystal Display) for mobile-phone or handy electrical equipments.
- NS2009 is A 4-wire resistive touch screen control circuit with I2C interface, which contains A 12-bit resolution A/D converter.
- The FT6X36 Series ICs are single-chip capacitive touch panel controller IC with a built-in 16 bit enhanced Micro-controller unit (MCU).
touch controller 一般是通过 I2C/SPI 接口来读取的:
- SPI 接口: 如 STMPE610 ,一般和 LCD SPI 接口复用,通过 CS 信号来区分;
#include "NS2009.h"

//I2C receive
void ns2009_recv(const uint8_t *send_buf, size_t send_buf_len, uint8_t *receive_buf,
                 size_t receive_buf_len)
{
    Wire.beginTransmission(NS2009_ADDR);
    Wire.write(send_buf, send_buf_len);
    Wire.endTransmission();
    Wire.requestFrom(NS2009_ADDR, receive_buf_len);
    while (Wire.available())
    {
        *receive_buf++ = Wire.read();
    }
}

//read 12bit data
unsigned int ns2009_read(uint8_t cmd)
{
    uint8_t buf[2];
    ns2009_recv(&cmd, 1, buf, 2);
    return (buf[0] << 4) | (buf[1] >> 4);
}

//Press maybe not correct
int ns2009_get_press()
{
    return ns2009_read(NS2009_LOW_POWER_READ_Z1);
}

int ns2009_pos(int pos[2])
{
    int press = ns2009_read(NS2009_LOW_POWER_READ_Z1);

    int x, y = 0;

    x = ns2009_read(NS2009_LOW_POWER_READ_X);
    y = ns2009_read(NS2009_LOW_POWER_READ_Y);

    pos[0] = x * SCREEN_X_PIXEL / 4096; //4096 = 2 ^ 12
    pos[1] = y * SCREEN_Y_PIXEL / 4096;

    //pos[0] = x;
    //pos[1] = y;
    return press;
}
FT6236:
// https://github.com/Makerfabs/Makerfabs-ESP32-S3-Parallel-TFT-with-Touch/blob/main/example/touch_keyboard_v2/FT6236.cpp
#include "FT6236.h"

int readTouchReg(int reg)
{
    int data = 0;
    Wire.beginTransmission(TOUCH_I2C_ADD);
    Wire.write(reg);
    Wire.endTransmission();
    Wire.requestFrom(TOUCH_I2C_ADD, 1);
    if (Wire.available())
    {
        data = Wire.read();
    }
    return data;
}

/*
int getTouchPointX()
{
    int XL = 0;
    int XH = 0;

    XH = readTouchReg(TOUCH_REG_XH);
    XL = readTouchReg(TOUCH_REG_XL);

    return ((XH & 0x0F) << 8) | XL;
}
*/

int getTouchPointX()
{
    int XL = 0;
    int XH = 0;

    XH = readTouchReg(TOUCH_REG_XH);
    //Serial.println(XH >> 6,HEX);
    if(XH >> 6 == 1)
        return -1;
    XL = readTouchReg(TOUCH_REG_XL);

    return ((XH & 0x0F) << 8) | XL;
}

int getTouchPointY()
{
    int YL = 0;
    int YH = 0;

    YH = readTouchReg(TOUCH_REG_YH);
    YL = readTouchReg(TOUCH_REG_YL);

    return ((YH & 0x0F) << 8) | YL;
}

int ft6236_pos(int pos[2])
{
    int XL = 0;
    int XH = 0;
    int YL = 0;
    int YH = 0;

    XH = readTouchReg(TOUCH_REG_XH);
    if(XH >> 6 == 1)
    {
        pos[0] = -1;
        pos[1] = -1;
        return 0;
    }
    XL = readTouchReg(TOUCH_REG_XL);
    YH = readTouchReg(TOUCH_REG_YH);
    YL = readTouchReg(TOUCH_REG_YL);

    pos[0] = ((XH & 0x0F) << 8) | XL;
    pos[1] = ((YH & 0x0F) << 8) | YL;
    return 1;
}
Makerfabs ESP32-S3 Parallel TFT with Touch: https://github.com/Makerfabs/Makerfabs-ESP32-S3-Parallel-TFT-with-Touch
ESP32 3.5" TFT Touch with Camera: https://wiki.makerfabs.com/ESP32_3.5_TFT_Touch_with_Camera.html
大量 LCD+Touch 的例子: https://github.com/Makerfabs/Project_Touch-Screen-Camera
17 Audio #
17.1 audio play #
一般来说,一个语音提示文件的 MP3 格式的大小约 5KB,而未压缩的 wav 格式的大小则为 60KB 左右。如果拿 2MB 的 FLASH 空间来存储 MP3 格式的语音提示文件,则其数量要远大于 WAV 格式。
- wav 保存的是未压缩的 PCM 数据,可以直接通过 I2S 接口发送给数字音频芯片来播放。
而其他格式如 MP3, 需要通过软件或硬件解码为 PCM 格式 ,然后才能通过 I2S 数字音频接口发送给功放芯片。
- 使用I2C协议来配置WM8978模块
- 初始化ESP32的I2S通信接口
- 建立数据缓冲,大于4096字节
- 从FLASH读取一个扇区(4096字节)
- 转为解码所需的stream比特流形式(如开源的
mad MP3 解码库) - 开始MP3解码
- 解码4096字节完成后,把
PCM 数据通过I2S送入WM8978模块
综上:
-
使用 ESP32 播放 mp3 文件前,都需要解码,解码输出的格式为 PCM:
- 开源的 MAD (MPEG Audio Decoder) MP3 解码库 : https://www.underbit.com/products/mad/
- ESP32 Box S3 的 esp-audio-player 使用的 libhelix-mp3 解码库: https://github.com/ultraembedded/libhelix-mp3/tree/master
- 开源的 ESP32-audioI2S:
https://github.com/schreibfaul1/ESP32-audioI2S
- 可以解码播放:
mp3, m4aand wav files from SD card via I2S,HELIX-mp3 and -aac decoder is included. There is also an OPUS decoder for Fullband, n VORBIS decoder(.ogg 格式) anda FLAC decoder.
- 可以解码播放:
-
然后将解码后的 PCM 编码数据通过 I2S 接口发送给数字音频功放芯片(codec chip);
-
功放芯片进行 DAC 转换,驱动扬声器;
-
对于支持 MIC 输入的 codec chip,drvier 也通过 I2S 接口来读取 ADC 后的音频 PCM 数据,然后进一步处理,如
直接保存为未编码的 wav 格式文件,或经过压缩后编码为其他格式,如 mp3、aac 等来存储到 TF 卡,或者再发送给 codec chip 来播放;
注:I2S 接口是数字音频信号的传输协议(不一定是物理接口),而 PCM 是数字音频的编码格式,可以经过 DAC 直接转换为模拟信号。
大一统的 ESP32-audioI2S 解码播放示例: https://github.com/schreibfaul1/ESP32-audioI2S
// https://github.com/schreibfaul1/ESP32-audioI2S
#include "Arduino.h"
#include "WiFi.h"
#include "Audio.h"
#include "SD.h"
#include "FS.h"

// Digital I/O used
#define SD_CS          5
#define SPI_MOSI      23
#define SPI_MISO      19
#define SPI_SCK       18
#define I2S_DOUT      25
#define I2S_BCLK      27
#define I2S_LRC       26

Audio audio;

String ssid =     "*******";
String password = "*******";

void setup() {
    pinMode(SD_CS, OUTPUT);      digitalWrite(SD_CS, HIGH);
    SPI.begin(SPI_SCK, SPI_MISO, SPI_MOSI);
    Serial.begin(115200);
    SD.begin(SD_CS);
    WiFi.disconnect();
    WiFi.mode(WIFI_STA);
    WiFi.begin(ssid.c_str(), password.c_str());
    while (WiFi.status() != WL_CONNECTED) delay(1500);
    audio.setPinout(I2S_BCLK, I2S_LRC, I2S_DOUT);
    audio.setVolume(21); // default 0...21
//  or alternative
//  audio.setVolumeSteps(64); // max 255
//  audio.setVolume(63);
//
//  *** radio streams ***
    audio.connecttohost("http://stream.antennethueringen.de/live/aac-64/stream.antennethueringen.de/"); // aac
//  audio.connecttohost("http://mcrscast.mcr.iol.pt/cidadefm");                                         // mp3
//  audio.connecttohost("http://www.wdr.de/wdrlive/media/einslive.m3u");                                // m3u
//  audio.connecttohost("https://stream.srg-ssr.ch/rsp/aacp_48.asx");                                   // asx
//  audio.connecttohost("http://tuner.classical102.com/listen.pls");                                    // pls
//  audio.connecttohost("http://stream.radioparadise.com/flac");                                        // flac
//  audio.connecttohost("http://stream.sing-sing-bis.org:8000/singsingFlac");                           // flac (ogg)
//  audio.connecttohost("http://s1.knixx.fm:5347/dein_webradio_vbr.opus");                              // opus (ogg)
//  audio.connecttohost("http://stream2.dancewave.online:8080/dance.ogg");                              // vorbis (ogg)
//  audio.connecttohost("http://26373.live.streamtheworld.com:3690/XHQQ_FMAAC/HLSTS/playlist.m3u8");    // HLS
//  audio.connecttohost("http://eldoradolive02.akamaized.net/hls/live/2043453/eldorado/master.m3u8");   // HLS (ts)
//  *** web files ***
//  audio.connecttohost("https://github.com/schreibfaul1/ESP32-audioI2S/raw/master/additional_info/Testfiles/Pink-Panther.wav");        // wav
//  audio.connecttohost("https://github.com/schreibfaul1/ESP32-audioI2S/raw/master/additional_info/Testfiles/Santiano-Wellerman.flac"); // flac
//  audio.connecttohost("https://github.com/schreibfaul1/ESP32-audioI2S/raw/master/additional_info/Testfiles/Olsen-Banden.mp3");        // mp3
//  audio.connecttohost("https://github.com/schreibfaul1/ESP32-audioI2S/raw/master/additional_info/Testfiles/Miss-Marple.m4a");         // m4a (aac)
//  audio.connecttohost("https://github.com/schreibfaul1/ESP32-audioI2S/raw/master/additional_info/Testfiles/Collide.ogg");             // vorbis
//  audio.connecttohost("https://github.com/schreibfaul1/ESP32-audioI2S/raw/master/additional_info/Testfiles/sample.opus");             // opus
//  *** local files ***
//  audio.connecttoFS(SD, "/test.wav");     // SD
//  audio.connecttoFS(SD_MMC, "/test.wav"); // SD_MMC
//  audio.connecttoFS(SPIFFS, "/test.wav"); // SPIFFS

//  audio.connecttospeech("Wenn die Hunde schlafen, kann der Wolf gut Schafe stehlen.", "de"); // Google TTS
}

void loop()
{
    audio.loop();
}

// optional
void audio_info(const char *info){
    Serial.print("info        "); Serial.println(info);
}
void audio_id3data(const char *info){  //id3 metadata
    Serial.print("id3data     ");Serial.println(info);
}
void audio_eof_mp3(const char *info){  //end of file
    Serial.print("eof_mp3     ");Serial.println(info);
}
void audio_showstation(const char *info){
    Serial.print("station     ");Serial.println(info);
}
void audio_showstreamtitle(const char *info){
    Serial.print("streamtitle ");Serial.println(info);
}
void audio_bitrate(const char *info){
    Serial.print("bitrate     ");Serial.println(info);
}
void audio_commercial(const char *info){  //duration in sec
    Serial.print("commercial  ");Serial.println(info);
}
void audio_icyurl(const char *info){  //homepage
    Serial.print("icyurl      ");Serial.println(info);
}
void audio_lasthost(const char *info){  //stream URL played
    Serial.print("lasthost    ");Serial.println(info);
}
void audio_eof_speech(const char *info){
    Serial.print("eof_speech  ");Serial.println(info);
}
PCM:脉冲编码调制(英语:Pulse-code modulation,缩写:PCM)是一种模拟信号的数字化方法。 A PCM stream has two basic properties that determine the stream’s fidelity to the original analog signal:
the sampling rate, which is the number of times per second that samples are taken;- and
the bit depth, which determines the number of possible digital values that can be used to represent each sample.
The compact disc (CD) brought PCM to consumer audio applications with its introduction in 1982. The
CD uses a 44,100 Hz sampling frequency and 16-bit resolution and stores up to 80 minutes of stereo
audio per disc. stereo audio 是通过 two-channel 提供的。
- The audio contained in a CD-DA consists of
two-channel signed 16-bit LPCM sampled at 44,100 Hzand written as a little-endian interleaved stream with left channel coming first
LPCM 的解释:Linear pulse-code modulation (LPCM) 是一种数字信号的表示方法,主要用于音频信号。它通过将模拟信号定期采样并量化为线性级别的数字值来工作。LPCM是脉冲编码调制(PCM)的一种形式,特别强调了量化过程是线性的。这意味着模拟信号的每个采样值都直接转换成相应的数字值, 而这个转换过程不涉及任何非线性压缩 。LPCM的关键步骤包括采样、量化和编码:
- **采样**:这是将连续的模拟信号转换为离散信号的过程。根据奈奎斯特定理,为了避免混叠效应,采样频率应至少为信号最高频率的两倍。例如,CD音频以44.1kHz的频率采样,这意味着它可以准确地再现高达22.05kHz 的声音频率,覆盖了人耳可听范围。
- **量化**:量化过程涉及将每个采样点的振幅(即大小或强度)近似到一组有限的数值中。在LPCM中,这个过程是线性的,这意味着模拟信号的动态范围被均匀分配给量化级别。量化的精度通常用比特数表示,比如CD音质的LPCM采用16位量化,提供了65536(2^16)个不同的可能振幅级别。
- **编码**:最后,量化后的数值被编码为数字信号,可以存储或传输。在LPCM中,这些数值直接表示信号的振幅,
不进行任何额外的压缩或编码。
LPCM 是一种无损的音频格式 ,因为它不涉及压缩过程中的信息丢失(尽管原始模拟信号在采样和量化过程中可能会有一定程度的近似)。由于它的这个特性, LPCM广泛用于需要高音质的应用中 ,如CD音频、DVD音频、蓝光音频和一些专业音频录制系统。
LPCM的主要优点包括简单、直接和高质量的音频表示, 但它也有一个缺点,即相对较高的数据率 。例如,未压缩的CD质量音频(使用44.1kHz的采样率和16位深度的立体声LPCM)的数据率约为1.4Mbps。相比之下, 许多现代音频压缩技术,如MP3或AAC ,通过去除人耳难以察觉的音频信息来大幅度减少所需的数据率,但这种压缩是有损的。
立体声和多声道 LPCM:
- 在立体声 LPCM 流中,左声道和右声道的采样值通常是
交错存储的。例如,一个典型的存储序列可能是L1、 R1、L2、R2、…、Ln、Rn,其中L和R分别代表左声道和右声道的采样值,n是采样点的索引。 - 在多声道LPCM流中,各声道的采样值可以按不同方式组织。最常见的是交错方式,即按照采样时刻顺序依次存储各声道的采样值,比如L1、C1、R1、LS1、RS1、L2、C2、R2、LS2、RS2、…,其中L、C、R、LS、RS分别代表左前、中央、右前、左后和右后声道的采样值。
参考: https://planethifi.com/pcm-audio/
WAV(Waveform Audio File Format) 是一种音频文件格式,它通常用来 存储未压缩的音频数据 ,这些数据大多数情况下 使用Linear Pulse-Code Modulation (LPCM) 编码 。WAV格式由微软和IBM开发,最初是为Windows 3.1
操作系统设计的。由于其无损特性和广泛的兼容性,WAV格式成为了保存高质量音频的一种流行选择。
总结:WAV 文件和 LPCM 的关系:
- **存储LPCM数据**:WAV文件格式经常用来存储LPCM编码的音频数据。这意味着WAV文件可以
保存按照LPCM方法采样、量化和编码的音频信号,保留原始音频的所有细节而不会丢失任何信息。 - **无损音频格式**:由于LPCM是一种无损编码方式,
因此使用LPCM编码的WAV文件也是无损的。这使得WAV文件特别适合需要高质量音频,如专业音乐制作、音频编辑和音频分析的场合。 - **高数据率**:LPCM编码的音频数据未经过压缩,所以WAV文件通常具有较高的数据率。例如,一段标准的CD质量音频(44.1kHz采样率、16位深度、立体声)的数据率大约为1.4Mbps。
这意味着WAV文件可以变得相当大,尤其是对于较长的录音。 - **广泛的应用**:WAV格式由于其简单、无损和高质量的特性,在很多应用中被广泛使用,尤其是在需要原始音质的场合,如音乐制作、电影后期制作、广播和科学研究等。
总结: wav 文件不需要解码,可以直接读取 LPCM 编码数据 ,然后通过 I2S 接口发送给功放芯片播放。
// https://github.com/espressif/esp-box/blob/master/examples/watering_demo/main/app/app_audio.c

static void audio_beep_task(void *pvParam)
{
    while (true) {
        xSemaphoreTake(audio_sem, portMAX_DELAY);
        b_audio_playing = true;
        sr_echo_play("/spiffs/echo_en_wake.wav"); // 直接播放 wav 文件的音频数据
        b_audio_playing = false;

        /* It's useful if wake audio didn't finish playing when next wake word detetced */
        // xSemaphoreTake(audio_sem, 0);
    }
}

esp_err_t sr_echo_play(void *filepath)
{
    FILE *fp = NULL;
    struct stat file_stat;
    esp_err_t ret = ESP_OK;

    const size_t chunk_size = 4096;
    uint8_t *buffer = malloc(chunk_size);
    ESP_GOTO_ON_FALSE(NULL != buffer, ESP_FAIL, EXIT, TAG, "buffer malloc failed");

    ESP_GOTO_ON_FALSE(-1 != stat(filepath, &file_stat), ESP_FAIL, EXIT, TAG, "Failed to stat file");

    fp = fopen(filepath, "r");
    ESP_GOTO_ON_FALSE(NULL != fp, ESP_FAIL, EXIT, TAG, "Failed create record file");

    wav_header_t wav_head;
    int len = fread(&wav_head, 1, sizeof(wav_header_t), fp);
    ESP_GOTO_ON_FALSE(len > 0, ESP_FAIL, EXIT, TAG, "Read wav header failed");

    if (NULL == strstr((char *)wav_head.Subchunk1ID, "fmt") &&
            NULL == strstr((char *)wav_head.Subchunk2ID, "data")) {
        ESP_LOGI(TAG, "PCM format");
        fseek(fp, 0, SEEK_SET);
        wav_head.SampleRate = 16000;
        wav_head.NumChannels = 2;
        wav_head.BitsPerSample = 16;
    }

    ESP_LOGD(TAG, "frame_rate= %" PRIi32 ", ch=%d, width=%d", wav_head.SampleRate, wav_head.NumChannels, wav_head.BitsPerSample);
    bsp_codec_set_fs(wav_head.SampleRate, wav_head.BitsPerSample, I2S_SLOT_MODE_STEREO);

    bsp_codec_mute_set(true);
    bsp_codec_mute_set(false);
    bsp_codec_volume_set(100, NULL);

    size_t cnt, total_cnt = 0;
    do {
        /* Read file in chunks into the scratch buffer */
        len = fread(buffer, 1, chunk_size, fp);
        if (len <= 0) {
            break;
        } else if (len > 0) {
            bsp_i2s_write(buffer, len, &cnt, portMAX_DELAY);
            total_cnt += cnt;
        }
    } while (1);
    ESP_LOGI(TAG, "play end, %d K", total_cnt / 1024);

EXIT:
    if (fp) {
        fclose(fp);
    }
    if (buffer) {
        free(buffer);
    }
    return ret;
}
There are three major groups of audio file formats :
- Uncompressed audio formats, such as
WAV, AIFF, AU or raw header-lessPCM; Note wav can also use compression as well. - Formats with lossless compression, such as
FLAC, Monkey's Audio (filename extension .ape), WavPack (filename extension .wv), TTA, ATRAC Advanced Lossless,ALAC (filename extension .m4a, Apple Lossless), MPEG-4 SLS, MPEG-4 ALS, MPEG-4 DST, Windows Media Audio Lossless (WMA Lossless), and Shorten (SHN).- Formats with lossy compression, such as Opus,
MP3, Vorbis, Musepack, AAC, ATRAC and Windows Media Audio Lossy (WMA lossy).
- Formats with lossy compression, such as Opus,
.m4a An audio-only MPEG-4 file, used by Apple for unprotected music downloaded from their iTunes
Music Store. Audio within the m4a file is typically encoded with AAC, although lossless ALAC may
also be used.
音频文件存储:
-
WAV(Waveform Audio File Format):
-
**普遍支持**:WAV是最广泛支持的音频文件格式之一,由微软开发,原生支持LPCM音频流。
-
**无损质量**:WAV文件可以无损存储LPCM音频数据,保持原始音频质量。
-
**元数据支持**:WAV格式支持存储关于音频流的详细信息,如采样率、位深度、声道数等。
-
**文件大小**:由于WAV文件通常不使用压缩,文件大小可能会非常大,尤其是对于高采样率、高位深度、多声道音频。
-
AIFF(Audio Interchange File Format)
-
**类似WAV**:AIFF是苹果公司开发的一种音频文件格式,与WAV非常相似,提供无损音频质量和广泛的元数据支持。
-
**跨平台**:虽然AIFF最初是为Macintosh系统设计的,但现在它在多个平台上都得到支持。
-
**文件大小**:和WAV一样,AIFF文件也可能相当大,特别是当存储高质量的多声道LPCM音频时。
-
FLAC(Free Lossless Audio Codec)
-
**无损压缩**:FLAC提供无损压缩,能够在不损失音质的情况下减小文件大小,适用于LPCM音频数据。
-
**标签和元数据**:FLAC支持丰富的标签和元数据,方便音乐管理和播放器识别。
-
**广泛支持**:尽管主要用于立体声音频,FLAC格式也支持多达8个声道的音频,适用于多声道LPCM音频流的存储。
-
Multichannel WAV/RF64
-
**大型文件**:为了克服WAV文件对文件大小的限制(4GB),扩展格式如RF64被设计用来支持更大的文件,适合长时间的高质量多声道录音。
-
**广泛兼容性**:这些格式保持了与标准WAV格式的向后兼容性,同时扩展了其能力,以支持更大的数据量。
存储过程:存储多声道LPCM音频流通常涉及以下步骤:
- **选择格式**:根据需要支持的声道数、对音质的要求以及对文件大小的考虑,选择合适的音频文件格式。
- **准备音频数据**:将LPCM编码的音频数据按照选择的格式要求(如声道排列、采样率、位深度等)进行组织。
- **写入文件**:将音频数据连同必要的元数据(如格式头信息)一起写入到文件中。
- **验证**:确保写入的音频文件符合所选格式的规范,并且可以被目标播放器或编辑软件正确读取。
使用适当的音频编辑或编码软件,你可以轻松地将多声道LPCM音频流保存到这些格式的文件中,无论是通过图形用户界面操作还是通过编程方式。
对于数字音频功放芯片,一般也称为 codec chip:
- 将 PCM 数字音频解码,然后 DAC 转换为模型信号输出;
- 将 MIC 收到的模拟声音信号经过 ADC 转换,然后编码为 PCM 数字比特流;
- driver 都是通过 I2S 接口来发送和接受 PCM 数字信号;
Wm8960 is a low power, high quality stereo CODEC, that provides two interface types: voice input and output. The communication between ESP32 and WM8960 is I2S.
一般 I2S 接口的数字音频功放芯片 codec chip,除了可以播放 PCM 编码格式的数字音频信号外,还提供控制(静音、音量大小等)和 MIC 输入功能,如 ES8374
- codec chip 的 MIC 将 ADC 转换为 PCM 编码数据,driver 可以通过 I2S 接口来读取这些数据,进行后续处理,如编码后保存到 TF 卡或者播放。
示例: https://github.com/espressif/esp-box/blob/master/examples/usb_headset/main/src/usb_headset.c
如果需要更好的音频质量和更多的接口选项,可使用外部 I2S 编解码器来完成所有模拟输入和输出信号的处理。不同类型的编解码器芯片可提供不同的额外功能,如音频输入信号前置放大器、耳机输出放大器、多个模拟输入和输出、音效处理等。I2S 是音频编解码器芯片接口的行业标准,通常用于高速、连续传输音频数据。为了优化音频数据处理的性能,可能需要额外的内存。对于这种情况,请考虑使用集成 8 MB PSRAM 和 ESP32 芯片的 ESP32-WROVER-E 模组。
https://docs.espressif.com/projects/esp-adf/en/latest/design-guide/project-design.html
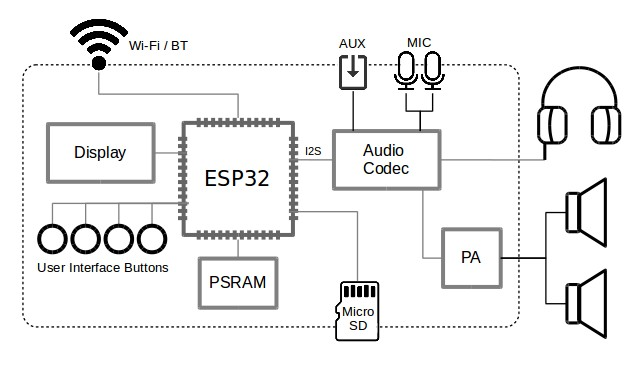
ESP32 提供了乐鑫音频开发框架(ADF),支持常见的编解码格式: https://docs.espressif.com/projects/esp-adf/en/latest/index.html
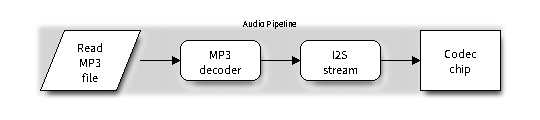
I (397) PLAY_FLASH_MP3_CONTROL: [ 1 ] Start audio codec chip
I (427) PLAY_FLASH_MP3_CONTROL: [ 2 ] Create audio pipeline, add all elements to pipeline, and subscribe pipeline event
I (427) PLAY_FLASH_MP3_CONTROL: [2.1] Create mp3 decoder to decode mp3 file and set custom read callback
I (437) PLAY_FLASH_MP3_CONTROL: [2.2] Create i2s stream to write data to codec chip
I (467) PLAY_FLASH_MP3_CONTROL: [2.3] Register all elements to audio pipeline
I (467) PLAY_FLASH_MP3_CONTROL: [2.4] Link it together [mp3_music_read_cb]-->mp3_decoder-->i2s_stream-->[codec_chip]
I (477) PLAY_FLASH_MP3_CONTROL: [ 3 ] Set up  event listener
I (477) PLAY_FLASH_MP3_CONTROL: [3.1] Listening event from all elements of pipeline
I (487) PLAY_FLASH_MP3_CONTROL: [ 4 ] Start audio_pipeline
I (507) PLAY_FLASH_MP3_CONTROL: [ * ] Receive music info from mp3 decoder, sample_rates=44100, bits=16, ch=2
I (7277) PLAY_FLASH_MP3_CONTROL: [ 5 ] Stop audio_pipeline
示例: https://github.com/espressif/esp-adf/tree/master/examples
17.2 audio record #
使用麦克风 Module 如 INMP441 module 来将声音转换为数字信号(PCM 编码后的数字流),然后 ESP32 driver 通过 I2S 接口来获取数字音频。
- INMP441 module will be acting as a mic input for capturing mono 16-bit audio signals at rate 8000 samples per second.
- 一般数字音频功放芯片集成有 MIC,也是通过 I2S 接口来获取 PCM 数据,所以也称为 codec chip。
如果是模拟 MIC 则可以使用 ESP32 的 ADC 引脚转换为 LPCM,然后再保存到 wav 文件中。
通过 I2S 从 MIC 读取 PCM 数字音频后,以 wav 文件格式存入 SD 卡:
- wav 文件:medatadata header + LPCM raw data;
// https://www.makerfabs.com/blog/post/how-to-make-an-esp32-sound-recorder

void WM8960_Record(String filename, char *buff, int record_time)
{
    int headerSize = 44;
    byte header[headerSize];
    int waveDataSize = record_time * 16000 * 16 * 2 / 8;
    int recode_time = millis();
    int part_time = recode_time;

    File file = SD.open(filename, FILE_WRITE);
    if (!file)
        return;

    Serial.println("Begin to record:");

    for (int j = 0; j < waveDataSize / sizeof(buff); ++j)
    {
        I2S_Read(buff, sizeof(buff));
        file.write((const byte *)buff, sizeof(buff));
        if ((millis() - part_time) > 1000)
        {
            Serial.print(".");
            part_time = millis();
        }
    }

    file.seek(0);
    CreateWavHeader(header, waveDataSize);
    file.write(header, headerSize);

    Serial.println("");
    Serial.println("Finish");
    Serial.println(millis() - recode_time);
    file.close();
}
播放 wav 文件:
// https://www.makerfabs.com/blog/post/how-to-make-an-esp32-sound-recorder

void WM8960_Play (String filename, char *buff)
{
    File file = SD.open(filename);
    if (! file)
        return;
    Serial.println("Begin to play:");
    Serial.println(filename);
    file.seek(44);  // 跳过 wav header
    while (file.readBytes(buff, sizeof(buff)))
    {
        I2S_Write(buff, sizeof(buff));
    }
    Serial.println("Finish");
    file.close();
}
另一个使用 I2S 从 MIC 读取数据,存入 wav 文件的例子: https://github.com/MhageGH/esp32_SoundRecorder/tree/master
#include "Arduino.h"
#include <FS.h>
#include "Wav.h"
#include "I2S.h"
#include <SD.h>


//comment the first line and uncomment the second if you use MAX9814
//#define I2S_MODE I2S_MODE_RX
#define I2S_MODE I2S_MODE_ADC_BUILT_IN

const int record_time = 10;  // second
const char filename[] = "/sound.wav";

const int headerSize = 44;
const int waveDataSize = record_time * 88000;
const int numCommunicationData = 8000;
const int numPartWavData = numCommunicationData/4;
byte header[headerSize];
char communicationData[numCommunicationData];
char partWavData[numPartWavData];
File file;

void setup() {
  Serial.begin(115200);
  if (!SD.begin()) Serial.println("SD begin failed");
  while(!SD.begin()){
    Serial.print(".");
    delay(500);
  }
  CreateWavHeader(header, waveDataSize);
  SD.remove(filename);
  file = SD.open(filename, FILE_WRITE);
  if (!file) return;
  file.write(header, headerSize);
  I2S_Init(I2S_MODE, I2S_BITS_PER_SAMPLE_32BIT);
  for (int j = 0; j < waveDataSize/numPartWavData; ++j) {
    I2S_Read(communicationData, numCommunicationData);
    for (int i = 0; i < numCommunicationData/8; ++i) {
      partWavData[2*i] = communicationData[8*i + 2];
      partWavData[2*i + 1] = communicationData[8*i + 3];
    }
    file.write((const byte*)partWavData, numPartWavData);
  }
  file.close();
  Serial.println("finish");
}

void loop() {
}


// wav 头文件
#include "Wav.h"

void CreateWavHeader(byte* header, int waveDataSize){
  header[0] = 'R';
  header[1] = 'I';
  header[2] = 'F';
  header[3] = 'F';
  unsigned int fileSizeMinus8 = waveDataSize + 44 - 8;
  header[4] = (byte)(fileSizeMinus8 & 0xFF);
  header[5] = (byte)((fileSizeMinus8 >> 8) & 0xFF);
  header[6] = (byte)((fileSizeMinus8 >> 16) & 0xFF);
  header[7] = (byte)((fileSizeMinus8 >> 24) & 0xFF);
  header[8] = 'W';
  header[9] = 'A';
  header[10] = 'V';
  header[11] = 'E';
  header[12] = 'f';
  header[13] = 'm';
  header[14] = 't';
  header[15] = ' ';
  header[16] = 0x10;  // linear PCM
  header[17] = 0x00;
  header[18] = 0x00;
  header[19] = 0x00;
  header[20] = 0x01;  // linear PCM
  header[21] = 0x00;
  header[22] = 0x01;  // monoral
  header[23] = 0x00;
  header[24] = 0x44;  // sampling rate 44100
  header[25] = 0xAC;
  header[26] = 0x00;
  header[27] = 0x00;
  header[28] = 0x88;  // Byte/sec = 44100x2x1 = 88200
  header[29] = 0x58;
  header[30] = 0x01;
  header[31] = 0x00;
  header[32] = 0x02;  // 16bit monoral
  header[33] = 0x00;
  header[34] = 0x10;  // 16bit
  header[35] = 0x00;
  header[36] = 'd';
  header[37] = 'a';
  header[38] = 't';
  header[39] = 'a';
  header[40] = (byte)(waveDataSize & 0xFF);
  header[41] = (byte)((waveDataSize >> 8) & 0xFF);
  header[42] = (byte)((waveDataSize >> 16) & 0xFF);
  header[43] = (byte)((waveDataSize >> 24) & 0xFF);
}
除了 I2S 接口的数字 MIC 外,常见的还有 模拟输出的 MIC ,这时可以使用 ESP32 的 ADC 引脚来进行模数转换 ,将结果以 LPCM 编码的 wav 文件保存:
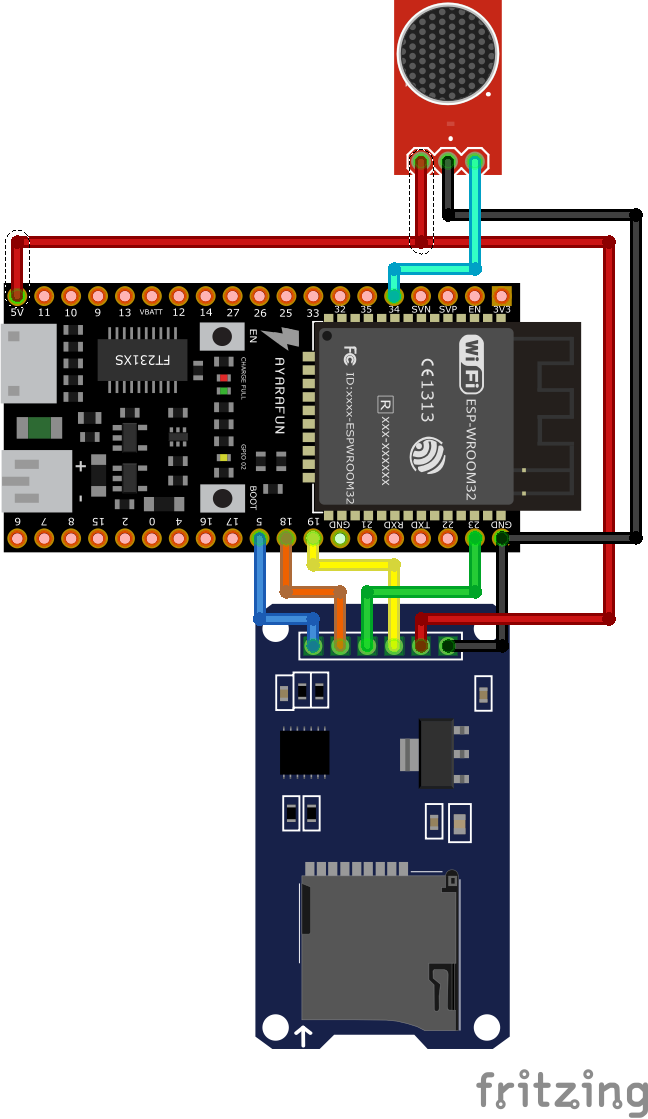
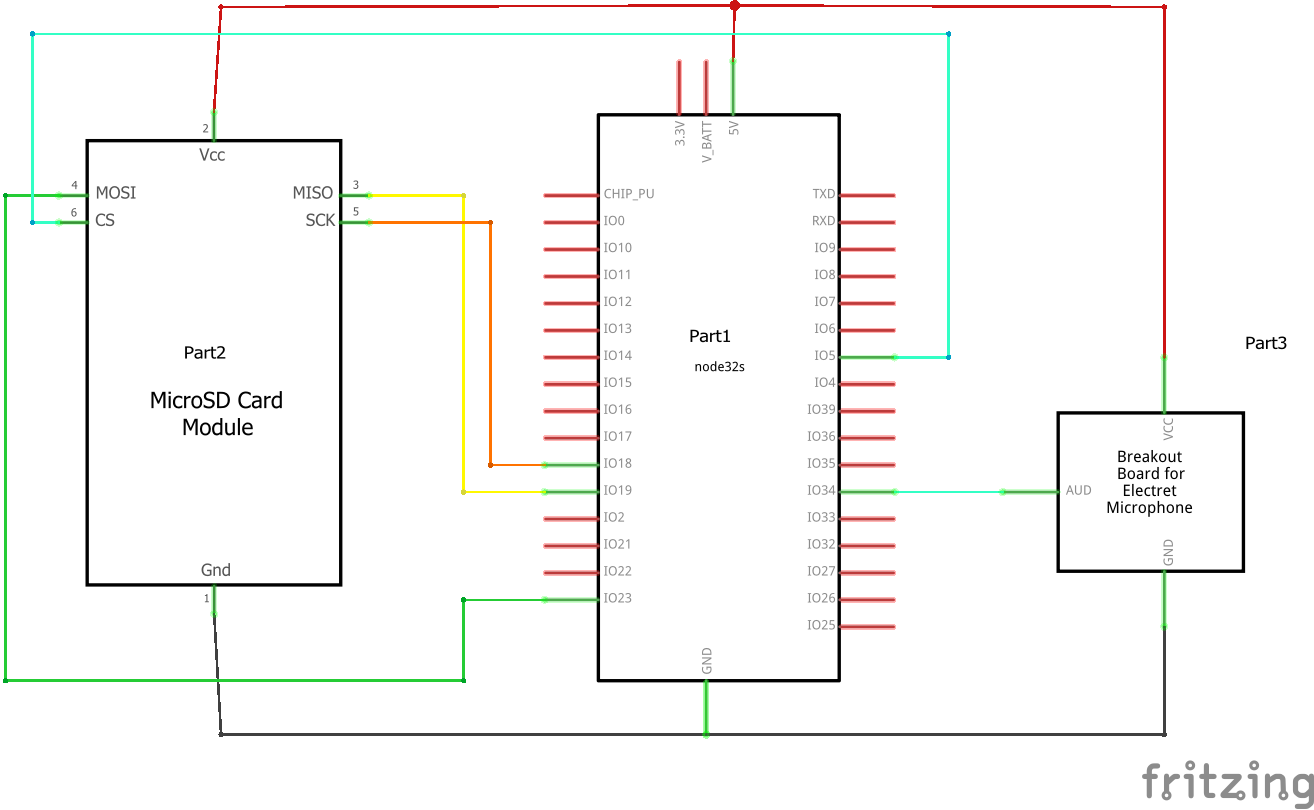
// https://github.com/AlirezaSalehy/WAVRecorder/blob/main/library/library.ino
#include <SD.h>
#include <SPI.h>

#include "src/WAVRecorder.h"
#include "src/AudioSystem.h"
#include "src/SoundActivityDetector.h"

#define SAMPLE_RATE 16000
#define SAMPLE_LEN 8

// Hardware SPI's CS pin which is different in each board
#ifdef ESP8266
  #define CS_PIN 16
#elif ARDUINO_SAM_DUE
  #define CS_PIN 4
#elif ESP32
  #define CS_PIN 5
#endif

// The analog pins (ADC inputs) which microphone outputs are connected to.
#define MIC_PIN_1 34
#define MIC_PIN_2 35

#define NUM_CHANNELS 1
channel_t channels[] = {{MIC_PIN_1}};

char file_name[] = "/sample.wav";
File dataFile;

#if defined(ESP32) || defined(ESP8266)
  AudioSystem* as;
#endif
WAVRecorder* wr;
//SoundActivityDetector* sadet;

void recordAndPlayBack();

void setup() {
  for (int i = 0; i < sizeof(channels)/sizeof(channel_t); i++)
    pinMode(channels[i].ADCPin, INPUT);
  //analogReadResolution(12); for ESP32

  pinMode(LED_BUILTIN, OUTPUT);
  Serial.begin(115200);
  Serial.println();

  // put your setup code here, to run once:
  if (!SD.begin(CS_PIN)) {
    Serial.println("Failes to initialize SD!");
  }
  else {
    Serial.println("SD opened successfuly");
  }
  SPI.setClockDivider(SPI_CLOCK_DIV2); // This is becuase feeding SD Card with more than 40 Mhz, leads to unstable operation.
                                       // (Also depends on SD class) ESP8266 & ESP32 SPI clock with no division is 80 Mhz.

  #if defined(ESP32) || defined(ESP8266)
     as = new AudioSystem(CS_PIN);
  #endif
  //sadet = new SoundActivityDetector(channels[0].ADCPin, 2000, 10 * 512, 6 * 512, &Serial);
  wr = new WAVRecorder(12, channels, NUM_CHANNELS, SAMPLE_RATE, SAMPLE_LEN, &Serial);

}

void loop() {
  // put your main code here, to run repeatedly:
  recordAndPlayBack();
}

void recordAndPlayBack() {
    if (SD.exists(file_name)) {
      SD.remove(file_name);
      Serial.println("File removed!");
    }

    dataFile = SD.open(file_name, FILE_WRITE);
    if (!dataFile) {
      Serial.println("Failed to open the file!");
      return;
    }

    // Setting file to store recodring
    wr->setFile(&dataFile);

    Serial.println("Started");
    // With checks Sound power level and it exceeds a threshold recording starts and stops recording when power fall behind another threshold.
    //wr->startBlocking(sadet);

    // Recording for 3000 ms
    wr->startBlocking(3000);
    Serial.println("File Created");

    Serial.println("Playing file");

    #if defined(ESP32) || defined(ESP8266)
        as->playAudioBlocking(file_name);
    #endif
}
另一个例子: Broadcasting Your Voice with ESP32-S3 & INMP441
The ESP32-S3’s I2S interface is set up to handle the audio data using Direct Memory Access (DMA) buffers. DMA allows for efficient data transfer without involving the main processor, offloading the task to a dedicated DMA controller. By configuring the DMA buffer in I2S, the captured audio samples can be stored and transmitted seamlessly.
void i2s_install() {
  // Set up I2S Processor configuration
  const i2s_config_t i2s_config = {
    .mode = i2s_mode_t(I2S_MODE_MASTER | I2S_MODE_RX),
    .sample_rate = 44100,
    //.sample_rate = 16000,
    .bits_per_sample = i2s_bits_per_sample_t(16),
    .channel_format = I2S_CHANNEL_FMT_ONLY_LEFT,
    .communication_format = i2s_comm_format_t(I2S_COMM_FORMAT_STAND_I2S),
    .intr_alloc_flags = 0,
    .dma_buf_count = bufferCnt,
    .dma_buf_len = bufferLen,
    .use_apll = false
  };

  i2s_driver_install(I2S_PORT, &i2s_config, 0, NULL);
}


void micTask(void* parameter) {

  i2s_install();
  i2s_setpin();
  i2s_start(I2S_PORT);

  size_t bytesIn = 0;
  while (1) {
    esp_err_t result = i2s_read(I2S_PORT, &sBuffer, bufferLen, &bytesIn, portMAX_DELAY);
    if (result == ESP_OK && isWebSocketConnected) {
      client.sendBinary((const char*)sBuffer, bytesIn);
    }
  }
}
参考: https://diyi0t.com/i2s-sound-tutorial-for-esp32/
18 USB/reset/download #
18.1 UART0 和 USB CDC-CAM #
各 ESP32 开发版一般有两个 USB 接口:
- 一个标记为 UART 的 USB 接口,实际连接的是板载的 USB-UART-Bridge 芯片,该芯片再连接到 ESP32 芯片的
UART0 串口(非 USB 接口),而 ESP32 支持通过 UART0 串口烧录固件和打印应用 log; - 一个标记为 USB 的 USB 接口,该接口实际连接 ESP32 芯片的 USB-Serial-JTAG controller(默认)或
USB-OTG controller。两者都实现了 USB-CDC-ACM function,连接到 PC 后都会被识别到串口设备:
- Linux:/dev/ttyACM*
- Windows:COM
- MacOS: /dev/cu*
对于 Mac 查看 USB-OTG 接口暴露的串口和 JTAG 接口:
zj@a:~/docs$ system_profiler SPUSBDataType | grep -A 11 "USB JTAG"
        USB JTAG/serial debug unit:

          Product ID: 0x1001
          Vendor ID: 0x303a
          Version: 1.01
          Serial Number: 3C:84:27:04:FE:18
          Speed: Up to 12 Mb/s
          Manufacturer: Espressif
          Location ID: 0x02100000 / 2
          Current Available (mA): 500
          Current Required (mA): 500
          Extra Operating Current (mA): 0
对应的设备名称为 /dev/tty.usbmodem* 或 /dev/cu.usbmodem*:
zj@a:~/docs$ ls -l /dev/*.usbmodem*
crw-rw-rw- 1 root 9, 11  5 10 21:38 /dev/cu.usbmodem2101
crw-rw-rw- 1 root 9, 10  5 10 20:16 /dev/tty.usbmodem2101
zj@a:~/docs$ espflash board-info
[2024-05-10T13:38:06Z INFO ] Detected 2 serial ports
[2024-05-10T13:38:06Z INFO ] Ports which match a known common dev board are highlighted
[2024-05-10T13:38:06Z INFO ] Please select a port
[2024-05-10T13:38:19Z INFO ] Serial port: '/dev/cu.usbmodem2101'
[2024-05-10T13:38:19Z INFO ] Connecting...
[2024-05-10T13:38:21Z INFO ] Using flash stub
Chip type:         esp32s3 (revision v0.2)
Crystal frequency: 40 MHz
Flash size:        16MB
Features:          WiFi, BLE
MAC address:       3c:84:27:04:fe:18

# 使用 probe-rs 工具
zj@a:~/docs$ probe-rs info
Probing target via JTAG

 WARN probe_rs::probe::espusbjtag: More than one TAP detected, defaulting to tap0
No DAP interface was found on the connected probe. ARM-specific information cannot be printed.
Error while reading RISC-V info: Connected target is not a RISC-V device.
Xtensa Chip:
  IDCODE: 00120034e5
    Version:      1
    Part:         8195
    Manufacturer: 626 (Tensilica)

Probing target via SWD

Error identifying target using protocol SWD: Probe does not support SWD

zj@a:~/docs$
如果烧写了 USB-OTG 应用,则他依赖的 USB Host/Device Stack 代码在启动时自动将 ESP32 内置的 USB Phy 链接到 USB-OTG Controller, 从而不会被 PC 识别为 USB-Serial-JTAG Controller。这时需要按住 BOOT 按钮的同时按RST 按钮,这样开发板重启并进入 download 模式,内部的 USB PHY 将重新连接 USB-Serial-JTAG Controller。
18.2 strapping pins #
参考:ESP32 datasheet
CPU reset:将 CPU EN 引脚置为低电平,即可触发芯片 reset;
- 开发板一般有一个单独的 RST 按钮,连接 CPU EN 引脚,按下是出发 CPU reset。
CPU 上电或 reset 时,CPU 先读取如下引脚的电平来决定启动模式等,reset 结束后,这些引脚恢复正常 IO 功能:
- Chip boot mode:GPIO0, GPIO46;
- VDD_SPI voltage: GPIO45; 《- flash memory 的 voltage
- ROM messages printing: GPIO46;
- JTAG signal source: GPIO3;
各接口的默认情况:
- GPIO0 默认内部 pull-up:默认为高电平。
- GPIO45/GPIO46 默认内部 pull-down:默认为低电平。
- GPIO3 为 floating,电平未知。
2.6.1 Chip Boot Mode Control
GPIO0 and GPIO46 control the boot mode after the reset is released. See Table 2-11 Chip Boot Mode
Control.
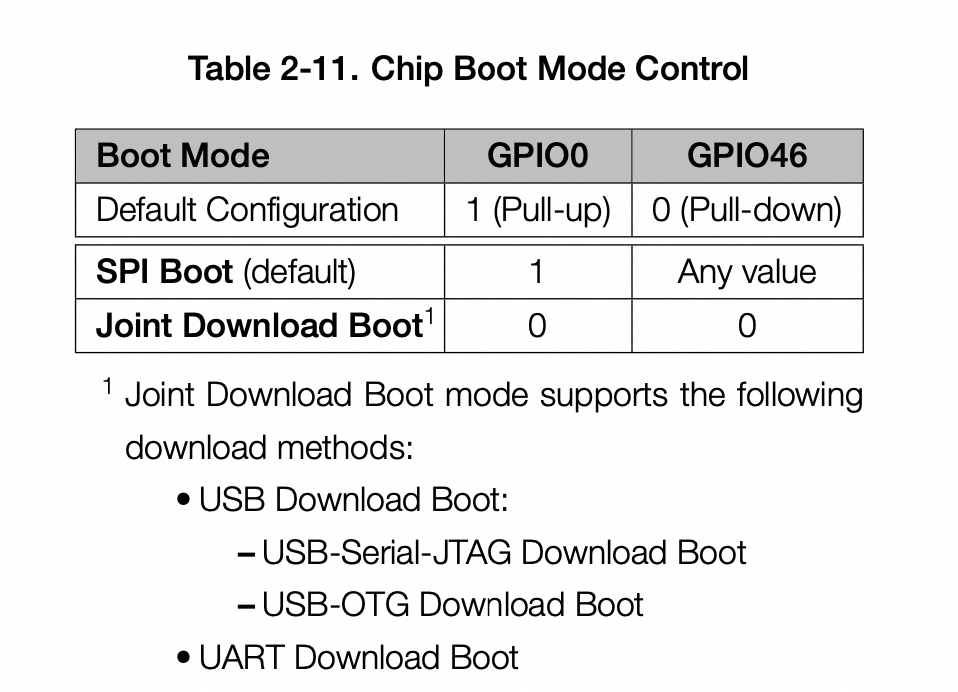
开发板中 GPIO46 引脚是悬空的,所以默认为内部 pull-down 的低电平。这样主要取决于 GPIO0 引脚的情况:
- GPIO0 在开发版中连接 BOOT 按钮,可以人工控制电平。
- GPIO0 引脚是在 reset 时才会读取的,所以需要和 RST 按钮一起按下。
当 reset 时按住 BOOT 按钮,就将 GPIO0 置为低电平,这时进入 Joint Download Boot Mode:
- USB Download Boot:
- USB-Serial-JTAG Download Boot
- USB-OTG Download Boot
- UART Download Boot
对于 Joint Download Boot Mode,ESP32 支持 同时从 USB 或 UART0 接口下载固件数据。
- ESP 内部只有一个 USB PHY,而有两个 Controller:USB-Serial-JTAG Controller 和 USB-OTG Controller;
- 该 USB PHY
只能连接到一个 Controller,默认连接到 USB-Serial-JTAG Controller; - 后续可以通过软件
设置寄存器或 eFuse 的方式来修改 PHY 连接到的 Controller 类型;
比如,如果要开发 USB-OTG 应用,芯片烧写了 USB Stack 代码(Host 或 Device 模式均可),则在 USB Host/Device Stack 的初始化代码 会通过设置寄存器的方式将 PHY 连接到 OTG Controller。这时如果要通过
USB 烧录固件,则需要 手动按住开发版上的 reset+boot 按钮 ,触发 CPU 复位重启和置为 Boot download mode,这时 USB PHY 重新连接了默认了 USB-Serial-JTAG Controller。
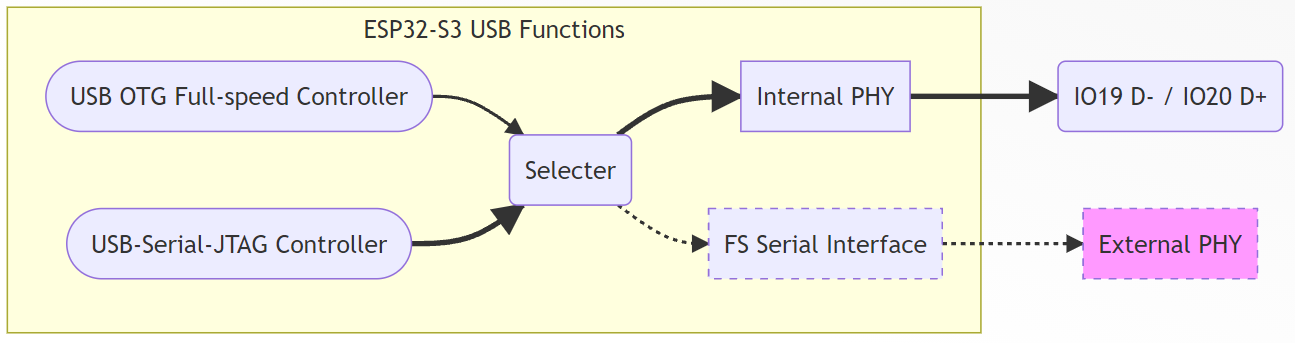
As the ESP32-S3 only has a single internal PHY, at first programming you may need to decide how that is going to be used in the intended application by burning eFuses to affect the initial USB configuration.
This affects ROM download mode as well: while both USB-OTG as well as the USB Serial/JTAG controller
allows serial programming, only USB-OTG supports the DFU protocol and only the USB Serial/JTAG controller supports JTAG debugging over USB .
Even when not using USB, eFuse configuration is required when an external JTAG adapter will be used.
Table 33-6 indicates which eFuse to burn to get a certain boot-up configuration. Note that this is
mostly relevant for the configuration in download mode and the bootloader as the configuration can
be altered at runtime as soon as user code is running.
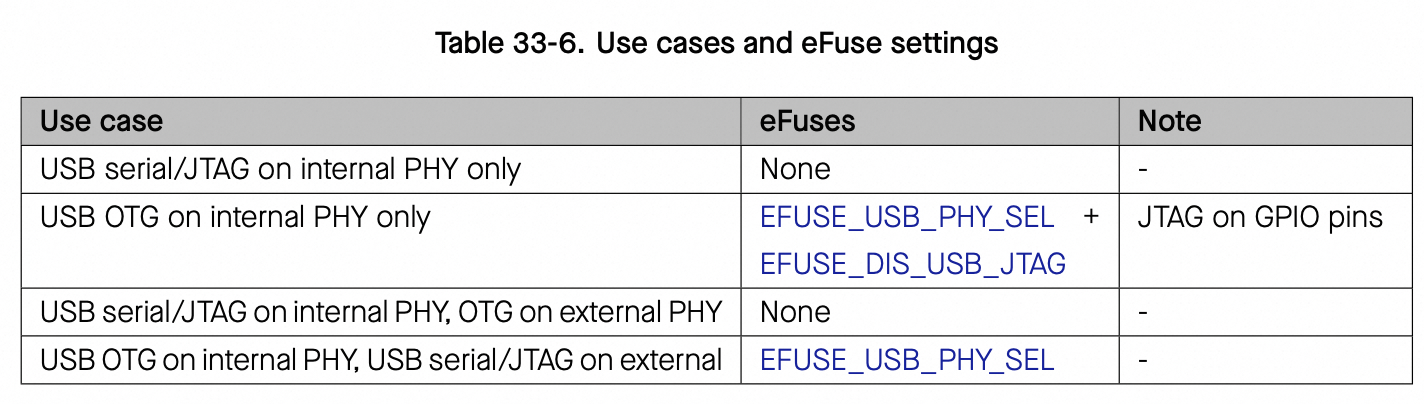
After the user program is running, it can modify the initial configuration by setting registers. Specifically, RTC_CNTL_SW_HW_USB_PHY_SEL can be used to have software override the effect of EFUSE_USB_PHY_SEL: if this bit is set, the USB PHY selection logic will use the value of the
RTC_CNTL_SW_USB_PHY_SEL bit in place of that of EFUSE_USB_PHY_SEL.
As shown in 33-3, by default (phy_sel = 0), ESP32-S3 USB Serial/JTAG Controller is connected to
internal PHY and USB-OTG is connected to external PHY. However, when USB-OTG Download mode is enabled, the chip initializes the IO pad connected to the external PHY in ROM when starts up. The
status of each IO pad after initialization is as follows.
In SPI Boot mode, the ROM bootloader loads and executes the program from SPI flash to boot the
system.
In Joint Download Boot mode, users can download binary files into flash using UART0 or USB
interface. It is also possible to download binary files into SRAM and execute it from SRAM.
In addition to SPI Boot and Joint Download Boot modes, ESP32-S3 also supports SPI Download Boot
mode. For details, please see ESP32-S3 Technical Reference Manual > Chapter Chip Boot Control.
2.6.3 ROM Messages Printing Control
使用 GPIO46 控制,开发版一般悬空,使用默认内部下拉的低电平。
During boot process the messages by the ROM code can be printed to:
(Default) UART and USB Serial/JTAG controller.(同时发送到 UART 和 USB)- USB Serial/JTAG controller.
- UART.
The ROM messages printing to UART or USB Serial/JTAG controller can be respectively disabled by
configuring registers and eFuse. For detailed information, please refer to ESP32-S3 Technical
Reference Manual > Chapter Chip Boot Control.
2.6.4 JTAG Signal Source Control
ESP32 内部的 JTAG Controller 的 signal 来源有两种方式:
- USB Serial/JTAG Controller;
- ESP32 单独提供的 JTAG 引脚,如 MTDI,MTCK, MTMS, and MTDO
The strapping pin GPIO3 can be used to control the source of JTAG signals during the early boot
process. This pin does not have any internal pull resistors and the strapping value must be
controlled by the external circuit that cannot be in a high impedance state.
As Table 2-13 shows, GPIO3 is used in combination with EFUSE_DIS_PAD_JTAG, EFUSE_DIS_USB_JTAG, and EFUSE_STRAP_JTAG_SEL .
GPIO3 开发板一般悬空,内部没有 pull up/down,电平未知。默认是从 USB Serial/JTAG Controller 获得 JTAG signal。
受三个 eFuse + GPIO3 共同控制:
- 三个 eFuse 都为 0(默认) 时,不管 GPIO3 为何电平,JTAG Controller 都从 USB Serial/JTAG Controller 获得 JTAG 信号;《– 默认行为
- 当三个 eFuse 为 0/0/1 时,取决于 GPIO3 电平:
- 0 : JTAG pins MTDI,MTCK, MTMS, and MTDO
- 1 : USB Serial/JTAG Controller
- 其他情况,只会根据 eFuse0/eFuse1 的值来决定是哪一个 source。
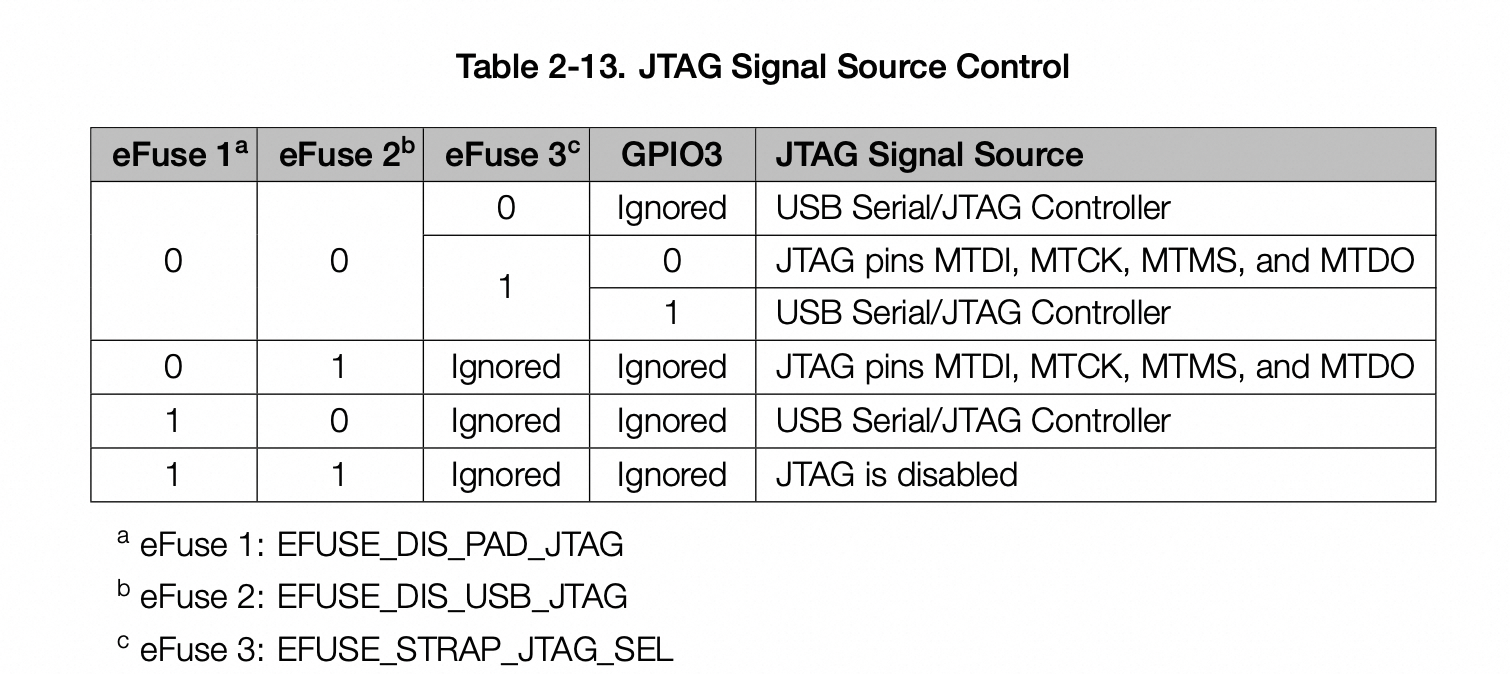
18.3 reset 和 download mode #
开发板上提供了两个轻触开关来控制 CHIP_PU(也称EN/RST)和 GPIO0 电平(未按时高电平,按下时将引脚置为低电平):
- SW1 BOOT 开关:连接 GPIO0 引脚,为低电平时将芯片置为
download 模式,否则就是正常的从 FLASH 加载代码来执行的模式; - SW2 REST 开关:连接 CHIP_PU(EN/REST 引脚),为低电平时 reset/restart 芯片;
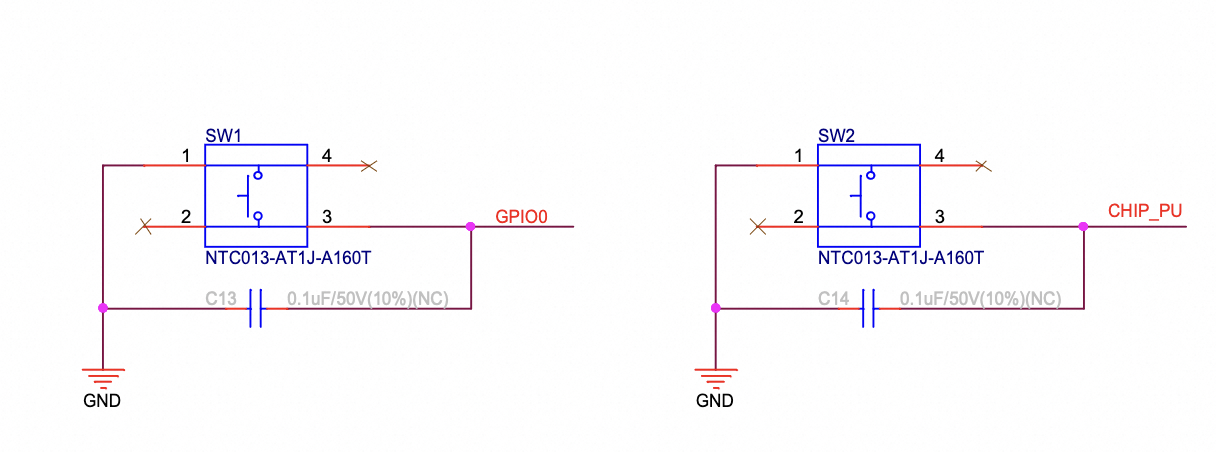
单独按 BOOT 开关没有效果,需要在按住 RST 开关的同时来按 BOOT 开关:
- 如果没有按 BOOT 开关,reset 复位后是
正常的启动流程,即从 FLASH 中加载代码; - 如果按了 BOOT 开关,reset 复位后进入
download 模式,从 UART0/USB 接收固件代码;- ESP32 同时从 UART0 或 USB OTG 接口接收固件代码,具体看烧写器连接的是哪一个接口。
- 使用 UART0 接口时,一般需要额外的 UART-USB-Bridge 芯片(因为当前电脑一般不直接带 UART 的 COM 硬件接口)。
- 使用 USB OTG 则直接使用 ESP32 内置的 USB Controller,不需要额外的硬件;
- 如果使用 USB OTG 接口,则称为 DFU( Device Firmware Upgrade)操作;
- ESP32 同时从 UART0 或 USB OTG 接口接收固件代码,具体看烧写器连接的是哪一个接口。
除了按物理开关外,也可以通过软件编程来将芯片复位和置为 download 模式:
-
USB-to-UART Bridge 芯片:带有 DTR 和 RTS 引脚(高电平有效),分别经过三极管转换为低电平有效后,连接芯片的 DTR -> GPIO0 和 RTS -> CHIP_PU 引脚,实现软件控制;
https://dl.espressif.com/dl/schematics/SCH_ESP32-S3-DevKitC-1_V1.1_20221130.pdf
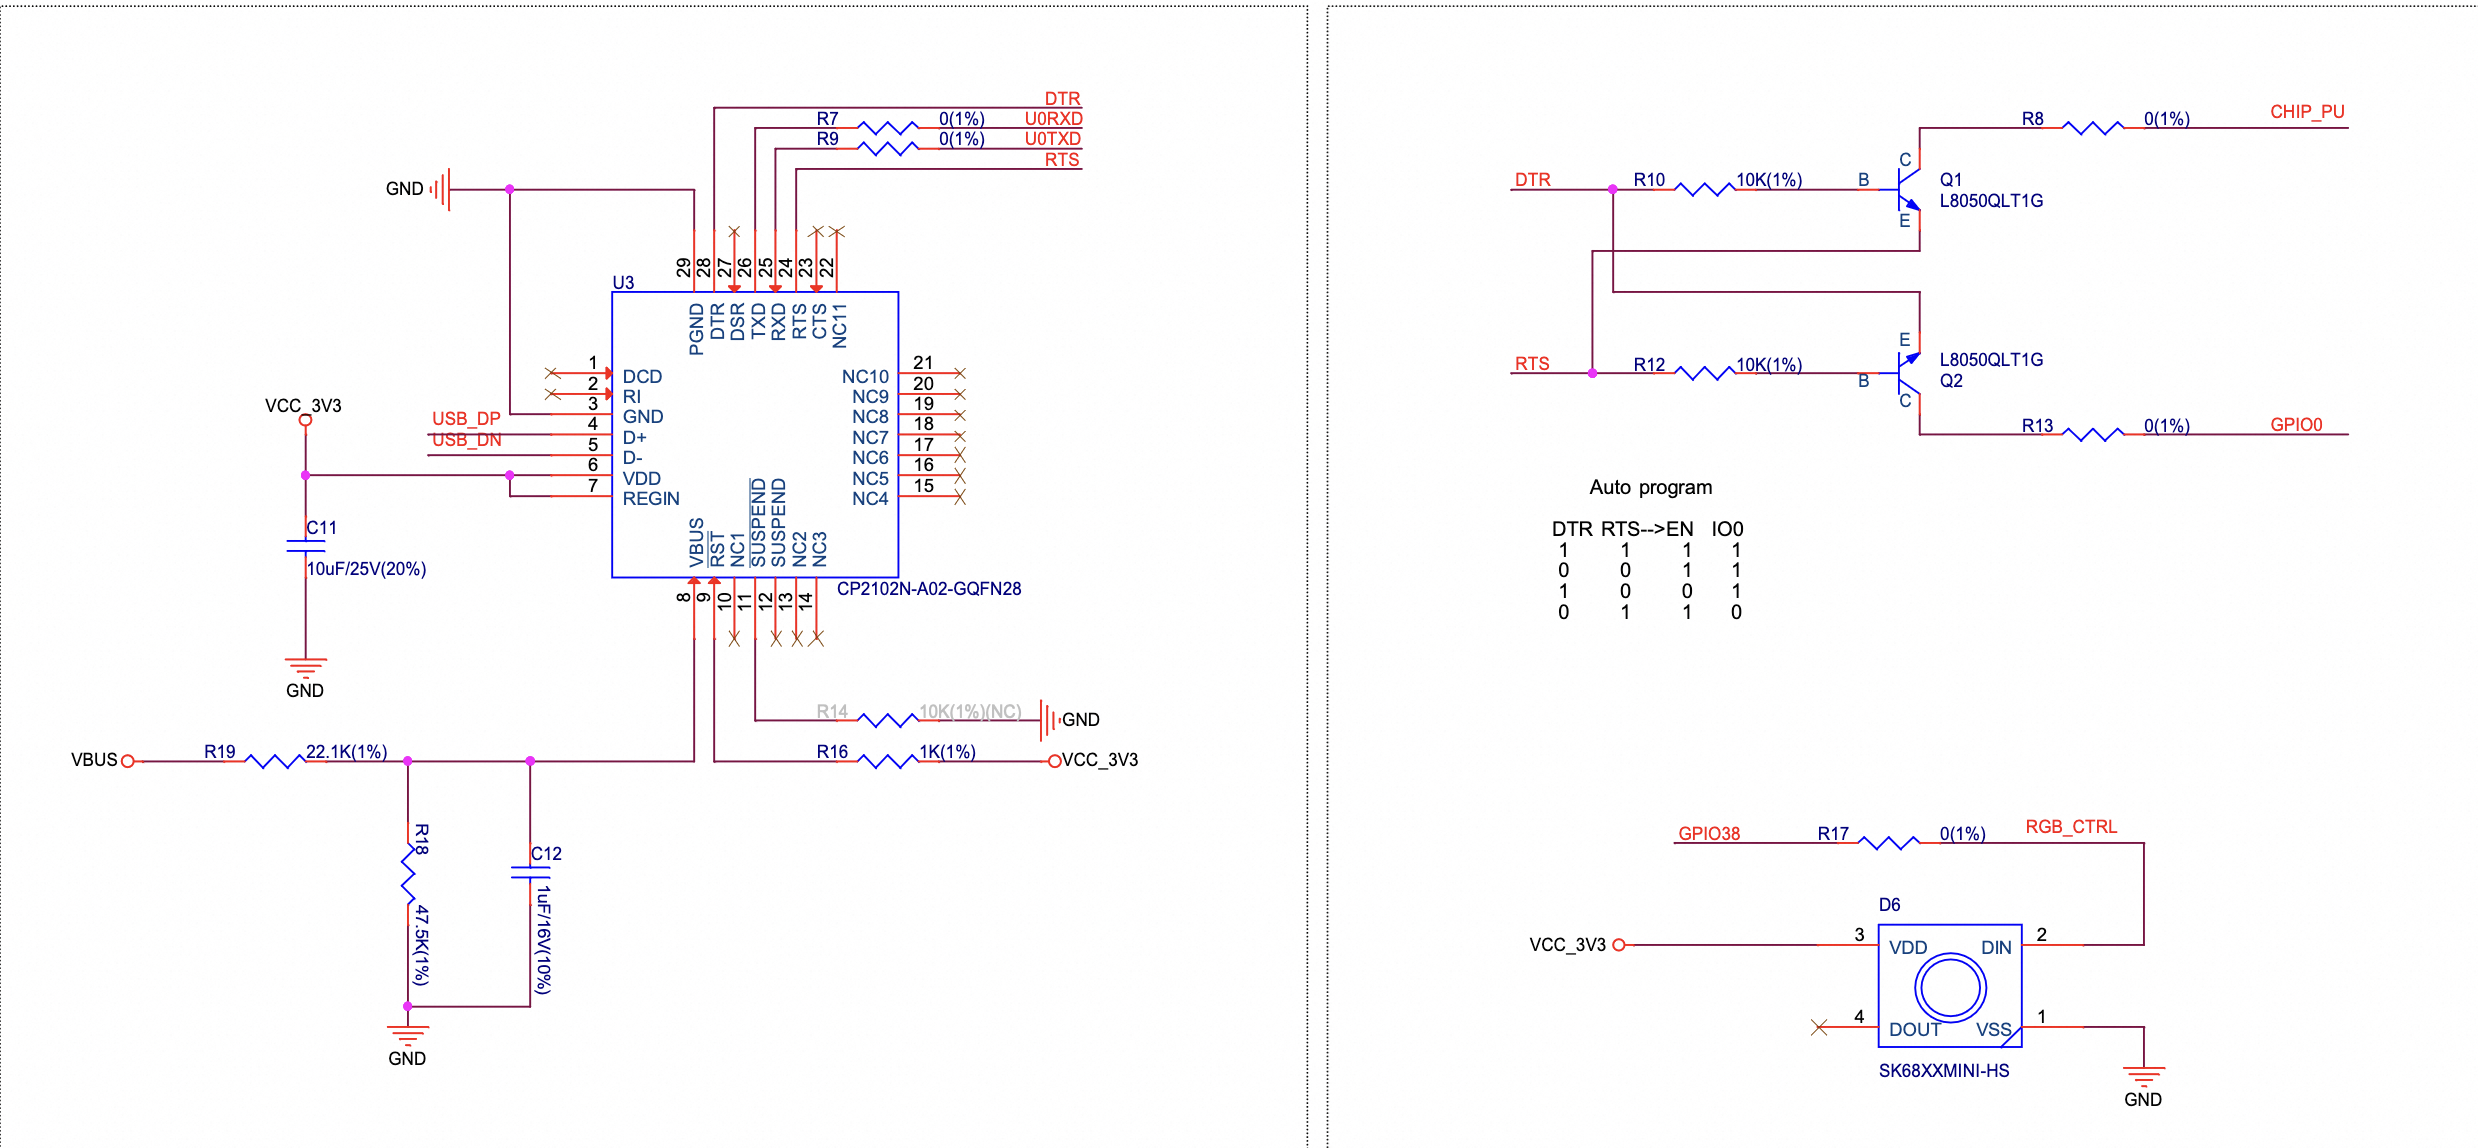
-
USB 接口(默认连接的是 USB-Serial-JTAG Controller):该接口虚拟的 USB-CDC-ACM 串口设备也提供了虚拟的 RST/DTR line,实现软件控制;
esptool.py 等 flash 烧写和调试软件,通过软件设置串口的 DTR 和 RST 参数组合,将芯片 reset 和设置 download 模式,download 结束后再 reset 芯片来启动正常的从 flash 加载应用的流程。
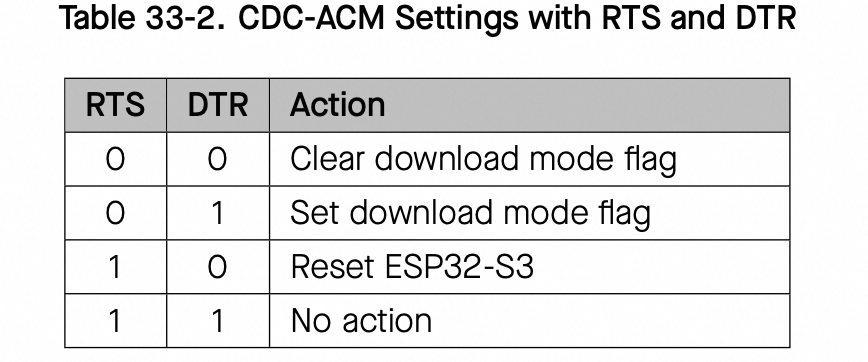
18.4 Application Startup Flow #
https://docs.espressif.com/projects/esp-idf/en/latest/esp32s3/api-guides/startup.html
This note explains various steps which happen before app_main function of an ESP-IDF application is called.
The high level view of startup process is as follows:
First Stage Bootloader in ROMloads second-stage bootloader image to RAM (IRAM & DRAM) from flash offset 0x0.Second Stage Bootloaderloads partition table and main app image from flash. Main app incorporates both RAM segments and read-only segments mapped via flash cache.Application Startup executes. At this point the second CPU and RTOS scheduler are started.
First Stage Bootloader in ROM 是 ESP32 芯片出厂内置在 ROM 中的代码,而且是只读不能修改的。
- CPU 复位后执行位于 ROM 中的 First Stage Bootloader。
Second Stage Bootloader 位于可编程 Flash 中(offset 0x0),是开发者可以修改和自定义的,他使用分区表来描述 Flash 中的内容。
First Stage Bootloader
After SoC reset, PRO CPU will start running immediately, executing reset vector code, while APP CPU
will be held in reset. During startup process, PRO CPU does all the initialization. APP CPU reset is
de-asserted in the call_start_cpu0 function of application startup code. Reset vector code is
located in the mask ROM of the ESP32-S3 chip and cannot be modified.
Startup code called from the reset vector determines the boot mode by checking GPIO_STRAP_REG
register for bootstrap pin states. Depending on the reset reason, the following takes place:
Second stage bootloader binary image is loaded from the start of flash at offset 0x0.
Second Stage Bootloader
In ESP-IDF, the binary image which resides at offset 0x0 in flash(用户可编程的 Flash,而非 ESP32内置的 ROM) is the second stage bootloader. Second stage bootloader source code is available in
components/bootloader directory of ESP-IDF. Second stage bootloader is used in ESP-IDF to add
flexibility to flash layout (using partition tables), and allow for various flows associated with
flash encryption, secure boot, and over-the-air updates (OTA) to take place.
When the first stage bootloader is finished checking and loading the second stage bootloader, it
jumps to the second stage bootloader entry point found in the binary image header.
Second stage bootloader reads the partition table found by default at offset 0x8000 (configurable
value). See partition tables documentation for more information. The bootloader finds factory and OTA app partitions. If OTA app partitions are found in the partition table, the bootloader consults
the otadata partition to determine which one should be booted. See Over The Air Updates (OTA) for
more information.
For a full description of the configuration options available for the ESP-IDF bootloader, see Bootloader.
For the selected partition, second stage bootloader reads the binary image from flash one segment at
a time:
- For segments with load addresses in internal IRAM (Instruction RAM) or DRAM (Data RAM), the contents are copied from flash to the load address.
- For segments which have load addresses in DROM (Data Stored in flash) or IROM (Code Executed from flash) regions, the flash MMU is configured to provide the correct mapping from the flash to the load address.
Once all segments are processed - meaning code is loaded and flash MMU is set up, second stage
bootloader verifies the integrity of the application and then jumps to the application entry point
found in the binary image header.
Application Startup
Application startup covers everything that happens after the app starts executing and before the app_main function starts running inside the main task. This is split into three stages:
Port initialization of hardware and basic C runtime environment.
System initialization of software services and FreeRTOS.
Running the main task and calling app_main.
18.5 bootloader #
这里的 bootloader 指的是位于 Flash 0x0 未知的 second stage bootloader。
- 第一个阶段的 bootload 位于 ROM 中,开发者不能修改和控制。
Bootloader is located at the address 0x1000 in the flash. 所以 Flash 前 4KB 没有使用。
而缺省情况下分区表在 flash 中的偏移地址是 CONFIG_PARTITION_TABLE_OFFSET value 0x8000, 所以
Bootloader 的 可用空间是 0x7000 大小 。
esp-rs 或 esp-idf 的 std 应用都会构建出:
- 应用本身 myespv4;
- 分区表文件 partition-table.bin;
- 缺省 bootloader 文件 bootloader.bin;
这三个文件都会被烧写到 flash 中。
zj@a:~/code/esp32/std$ ls -l target/xtensa-esp32s3-espidf/debug/myespv4
-rwxr-xr-x 1 alizj 12M  5  8 15:54 target/xtensa-esp32s3-espidf/debug/myespv4*
zj@a:~/code/esp32/std$ ls -l target/xtensa-esp32s3-espidf/debug/*.bin
-rw-r--r-- 1 alizj  21K  5  8 15:52 target/xtensa-esp32s3-espidf/debug/bootloader.bin
-rw-r--r-- 1 alizj 3.0K  5  8 15:54 target/xtensa-esp32s3-espidf/debug/partition-table.bin
https://docs.espressif.com/projects/esp-idf/en/latest/esp32/api-guides/bootloader.html
The ESP-IDF Software Bootloader performs the following functions:
Minimal initial configuration of internal modules;
Initialize Flash Encryption and/or Secure features, if configured;
Select the application partition to boot, based on the partition table and ota_data (if any);
Load this image to RAM (IRAM & DRAM) and transfer management to the image that was just loaded.
Bootloader is located at the address 0x1000 in the flash.
For a full description of the startup process including the ESP-IDF bootloader, see Application Startup Flow.
Bootloader Compatibility
It is recommended to update to newer versions of ESP-IDF: when they are released. The OTA (over the air) update process can flash new apps in the field but cannot flash a new bootloader. For this reason, the bootloader supports booting apps built from newer versions of ESP-IDF.
The bootloader does not support booting apps from older versions of ESP-IDF. When updating ESP-IDF manually on an existing product that might need to downgrade the app to an older version, keep using the older ESP-IDF bootloader binary as well.
Note
If testing an OTA update for an existing product in production, always test it using the same ESP-IDF bootloader binary that is deployed in production.
SPI Flash Configuration
Each ESP-IDF application or bootloader .bin file contains a header with CONFIG_ESPTOOLPY_FLASHMODE, CONFIG_ESPTOOLPY_FLASHFREQ, CONFIG_ESPTOOLPY_FLASHSIZE embedded in it. These are used to configure
the SPI flash during boot.
The First Stage Bootloader in ROM reads the Second Stage Bootloader header information from flash
and uses this information to load the rest of the Second Stage Bootloader from flash. However, at
this time the system clock speed is lower than configured and not all flash modes are
supported. When the Second Stage Bootloader then runs, it will reconfigure the flash using values
read from the currently selected app binary’s header (and NOT from the Second Stage Bootloader
header). This allows an OTA update to change the SPI flash settings in use.
Bootloaders prior to ESP-IDF V4.0 used the bootloader’s own header to configure the SPI flash, meaning these values could not be changed in an update. To maintain compatibility with older bootloaders, the app re-initializes the flash settings during app startup using the configuration found in the app header.
Log Level
The default bootloader log level is "Info". By setting the CONFIG_BOOTLOADER_LOG_LEVEL option, it is
possible to increase or decrease this level. This log level is separate from the log level used in
the app (see Logging library).
Reducing bootloader log verbosity can improve the overall project boot time by a small amount.
Bootloader Size
When enabling additional bootloader functions, including Flash Encryption or Secure Boot, and
especially if setting a high CONFIG_BOOTLOADER_LOG_LEVEL level, then it is important to monitor the bootloader .bin file's size.
When using the default CONFIG_PARTITION_TABLE_OFFSET value 0x8000, the size limit is 0x8000 bytes.
If the bootloader binary is too large, then the bootloader build will fail with an error “Bootloader binary size [..] is too large for partition table offset”. If the bootloader binary is flashed anyhow then the ESP32 will fail to boot - errors will be logged about either invalid partition table or invalid bootloader checksum.
Options to work around this are:
Set bootloader compiler optimization back to “Size” if it has been changed from this default value.
Reduce bootloader log level. Setting log level to Warning, Error or None all significantly reduce the final binary size (but may make it harder to debug).
Set CONFIG_PARTITION_TABLE_OFFSET to a higher value than 0x8000, to place the partition table later in the flash. This increases the space available for the bootloader. If the partition table CSV file contains explicit partition offsets, they will need changing so no partition has an offset lower than CONFIG_PARTITION_TABLE_OFFSET + 0x1000. (This includes the default partition CSV files supplied with ESP-IDF.)
When Secure Boot V2 is enabled, there is also an absolute binary size limit of 48 KB (0xC000 bytes)
(excluding the 4 KB signature), because the bootloader is first loaded into a fixed size buffer for
verification.
开发 second stage bootloader:
The current bootloader implementation allows a project to extend it or modify it. There are two ways
of doing it: by implementing hooks or by overriding it. Both ways are presented in custom_bootloader
folder in ESP-IDF examples:
- bootloader_hooks which presents how to connect some hooks to the bootloader initialization
- bootloader_override which presents how to override the bootloader implementation
In the bootloader space, you cannot use the drivers and functions from other components. If necessary, then the required functionality should be placed in the project’s bootloader_components directory (note that this will increase its size).
If the bootloader grows too large then it can collide with the partition table, which is flashed at offset 0x8000 by default. Increase the partition table offset value to place the partition table later in the flash. This increases the space available for the bootloader.
custom_bootloader: https://github.com/espressif/esp-idf/tree/master/examples/custom_bootloader
https://github.com/espressif/esp-idf/tree/master/components/bootloader
esp-idf/components/bootloader/subproject/main/bootloader_hooks.h
#ifndef BOOTLOADER_HOOKS_H
#define BOOTLOADER_HOOKS_H

/**
 * @file The 2nd stage bootloader can be overriden or completed by an application.
 * The functions declared here are weak, and thus, are meant to be defined by a user
 * project, if required.
 * Please check `custom_bootloader` ESP-IDF examples for more details about this feature.
 */


/**
 * @brief Function executed *before* the second stage bootloader initialization,
 * if provided.
 */
void __attribute__((weak)) bootloader_before_init(void);

/**
 * @brief Function executed *after* the second stage bootloader initialization,
 * if provided.
 */
void __attribute__((weak)) bootloader_after_init(void);

#endif // BOOTLOADER_HOOKS_H
components/bootloader/subproject/main/bootloader_start.c
/*
 * SPDX-FileCopyrightText: 2015-2022 Espressif Systems (Shanghai) CO LTD
 *
 * SPDX-License-Identifier: Apache-2.0
 */
#include <stdbool.h>
#include "esp_log.h"
#include "esp_rom_sys.h"
#include "bootloader_init.h"
#include "bootloader_utility.h"
#include "bootloader_common.h"
#include "bootloader_hooks.h"

static const char *TAG = "boot";

static int select_partition_number(bootloader_state_t *bs);
static int selected_boot_partition(const bootloader_state_t *bs);

/*
 * We arrive here after the ROM bootloader finished loading this second stage bootloader from flash.
 * The hardware is mostly uninitialized, flash cache is down and the app CPU is in reset.
 * We do have a stack, so we can do the initialization in C.
 */
void __attribute__((noreturn)) call_start_cpu0(void)
{
    // (0. Call the before-init hook, if available)
    if (bootloader_before_init) {
        bootloader_before_init();
    }

    // 1. Hardware initialization
    if (bootloader_init() != ESP_OK) {
        bootloader_reset();
    }

    // (1.1 Call the after-init hook, if available)
    if (bootloader_after_init) {
        bootloader_after_init();
    }

#ifdef CONFIG_BOOTLOADER_SKIP_VALIDATE_IN_DEEP_SLEEP
    // If this boot is a wake up from the deep sleep then go to the short way,
    // try to load the application which worked before deep sleep.
    // It skips a lot of checks due to it was done before (while first boot).
    bootloader_utility_load_boot_image_from_deep_sleep();
    // If it is not successful try to load an application as usual.
#endif

    // 2. Select the number of boot partition
    bootloader_state_t bs = {0};
    int boot_index = select_partition_number(&bs);
    if (boot_index == INVALID_INDEX) {
        bootloader_reset();
    }

    // 3. Load the app image for booting
    bootloader_utility_load_boot_image(&bs, boot_index);
}

// Select the number of boot partition
static int select_partition_number(bootloader_state_t *bs)
{
    // 1. Load partition table
    if (!bootloader_utility_load_partition_table(bs)) {
        ESP_LOGE(TAG, "load partition table error!");
        return INVALID_INDEX;
    }

    // 2. Select the number of boot partition
    return selected_boot_partition(bs);
}

/*
 * Selects a boot partition.
 * The conditions for switching to another firmware are checked.
 */
static int selected_boot_partition(const bootloader_state_t *bs)
{
    int boot_index = bootloader_utility_get_selected_boot_partition(bs);
    if (boot_index == INVALID_INDEX) {
        return boot_index; // Unrecoverable failure (not due to corrupt ota data or bad partition contents)
    }
    if (esp_rom_get_reset_reason(0) != RESET_REASON_CORE_DEEP_SLEEP) {
        // Factory firmware.
#ifdef CONFIG_BOOTLOADER_FACTORY_RESET
        bool reset_level = false;
#if CONFIG_BOOTLOADER_FACTORY_RESET_PIN_HIGH
        reset_level = true;
#endif
        if (bootloader_common_check_long_hold_gpio_level(CONFIG_BOOTLOADER_NUM_PIN_FACTORY_RESET, CONFIG_BOOTLOADER_HOLD_TIME_GPIO, reset_level) == GPIO_LONG_HOLD) {
            ESP_LOGI(TAG, "Detect a condition of the factory reset");
            bool ota_data_erase = false;
#ifdef CONFIG_BOOTLOADER_OTA_DATA_ERASE
            ota_data_erase = true;
#endif
            const char *list_erase = CONFIG_BOOTLOADER_DATA_FACTORY_RESET;
            ESP_LOGI(TAG, "Data partitions to erase: %s", list_erase);
            if (bootloader_common_erase_part_type_data(list_erase, ota_data_erase) == false) {
                ESP_LOGE(TAG, "Not all partitions were erased");
            }
#ifdef CONFIG_BOOTLOADER_RESERVE_RTC_MEM
            bootloader_common_set_rtc_retain_mem_factory_reset_state();
#endif
            return bootloader_utility_get_selected_boot_partition(bs);
        }
#endif // CONFIG_BOOTLOADER_FACTORY_RESET
        // TEST firmware.
#ifdef CONFIG_BOOTLOADER_APP_TEST
        bool app_test_level = false;
#if CONFIG_BOOTLOADER_APP_TEST_PIN_HIGH
        app_test_level = true;
#endif
        if (bootloader_common_check_long_hold_gpio_level(CONFIG_BOOTLOADER_NUM_PIN_APP_TEST, CONFIG_BOOTLOADER_HOLD_TIME_GPIO, app_test_level) == GPIO_LONG_HOLD) {
            ESP_LOGI(TAG, "Detect a boot condition of the test firmware");
            if (bs->test.offset != 0) {
                boot_index = TEST_APP_INDEX;
                return boot_index;
            } else {
                ESP_LOGE(TAG, "Test firmware is not found in partition table");
                return INVALID_INDEX;
            }
        }
#endif // CONFIG_BOOTLOADER_APP_TEST
        // Customer implementation.
        // if (gpio_pin_1 == true && ...){
        //     boot_index = required_boot_partition;
        // } ...
    }
    return boot_index;
}

// Return global reent struct if any newlib functions are linked to bootloader
struct _reent *__getreent(void)
{
    return _GLOBAL_REENT;
}
开发 bootloader 的支持库: https://github.com/espressif/esp-idf/tree/master/components/bootloader_support
esp bootloader plus:
https://github.com/espressif/esp-bootloader-plus/blob/master/README_CN.md esp
bootloader plus 是乐鑫基于 ESP-IDF 的 custom bootloader 推出的 增强版 bootloader ,支持在 bootloader
阶段 对压缩或差分 + 压缩的固件进行 解压缩或解压缩 + 反差分,来升级原有固件 。 下表总结了适配 esp
bootloader plus 的乐鑫芯片以及其对应的 ESP-IDF 版本:
Chip ESP-IDF Release/v4.4 ESP-IDF Master ESP32-C3 alt text alt text ESP32-C2 N/A alt text
使用 esp bootloader plus 可以轻松支持下述三种 OTA 更新方式:
全量更新:服务器将完整的 new_app.bin 发送到设备端,设备端直接应用 new_app.bin 完成固件更新。压缩更新:服务器将压缩后的 new_app.bin,即 compressed_app.bin 发送到设备端,设备端应用解压后得到的 new_app.bin 完成固件更新。差分压缩更新:服务器使用设备端正在运行的 origin_app.bin 和 需要更新的 new_app.bin 计算出一个补丁文件 patch.bin,然后将补丁文件发送到设备端;设备端使用补丁,执行反差分,恢复出 new_app.bin,并应用 new_app.bin 完成固件更新。
注:每种更新方式向下兼容。压缩更新兼容全量更新;差分压缩更新兼容压缩更新和全量更新。
18.6 USB #
-
USB Controller
参考文档:
A
USB hostcan establish a connection withUSB devicesthrough a USB interface,enabling functionssuch as data transfer and power supply.USB-IF (USB Implementers Forum) defines
USB Device Class standards, with common device classes such as- HID (Human Interface Device);
- MSC (Mass Storage Class)
- CDC (Communication Device Class),
- UAC: Audio,
- UVC:Video
- 。。。
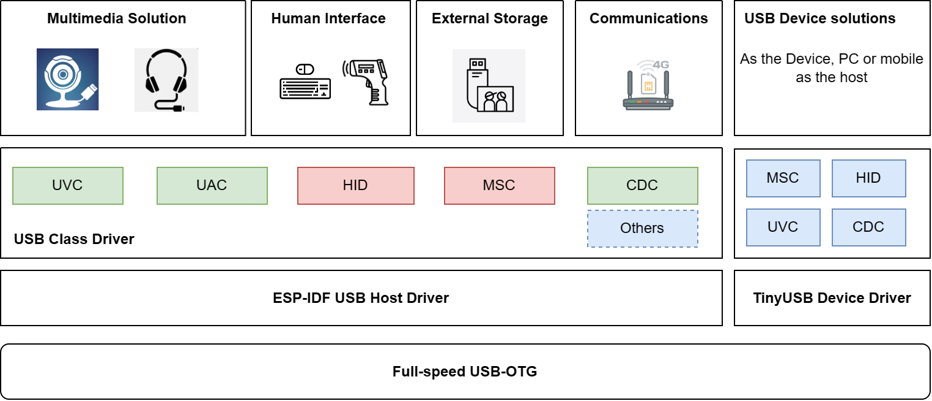
ESP32 USB 包含两个 Controller:USB-Serial-JTAG Controller 和 USB OTG Full-Speed Controller。
USB-Serial-JTAG Controller: A dedicated USB controller with bothUSB Serial and USB JTAGcapabilities. It supports firmware download, log printing, CDC transmission, and JTAG debugging through the USB interface. Secondary development such as modifying USB functions or descriptors is not supported.- 默认启用的是 USB-Serial-JTAG Controller 而非 USB OTG Full-Speed Controller;
- 连接到 PC 后会被识别为一个 USB 串口 + 一个 JTAG 接口;COM* for Windows, /dev/ttyACM* for Linux,
/dev/cu* for MacOS;
- 对于 JTAG 调试,不需要额外的调试器硬件,直接使用 OpenOCD 或 probe-rs 即可调试。
- USB-Serial-JTAG Controller Introduction: https://docs.espressif.com/projects/esp-iot-solution/en/latest/usb/usb_overview/usb_serial_jtag.html
USB OTG Full-Speed Controller: refers to a controller that simultaneously supportsUSB-OTG, USB Host, and USB Device modes, with the capability for mode negotiation and switching. It supports two speeds:Full-speed (12Mbps) and Low-speed (1.5Mbps), and is compatible with both USB 1.1 and USB 2.0 protocols. Starting from ESP-IDF version 4.4, it includesUSB Host and USB Deviceprotocol stacks, as well as variousdevice class drivers, supporting user secondary development.- USB-OTG Peripheral Introduction: https://docs.espressif.com/projects/esp-iot-solution/en/latest/usb/usb_overview/usb_otg.html
只有 USB OTG 才能使用 USB 接口进行 DFU 更新。
只有 USB JTAG 才能进行 JTAG 调试。
-
USB OTG Host
USB-OTG 默认实现了 CDC function,所以可以被 PC 识别为串口设备,可以用于 logging, console access, and firmware downloads. The PC will detect a new serial port device, listed as COM* on Windows, /dev/ttyACM* on Linux, and /dev/cu* on MacOS.
ESP32-S2/S3 的 USB-OTG 还实现了 DFU(Device Firmware Upgrade) function,可以实现从 USB 存储设备中获取 firmware 文件然后升级。
USB-OTG 还实现了 USB Host func,USB Host drivers for HID, MSC, CDC, UVC, and other device classes. 这样可以将其他 USB 设备,如 USB 摄像头 UVC,USB 麦克风 UAC 等直接连接到 ESP32 的 USB 接口,来供 ESP32 上允许的应用来使用。
USB-OTG 还实现了 USB Device func,同时还支持 TinyUSB Stack,这样开发者可以将 ESP32 作为一个 MSC 或其他自定义 device 来开发使用.
目前只有 P4 支持 High-speed 480 Mbit/s (60 MB/s) USB 2.0 接口,其他设备都是 USB 1.0 接口的 12Mbps。
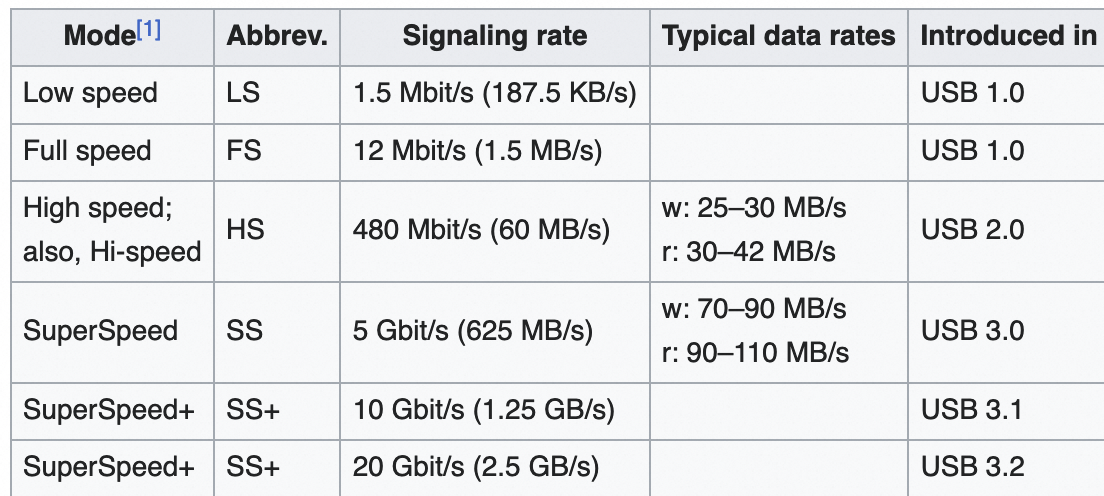
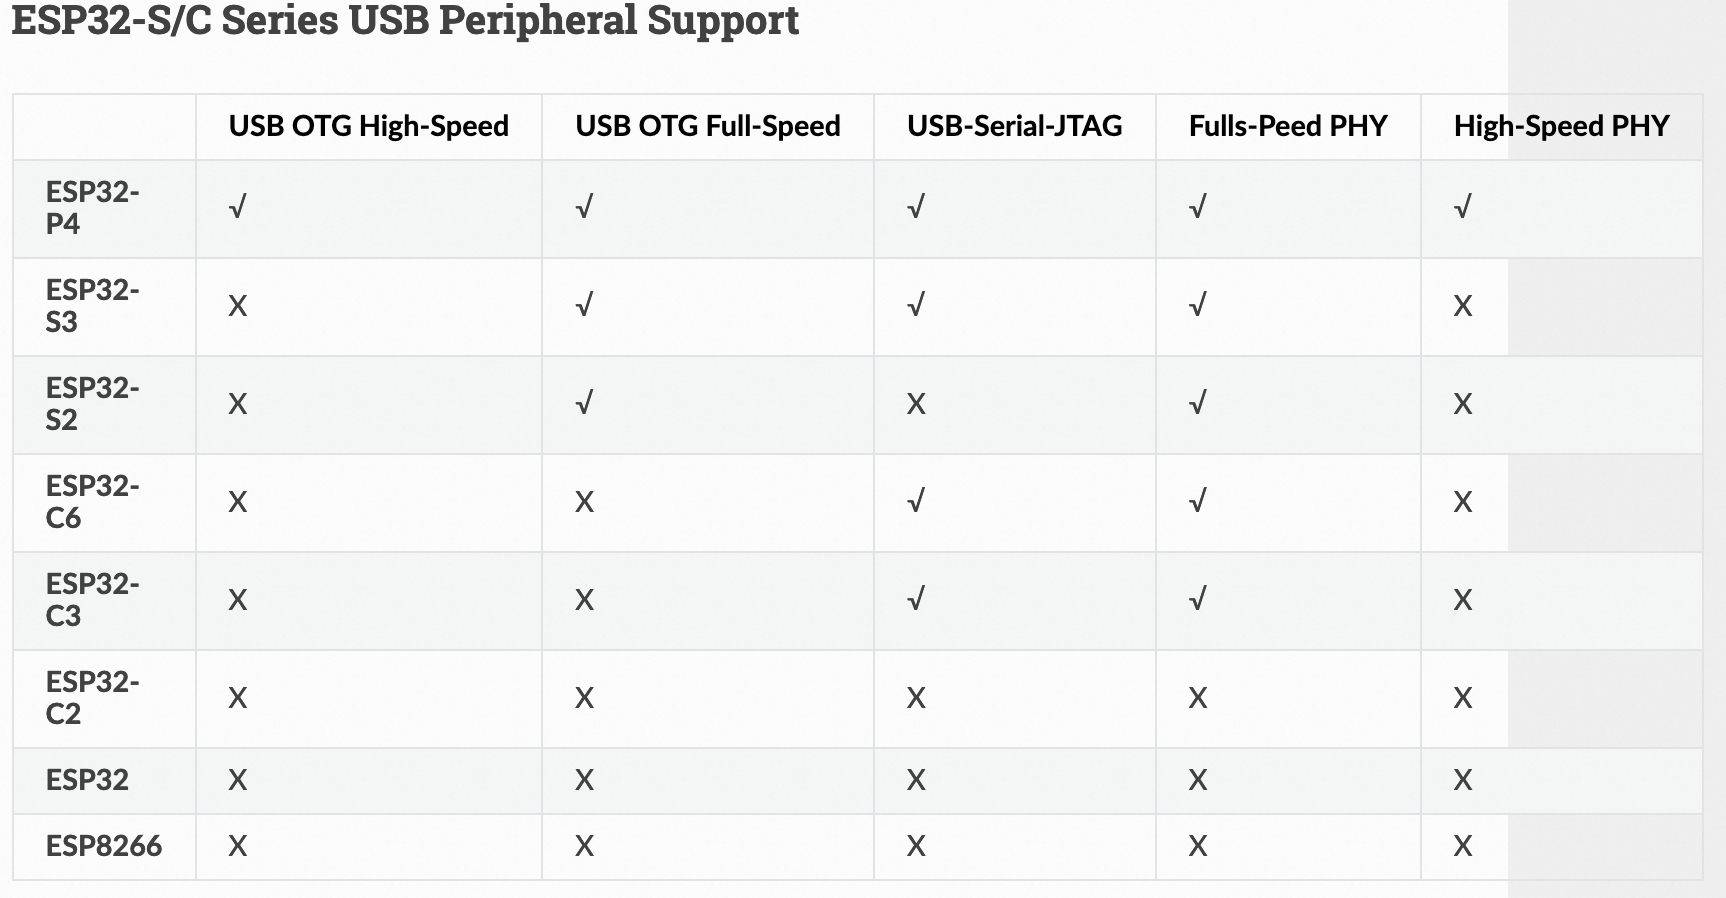
USB Hosts 是将 ESP32 作为一个 USB 主控,其他 USB 设备可以连接到 ESP32,ESP32 主控应用来发现和读取这些 USB 设备的数据。
The USB Host Library(hereinafter referred to as theHost Library) is the lowest layer of the USB Host stack that exposes a public facing API. In most cases, applications that require USB Host functionality do not need to interface with the Host Library directly. Instead, most applicationsuse the API provided by a host class driverthat is implemented on top of the Host Library.However, you may want to use the Host Library directly for some of (but not limited to) the following reasons:
- Implementation of
a custom host class driver - Usage of lower level USB Host API
Diagram of the Key Entities of USB Host Functionality
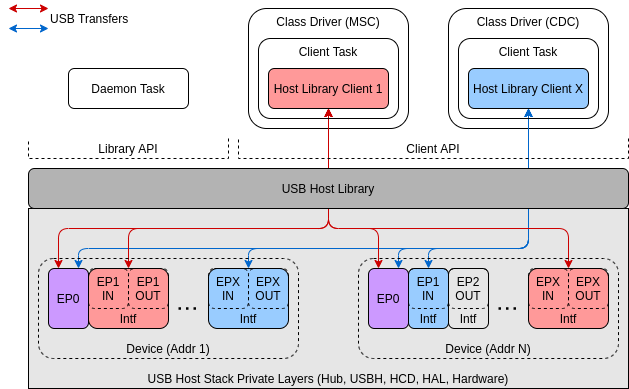
The diagram above shows the key entities that are involved when implementing USB Host functionality. These entities are:
- The Host Library
- Clients of the Host Library
- Devices
- Host Library Daemon Task
USB Hosts 应用举例: https://github.com/espressif/esp-idf/tree/master/examples/peripherals/usb/host
-
下面是 USB Host Stack 提供的使用 Host Library APIs 实现的各种 host class drivers 例子;
-
使用的 USB-OTG Contrller。
-
CDC-ACM:A host class driver for the
Communication Device Class (Abstract Control Model)is distributed as a managed component via the ESP-IDF Component Registry.- The peripherals/usb/host/cdc/cdc_acm_host example uses the =CDC-ACM host driver component to
communicate with CDC-ACM devices= .
- The peripherals/usb/host/cdc/cdc_acm_vcp example shows how can you extend the CDC-ACM host
driver to interface
Virtual COM Port devices.- The CDC-ACM driver is also used in esp_modem examples, where it is used for
communication with cellular modems.
-
MSC:A host class driver for the
Mass Storage Class (Bulk-Only Transport)is deployed to ESP-IDF Component Registry.- The peripherals/usb/host/msc example demonstrates the usage of
the MSC host driver to read and write to a USB flash drive.
- The peripherals/usb/host/msc example demonstrates the usage of
-
HID:A host class driver for the
HID (Human interface device)is distributed as a managed component via the ESP-IDF Component Registry.- The peripherals/usb/host/hid example demonstrates the possibility to
receive reports from a USB HID device with several interfaces.
- The peripherals/usb/host/hid example demonstrates the possibility to
-
UVC:A host class driver for the
USB Video Device Classis distributed as a managed component via the ESP-IDF Component Registry.- The peripherals/usb/host/uvc example demonstrates the usage of
the UVC host driver to receive a video stream from a USB cameraand optionally forward that stream over Wi-Fi.
- The peripherals/usb/host/uvc example demonstrates the usage of
- Implementation of
-
USB OTG Device
USB Device 是将 ESP32 编程为一个 USB 设备,连接到其他 USB Host 设备,如 PC。
The ESP-IDF
USB Device Stack(hereinafter referred to as theDevice Stack) enables USB Device support on ESP32-S3. By using the Device Stack, ESP32-S3 canbe programmed with any well defined USB device functions(e.g., keyboard, mouse, camera),a custom function(aka vendor-specific class), ora combinationof those functions (aka a composite device).The Device Stack is built around the
TinyUSB stack, but extends TinyUSB with some minor features and modifications for better integration with ESP-IDF. The Device stack is distributed as a managed component via the ESP-IDF Component Registry.Features:
- Multiple supported device classes (CDC, HID, MIDI, MSC)
- Composite devices
- Vendor specific classes
- Maximum of 6 endpoints
- 5 IN/OUT endpoints
- 1 IN endpoints
- VBUS monitoring for self-powered devices
USB Device 应用举例: https://github.com/espressif/esp-idf/tree/d4cd437e/examples/peripherals/usb/device
- peripherals/usb/device/tusb_console :How to set up ESP32-S3 chip to get log output via Serial Device connection
- peripherals/usb/device/tusb_serial_device :How to set up ESP32-S3 chip to work as a USB Serial Device
- peripherals/usb/device/tusb_midi : How to set up ESP32-S3 chip to work as a USB MIDI Device
- peripherals/usb/device/tusb_hid : How to set up ESP32-S3 chip to work as a USB Human Interface Device
- peripherals/usb/device/tusb_msc :How to set up ESP32-S3 chip to work as a USB Mass Storage Device
- peripherals/usb/device/tusb_composite_msc_serialdevice:How to set up ESP32-S3 chip to work as a Composite USB Device (MSC + CDC)
-
USB JTAG Controller
Espressif has ported OpenOCD to support the ESP32-S3 processor and the multi-core FreeRTOS (which is the foundation of most ESP32-S3 apps). Additionally, some extra tools have been written to provide extra features that OpenOCD does not support natively.
This document provides a guide to installing OpenOCD for ESP32-S3 and debugging using GDB under Linux, Windows and macOS
JTAG & OpenOCD 调试原理:
- xtensa-esp32s3-elf-gdb debugger
- OpenOCD on chip debugger,
- and the JTAG adapter connected to ESP32-S3 target.
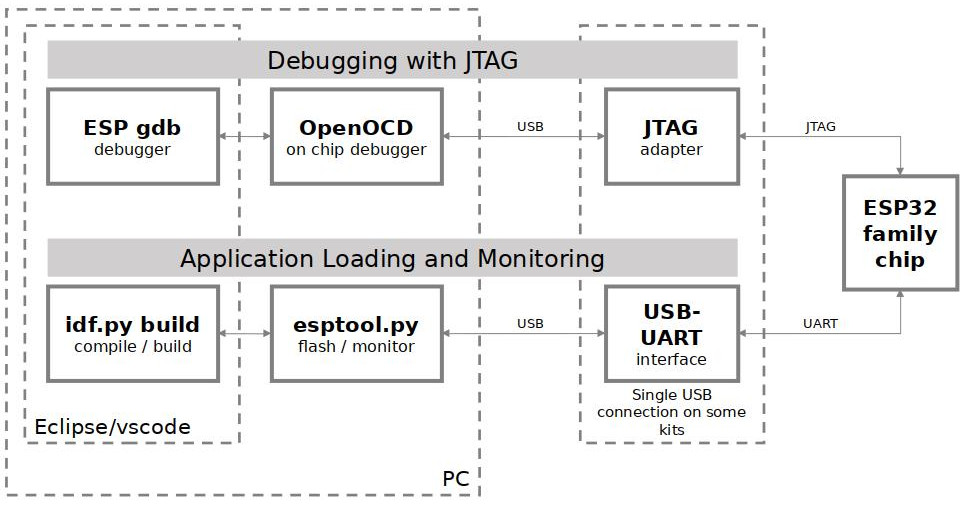
ESP32 内置的 USB-Serial-JTAG Controller 同时提供了 JTAG + 串口,所以可以通过一根 USB 线来同时使用这两个功能:
- 串口:对应的设备是 COM* for Windows, /dev/ttyACM* for Linux, /dev/cu* for MacOS;
- JTAG 接口;
缺省情况下,ESP32-S3 JTAG 功能是连接到 USB_SERIAL_JTAG Controller 的,使用 USB_SERIAL_JTAG 输入使用的是 ESP32 芯片的 GPIO19/20 D-/D+ 引脚。而当不使用 EPS32 内置的 USB_SERIAL_JTAG Controller,而想使用自己外置的 JTAG 硬件调试器时,需要直接使用 ESP32 提供的 JTAG 引脚 GPIO39-GPIO42。而且需要使用 espefuse.py 工具来 burning eFuse 来实现。
- Burning
DIS_USB_JTAG eFusewillpermanently disablethe connection between USB_SERIAL_JTAG and the JTAG port of the ESP32-S3.JTAG interface can then be connected to GPIO39-GPIO42. Note thatUSB CDC functionalityof USB_SERIAL_JTAG will still be usable, i.e., flashing and monitoring over USB CDC will still work. - Burning
STRAP_JTAG_SEL eFusewill enable selection of JTAG interface bya strapping pin, GPIO3. If the strapping pin is lowwhen ESP32-S3 is reset, JTAG interface will use GPIO39-GPIO42. If the strapping pin is high, USB_SERIAL_JTAG will be used as the JTAG interface.
18.7 USB Stream #
usb_stream 是基于 ESP32-S2/ESP32-S3 的 USB UVC + UAC 主机驱动程序,支持从 USB 设备读取/写入/控制多媒体流。例如最多同时支持 1 路摄像头 + 1 路麦克风 + 1 路扬声器播放器数据流。
- 需要将 ESP32 作为 USB Host 模式来使用。
特性:
- 支持通过 UVC Stream 接口获取视频流,支持批量和同步两种传输模式
- 支持通过 UAC Stream 接口获取麦克风数据流,发送播放器数据流
- 支持通过 UAC Control 接口控制麦克风音量、静音等特性
- 支持自动解析设备配置描述符
- 支持对数据流暂停和恢复
USB UVC 功能:获得 JPEG 图片格式视频流;
- 摄像头必须兼容 USB1.1 全速(Fullspeed)模式
- 摄像头需要自带 MJPEG 压缩
- 用户可通过 uvc_streaming_config() 函数手动指定相机接口、传输模式和图像帧参数
- 如使用同步传输摄像头,需要支持设置接口 MPS(Max Packet Size) 为 512
- 同步传输模式,图像数据流 USB 传输总带宽应小于 4 Mbps (500 KB/s)
- 批量传输模式,图像数据流 USB 传输总带宽应小于 8.8 Mbps (1100 KB/s)
USB UAC 功能:支持 speaker 和 mic,一般通过 I2S 接口收发数据,前者是 PCM 编码数字音频播放,后者是读取 PCM 编码格式的麦克风输入。
- 音频功能必须兼容 UAC 1.0 协议
- 用户需要通过 uac_streaming_config() 函数手动指定 spk/mic 采样率,位宽参数
注:I2S 接口是数字音频信号的传输协议(不一定是物理接口),而 PCM 是数字音频的编码格式,可以结果 DAC 直接转换为模拟信号。
USB UVC + UAC 功能
- UVC 和 UAC 功能可以单独启用,例如仅配置 UAC 来驱动一个 USB 耳机,或者仅配置 UVC 来驱动一个 USB 摄像头
- 如需同时启用 UVC + UAC,该驱动程序目前仅支持具有摄像头和音频接口的复合设备(Composite Device),不支持同时连接两个单独的设备
uvc_config_t uvc_config = {
    .frame_width = 320, // mjpeg width pixel, for example 320
    .frame_height = 240, // mjpeg height pixel, for example 240
    .frame_interval = FPS2INTERVAL(15), // frame interval (100µs units), such as 15fps
    .xfer_buffer_size = 32 * 1024, // single frame image size, need to be determined according to actual testing, 320 * 240 generally less than 35KB
    .xfer_buffer_a = pointer_buffer_a, // the internal transfer buffer
    .xfer_buffer_b = pointer_buffer_b, // the internal transfer buffer
    .frame_buffer_size = 32 * 1024, // single frame image size, need to determine according to actual test
    .frame_buffer = pointer_frame_buffer, // the image frame buffer
    .frame_cb = &camera_frame_cb, //camera callback, can block in here
    .frame_cb_arg = NULL, // camera callback args
}

uac_config_t uac_config = {
    .mic_bit_resolution = 16, //microphone resolution, bits
    .mic_samples_frequence = 16000, //microphone frequence, Hz
    .spk_bit_resolution = 16, //speaker resolution, bits
    .spk_samples_frequence = 16000, //speaker frequence, Hz
    .spk_buf_size = 16000, //size of speaker send buffer, should be a multiple of spk_ep_mps
    .mic_buf_size = 0, //mic receive buffer size, 0 if not use, else should be a multiple of mic_min_bytes
    .mic_cb = &mic_frame_cb, //mic callback, can not block in here
    .mic_cb_arg = NULL, //mic callback args
};
- 用户可通过 uvc_config_t 配置摄像头分辨率、帧率参数。通过 uac_config_t 配置音频采样率、位宽等参数。参数说明如下:
- 使用 uvc_streaming_config() 配置 UVC 驱动,如果设备同时支持音频,可使用 uac_streaming_config() 配置 UAC 驱动
- 使用 usb_streaming_start() 打开数据流,之后驱动将响应设备连接和协议协商
- 之后,主机将根据用户参数配置,匹配已连接设备的描述符,如果设备无法满足配置要求,驱动将以警告提示
- 如果设备满足用户配置要求,主机将持续接收 IN 数据流(UVC 和 UAC 麦克风),并在新帧准备就绪后调用用户的回调
- 接收到新的 MJPEG 图像后,将触发 UVC 回调函数。用户可在回调函数中阻塞,因为它在独立的任务上下文中工作
- 接收到 mic_min_bytes 字节数据后,将触发 mic 回调。但是这里的回调一定不能以任何方式阻塞,否则会影响下一帧的接收。如果需要对 mic 进行阻塞操作,可以通过 uac_mic_streaming_read 轮询方式代替回调方式
- 发送扬声器数据时,用户可通过 uac_spk_streaming_write() 将数据写入内部 ringbuffer,主机将在 USB 空闲时从中获取数据并发送 OUT 数据
- 使用 usb_streaming_control() 控制流挂起/恢复。如果 UAC 支持特性单元,可通过其分别控制麦克风和播放器的音量和静音
- 使用 usb_streaming_stop() 停止 USB 流,USB 资源将被完全释放。
示例:
This example demonstrates how to use usb_stream component with an ESP device. Example does the following steps:
- Config a UVC function with specified frame resolution and frame rate, register frame callback
- Config a UAC function with one microphone and one speaker stream, register mic frame callback
- Start the USB streaming
- In image frame callback, if ENABLE_UVC_WIFI_XFER is set to 1, the real-time image can be fetched through ESP32Sx’s Wi-Fi softAP (ssid: ESP32S3-UVC, http: 192.168.4.1), else will just print the image message
- In mic callback, if ENABLE_UAC_MIC_SPK_LOOPBACK is set to 1, the mic data will be write back to usb speaker, else will just print mic data message
- For speaker, if ENABLE_UAC_MIC_SPK_LOOPBACK is set to 0, the default sound will be played back
This routine demonstrates how to use the usb_stream component to get an image from a USB camera and display it dynamically on the RGB screen.
- Pressing the boot button can switch the display resolution.
- For better performance, please use ESP-IDF release/v5.0 or above versions.
- Currently only images with a resolution smaller than the screen resolution are displayed When the image width is equal to the screen width, the refresh rate is at its highest.
使用 PSRAM 120M DDR 来提供高速 RGB LCD fps 显示。
- Displaying 800*480 images on ESP32-S3-LCD-EV-Board with psram 120M and
800480 screen can reach 16FPS - Displaying 480*320 images on ESP32-S3-LCD-Ev-Board with psram 120M and
480480 screen can reach 29FPS
使用 esp_jpeg 将 jpeg 解码为 LCD 可以显示的 RGB565 raw picture 格式。
- 在 LCD 屏幕底部显示 FPS;
// https://github.com/espressif/esp-iot-solution/blob/ce4c75dc133e72a566eaf0827073d15f570a41cc/examples/usb/host/usb_camera_lcd_display/main/main.c
static void _display_task(void *arg)
{
    uint16_t *lcd_buffer = NULL;
    int64_t count_start_time = 0;
    int frame_count = 0;
    int fps = 0;
    int x_start = 0;
    int y_start = 0;
    int width = 0;
    int height = 0;
    int x_jump = 0;
    int y_jump = 0;

    while (!if_ppbuffer_init) {
        vTaskDelay(1);
    }

    while (1) { // 持续显示从 camera 获得并解码的 JPEG 图片,显示 FPS
        if (ppbuffer_get_read_buf(ppbuffer_handle, (void *)&lcd_buffer) == ESP_OK) {
            if (current_width == BSP_LCD_H_RES && current_height <= BSP_LCD_V_RES) {
                x_start = 0;
                y_start = (BSP_LCD_V_RES - current_height) / 2;
                esp_lcd_panel_draw_bitmap(panel_handle, 0, 0, current_width, current_height, cur_frame_buf);
            } else if (current_width < BSP_LCD_H_RES && current_height < BSP_LCD_V_RES) {
                x_start = (BSP_LCD_H_RES - current_width) / 2;
                y_start = (BSP_LCD_V_RES - current_height) / 2;
                esp_lcd_panel_draw_bitmap(panel_handle, 0, 0, 1, 1, cur_frame_buf);
                esp_lcd_panel_draw_bitmap(panel_handle, x_start, y_start, x_start + current_width, y_start + current_height, lcd_buffer);
            } else {
                /* This section is for refreshing images with a resolution larger than the screen, which is currently not enabled */
                if (current_width < BSP_LCD_H_RES) {
                    width = current_width;
                    x_start = (BSP_LCD_H_RES - current_width) / 2;
                    x_jump = 0;
                } else {
                    width = BSP_LCD_H_RES;
                    x_start = 0;
                    x_jump = (current_width - BSP_LCD_H_RES) / 2;
                }

                if (current_height < BSP_LCD_V_RES) {
                    height = current_height;
                    y_start = (BSP_LCD_V_RES - current_height) / 2;
                    y_jump = 0;
                } else {
                    height = BSP_LCD_V_RES;
                    y_start = 0;
                    y_jump = (current_height - BSP_LCD_V_RES) / 2;
                }

                esp_lcd_panel_draw_bitmap(panel_handle, 0, 0, 1, 1, cur_frame_buf);
                for (int i = y_start; i < height; i++) {
                    esp_lcd_panel_draw_bitmap(panel_handle, x_start, i, x_start + width, i + 1, &lcd_buffer[(y_jump + i)*current_width + x_jump]);
                }
            }

            ppbuffer_set_read_done(ppbuffer_handle);
            if (count_start_time == 0) {
                count_start_time = esp_timer_get_time();
            }

            if (++frame_count == 20) {
                frame_count = 0;
                fps = 20 * 1000000 / (esp_timer_get_time() - count_start_time);
                count_start_time = esp_timer_get_time();
                ESP_LOGI(TAG, "camera fps: %d %d*%d", fps, current_width, current_height);
            }

            esp_painter_draw_string_format(painter, x_start, y_start, NULL, COLOR_BRUSH_DEFAULT, "FPS: %d %d*%d", fps, current_width, current_height);
            cur_frame_buf = (cur_frame_buf == rgb_frame_buf1) ? rgb_frame_buf2 : rgb_frame_buf1;
        }
        vTaskDelay(1);
    }
}
This example demonstrates how to use usb_stream component to handle an USB Headset device.
- The usb_stream driver currently support 48 KHz 16 bit dual channel at most due to the limitation
of the USB FIFO strategy, if you want to play other format MP3 file, please convert it to
44.1KHz/48 KHz 16 bit dual channel first.
- 将 mp3 解码为 LPCM 格式,使用的是 chmorgan/esp-audio-player 软件 mp3 解码库;
同时支持扬声器和麦克风的,基于 UAC 协议的的 USB 耳机:
// https://github.com/espressif/esp-box/blob/master/examples/usb_headset/main/src/usb_headset.c

static void usb_headset_spk(void *pvParam)
{
    while (1) {
        SYSVIEW_SPK_WAIT_EVENT_START();
        if (s_spk_active == false) {
            ulTaskNotifyTake(pdFAIL, portMAX_DELAY);
            continue;
        }
        // clear the notification
        ulTaskNotifyTake(pdTRUE, portMAX_DELAY);
        if (s_spk_buf_len == 0) {
            continue;
        }
        // playback the data from the ring buffer chunk by chunk
        SYSVIEW_SPK_WAIT_EVENT_END();
        SYSVIEW_SPK_SEND_EVENT_START();
        size_t bytes_written = 0;
        bsp_i2s_write(s_spk_buf, s_spk_buf_len, &bytes_written, 0); // 使用 I2S 写 PCM 数字音频信号
        for (int i = 0; i < bytes_written / 2; i ++) {
            rb_write(s_spk_buf + i, 2);
        }
        s_spk_buf_len = 0;
        SYSVIEW_SPK_SEND_EVENT_END();
    }
}

static void usb_headset_mic(void *pvParam)
{
    while (1) {
        if (s_mic_active == false) {
            ulTaskNotifyTake(pdFAIL, portMAX_DELAY);
            continue;
        }
        // clear the notification
        ulTaskNotifyTake(pdTRUE, 0);
        // read data from the microphone chunk by chunk
        SYSVIEW_MIC_READ_EVENT_START();
        size_t bytes_read = 0;
        size_t bytes_require = s_mic_bytes_ms * (CFG_TUD_AUDIO_FUNC_1_EP_IN_SW_BUF_MS - 1);
        esp_err_t ret = bsp_i2s_read(s_mic_write_buf, bytes_require, &bytes_read, 0);  // 使用 I2S 从设备读取麦克风 PCM 信号
        if (ret != ESP_OK) {
            ESP_LOGD(TAG, "Failed to read data from I2S, ret = %d", ret);
            SYSVIEW_MIC_READ_EVENT_END();
            continue;
        }
        // swap the buffer
        int16_t *tmp_buf = s_mic_read_buf;
        UAC_ENTER_CRITICAL();
        s_mic_read_buf = s_mic_write_buf;
        s_mic_read_buf_len = bytes_read;
        s_mic_write_buf = tmp_buf;
        UAC_EXIT_CRITICAL();
        SYSVIEW_MIC_READ_EVENT_END();
    }
}