1 std::alloc #
Rust 的内存分配 APIs。
标准库使用一个 global 内存分配器来为 Box<T>/Vec<T> 等分配堆内存。
- 默认情况下,使用
std::alloc::System作为 global 内存分配器, System同时实现了 Allocator 和 GlobalAlloc trait;- 对于 unix/linux 系统,使用 malloc 实现。对于windows 系统,使用 HeapAlloc 实现;
- 用户程序也可以使用
#[global_allocator]来为程序指定一个实现std::alloc::GlobalAlloctrait 的自定义的 global 内存分配器;
// 使用 OS 缺省的 System 内存分配器实现自定义内存分配器
use std::alloc::{GlobalAlloc, System, Layout};

struct MyAllocator;
unsafe impl GlobalAlloc for MyAllocator {
    unsafe fn alloc(&self, layout: Layout) -> *mut u8 {
        System.alloc(layout)
    }

    unsafe fn dealloc(&self, ptr: *mut u8, layout: Layout) {
        System.dealloc(ptr, layout)
    }
}

#[global_allocator]
static GLOBAL: MyAllocator = MyAllocator;

fn main() {
    // This `Vec` will allocate memory through `GLOBAL` above
    let mut v = Vec::new();
    v.push(1);
}

// 使用 jemalloc 内存分配器
use jemallocator::Jemalloc;

#[global_allocator]
static GLOBAL: Jemalloc = Jemalloc; // Jemalloc 是一个无 field 的 struct 类型。
fn main() {}


// 默认的 System 内存分配器
use std::alloc::System;

#[global_allocator]
static A: System = System;

fn main() {
    let a = Box::new(4); // Allocates from the system allocator.
    println!("{a}");
}
Trait std::alloc::Allocator 定义了内存分配的接口:
- 根据传入的 std::alloc::Layout 类型来分配内存。
pub unsafe trait Allocator {
    // Required methods
    fn allocate(&self, layout: Layout) -> Result<NonNull<[u8]>, AllocError>;
    unsafe fn deallocate(&self, ptr: NonNull<u8>, layout: Layout);

    //...
}
std::alloc::Layout 包含要分配内存的 align 要求和 size:
- std::alloc:🆕:<T>() 为 T 类型创建 Layout;
pub struct Layout { /* private fields */ }


impl Layout

// 创建 Layout
pub const fn new<T>() -> Layout // 从 T 类型创建 Layout
pub fn for_value<T>(t: &T) -> Layout where T: ?Sized, // 从 T 的 value 创建 Layout
pub unsafe fn for_value_raw<T>(t: *const T) -> Layout where T: ?Sized,

pub const fn from_size_align(size: usize, align: usize ) -> Result<Layout, LayoutError>
pub const unsafe fn from_size_align_unchecked( size: usize, align: usize ) -> Layout

// 获得 Layout 的 size 和 align 信息
pub const fn size(&self) -> usize
pub const fn align(&self) -> usize

pub fn dangling(&self) -> NonNull<u8>
pub fn align_to(&self, align: usize) -> Result<Layout, LayoutError>
pub fn padding_needed_for(&self, align: usize) -> usize
pub fn pad_to_align(&self) -> Layout
pub fn repeat(&self, n: usize) -> Result<(Layout, usize), LayoutError>
pub fn extend(&self, next: Layout) -> Result<(Layout, usize), LayoutError>
pub fn repeat_packed(&self, n: usize) -> Result<Layout, LayoutError>
pub fn extend_packed(&self, next: Layout) -> Result<Layout, LayoutError>
pub fn array<T>(n: usize) -> Result<Layout, LayoutError>
几个内存分配函数:
- alloc⚠
- Allocate memory with the global allocator.
- alloc_zeroed
- Allocate zero-initialized memory with the global allocator.
- dealloc
- Deallocate memory with the global allocator.
- handle_alloc_error
- Signal a memory allocation error.
- realloc
- Reallocate memory with the global allocator.
- set_alloc_error_hook
- Registers a custom allocation error hook, replacing any that was previously registered.
- take_alloc_error_hook
- Unregisters the current allocation error hook, returning it.
这些函数都使用默认的 Global 分配器:
- 这些函数都没有返回错误,需要根据返回的 raw pointer 是否为 null 来判断是否分配成功。
- handle_alloc_error(layout) 可以用来处理分配错误情况,默认的行为是在 stderr 打印消息,
abort进程。 - set_alloc_error_hook 和 take_alloc_error_hook() 可以设置调用 handle_alloc_error() 时的行为,可以选择 panic 或 abort;
// Allocate memory with the global allocator.
pub unsafe fn alloc(layout: Layout) -> *mut u8

use std::alloc::{alloc, dealloc, handle_alloc_error, Layout};
unsafe {
    let layout = Layout::new::<u16>();
    let ptr = alloc(layout);
    if ptr.is_null() {
        handle_alloc_error(layout);
    }

    *(ptr as *mut u16) = 42;
    assert_eq!(*(ptr as *mut u16), 42);

    dealloc(ptr, layout);
}

// Allocate zero-initialized memory with the global allocator.
pub unsafe fn alloc_zeroed(layout: Layout) -> *mut u8

use std::alloc::{alloc_zeroed, dealloc, Layout};

unsafe {
    let layout = Layout::new::<u16>();
    let ptr = alloc_zeroed(layout);

    assert_eq!(*(ptr as *mut u16), 0);

    dealloc(ptr, layout);
}

// Deallocate memory with the global allocator.
pub unsafe fn dealloc(ptr: *mut u8, layout: Layout)

// Reallocate memory with the global allocator.
pub unsafe fn realloc(ptr: *mut u8, layout: Layout, new_size: usize) -> *mut u8

// Registers a custom allocation error hook, replacing any that was previously registered.
pub fn set_alloc_error_hook(hook: fn(_: Layout))
#![feature(alloc_error_hook)]

use std::alloc::{Layout, set_alloc_error_hook};

fn custom_alloc_error_hook(layout: Layout) {
   panic!("memory allocation of {} bytes failed", layout.size());
}

set_alloc_error_hook(custom_alloc_error_hook);
2 std::collector #
数组 [N; T] 和各种 collector 类型默认都没有实现 Display trait, 但是实现了 Debug trait;
Option/Result 都是 enum 类型,但是也支持迭代(实现了 IntoIterator),效果就如一个或0个元素。
2.1 Vec #
Vec 是相同类型元素,动态大小, 在 heap 上分配的连续内存块. 可以被 index 操作 &v[a..b] 生成指向对应内存区域 slice. 有三个字段: 长度, 容量和指向堆内存首地址的指针.
可以使用 push 向 Vec 添加元素, Rust 自动扩充 Vec 的内存块大小, 这种扩容将老的 Vec 内容 move 到新的连续内存块, 所以:
- 有性能开销, 涉及到内存数据的复制移动;
- 会导致已有的 Vec Item 的引用失效, 所以在有共享引用的情况下, 不能修改 Vec;
为了避免在 push 过程中容量增长带来的开销, 可以使用 Vec::with_capacity(n) 来一次性创建容量为 n 的 Vec.
Vec 只能高效的在尾部进行 push/pop 操作, 如果在中间 insert/remove 元素, 则涉及后续元素的移动, 所以Vec 越长, 中间插入和删除元素性能越差.
Vec 创建和操作:
- vec[a..b] 的 a 和 b 类似是 usize, 必须小于 vec.len() 否则会 panic;
- vec.get(index) 返回一个 Option, 当 index 不存在时, 返回 None;
// 创建一个空的vector, len/capacity 均为 0
let mut numbers: Vec<i32> = vec![];
// 用给定的内容创建一个vector, len/capacity 等于元素数目
let words = vec!["step", "on", "no", "pets"];
let mut buffer = vec![0u8; 1024]; // 1024个0字节

// 将一个其他集合转换成vector
let my_vec = my_set.into_iter().collect::<Vec<String>>();

// 获取一个元素的引用
let first_line = &lines[0];
// 获取一个元素的拷贝
let fifth_number = numbers[4]; // Copy
let second_number = lines[1].clone();
// 获取一个切片的引用
let my_ref = &buffer[4..12];
// 获取一个切片的拷贝
let my_copy = buffer[4..12].to_vec(); // clone 生成 Vec

// slice.to_vec(), Clone 切片生成 Vec
let v = [1, 2, 3, 4, 5, 6, 7, 8, 9];
assert_eq!(v.to_vec(), vec![1, 2, 3, 4, 5, 6, 7, 8, 9]);
assert_eq!(v[0..6].to_vec(), vec![1, 2, 3, 4, 5, 6]);

// 将iterable的所有item按顺序添加到vec的末尾。它类似于多值版本的.push()。 iterable 参数可以是任何实
// 现了 IntoIterator<Item=T>。
vec.extend(iterable)

    // 类似于 vec.truncate(index),除了它返回一个 Vec<T> 包含 vec 尾部被移除的元素。它类似于.pop() 的多
    // 值版本。
    vec.split_off(index) // 返回一个 Vec 包含 index 及以后的元素, 原来的 vec 只包含 index 前的元素

    // 将 vec2 的内容添加到 vec, 然后 vec2 被清空. 这类似于 vec.extend(vec2),除了调用之后 vec2 仍然存在,
    // 并且容量不变。
    vec.append(&mut vec2)

    // 这会从vec中移除范围vec[range],并返回一个迭代被移除元素的迭代器,其中 range 是一个范围值,例如..
    // 或 0..4。
    vec.drain(range)

    // 移除所有没有通过给定测试的方法。类似于 vec = vec.into_iter().filter(test).collect();
    vec.retain(test)
不能在借用 Vec 元素的情况下,修改 Vec 本身(这是由于修改 Vec 时可能会重新分配内存,从而导致借用的指针失效):
- 但是 tuple/struct 是支持部分 field 修改的。
// 不能同时 &mut 借用 Vec 的元素
let mut v = vec![0, 1, 2, 3];
let a = &mut v[i];
let b = &mut v[j]; // error: 不能同时借用`v`的多个可变引用。

let first = &v[0];
v.push(6) // erorr:first 共享借用 Vec,不能再修改(需要可变借用) Vec
println!("{}", first);
如果类型 T 支持 = 和! 运算符(PartialEq trait,见相等性比较),那么数组 [T; N]、切 片 [T]、vector
Vec<T> 也支持这些运算符。当两个切片的长度和相应的元素都相等时两个切 片才相等。数组和 vector 也是一样。
如果 T 支持运算符 <、<=、>、>=(PartialOrd trait,见顺序性比较),那么 T 的数组、切片 和 vector 也支持。切片的比较按照字典序进行。
创建 Vec 的宏 vec![] 和 vec!() 是等效的。
2.2 Vec 方法 #
由于 Vec<T> 可以被 Deref<Targe=[T]>, 所以 Vec 对象也继承了 slice [T] 的方法.
// 创建
pub const fn new() -> Vec<T>
let mut vec: Vec<i32> = Vec::new();

pub fn with_capacity(capacity: usize) -> Vec<T>
let mut vec = Vec::with_capacity(10);
// The vector contains no items, even though it has capacity for more
assert_eq!(vec.len(), 0);
assert!(vec.capacity() >= 10);

pub unsafe fn from_raw_parts( ptr: *mut T, length: usize, capacity: usize ) -> Vec<T>

impl<T, A> Vec<T, A> where A: Allocator,
pub const fn new_in(alloc: A) -> Vec<T, A>
pub fn with_capacity_in(capacity: usize, alloc: A) -> Vec<T, A>
pub unsafe fn from_raw_parts_in( ptr: *mut T, length: usize, capacity: usize, alloc: A ) -> Vec<T, A>
pub fn into_raw_parts(self) -> (*mut T, usize, usize)
pub fn into_raw_parts_with_alloc(self) -> (*mut T, usize, usize, A)

pub fn capacity(&self) -> usize
pub fn reserve(&mut self, additional: usize)
let mut vec = vec![1];
vec.reserve(10);
assert!(vec.capacity() >= 11);

pub fn reserve_exact(&mut self, additional: usize)
pub fn try_reserve(&mut self, additional: usize) -> Result<(), TryReserveError>
pub fn try_reserve_exact( &mut self, additional: usize ) -> Result<(), TryReserveError>

pub fn shrink_to_fit(&mut self)
let mut vec = Vec::with_capacity(10);
vec.extend([1, 2, 3]);
assert!(vec.capacity() >= 10);
vec.shrink_to_fit();
assert!(vec.capacity() >= 3);

// 将 vector 的 capacity 收缩到指定的最小值
pub fn shrink_to(&mut self, min_capacity: usize)
let mut vec = Vec::with_capacity(10);
vec.extend([1, 2, 3]);
assert!(vec.capacity() >= 10);
vec.shrink_to(4);
assert!(vec.capacity() >= 4);
vec.shrink_to(0);
assert!(vec.capacity() >= 3);

// 将 vec 转换为 Box<[T]> , 该方法会丢弃 capacity 超过 shink_to_fit 的空间
pub fn into_boxed_slice(self) -> Box<[T], A>
let mut vec = Vec::with_capacity(10);
vec.extend([1, 2, 3]);
assert!(vec.capacity() >= 10);
let slice = vec.into_boxed_slice();
assert_eq!(slice.into_vec().capacity(), 3);

pub fn truncate(&mut self, len: usize)
let mut vec = vec![1, 2, 3];
vec.truncate(8);
assert_eq!(vec, [1, 2, 3]);

// 等效于 &s[..]
pub fn as_slice(&self) -> &[T]
use std::io::{self, Write};
let buffer = vec![1, 2, 3, 5, 8];
io::sink().write(buffer.as_slice()).unwrap();

pub fn as_mut_slice(&mut self) -> &mut [T]
pub fn as_ptr(&self) -> *const T
pub fn as_mut_ptr(&mut self) -> *mut T

// 返回底层使用的内存分配器
pub fn allocator(&self) -> &A

// 将长度设置为 new_len,一般使用安全方法 truncate, resize, extend, or clear.
// new_len 需要小于等于 capacity(), 而且 old_len..new_len must be initialized.
pub unsafe fn set_len(&mut self, new_len: usize)

// 使用 vec 最后一个元素替换 index 元素,返回 index 元素
pub fn swap_remove(&mut self, index: usize) -> T
let mut v = vec!["foo", "bar", "baz", "qux"];
assert_eq!(v.swap_remove(1), "bar");
assert_eq!(v, ["foo", "qux", "baz"]);
assert_eq!(v.swap_remove(0), "foo");
assert_eq!(v, ["baz", "qux"]);

// 插入和删除元素,会导致后续元素批量移动。
pub fn insert(&mut self, index: usize, element: T)
pub fn remove(&mut self, index: usize) -> T

// 只保留 f 返回 true 的元素
pub fn retain<F>(&mut self, f: F) where F: FnMut(&T) -> bool
let mut vec = vec![1, 2, 3, 4];
vec.retain(|&x| x % 2 == 0);
assert_eq!(vec, [2, 4]);

pub fn retain_mut<F>(&mut self, f: F) where F: FnMut(&mut T) -> bool

// 使用指定 F 来过滤重复的元素
pub fn dedup_by_key<F, K>(&mut self, key: F) where F: FnMut(&mut T) -> K, K: PartialEq
let mut vec = vec![10, 20, 21, 30, 20];
vec.dedup_by_key(|i| *i / 10);
assert_eq!(vec, [10, 20, 30, 20]);

pub fn dedup_by<F>(&mut self, same_bucket: F) where F: FnMut(&mut T, &mut T) -> bool
let mut vec = vec!["foo", "bar", "Bar", "baz", "bar"];
vec.dedup_by(|a, b| a.eq_ignore_ascii_case(b));
assert_eq!(vec, ["foo", "bar", "baz", "bar"]);

pub fn push(&mut self, value: T)
pub fn push_within_capacity(&mut self, value: T) -> Result<(), T>
pub fn pop(&mut self) -> Option<T>

// 将 other 的元素移动到 self,other 为空(还是可以访问的):
pub fn append(&mut self, other: &mut Vec<T, A>)
let mut vec = vec![1, 2, 3];
let mut vec2 = vec![4, 5, 6];
vec.append(&mut vec2);
assert_eq!(vec, [1, 2, 3, 4, 5, 6]);
assert_eq!(vec2, []);

// 从 self 删除 range 的元素,返回 range 元素的迭代器
pub fn drain<R>(&mut self, range: R) -> Drain<'_, T, A> where R: RangeBounds<usize>
let mut v = vec![1, 2, 3];
let u: Vec<_> = v.drain(1..).collect();
assert_eq!(v, &[1]);
assert_eq!(u, &[2, 3]);
// A full range clears the vector, like `clear()` does
v.drain(..);
assert_eq!(v, &[]);

pub fn clear(&mut self)
pub fn len(&self) -> usize
pub fn is_empty(&self) -> bool

// 将 self 从 at 位置切分为两个,self 为 at 前元素,返回 at 后元素
pub fn split_off(&mut self, at: usize) -> Vec<T, A> where A: Clone
let mut vec = vec![1, 2, 3];
let vec2 = vec.split_off(1);
assert_eq!(vec, [1]);
assert_eq!(vec2, [2, 3]);

// 调整 vec,使其长度打到 new_len, 新的元素使用 f 返回
pub fn resize_with<F>(&mut self, new_len: usize, f: F) where F: FnMut() -> T
let mut vec = vec![1, 2, 3];
vec.resize_with(5, Default::default);
assert_eq!(vec, [1, 2, 3, 0, 0]);
let mut vec = vec![];
let mut p = 1;
vec.resize_with(4, || { p *= 2; p });
assert_eq!(vec, [2, 4, 8, 16]);

pub fn leak<'a>(self) -> &'a mut [T] where A: 'a
pub fn spare_capacity_mut(&mut self) -> &mut [MaybeUninit<T>]
        pub fn split_at_spare_mut(&mut self) -> (&mut [T], &mut [MaybeUninit<T>])


      impl<T, A> Vec<T, A> where T: Clone, A: Allocator,
       pub fn resize(&mut self, new_len: usize, value: T)
       let mut vec = vec!["hello"];
vec.resize(3, "world");
assert_eq!(vec, ["hello", "world", "world"]);
let mut vec = vec![1, 2, 3, 4];
vec.resize(2, 0);
assert_eq!(vec, [1, 2]);

pub fn extend_from_slice(&mut self, other: &[T])
let mut vec = vec![1];
vec.extend_from_slice(&[2, 3, 4]);
assert_eq!(vec, [1, 2, 3, 4]);

pub fn extend_from_within<R>(&mut self, src: R) where R: RangeBounds<usize>

impl<T, A> Vec<T, A> where A: Allocator

// 将 range 元素用 replace_with 替换, 返回替换前的 range 元素
pub fn splice<R, I>( &mut self, range: R, replace_with: I) -> Splice<'_, <I as IntoIterator>::IntoIter, A> where R: RangeBounds<usize>, I: IntoIterator<Item = T>
let mut v = vec![1, 2, 3, 4];
let new = [7, 8, 9];
let u: Vec<_> = v.splice(1..3, new).collect();
assert_eq!(v, &[1, 7, 8, 9, 4]);
assert_eq!(u, &[2, 3]);

pub fn extract_if<F>(&mut self, filter: F) -> ExtractIf<'_, T, F, A> where F: FnMut(&mut T) -> bool
#![feature(extract_if)]
let mut numbers = vec![1, 2, 3, 4, 5, 6, 8, 9, 11, 13, 14, 15];
let evens = numbers.extract_if(|x| *x % 2 == 0).collect::<Vec<_>>();
let odds = numbers;
assert_eq!(evens, vec![2, 4, 6, 8, 14]);
assert_eq!(odds, vec![1, 3, 5, 9, 11, 13, 15]);
2.3 VecDeque<T> #
VecDeque 也是动态大小, 在 heap 上分配内存块的环形缓冲区, 有 start 和 end 指针, 所以和 Vec 不同的是, 数据并不是从内存区域的开始存储, 也可以在尾部回环(自动管理), 所以内存块不一定是连续的. VecDeque 支持 index 操作, 如 deque[index], 但是在内存不一定是连续存储元素, 所以不能创建切片和继承切片的方法. 主要是能快速的开头和尾部 push/pop 元素.

2.4 BinaryHeap<T> #
BinaryHeap<T> 集合始终以某种形式组织元素,其中最大的元素总是会被移动到队列的首部。这里是 BinaryHeap 最常用的几个方法:
- BinaryHeap 并不仅限于数字。它可以包含任何实现了内建的 Ord trait 的类型。
heap.push(value) // 向堆中添加一个元素
heap.pop() // 移除并返回堆中最大的值。它返回 Option<T>,如果堆为空时返回 None。
heap.peek() //返回堆中最大的值的引用。返回类型是 Option<&T>。

use std::collections::binary_heap::PeekMut;
if let Some(top) = heap.peek_mut() {
        if *top > 10 {
            PeekMut::pop(top);
        }
}

use std::collections::BinaryHeap;
let mut heap = BinaryHeap::from(vec![2, 3, 8, 6, 9, 5, 4]);
// 值 9 在堆的顶部:
assert_eq!(heap.peek(), Some(&9));
assert_eq!(heap.pop(), Some(9));
// 移除 9 也会重新排布其他元素,把 8 移动到头部,等等:
assert_eq!(heap.pop(), Some(8));
assert_eq!(heap.pop(), Some(6));
assert_eq!(heap.pop(), Some(5));
这让 BinaryHeap 可以用作一个工作队列。你可以定义一个任务结构体,然后根据任务的 优先级实现 Ord,让高优先级的任务大于低优先级的任务。然后,创建一个 BinaryHeap 来保 存所有待办的任务。它的.pop() 方法将总是返回最重要的任务。
注意:BinaryHeap 是可迭代的对象,并且它有.iter() 方法,但这个迭代器以任意顺序产 生堆中的元素,而不是按照从大到小的顺序。为了按照大小顺序消耗 BinaryHeap 中的值,可 以使用 while 循环:
    while let Some(task) = heap.pop() {
        handle(task);
}
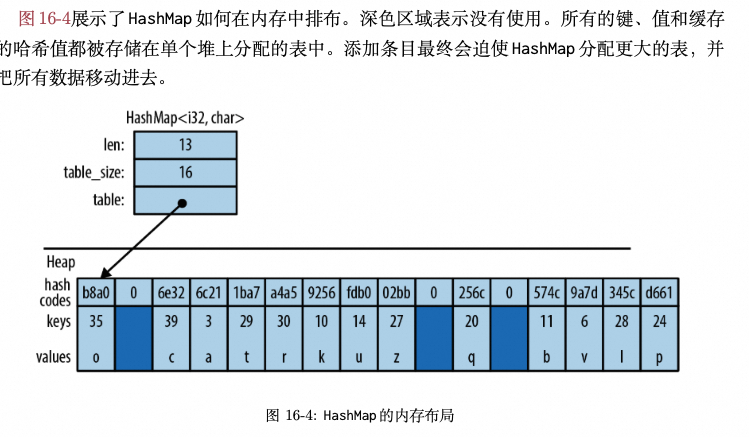
2.5 HashMap #
map(映射) 是键值对(称为条目 (entry))的集合。任何两个条目的键都不同,所有的条目按照一定结构组织,如果有一个键就可以高效地在 map 中查找到相应的值。简而言之,map 是一个查找表。
Rust 提供两者两种 map 类型: HashMap<K, V> 和 BTreeMap<K, V>。这两种类型共享了很多相同的方法;不同之处在于它们组织条目的方式。
-
HashMap 把键和值都存储在哈希表中,因此它要求键的类型 K 实现了 Hash 和 Eq,这两个 trait 分别用于哈希和相等性比较。
- bool、int、uint、String、&str 等;
- float 没有实现这两个 trait,不能用于 key;
- 对于 collection,如果它们的元素类型都实现了 Hash 和 Eq,则 collection 也实现了 Hash 和 Eq,例如 Vec<u8>;
-
BTreeMap按照键的顺序在树形结构中存储条目,因此它要求键的类型 K 实现了 Ord。图 16-5展示了一个 BTreeMap。同样,深色区域表示没有被使用的空间。
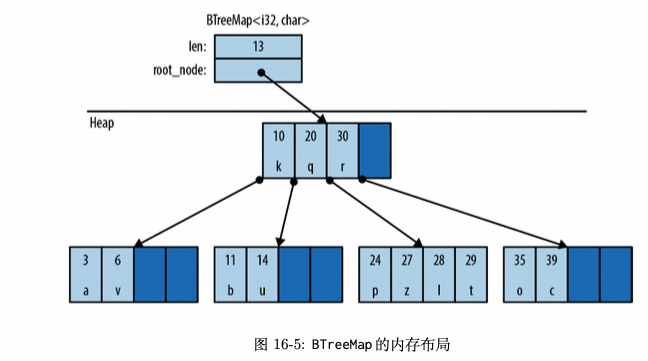
可见:
- HashMap 是使用一块连续的 heap 来保存 map 元素的, 如果 map 容量要增加, 则需要分配一块新的连续内存区域, 并将老的 map 元素移动过去, 所以有一定性能开销;
- BTreeMap 是使用 Node 来保存元素的, 所以不是连续内存区域, 便于随机插入和读取;
// 从键值对创建并填充新的 HashMap 或 BTreeMap。iter 必须是一个 Iterator<Item=(K, V)>。
iter.collect()

// 如果 map 里有给定 key 的条目则返回 true。
map.contains_key(&key)

// 在 map 中查找给定 key 的条目。如果找到了匹配的条目,就返回 Some(r),其中 r 是相 应的值的引用。否则返回 None。
map.get(&key)
在查询 map 时,传入的 key 类型 B 和 map 定义的 key 类型 K 可以不一致,需要满足 B = Borrow<K>;
map 可以使用方括号 map[&key] 进行查询。这是因为 map 实现了 Index trait。然而,如果没有给定的 key 的条目存在,这会 panic,就类似越界访问数组一样。因此只有当你确定 要查找的条目在 map 中时再使用这个语法。
- 不支持 map[&key] = value 赋值.
因为一个BTreeMap<K, V>按照键的顺序保存条目,所以它支持一个附加的操作:
btree_map.split_off(&key)
把 btree_map 分割成两个。键小于 key 的条目被留在 btree_map 中,返回一个包含其余 条目的新BTreeMap<K, V>。
map 支持 Entry 操作:
let record = student_map.entry(name.to_string()).or_insert_with(Student::new);
student_map.entry(name.to_string()) 返回的 Entry 值就像一个可变引用,它指向 map 中 一个已经被键值对占据 (occupied) 的位置,或者是空的 (vacant),意思是还没有条目占据这个 位置。如果为空,条目的.or_insert_with() 方法会插入一个新的 Student。
// 对给定的 key 返回一个 Entry。如果 map 中没有这个 key,它会返回一个空的 Entry。 这个方法以 mut 引
// 用获取 self 参数,并返回一个生命周期相同的 Entry:
pub fn entry<'a>(&'a mut self, key: K) -> Entry<'a, K, V>
// Entry 类型有一个生命周期参数'a,因为它是 map 的一种 mut 借用。只要 Entry 存在, 它就有 map 的独占
// 访问权限。不幸的是,如果 map 的键的类型为 String,那么不能向这个方法传递 &str 类型的参 数。这种情
// 况下的.entry() 方法需要一个真实的 String。因为 entry 的输入参数 key 是 K 类型, 而非 Borrow<Q> 类
// 型;
map.entry(key)

// 确保 map 包含给定的 key 的条目,如果需要的话用给定的 value 插入一个新的条目。它 返回新插入的或者
// 现有的值的 mut 引用。
map.entry(key).or_insert(value)

let mut vote_counts: HashMap<String, usize> = HashMap::new();
  for name in ballots {
      let count = vote_counts.entry(name).or_insert(0); // .or_insert()返回一个可变引用,因此count的类型是&mut usize。
      *count += 1;
  }

// 确保 map 包含给定的 key 的条目,如果需要的话用 Default::default() 返回的值插入 一个新条目
map.entry(key).or_default()

// 这个方法也一样,除了当它需要创建新的条目时,它会调用 default_fn() 来产生默认 值。
map.entry(key).or_insert_with(default_fn)
// 这个map中包含每个单词和出现它的文件的集合。
let mut word_occurrence: HashMap<String, HashSet<String>> = HashMap::new(); for file in files {
        for word in read_words(file)? {
            let set = word_occurrence
                .entry(word)
                .or_insert_with(HashSet::new);
            set.insert(file.clone());
} }


// 如果给定的 key 的条目存在就调用 closure,把值的可变引用传进闭包。它返回一 个 Entry,因此它可以和
// 其它方法链式调用。
map.entry(key).and_modify(closure)

// 这个map包含给定字符串中的所有单词,
// 以及它们出现的次数。
let mut word_frequency: HashMap<&str, u32> = HashMap::new(); for c in text.split_whitespace() {
        word_frequency.entry(c)
            .and_modify(|count| *count += 1)
            .or_insert(1);
}
迭代 map 的方法:
- 以值迭代(for (k, v) in map),产生(K, V)对。这会消耗掉map。
- 迭代共享引用(for (k, v) in &map),产生(&K, &V)对。
- 迭代可变引用(for (k, v) in &mut map),产生(&K, &mut V)对。(再提醒一次,没有获取 map 中键的 mut 访问的方法,因为条目是按照键来组织的。
类似于 vector,map 有.iter() 和.iter_mut() 方法返回以引用迭代的迭代器,类似于迭代 &map 或者 &mut map。
另外:
- map.keys() 返回一个只迭代键的迭代器,以引用的形式返回。
- map.values() 返回一个只迭代值的迭代器,以引用的形式返回。
- map.values_mut() 返回一个只迭代值的迭代器,以 mut 引用的形式返回。
所有的 HashMap 迭代器都会以 任意顺序 访问 map 的条目。BTreeMap 的迭代器会按照 键的顺序 访问它们。
2.6 HashSet<T> 和 BTreeSet<T> #
map 和 set 有不同的方法,但其实一个 set 就是一个只有键而不是键值对的 map。事实上, Rust 的HashSet<T> 和 BTreeSet<T> 被实现为 HashMap<T, ()> 和 BTreeMap<T, ()> 的包装。
有两种迭代 set 的方法:
- 以值迭代(for v in set)产生set的成员(并消耗这个set)。
- 以共享引用迭代(for v in &set)产生set中成员的共享引用。
不支持以 mut 引用迭代 set。没有方法获取 set 中值的 mut 引用。
set.iter() 返回一个以共享引用方式迭代 set 的迭代器。
HashSet 迭代器类似于 HashMap 的迭代器,也会以任意顺序产生值。BTreeSet 迭代器按照顺序产生值,类似于一个排序过的 vector。
2.7 Hash #
std:#️⃣:Hash 是标准库用于可哈希类型的 trait。HashMap 的键和 HashSet 的元素必须实现 Hash 和 Eq。
大多数实现了 Eq 的内建类型也都实现了 Hash。整数类型、char、String 都是可哈希类型; 当元素是可哈希类型时,元组、数组、切片、vector 也是可哈希类型。
标准库的一个原则是不管你把一个值存储到哪里或者如何指向它,它必须有相同的哈 希值。因此,引用和被引用的值有相同的哈希值。Box 和被装箱的值有相同的哈希值。一 个 vector vec 和包含它的所有元素的切片 &vec[..] 有相同的哈希值。一个 String 和一个有相 同字符的 &str 有相同的哈希值。
结构和枚举默认没有实现 Hash,但可以派生实现:
/// 大英博物馆藏品中的对象的ID
#[derive(Clone, PartialEq, Eq, Hash)]
enum MuseumNumber {
... }
只要所有的字段都是可哈希的就可以正常工作。
3 std::backtrace #
捕获和打印 OS thread 的 stack backtrace。
需要程序在编译时包含 debug information,否则 filename/line number 将不会包含。
- Rust 1.77.0 版本开始 release 版本的 binary/lib 默认开启了 strip,
将不包含 debug info。
Backtrace::capture() 的行为受两个环境变量控制:
RUST_LIB_BACKTRACE- if this is set to 0 then Backtrace::capture will never capture a backtrace. Any other value set will enable Backtrace::capture.RUST_BACKTRACE- if RUST_LIB_BACKTRACE is not set, then this variable is consulted with the same rules of RUST_LIB_BACKTRACE.- If neither of the above env vars are set, then Backtrace::capture
will be disabled.
所以,为了 Backtrace::capture() 能返回结果,需要至少设置上面的一个环境变量值为非 0.
Backtrace::force_capture() 函数不参考上面两个环境变量的值,而是强制返回 Backtrace。
use std::backtrace::Backtrace

fn main() {
    let bt  = Backtrace::force_capture();
    println!("{}", bt); // Backtrace 实现了 Debug 和 Display
}
Backtrace 方法:
impl Backtrace

pub fn capture() -> Backtrace // capture 受环境变量调控
pub fn force_capture() -> Backtrace // 强制打印
pub const fn disabled() -> Backtrace // 关闭
pub fn status(&self) -> BacktraceStatus // 返回是否支持 Backtrace,如受环境变量和上面 disabled() 环境影响

impl<'a> Backtrace
pub fn frames(&'a self) -> &'a [BacktraceFrame] // BacktraceFrame 实现了 Debug,没有方法。
4 std::panic #
panic 是最简单的异常处理机制,它打印 error message,然后开始 unwinding stack,最后退出当前thread(可以通过 std::panic::set_hook() 重新定义):
- 如果是 main thread panic,则程序退出;
- 否则,如果是 spawned thread panic,则该 thread 会终止,程序不退出。
注意:如果 panic 是 FFI 调用的外部库函数导致的,则 Rust 不会进行 unwinding,而是直接 panic。
unwinding stack 过程中,Rust 会回溯调用栈,drop 所有的对象和资源。
也可以在 Cargo.toml 里设置 panic 时不 unwiding stack 而是直接 abort 退出:
[profile.release]
panic = 'abort'
panic!() 时返回错误信息,unwinding stack 和释放资源(drop 对象):
- 使用 RUST_BACKTRACE=1 cargo run 来打印 stack 详情;
fn drink(beverage: &str) {
    // You shouldn't drink too much sugary beverages.
    if beverage == "lemonade" { panic!("AAAaaaaa!!!!"); }

    println!("Some refreshing {} is all I need.", beverage);
}

fn main() {
    drink("water");
    drink("lemonade");
    drink("still water");
}
std::panic module 提供的函数:
- catch_unwind
- Invokes a closure, capturing the cause of an unwinding panic if one occurs.
- panic_any
- Panic the current thread with the given message as the panic payload.
- resume_unwind
- Triggers a panic without invoking the panic hook.
- set_hook
- Registers a custom panic hook, replacing the previously registered hook.
- take_hook
- Unregisters the current panic hook and returns it, registering the default hook in its place.
- always_abort Experimental
- Make all future panics abort directly without running the panic hook or unwinding.
- get_backtrace_style Experimental
- Checks whether the standard library’s panic hook will capture and print a backtrace.
- set_backtrace_style Experimental
- Configure whether the default panic hook will capture and display a backtrace.
- update_hook Experimental
- Atomic combination of take_hook and set_hook. Use this to replace the panic handler with a new panic handler that does something and then executes the old handler.
使用 std::panic::cach_unwinde() 来实现可以 捕获闭包中的 panic ,该函数返回一个 Result:
- 当闭包内 panic 时,返回 Err 否则返回 Ok;
- 如果 panic 使用 unwinding 实现,则会捕获。否则如果是 abort 实现,则不会捕获;
- 如果设置了 panic hook, 则该 hook 在 panic 被捕获前,被 unwinding 前调用;
- Also note that unwinding into Rust code with a foreign exception (e.g.
an exception thrown from C++ code) is undefined behavior.
pub fn catch_unwind<F: FnOnce() -> R + UnwindSafe, R>(f: F) -> Result<R>

use std::panic;

let result = panic::catch_unwind(|| {
    println!("hello!");
});
assert!(result.is_ok());

let result = panic::catch_unwind(|| {
    panic!("oh no!");
});
assert!(result.is_err());
使用 std::panic::resume_unwind() 来触发一个 不执行 panic hook 的 panic:
- 如果 panic 被配置使用 abort 实现,则该函数会 abort 程序而不是 unwinding;
pub fn resume_unwind(payload: Box<dyn Any + Send>) -> !

use std::panic;

let result = panic::catch_unwind(|| {
    panic!("oh no!");
});

if let Err(err) = result {
    panic::resume_unwind(err);
}
使用 std::panic::panic_any(msg: M) 来触发 执行 panic hook 的 panic ,其中 M 可以是任意类型:
- 而 panic!() 的参数只能是和 println!() 类似的格式化字符串。
// msg 可以任意类型(Any + Send)而不只是 string。
// 后续可以使用 PanicInfo::payload() 来获取 mesage。
pub fn panic_any<M: 'static + Any + Send>(msg: M) -> !

panic!();
panic!("this is a terrible mistake!");
panic!("this is a {} {message}", "fancy", message = "message");
std::panic::panic_any(4); // panic with the value of 4 to be collected elsewhere
std::panic::set_hook 设置自定义 panic hook(只能生效一个,取代以前的 hook)
- 在 thread panic 时,但是 panic runtime 调用前执行,所以对于 aborting 和 unwinding
都适用; - 缺省的 hook 是程序启动时自动注册的,他会在 stderr 打印 message,并按需打印 backtrace。
pub fn set_hook(hook: Box<dyn Fn(&PanicInfo<'_>) + Sync + Send + 'static>)

// 示例
use std::panic;

panic::set_hook(Box::new(|_| {  // panic 时传入一个 PanicInfo 对象,可以用来提取 panic 信息
    println!("Custom panic hook");
}));

panic!("Normal panic");
std::panic::take_hook() 将 panic hook 设置为缺省 hook:
pub fn take_hook() -> Box<dyn Fn(&PanicInfo<'_>) + Sync + Send + 'static>

use std::panic;

panic::set_hook(Box::new(|_| {
    println!("Custom panic hook");
}));

let _ = panic::take_hook();

panic!("Normal panic");
std::panic::update_hook() 是 take_hook/set_hook 的原子操作,用来替换当前 hook 并返回以前的 hook:
#![feature(panic_update_hook)]
use std::panic;

// Equivalent to
// let prev = panic::take_hook();
// panic::set_hook(move |info| {
//     println!("...");
//     prev(info);
// );
panic::update_hook(move |prev, info| {
    println!("Print custom message and execute panic handler as usual");
    prev(info);
});

panic!("Custom and then normal");
set_hook/get_hook 使用的 std::panic::PanicInfo 对象提供了 location()/message()/payload() 方法,提供 apnic 信息:
use std::panic;

panic::set_hook(Box::new(|panic_info| {
    if let Some(location) = panic_info.location() {
        println!("panic occurred in file '{}' at line {}",
            location.file(),
            location.line(),
        );
    } else {
        println!("panic occurred but can't get location information...");
    }
}));

panic!("Normal panic");
std::panic::set_backtrace_style/ std::panic::get_backtrace_style() 用于设置和返回 panic 时 panic hook 是否能捕获和显示 backtrace:
- 缺省值可以使用环境变量 RUST_BACKTRACE 来配置。
- for BacktraceStyle::Off
- for BacktraceStyle::Full
- for BacktraceStyle::Short
Other values are currently BacktraceStyle::Short, but this may change in the future
#[non_exhaustive]
pub enum BacktraceStyle {
    Short,
    Full,
    Off,
}
get_backtrace_style() 先查找 set_backtrace_style() 设置的值,如果没有设置则查找 RUST_BACKTRACE 环境变量。
pub fn set_backtrace_style(style: BacktraceStyle)
pub fn get_backtrace_style() -> Option<BacktraceStyle>
5 std::error #
Rust 提供了两种错误处理类型:
- panic runtime 和接口;
- Result 、 error trait 和用户指定错误类型;
panic runtime 和接口包括如下内容(参考 std::panic module 笔记):
- panic! and panic_any (Constructing, Propagated automatically)
- PanicInfo (Reporting)
- set_hook, take_hook, and #[panic_handler] (Reporting)
- catch_unwind and resume_unwind (Discarding, Propagating)
Result 和 Error trait 等:
- Result (Propagating, Reacting)
- The Error trait (Reporting)
- User defined types (Constructing / Representing)
- match and downcast (Reacting)
- The question mark operator (?) (Propagating)
- The partially stable Try traits (Propagating, Constructing)
- Termination (Reporting)
通过使用如下两个方法,可以将 Error 转换为 panic:
- Result::unwrap
- Result::expect
Trait std::error::Error 代表发生的 error 接口:
- Error trait 没有必须方法;
- 实现 Error trait 的类型必须实现了 Display 和 Debug trait,报错信息一般是小写字符串;
pub trait Error: Debug + Display {
    // Provided methods
    fn source(&self) -> Option<&(dyn Error + 'static)> { ... }

    // description 和 cause 方法已被弃用
    fn description(&self) -> &str { ... } // 用 to_string() 代替
    fn cause(&self) -> Option<&dyn Error> { ... } // 用 source() 代替

    // 很少需要定义,目前仅仅标准库内部使用(std::error::Report 的 show_backtrace() 方法需要)
    fn provide<'a>(&'a self, request: &mut Request<'a>) { ... }
}

let err = "NaN".parse::<u32>().unwrap_err();
assert_eq!(err.to_string(), "invalid digit found in string");
实现 Error trait 的错误类型,可以重新定义 Error::source() 方法,从而获得下一层(根因)错误:
// The lower-level source of this error, if any.
fn source(&self) -> Option<&(dyn Error + 'static)>

// 举例
use std::error::Error;
use std::fmt;

// 自定义错误类型必须同时实现 Debug 和 Display trait
#[derive(Debug)]
struct SuperError {
    source: SuperErrorSideKick,
}

impl fmt::Display for SuperError {
    fn fmt(&self, f: &mut fmt::Formatter<'_>) -> fmt::Result {
        write!(f, "SuperError is here!")
    }
}

impl Error for SuperError {
    // SuperError 重新定义了 source 方法,返回内部(更底层)的错误
    fn source(&self) -> Option<&(dyn Error + 'static)> {
        Some(&self.source)
    }
}

#[derive(Debug)]
struct SuperErrorSideKick;

impl fmt::Display for SuperErrorSideKick {
    fn fmt(&self, f: &mut fmt::Formatter<'_>) -> fmt::Result {
        write!(f, "SuperErrorSideKick is here!")
    }
}

impl Error for SuperErrorSideKick {}

fn get_super_error() -> Result<(), SuperError> {
    Err(SuperError { source: SuperErrorSideKick })
}

fn main() {
    match get_super_error() {
        Err(e) => {
            println!("Error: {e}");
            println!("Caused by: {}", e.source().unwrap());
        }
        _ => println!("No error"),
    }
}
标准库为实现 Error trait 的 trait object 如 dyn Error 提供了 downcase_xx<T> 方法,用于对 Error 的具体类型进行 下钻判断 :
// 下面 3 种类型均提供了如下 4 个方法
impl dyn Error
impl dyn Error + Send
impl dyn Error + Send + Sync

// 以 impl dyn Error 为例
pub fn is<T>(&self) -> bool where T: Error + 'static,
pub fn downcast_ref<T>(&self) -> Option<&T> where T: Error + 'static,
pub fn downcast_mut<T>(&mut self) -> Option<&mut T> where T: Error + 'static,
pub fn downcast<T>( self: Box<dyn Error> ) -> Result<Box<T>, Box<dyn Error>> where T: Error + 'static,
也可以使用 std::error module 提供的两个函数来返回 trait object 的类型引用或值:
- request_ref
- Request a reference of type T from the given impl Error.
- request_value
- Request a value of type T from the given impl Error.
// 从 trait object 返回引用
pub fn request_ref<T, 'a>(err: &'a (impl Error + ?Sized)) -> Option<&'a T> where T: 'static + ?Sized,
use core::error::Error;
use core::error::request_ref;

fn get_str(err: &impl Error) -> &str {
    request_ref::<str>(err).unwrap()
}

// 从 trait object 返回 value
pub fn request_value<T, 'a>(err: &'a (impl Error + ?Sized)) -> Option<T> where T: 'static,
use std::error::Error;
use core::error::request_value;
fn get_string(err: &impl Error) -> String {
    request_value::<String>(err).unwrap()
}
Struct std::error::Report<<E = Box<dyn Error>> 用来打印 E 的信息:
impl<E> Report<E> where Report<E>: From<E>,
pub fn new(error: E) -> Report<E>

impl<E> Report<E>
pub fn pretty(self, pretty: bool) -> Self
pub fn show_backtrace(self, show_backtrace: bool) -> Self
例如:
#![feature(error_reporter)]
use std::error::Report;

fn main() -> Result<(), Report<SuperError>> {
    get_super_error()
        .map_err(Report::from)
        .map_err(|r| r.pretty(true).show_backtrace(true))?;
    Ok(())
}

// 输出
// Error: SuperError is here!

// Caused by:
//       SuperErrorSideKick is here!


#![feature(error_reporter)]
use std::error::Report;

let source = SuperErrorSideKickSideKick;
let source = SuperErrorSideKick { source };
let error = SuperError { source };
let report = Report::new(error).pretty(true);
eprintln!("Error: {report:?}");
// 输出
// Error: SuperError is here!

// Caused by:
//    0: SuperErrorSideKick is here!
//    1: SuperErrorSideKickSideKick is here!
show_backtrace():
- show_backtrace 依赖于 Error 实现 provide() 方法.
#![feature(error_reporter)]
#![feature(error_generic_member_access)]
use std::error::Request;
use std::error::Report;
use std::backtrace::Backtrace;

#[derive(Debug)]
struct SuperErrorSideKick {
    backtrace: Backtrace,
}

impl SuperErrorSideKick {
    fn new() -> SuperErrorSideKick {
        SuperErrorSideKick { backtrace: Backtrace::force_capture() } // 捕获 backtrace
    }
}

impl Error for SuperErrorSideKick {
    fn provide<'a>(&'a self, request: &mut Request<'a>) {
        request.provide_ref::<Backtrace>(&self.backtrace); // 提供 Backtrace 类型
    }
}

// The rest of the example is unchanged ...

let source = SuperErrorSideKick::new();
let error = SuperError { source };
// show_backtrace 依赖于 Error 实现 provide() 方法
let report = Report::new(error).pretty(true).show_backtrace(true);
eprintln!("Error: {report:?}");

// 输出:
// Error: SuperError is here!

// Caused by:
//       SuperErrorSideKick is here!

// Stack backtrace:
//    0: rust_out::main::_doctest_main_src_error_rs_1158_0::SuperErrorSideKick::new
//    1: rust_out::main::_doctest_main_src_error_rs_1158_0
//    2: rust_out::main
//    3: core::ops::function::FnOnce::call_once
//    4: std::sys_common::backtrace::__rust_begin_short_backtrace
//    5: std::rt::lang_start::{{closure}}
//    6: std::panicking::try
//    7: std::rt::lang_start_internal
//    8: std::rt::lang_start
//    9: main
//   10: __libc_start_main
//   11: _start
6 std::boxed #
该 module 提供了堆分配的 Box<T> 类型:一般情况下,开发者并不能任意在堆上分配内存,但是 Box<T> 提供了最简单的在堆上分配内存的机制。
Box 又有分配内存的所有权,当 Box 离开 scope 时 drop 对应的内存。
举例:使用 Box 来将 stack 变量转换为 heap 变量:
let val: u8 = 5;
let boxed: Box<u8> = Box::new(val);

// Box 实现了 Deref<Target=T>,所以是智能指针类型,可以解引用后将对象 move 回 stack
let boxed: Box<u8> = Box::new(5);
let val: u8 = *boxed;

// 创建递归数据解构,Box<T> 具有固定的大小
#[allow(dead_code)]
#[derive(Debug)]
enum List<T> {
    Cons(T, Box<List<T>>),
    Nil,
}
let list: List<i32> = List::Cons(1, Box::new(List::Cons(2, Box::new(List::Nil))));
println!("{list:?}");
Box 默认使用 Global allocator 来分配内存,可以和 raw pointer 之间相互转换:
let value = &mut 32 as *mut i32;
let box = Box::<i32>::from_raw(value);
let value2 = &*box as *const i32;
只要 T: Sized, 则 Box<T> 将确保可以用一个 single pointer 来代表, 而且和 C 指针(T*)是 ABI 兼容的
。这意味着, 如果要在 C 中调用 Rust func ,可以在 Rust func 中使用 Box<T> 类型,而在 C side 当作 T*
来使用。
- 但是如果在 Rust func 中调用 C func,则不建议对 C 指针使用 Box<T> 类型,否则是未定义行为。而是尽可能使用 raw pointer;
例如,C 的 header 中函数声明:
/* C header */

/* Returns ownership to the caller */
struct Foo* foo_new(void);

/* Takes ownership from the caller; no-op when invoked with null */
void foo_delete(struct Foo*);
这两个 C 函数的 Rust 实现如下:
#[repr(C)]
pub struct Foo;

#[no_mangle]
pub extern "C" fn foo_new() -> Box<Foo> {
    Box::new(Foo)
}

// foo_delete() 的参数可能是 nullable 指针,而 Box<Foo> 不可能是 null,故需要使用 Option
#[no_mangle]
pub extern "C" fn foo_delete(_: Option<Box<Foo>>) {}
Struct std::boxed::Box 默认使用 Global 内存分配器:
pub struct Box<T, A = Global>(/* private fields */)
where
    A: Allocator,
    T: ?Sized;
7 std::hash #
该 module 提供了通用计算类型的 hash 值的支持。hash 值在 HashMap 和 HashSet 中广泛使用。
自定义类型需要先实现 std:#️⃣:Hash trait, 然后才能使用 std:#️⃣:Hasher 来计算他的 hash 值。
- 对于任意实现了 Hash 和 Eq 类型,
k1 == k2 -》hash(k1) == hash(k2), 也就是如果 Eq 则 Hash 只需要相等, HashMap 和 HashSet 都依赖于这个语义;可以通过#[derive(PartialEq, Eq, Hash)]来确保这一点。 - Rust 为绝大部分标准类似自动实现了 Hash trait, 如 str/String/Path/PathBuf/Cow 等。
pub trait Hash {
    // Required method
    fn hash<H>(&self, state: &mut H) where H: Hasher;

    // Provided method
    fn hash_slice<H>(data: &[Self], state: &mut H)
       where H: Hasher,
             Self: Sized { ... }
}

use std::hash::{DefaultHasher, Hash, Hasher};
let mut hasher = DefaultHasher::new();
7920.hash(&mut hasher);
println!("Hash is {:x}!", hasher.finish());

// Hash 一个 slice
let numbers = [6, 28, 496, 8128];
Hash::hash_slice(&numbers, &mut hasher);
println!("Hash is {:x}!", hasher.finish());
最简单的实现 Hash trait 的方式是使用 #[derive(Hash)] :
use std::hash::{DefaultHasher, Hash, Hasher};

#[derive(Hash)]
struct Person {
    id: u32,
    name: String,
    phone: u64,
}
let person1 = Person {
    id: 5,
    name: "Janet".to_string(),
    phone: 555_666_7777,
};
let person2 = Person {
    id: 5,
    name: "Bob".to_string(),
    phone: 555_666_7777,
};

assert!(calculate_hash(&person1) != calculate_hash(&person2));

fn calculate_hash<T: Hash>(t: &T) -> u64 {
    let mut s = DefaultHasher::new();
    t.hash(&mut s); // t 实现了 Hash trait,故具有 hash() 方法,需要传入一个 Hasher
    s.finish() // 返回计算的 hash 值,是 u64 类型。
}
也可以手动实现 Hash trait:
use std::hash::{DefaultHasher, Hash, Hasher};

struct Person {
    id: u32,
    name: String,
    phone: u64,
}

impl Hash for Person {
    fn hash<H: Hasher>(&self, state: &mut H) {
        // Rust 已经为基本类型实现了 Hash trait,故可以挨个调用各 field 来计算 hash 值。
        // 注意:
        //  1. hash() 方法没有返回值;传入的 state 对应的 Hasher 内部维护有状态;
        //  2. 这里没有调用 state 的 finish() 方法,而是在后续对 Person 计算整体 hash 值时才调用该方法。
        self.id.hash(state);
        self.phone.hash(state);
    }
}

let person1 = Person {
    id: 5,
    name: "Janet".to_string(),
    phone: 555_666_7777,
};
let person2 = Person {
    id: 5,
    name: "Bob".to_string(),
    phone: 555_666_7777,
};

assert_eq!(calculate_hash(&person1), calculate_hash(&person2));

fn calculate_hash<T: Hash>(t: &T) -> u64 {
    let mut s = DefaultHasher::new();
    t.hash(&mut s);
    s.finish()
}
Trait std:#️⃣:Hasher 定义了一个 Hash 算法类型需要实现的接口:
- Hasher
内部包含状态,可以多次调用 Hasher 的 write/write_xx() 方法,最终调用 finish() 返回 hash 值;
pub trait Hasher {
    // Required methods
    fn finish(&self) -> u64;
    fn write(&mut self, bytes: &[u8]); // 计算任意字节序列的 hash 值。

    // Provided methods
    fn write_u8(&mut self, i: u8) { ... }
    fn write_u16(&mut self, i: u16) { ... }
    fn write_u32(&mut self, i: u32) { ... }
    fn write_u64(&mut self, i: u64) { ... }
    fn write_u128(&mut self, i: u128) { ... }
    fn write_usize(&mut self, i: usize) { ... }
    fn write_i8(&mut self, i: i8) { ... }
    fn write_i16(&mut self, i: i16) { ... }
    fn write_i32(&mut self, i: i32) { ... }
    fn write_i64(&mut self, i: i64) { ... }
    fn write_i128(&mut self, i: i128) { ... }
    fn write_isize(&mut self, i: isize) { ... }
    fn write_length_prefix(&mut self, len: usize) { ... }
    fn write_str(&mut self, s: &str) { ... } // 计算字符串 hash
}

// 举例
use std::hash::{DefaultHasher, Hasher};
let mut hasher = DefaultHasher::new();

hasher.write_u32(1989);
hasher.write_u8(11);
hasher.write_u8(9);
hasher.write(b"Huh?");
hasher.write(&[1, 2, 3, 4]);
hasher.write(&[5, 6]);

println!("Hash is {:x}!", hasher.finish());
std:#️⃣:DefaultHasher 类型实现了 std:#️⃣:Hasher trait,他是 HashMap 的 RandomState 的缺省实现。
由于 Hasher 内部包含状态(多次 write,最后 finish() 返回 hash 值),所以对于 HashMap 需要为每一个 key 创建一个 Hasher 来计算它的 hash 值。而 std:#️⃣:BuildHasher trait 就是来创建该 Hasher 对象的:
- 对于 build_hasher() 返回的 Hasher,相同的输入应该产生相同的 hash 值;
pub trait BuildHasher {
    type Hasher: Hasher;

    // Required method
    fn build_hasher(&self) -> Self::Hasher;

    // Provided method
    fn hash_one<T>(&self, x: T) -> u64
       where T: Hash,
             Self: Sized,
             Self::Hasher: Hasher { ... }
}
std:#️⃣:RandomState struct 实现了 BuildHahser trait, 他是 HashMap 默认的 Hasher:
use std::hash::{BuildHasher, Hasher, RandomState};

let s = RandomState::new();
let mut hasher_1 = s.build_hasher();
let mut hasher_2 = s.build_hasher();

hasher_1.write_u32(8128);
hasher_2.write_u32(8128);

assert_eq!(hasher_1.finish(), hasher_2.finish());
8 std::convert #
Enum std::convert::Infallible, 一般用于 Result 中的 error type, 表示不可能发生的 error(也就是 Result
只能一直是 Ok), 这时通过该 enum 没有 variant value 来实现的.
pub enum Infallible {}
The error type for errors that can never happen . Since this enum has no variant, a value of this
type can never actually exist. This can be useful for generic APIs that use Result and parameterize
the error type, to indicate that the result is always Ok .
For example, the TryFrom trait (conversion that returns a Result) has a blanket implementation for all types where a reverse Into implementation exists.
impl<T, U> TryFrom<U> for T where U: Into<T> {
    type Error = Infallible;

    fn try_from(value: U) -> Result<Self, Infallible> {
        Ok(U::into(value))  // Never returns `Err`
    }
}
9 std::fmt #
Debug 只能通过 #[derive(Debug)] 宏由编译器自动实现,而 Display 是需要自己手动实现的:
- fmt::Debug: Uses the {:?} marker. Format text for debugging purposes.
- fmt::Display: Uses the {} marker. Format text in a more elegant, user friendly fashion.
可以使用 write!() 宏来实现 Dieplay trait。
std::fmt 定义的常用宏:
- format!: write formatted text to [String][string]
- print!: same as format! but the text is printed to the console (io::stdout).
- println!: same as print! but a newline is appended.
- eprint!: same as format! but the text is printed to the standard error (io::stderr).
- eprintln!: same as eprint!but a newline is appended.
格式化:
- 字符串默认是左对齐,数字是右对齐;
- 位置参数和命名参数可以混用,但是 println!() 等的命名参数必须位于位置参数后面;命名参数的名称也可以是上下文中的变量名称;
10 std::mem #
std::mem module 提供了各类型的 size/aligment/take/replace 等操作函数。
- align_of::<T>()/align_of_val(&v) 返回类型 T 或 v 指向的对象的对齐方式;
- drop(T): drop 对象 T, 执行 T 实现的 Drop trait 方法;
- forget(T): drop 对象 T, 但是不执行它的 Drop trait 方法;
- replace(&mut T1, T2): 用传入的 T2 值替换 &mut T1 对象,返回旧的 T1 值;
- swap(&mut T1, &mut T2): 交换 T1 和 T2 的值;
- take(&mut T1): 返回 T1 的值,将原来 &mut T1 的值用 T1 的 Default 值填充;
use std::mem;

pub const fn align_of<T>() -> usize
          assert_eq!(4, mem::align_of::<i32>());

pub fn align_of_val<T>(val: &T) -> usize where T: ?Sized, // 返回 val 执行的 T 类型值的内存对齐要求
          assert_eq!(4, mem::align_of_val(&5i32));

pub fn drop<T>(_x: T) // 回收 T 值, 其实是获得 T 的所有权后丢弃
let v = vec![1, 2, 3];
drop(v); // explicitly drop the vector

pub const fn forget<T>(t: T) // Takes ownership and “forgets” about the value without running its destructor.
let file = File::open("foo.txt").unwrap();
mem::forget(file);

// Moves src into the referenced dest, returning the previous dest value.
pub fn replace<T>(dest: &mut T, src: T) -> T
use std::mem;
let mut v: Vec<i32> = vec![1, 2];
let old_v = mem::replace(&mut v, vec![3, 4, 5]); // 新的值替换传入的 &mut 值,返回 v 对象。
assert_eq!(vec![1, 2], old_v);
assert_eq!(vec![3, 4, 5], v);
// replace 的场景场景是替换容器中的元素
use std::mem;
impl<T> Buffer<T> {
    fn replace_index(&mut self, i: usize, v: T) -> T {
        mem::replace(&mut self.buf[i], v)
    }
}
let mut buffer = Buffer { buf: vec![0, 1] };
assert_eq!(buffer.buf[0], 0);
assert_eq!(buffer.replace_index(0, 2), 0);
assert_eq!(buffer.buf[0], 2);


pub const fn size_of<T>() -> usize // 返回指定类型 T 的大小
use std::mem;
// Some primitives
assert_eq!(4, mem::size_of::<i32>());
assert_eq!(8, mem::size_of::<f64>());
assert_eq!(0, mem::size_of::<()>());
// Some arrays
assert_eq!(8, mem::size_of::<[i32; 2]>());
assert_eq!(12, mem::size_of::<[i32; 3]>());
assert_eq!(0, mem::size_of::<[i32; 0]>());
// Pointer size equality
assert_eq!(mem::size_of::<&i32>(), mem::size_of::<*const i32>());
assert_eq!(mem::size_of::<&i32>(), mem::size_of::<Box<i32>>());
assert_eq!(mem::size_of::<&i32>(), mem::size_of::<Option<&i32>>());
assert_eq!(mem::size_of::<Box<i32>>(), mem::size_of::<Option<Box<i32>>>());

//  返回指向的 T 的大小,于 size_of::<T>() 的区别是该方法也适用于 Thas no statically-known size,
//  e.g., a slice [T] or a trait object, then size_of_val can be used to get the dynamically-known
//  size.
pub fn size_of_val<T>(val: &T) -> usize where T: ?Sized,
  use std::mem;
assert_eq!(4, mem::size_of_val(&5i32));
let x: [u8; 13] = [0; 13];
let y: &[u8] = &x;
assert_eq!(13, mem::size_of_val(y));

pub fn swap<T>(x: &mut T, y: &mut T) // Swaps the values at two mutable locations, without deinitializing either one.
use std::mem;
let mut x = 5;
let mut y = 42;
mem::swap(&mut x, &mut y);
assert_eq!(42, x);
assert_eq!(5, y);

// Replaces dest with the default value of T, returning the previous dest value.
pub fn take<T>(dest: &mut T) -> T where T: Default,
use std::mem;
let mut v: Vec<i32> = vec![1, 2];
let old_v = mem::take(&mut v);
assert_eq!(vec![1, 2], old_v);
assert!(v.is_empty());
align_of/align_of_val 以及 size_of/size_of_val 都提供了 _val 版本,主要的使用场景是获得动态类型对应的实际类型的对齐方式或大小: Thas no statically-known size, / e.g., a slice [T] or a trait object, then size_of_val can be used to get the dynamically-known / size.
std::mem::offset_of!() 返回 struct filed 或 enum variant field 的偏移:
#![feature(offset_of_enum, offset_of_nested)]

use std::mem;
#[repr(C)]
struct FieldStruct {
    first: u8,
    second: u16,
    third: u8
}

assert_eq!(mem::offset_of!(FieldStruct, first), 0);
assert_eq!(mem::offset_of!(FieldStruct, second), 2);
assert_eq!(mem::offset_of!(FieldStruct, third), 4);

#[repr(C)]
struct NestedA {
    b: NestedB
}

#[repr(C)]
struct NestedB(u8);

assert_eq!(mem::offset_of!(NestedA, b.0), 0);

#[repr(u8)]
enum Enum {
    A(u8, u16),
    B { one: u8, two: u16 },
}

assert_eq!(mem::offset_of!(Enum, A.0), 1);
assert_eq!(mem::offset_of!(Enum, B.two), 2);

assert_eq!(mem::offset_of!(Option<&u8>, Some.0), 0);
std::mem::discriminant() 返回唯一确定 enum variant 的 tag 值:
use std::mem;
enum Foo { A(&'static str), B(i32), C(i32) }
assert_eq!(mem::discriminant(&Foo::A("bar")), mem::discriminant(&Foo::A("baz")));
assert_eq!(mem::discriminant(&Foo::B(1)), mem::discriminant(&Foo::B(2)));
assert_ne!(mem::discriminant(&Foo::B(3)), mem::discriminant(&Foo::C(3)));

enum Enum {
    Foo,
    Bar,
    Baz,
}
assert_eq!(0, Enum::Foo as isize);
assert_eq!(1, Enum::Bar as isize);
assert_eq!(2, Enum::Baz as isize);
类型大小:
- () = 1; bool = 1; char = 4;The types *const T, &T, Box<T>, Option<&T>, and Option<Box<T>> all
have the same size. If T is Sized, all of those types have the same size as
usize. - for any type T and length n, [T; n] has a size of
n * size_of::<T>(). - 对象类型的大小还受 #[repr(C)], repr(align(N)) 和 #[repr(u16)] 等属性的影响。
- Size of Enums: Enums that carry
no dataother than the discriminant have the same size as C enums on the platform they are compiled for. - Size of Unions: The size of a union is the size of its largest field.
std::mem::transmute() 函数:
- transmute 将以各种 Src 类型的 value 解释为 Dst 类型的 value,这里的解释是 bits 级别的: 将 Src value bits 级别的 copy 为 Dst 的 value,然后 forget Src value(drop 但不调用他的 Drop trait)。
- Src 和 Dst 类型必须具有相同长度,否则编译出错;
pub const unsafe extern "rust-intrinsic" fn transmute<Src, Dst>( src: Src ) -> Dst

// transmute 的两个常用场景:

// 例子 1,在 *const 指针和函数指针间转换
fn foo() -> i32 {
    0
}
// Crucially, we `as`-cast to a raw pointer before `transmute`ing to a function pointer.
// This avoids an integer-to-pointer `transmute`, which can be problematic.
// Transmuting between raw pointers and function pointers (i.e., two pointer types) is fine.
let pointer = foo as *const ();
let function = unsafe {
    std::mem::transmute::<*const (), fn() -> i32>(pointer)
};
assert_eq!(function(), 0);

// 例子 2,扩充或缩短 lifetime
struct R<'a>(&'a i32);
unsafe fn extend_lifetime<'b>(r: R<'b>) -> R<'static> {
    std::mem::transmute::<R<'b>, R<'static>>(r)
}
unsafe fn shorten_invariant_lifetime<'b, 'c>(r: &'b mut R<'static>) -> &'b mut R<'c> {
    std::mem::transmute::<&'b mut R<'static>, &'b mut R<'c>>(r)
}
其他可以 transmute 场景可以更安全地使用其他 APIs 的例子:
let raw_bytes = [0x78, 0x56, 0x34, 0x12];
let num = unsafe {
    std::mem::transmute::<[u8; 4], u32>(raw_bytes) // 将 4 个 u8 解释为 u32
};

// use `u32::from_ne_bytes` instead
let num = u32::from_ne_bytes(raw_bytes);
// or use `u32::from_le_bytes` or `u32::from_be_bytes` to specify the endianness
let num = u32::from_le_bytes(raw_bytes);
assert_eq!(num, 0x12345678);
let num = u32::from_be_bytes(raw_bytes);
assert_eq!(num, 0x78563412);


let ptr = &0;
let ptr_num_transmute = unsafe {
    std::mem::transmute::<&i32, usize>(ptr) // 将指针专为 usize
};
// Use an `as` cast instead
let ptr_num_cast = ptr as *const i32 as usize; // 使用更安全的 as 转换


let ptr: *mut i32 = &mut 0;
let ref_transmuted = unsafe {
    std::mem::transmute::<*mut i32, &mut i32>(ptr) // 将 *mut T 转换为 &mut T
};
// Use a reborrow instead
let ref_casted = unsafe { &mut *ptr };


let ptr = &mut 0;
let val_transmuted = unsafe {
    std::mem::transmute::<&mut i32, &mut u32>(ptr) // &mut T into an &mut U:
};
// Now, put together `as` and reborrowing - note the chaining of `as`
// `as` is not transitive
let val_casts = unsafe { &mut *(ptr as *mut i32 as *mut u32) };


// this is not a good way to do this.
let slice = unsafe { std::mem::transmute::<&str, &[u8]>("Rust") }; // 将 &str 转换为 &[u8]
assert_eq!(slice, &[82, 117, 115, 116]);
// You could use `str::as_bytes`
let slice = "Rust".as_bytes();
assert_eq!(slice, &[82, 117, 115, 116]);
// Or, just use a byte string, if you have control over the string literal
assert_eq!(b"Rust", &[82, 117, 115, 116]);
std::mem::transmute_copy
pub const unsafe fn transmute_copy<Src, Dst>(src: &Src) -> Dst
Interprets src as having type &Dst, and then reads src without moving the contained value.
This function will unsafely assume the pointer src is valid for size_of::<Dst> bytes by transmuting &Src to &Dst and then reading the &Dst (except that this is done in a way that is correct even when &Dst has stricter alignment requirements than &Src). It will also unsafely create a copy of the contained value instead of moving out of src.
It is not a compile-time error if Src and Dst have different sizes, but it is highly encouraged to only invoke this function where Src and Dst have the same size. This function triggers undefined behavior if Dst is larger than Src.
use std::mem;

#[repr(packed)]
struct Foo {
    bar: u8,
}

let foo_array = [10u8];

unsafe {
    // Copy the data from 'foo_array' and treat it as a 'Foo'
    let mut foo_struct: Foo = mem::transmute_copy(&foo_array);
    assert_eq!(foo_struct.bar, 10);

    // Modify the copied data
    foo_struct.bar = 20;
    assert_eq!(foo_struct.bar, 20);
}

// The contents of 'foo_array' should not have changed
assert_eq!(foo_array, [10]);
std::mem::zeroed: pub const unsafe fn zeroed<T>() -> T
Returns the value of type T represented by the all-zero byte-pattern.
use std::mem;
let x: i32 = unsafe { mem::zeroed() };
assert_eq!(0, x);

// 错误的用法
use std::mem;
let _x: &i32 = unsafe { mem::zeroed() }; // Undefined behavior!
let _y: fn() = unsafe { mem::zeroed() }; // And again!
Struct std::mem::ManuallyDrop<T> 将 T 对象封装,可以阻止编译器自动调用 T 的解构器,而是在需要时手动
drop 对象:
use std::mem::ManuallyDrop;
let mut x = ManuallyDrop::new(String::from("Hello World!"));
x.truncate(5); // You can still safely operate on the value
assert_eq!(*x, "Hello");
// But `Drop` will not be run here
Union std::mem::MaybeUninit:A wrapper type to construct uninitialized instances of T.
pub union MaybeUninit<T> {
    /* private fields */
}
C 很常见的情况是, 传递一个指针, 然后让函数内的逻辑来修改指针指向的内容. Rust 提供了
std::mem::MaybeUninit<T> 类型, 他告诉编译器为 T 分配足够的内存, 但是不做任何处理, 直到后续明确告诉他可以安全地操作这一块内存区域. MaybeUninit<T> 拥有这一块内存区域, 这样编译器就不会做一些优化和操作,从而避免非预期的行为.
- MaybeUninit.as_mut_ptr() 返回这个内存区域的 *mut T 指针, 可以将他传递给 FFI 函数使用;
- 然后调用 MaybeUninit.assume_init() 来将内存区域标记为已初始化;
MaybeUninit<T> 可以在 unsafe code 中使用 uninitialized data,他用于告诉编译器这一部分数据没有初始化:
- 编译器根据 T 来分配合适大小的未初始化内存区域,后续一般是先使用 as_ptr()/as_mut_ptr() 转换为 raw pointer,然后使用他的 read/write() 来对未初始化内存区域进行读写。
- 编译器不会对 MaybeUninit<T> 进行 runtime tracking 和 safety check;
use std::mem::MaybeUninit;

// Create an explicitly uninitialized reference. The compiler knows that data inside a
// `MaybeUninit<T>` may be invalid, and hence this is not UB:
let mut x = MaybeUninit::<&i32>::uninit(); //
// Set it to a valid value.
x.write(&0);
// Extract the initialized data -- this is only allowed *after* properly initializing `x`!
let x = unsafe { x.assume_init() };
out-pointers:use MaybeUninit<T> to implement “out-pointers”: instead of returning data from a function, pass it a pointer to some (uninitialized) memory to put the result into.
use std::mem::MaybeUninit;

unsafe fn make_vec(out: *mut Vec<i32>) { // 传入指针,然后使用 write 来填充内存区域的值
    // `write` does not drop the old contents, which is important.
    out.write(vec![1, 2, 3]);
}

let mut v = MaybeUninit::uninit(); // 未指定类型,由编译器自动推导
unsafe { make_vec(v.as_mut_ptr()); }
// Now we know `v` is initialized! This also makes sure the vector gets
// properly dropped.
let v = unsafe { v.assume_init() };
assert_eq!(&v, &[1, 2, 3]);
Initializing an array element-by-element: MaybeUninit<T> can be used to initialize a large array element-by-element:
use std::mem::{self, MaybeUninit};

let data = {
    // Create an uninitialized array of `MaybeUninit`. The `assume_init` is safe because the type we
    // are claiming to have initialized here is a bunch of `MaybeUninit`s, which do not require
    // initialization.
    let mut data: [MaybeUninit<Vec<u32>>; 1000] = unsafe {
        MaybeUninit::uninit().assume_init()
    };

    // Dropping a `MaybeUninit` does nothing, so if there is a panic during this loop, we have a
    // memory leak, but there is no memory safety issue.
    for elem in &mut data[..] {
        elem.write(vec![42]);
    }

    // Everything is initialized. Transmute the array to the initialized type.
    unsafe { mem::transmute::<_, [Vec<u32>; 1000]>(data) }
};

assert_eq!(&data[0], &[42]);
Initializing a struct field-by-field: You can use MaybeUninit<T>, and the std::ptr::addr_of_mut macro, to initialize structs field by field:
use std::mem::MaybeUninit;
use std::ptr::addr_of_mut;

#[derive(Debug, PartialEq)]
pub struct Foo {
    name: String,
    list: Vec<u8>,
}

let foo = {
    let mut uninit: MaybeUninit<Foo> = MaybeUninit::uninit();
    let ptr = uninit.as_mut_ptr();

    // Initializing the `name` field
    // Using `write` instead of assignment via `=` to not call `drop` on the
    // old, uninitialized value.
    unsafe { addr_of_mut!((*ptr).name).write("Bob".to_string()); }

    // Initializing the `list` field
    // If there is a panic here, then the `String` in the `name` field leaks.
    unsafe { addr_of_mut!((*ptr).list).write(vec![0, 1, 2]); }

    // All the fields are initialized, so we call `assume_init` to get an initialized Foo.
    unsafe { uninit.assume_init() }
};

assert_eq!(
    foo,
    Foo {
        name: "Bob".to_string(),
        list: vec![0, 1, 2]
    }
);
MaybeUninit<T> is guaranteed to have the same size, alignment, and ABI as T:
use std::mem::{MaybeUninit, size_of, align_of};
assert_eq!(size_of::<MaybeUninit<u64>>(), size_of::<u64>());
assert_eq!(align_of::<MaybeUninit<u64>>(), align_of::<u64>());
MaybeUninit<T> 实现的方法:
impl<T> MaybeUninit<T>

// Creates a new MaybeUninit<T> initialized with the given value. It is safe to call assume_init on
// the return value of this function.

// Note that dropping a MaybeUninit<T> will never call T’s drop code. It is your responsibility to
// make sure T gets dropped if it got initialized.
pub const fn new(val: T) -> MaybeUninit<T>
use std::mem::MaybeUninit;
let v: MaybeUninit<Vec<u8>> = MaybeUninit::new(vec![42]);

// Creates a new MaybeUninit<T> in an uninitialized state.
pub const fn uninit() -> MaybeUninit<T>
use std::mem::MaybeUninit;
let v: MaybeUninit<String> = MaybeUninit::uninit();

pub fn uninit_array<const N: usize>() -> [MaybeUninit<T>; N]
#![feature(maybe_uninit_uninit_array, maybe_uninit_slice)]
use std::mem::MaybeUninit;
extern "C" {
    fn read_into_buffer(ptr: *mut u8, max_len: usize) -> usize;
}
/// Returns a (possibly smaller) slice of data that was actually read
fn read(buf: &mut [MaybeUninit<u8>]) -> &[u8] {
    unsafe {
        let len = read_into_buffer(buf.as_mut_ptr() as *mut u8, buf.len());
        MaybeUninit::slice_assume_init_ref(&buf[..len])
    }
}
let mut buf: [MaybeUninit<u8>; 32] = MaybeUninit::uninit_array();
let data = read(&mut buf);


// Creates a new MaybeUninit<T> in an uninitialized state, with the memory being filled with 0
// bytes.
pub const fn zeroed() -> MaybeUninit<T>
use std::mem::MaybeUninit;
let x = MaybeUninit::<(u8, bool)>::zeroed();
let x = unsafe { x.assume_init() };
assert_eq!(x, (0, false));


pub fn write(&mut self, val: T) -> &mut T
use std::mem::MaybeUninit;
let mut x = MaybeUninit::<Vec<u8>>::uninit();
{
    let hello = x.write((&b"Hello, world!").to_vec());
    // Setting hello does not leak prior allocations, but drops them
    *hello = (&b"Hello").to_vec();
    hello[0] = 'h' as u8;
}
// x is initialized now:
let s = unsafe { x.assume_init() };
assert_eq!(b"hello", s.as_slice());


// Gets a pointer to the contained value. Reading from this pointer or turning it into a reference
// is undefined behavior unless the MaybeUninit<T> is initialized.
pub const fn as_ptr(&self) -> *const T
use std::mem::MaybeUninit;
let mut x = MaybeUninit::<Vec<u32>>::uninit();
x.write(vec![0, 1, 2]);
// Create a reference into the `MaybeUninit<T>`. This is okay because we initialized it.
let x_vec = unsafe { &*x.as_ptr() };
assert_eq!(x_vec.len(), 3);


pub fn as_mut_ptr(&mut self) -> *mut T


// Extracts the value from the MaybeUninit<T> container. This is a great way to ensure that the data will get dropped, because the resulting T is subject to the usual drop handling.
pub const unsafe fn assume_init(self) -> T
use std::mem::MaybeUninit;
let mut x = MaybeUninit::<bool>::uninit();
x.write(true);
let x_init = unsafe { x.assume_init() };
assert_eq!(x_init, true);

pub const unsafe fn assume_init_read(&self) -> T
pub unsafe fn assume_init_drop(&mut self)
pub const unsafe fn assume_init_ref(&self) -> &T
pub unsafe fn assume_init_mut(&mut self) -> &mut T

pub unsafe fn array_assume_init<const N: usize>( array: [MaybeUninit<T>; N] ) -> [T; N]
pub unsafe fn slice_assume_init_ref(slice: &[MaybeUninit<T>]) -> &[T]
pub unsafe fn slice_assume_init_mut(slice: &mut [MaybeUninit<T>]) -> &mut [T]
pub fn slice_as_ptr(this: &[MaybeUninit<T>]) -> *const T
pub fn slice_as_mut_ptr(this: &mut [MaybeUninit<T>]) -> *mut T

pub fn write_slice<'a>(this: &'a mut [MaybeUninit<T>], src: &[T]) -> &'a mut [T] where T: Copy,
pub fn write_slice_cloned<'a>( this: &'a mut [MaybeUninit<T>], src: &[T] ) -> &'a mut [T] where T: Clone,

pub fn as_bytes(&self) -> &[MaybeUninit<u8>]
pub fn as_bytes_mut(&mut self) -> &mut [MaybeUninit<u8>]
pub fn slice_as_bytes(this: &[MaybeUninit<T>]) -> &[MaybeUninit<u8>]
pub fn slice_as_bytes_mut(this: &mut [MaybeUninit<T>]) -> &mut [MaybeUninit<u8>]
11 std::ptr #
https://doc.rust-lang.org/std/ptr/index.html
本 module 提供了一些操作 raw pointer 的函数。
- raw pointer 类型本身 *const T 或 *mut T 也提供一些方法,可以用来操作 raw pointer;
这个 module 中通过 raw pointer 如 *mut T 或 *const T 来存取一个值,这个值的大小如果没有特殊说明,大小是 std::mem::size_of::<T>() bytes。
使用 std::ptr::addr_of!() 和 std::ptr::addr_of_mut!() 来返回参数 express 的 raw pointer:
- packed struct:默认情况下,struct 对象的 field 会通过 pading 来对齐。通过添加 packed attr,可以关闭 struct field padding 对齐机制,这样 struct 的某个 field 可能是未对齐的。
- 对于未对齐的 filed,是不能创建引用的,但是通过 addr_of!() 和 addr_of_mut!() 宏是可以创建
未对齐的 raw pointer 的。
#[derive(Debug, Default, Copy, Clone)]
#[repr(C, packed)]
struct S {
    aligned: u8,
    unaligned: u32,
}
let s = S::default();
let p = std::ptr::addr_of!(s.unaligned); // not allowed with coercion
Rust 的 raw pointer 和引用都是指针,包括两部分:
- data pointer:指向 value 内存地址的指针;
- 可选的 metadata 指针;
对于编译时可知的固定大小类型(实现了 Sized trait)或 extern 类型的指针,是 thin 指针 ,它的 metadata
是 zero-sized 的 () 类型,所以 thin 指针只占用一个机器字 usize 的变量。
对于动态大小类型,他的指针是 fat 指针 ,它的 metadata 是非空的。fat 指针占用两个 usize 大小(data
pointer + metadata pointer),如*const [u8] 或 *mut dyn std::io::Write:
- For structs whose last field is a DST, metadata is
the metadata for the last field - For the str type, metadata is
the length in bytesas usize - For slice types like [T], metadata is
the length in itemsas usize - For trait objects like dyn SomeTrait, metadata is
DynMetadata<Self>(e.g. DynMetadata<dyn SomeTrait>)
std::ptr::Pointee trait 来为任意指针(thin 或 fat pointer)提供 metadata 的 type 信息:
- Metadata 关联类型可能是 () or usize or DynMetadata<_> 类型;
- (): 对应没有 Metadata 的 thin 指针;
- usize:对应 lenght in bytes(如 &str)或 length in items(如 [T]);
- DynMetadata: 对应 trait object;
- Rust
为所有类型实现了该 trait, 所以可以直接使用;
可以使用 raw pointer 或 std::ptr module 提供的方法或函数来管理 data pointer 和 Metadata 对象:
- raw pointer 的 .to_raw_parts() 方法返回对象的 data pointer 和包裹 Metadata 类型的 Pointee 对象;
- std::ptr::metadata() 方法返回对象的 Metadata 类型对象;
- std::ptr::fromm_raw_parts()/from_raw_parts_mut() 函数来使用 data pointer 和 Metadata 类型对象闯进 raw pointer
// raw pointer 的 to_raw_parts() 方法返回他的 Metadata 信息
pub trait Pointee {
    // Metadata 的实例化类型:() 或 usize 或 DynMetadata<Dyn>
    type Metadata: Copy + Send + Sync + Ord + Hash + Unpin;
}

pub struct DynMetadata<Dyn>
where
    Dyn: ?Sized,
{ /* private fields */ }

// Decompose a (possibly wide) pointer into its data pointer and metadata components.
pub fn to_raw_parts(self) -> (*const (), <T as Pointee>::Metadata)

// Forms a (possibly-wide) raw pointer from a data pointer and metadata.
pub fn from_raw_parts<T>(data_pointer: *const (), metadata: <T as Pointee>::Metadata) -> *const T where T: ?Sized,
Struct std::ptr::DynMetadata 是 trait object 的 metadata,It is a pointer to a vtable (virtual call table) that represents all the necessary information to manipulate the concrete type stored inside a
trait object. The vtable notably it contains:
- type size
- type alignment
- a pointer to the
type’s drop_in_place impl(may be a no-op for plain-old-data) - pointers to
all the methodsfor the type’s implementation of the trait
std::ptr module 提供的函数列表(大部分函数也是 *const T 或 *mut T 类型的方法):
- addr_eq Compares the addresses of the two pointers for equality, ignoring any metadata in fat pointers.
- copy⚠ Copies count * size_of::<T>() bytes from src to dst. The source and destination may overlap.
- copy_nonoverlapping⚠ Copies count * size_of::<T>() bytes from src to dst. The source and destination must not overlap.
- drop_in_place⚠ Executes the destructor (if any) of the pointed-to value.
- eq Compares raw pointers for equality.
- from_mut Convert a mutable reference to a raw pointer.
- from_ref Convert a reference to a raw pointer.
- hash Hash a raw pointer.
- null Creates a null raw pointer.
- null_mut Creates a null mutable raw pointer.
- read⚠
Reads the value from src without moving it. This leaves the memory in src unchanged. - read_unaligned⚠ Reads the value from src without moving it. This leaves the memory in src unchanged.
- read_volatile⚠ Performs a volatile read of the value from src without moving it. This leaves the memory in src unchanged.
- replace⚠ Moves src into the pointed dst, returning the previous dst value.
- slice_from_raw_parts Forms a raw slice from a pointer and a length.
- slice_from_raw_parts_mut Performs the same functionality as slice_from_raw_parts, except that a raw mutable slice is returned, as opposed to a raw immutable slice.
- swap⚠ Swaps the values at two mutable locations of the same type, without deinitializing either.
- swap_nonoverlapping⚠ Swaps count * size_of::<T>() bytes between the two regions of memory beginning at x and y. The two regions must not overlap.
- write⚠
Overwrites a memory location with the given value without reading or dropping the old value. - write_bytes⚠ Sets count * size_of::<T>() bytes of memory starting at dst to val.
- write_unaligned⚠ Overwrites a memory location with the given value without reading or dropping the old value.
- write_volatile⚠ Performs a volatile write of a memory location with the given value without reading or dropping the old value.
- from_exposed_addrExperimental Convert an address back to a pointer, picking up a previously ‘exposed’ provenance.
- from_exposed_addr_mutExperimental Convert an address back to a mutable pointer, picking up a previously ‘exposed’ provenance.
- from_raw_partsExperimental Forms a (possibly-wide) raw pointer from a data pointer and metadata.
- from_raw_parts_mutExperimental Performs the same functionality as from_raw_parts, except that a raw *mut pointer is returned, as opposed to a raw *const pointer.
- invalidExperimental Creates an invalid pointer with the given address.
- invalid_mutExperimental Creates an invalid mutable pointer with the given address.
- metadataExperimental Extract the metadata component of a pointer.
std::ptr::write
pub unsafe fn write<T>(dst: *mut T, src: T)
Overwrites a memory location with the given value without reading or dropping the old value.
write does not drop the contents of dst. This is safe, but it could leak allocations or resources,
so care should be taken not to overwrite an object that should be dropped.
Additionally, it does not drop src. Semantically, src is moved into the location pointed to by dst.
This is appropriate for initializing uninitialized memory, or overwriting memory that has previously been read from.
let mut x = 0;
let y = &mut x as *mut i32;
let z = 12;
unsafe {
    std::ptr::write(y, z);
    assert_eq!(std::ptr::read(y), 12);
}

// Manually implement mem::swap:

use std::ptr;

fn swap<T>(a: &mut T, b: &mut T) {
    unsafe {
        // Create a bitwise copy of the value at `a` in `tmp`.
        let tmp = ptr::read(a);

        // Exiting at this point (either by explicitly returning or by
        // calling a function which panics) would cause the value in `tmp` to
        // be dropped while the same value is still referenced by `a`. This
        // could trigger undefined behavior if `T` is not `Copy`.

        // Create a bitwise copy of the value at `b` in `a`.
        // This is safe because mutable references cannot alias.
        ptr::copy_nonoverlapping(b, a, 1);

        // As above, exiting here could trigger undefined behavior because
        // the same value is referenced by `a` and `b`.

        // Move `tmp` into `b`.
        ptr::write(b, tmp);

        // `tmp` has been moved (`write` takes ownership of its second argument),
        // so nothing is dropped implicitly here.
    }
}

let mut foo = "foo".to_owned();
let mut bar = "bar".to_owned();

swap(&mut foo, &mut bar);

assert_eq!(foo, "bar");
assert_eq!(bar, "foo");
12 std::cell #
std::cell module 提供了多种的可共享的内部可变性类型。
- Cell<T>: T 必须实现 Copy;
- RefCell<T>: T 不需要实现 Copy
- OnceCell<T>: 对 T 只进行一次初始化。
各种 Cell 都没有实现 Sync,只能在单线程环境中使用。
- Mutex<T>, RwLock<T>, OnceLock<T> 和各种 automic type 实现了多线程的内部可变性。
这些 Cell 对象可以通过共享引用 &T 来进行修改。
13 std::any #
两个函数:
- type_name::<T>(): 返回 T 的类型名称字符串;
- type_name_of_value(&T): 返回指向的 T 的值的类型名称字符串;
assert_eq!(
    std::any::type_name::<Option<String>>(),
    "core::option::Option<alloc::string::String>",
);

use std::any::type_name_of_val;
let s = "foo";
let x: i32 = 1;
let y: f32 = 1.0;
assert!(type_name_of_val(&s).contains("str"));
assert!(type_name_of_val(&x).contains("i32"));
assert!(type_name_of_val(&y).contains("f32"));
一个 trait:std::any::Any, 一般将借用转换为 &dyn Any 或对象转换为 Box<dyn Any>, 然后就可以使用 downcast<T>() 方法来进行类型判断和处理。
Rust 为绝大部分类型实现 Any,所以对象借用可以转换为 &dyn Any, 对象自身可以转换为 Box<dyn Any>.
- 但是对于引用类型,如果不是 ‘static 类型则没有实现 Any trait。
pub trait Any: 'static {
    // Required method
    fn type_id(&self) -> TypeId;
}

use std::any::{Any, TypeId};

fn is_string(s: &dyn Any) -> bool { // 传入的是 'static 引用,他们都自动实现了 Any trait
    TypeId::of::<String>() == s.type_id()
}
assert_eq!(is_string(&0), false);
assert_eq!(is_string(&"cookie monster".to_string()), true);
&dyn Any 实现了 is<T>/downcast_ref<T>/downcast_mut<T>() 方法:
use std::any::Any;

fn is_string(s: &dyn Any) {
    if s.is::<String>() {
        println!("It's a string!");
    } else {
        println!("Not a string...");
    }
}
is_string(&0);
is_string(&"cookie monster".to_string());

fn modify_if_u32(s: &mut dyn Any) {
    if let Some(num) = s.downcast_mut::<u32>() {
        *num = 42;
    }
}

let mut x = 10u32;
let mut s = "starlord".to_string();

modify_if_u32(&mut x);
modify_if_u32(&mut s);

assert_eq!(x, 42);
assert_eq!(&s, "starlord");
三个 Box 类型的 trait object 都实现了 downcast<T> 和 downcast_unchecked<T> 方法:
- impl<A> Box<dyn Any, A>
- impl<A> Box<dyn Any + Send, A>
- impl<A> Box<dyn Any + Sync + Send, A>
pub fn downcast<T>(self) -> Result<Box<T, A>, Box<dyn Any, A>> where T: Any,
pub unsafe fn downcast_unchecked<T>(self) -> Box<T, A> where T: Any,

// 例子
use std::any::Any;

fn print_if_string(value: Box<dyn Any>) {
    if let Ok(string) = value.downcast::<String>() {
        println!("String ({}): {}", string.len(), string);
    }
}

let my_string = "Hello World".to_string();
print_if_string(Box::new(my_string));
print_if_string(Box::new(0i8));


#![feature(downcast_unchecked)]
use std::any::Any;
let x: Box<dyn Any> = Box::new(1_usize);
unsafe {
    assert_eq!(*x.downcast_unchecked::<usize>(), 1);
}
14 std::process #
std::process module 提供的函数:
- abort :: Terminates the process in an abnormal fashion.
- exit :: Terminates the current process with the specified exit code.
- id :: Returns the OS-assigned process identifier associated with this process.
std::process::Command::new() 创建一个 Command, 默认的行为如下:
- No arguments to the program
- Inherit the current process’s
environment - Inherit the current process’s
working directory - Inherit stdin/stdout/stderr for
spawn() or status(), but create pipes foroutput()- 对于 spawn()/status() 默认是继承父进程的 stdin/stdout/stderr;
- 对于 output() 则会创建 pipe,这样后续可以获得结果 Output 对象的 stdout 和 stderr。
后续, 在执行 Command 前,可以进一步设置子进程的参数,工作目录,环境变量等:
// 创建要执行的 program
pub fn new<S: AsRef<OsStr>>(program: S) -> Command
// 设置 program 参数
pub fn arg<S: AsRef<OsStr>>(&mut self, arg: S) -> &mut Command // 一次只能设置一个参数
pub fn args<I, S>(&mut self, args: I) -> &mut Command
where
    I: IntoIterator<Item = S>,
    S: AsRef<OsStr>,
// 设置和清理环境变量
pub fn env<K, V>(&mut self, key: K, val: V) -> &mut Command
where
    K: AsRef<OsStr>,
    V: AsRef<OsStr>,
pub fn envs<I, K, V>(&mut self, vars: I) -> &mut Command
where
    I: IntoIterator<Item = (K, V)>,
    K: AsRef<OsStr>,
    V: AsRef<OsStr>,
pub fn env_remove<K: AsRef<OsStr>>(&mut self, key: K) -> &mut Command
pub fn env_clear(&mut self) -> &mut Command
// 设置工作目录
pub fn current_dir<P: AsRef<Path>>(&mut self, dir: P) -> &mut Command
// 设置子进程的 stdin/stdout/stderr
// cfg 是可以转换为 Stdio 的类型, 例如 Stdio::null(), Stdio::inherit(), Stdio::piped()
pub fn stdin<T: Into<Stdio>>(&mut self, cfg: T) -> &mut Command // cfg
pub fn stdout<T: Into<Stdio>>(&mut self, cfg: T) -> &mut Command
pub fn stderr<T: Into<Stdio>>(&mut self, cfg: T) -> &mut Command
// 获取进程信息
pub fn get_program(&self) -> &OsStr
pub fn get_args(&self) -> CommandArgs<'_> ⓘ
pub fn get_envs(&self) -> CommandEnvs<'_> ⓘ
pub fn get_current_dir(&self) -> Option<&Path>

// 上面创建的 Command 可以被重复执行, 来进行复用.

// 执行 Command 并获得输出或退出状态:
// 1. spawn() 立即返回一个 Child,调用 kill/wait/wait_with_output() 结束;
// 2. 或者, 直接运行指导结束: output/status();
pub fn spawn(&mut self) -> Result<Child>
pub fn output(&mut self) -> Result<Output> // Output 中包含 status/stdout/stderr 内容
pub fn status(&mut self) -> Result<ExitStatus>

// Linux/Unix 的 CommandExt 方法:
fn create_pidfd(&mut self, val: bool) -> &mut Command
fn uid(&mut self, id: u32) -> &mut Command
fn gid(&mut self, id: u32) -> &mut Command
fn groups(&mut self, groups: &[u32]) -> &mut Command
fn process_group(&mut self, pgroup: i32) -> &mut Command
fn exec(&mut self) -> Error // 准备好所有工作,执行 execvp 系统调用
fn arg0<S>(&mut self, arg: S) -> &mut Command
unsafe fn pre_exec<F>(&mut self, f: F) -> &mut Command where F: FnMut() -> Result<()> + Send + Sync + 'static,
fn before_exec<F>(&mut self, f: F) -> &mut Command where F: FnMut() -> Result<()> + Send + Sync + 'static,


// 举例
use std::process::Command;

let output = if cfg!(target_os = "windows") {
    Command::new("cmd")
        .args(["/C", "echo hello"])
        .output() // 立即执行命令并捕获输出
        .expect("failed to execute process")
} else {
    Command::new("sh")
        .arg("-c")
        .arg("echo hello")
        .args(["-l", "-a"])
	    .current_dir("/bin")
        .env_remove("PATH")
	    .env_clear()
        .env("PATH", "/bin")
 .stdin(Stdio::null())
 .stdout(Stdio::inherit())
 .stderr(Stdio::null())
        .output()
        .expect("failed to execute process")
};

let hello = output.stdout;
spawn 产生的 Child 子进程并不等待子进程执行结束, 后续需要使用 status/wait/output() 等方法来等待执行结束, 或者 kill() 来终止子进程.
pub struct Child {
    pub stdin: Option<ChildStdin>,
    pub stdout: Option<ChildStdout>,
    pub stderr: Option<ChildStderr>,
    /* private fields */
}
pub fn id(&self) -> u32
// 等待 Child 执行结束
pub fn kill(&mut self) -> Result<()>
pub fn status(&mut self) -> Result<ExitStatus>   // 获得执行结果状态
pub fn wait(&mut self) -> Result<ExitStatus>
pub fn try_wait(&mut self) -> Result<Option<ExitStatus>>
pub fn output(&mut self) -> Result<Output> // 包含 stdout/stderr 的输出以及 ExitStatus
pub fn wait_with_output(self) -> Result<Output>


// 例子
use std::process::{Command, Stdio};
use std::io::Write;

let mut child = Command::new("/bin/cat")
    .stdin(Stdio::piped()) // 设置产生的 Child 的 stdin
    .stdout(Stdio::piped())
    .spawn()
    .expect("failed to execute child");

// If the child process fills its stdout buffer, it may end up waiting until the parent reads the
// stdout, and not be able to read stdin in the meantime, causing a deadlock.  Writing from another
// thread ensures that stdout is being read at the same time, avoiding the problem.
let mut stdin = child.stdin.take().expect("failed to get stdin");
std::thread::spawn(move || {
    stdin.write_all(b"test").expect("failed to write to stdin");
});

let output = child
    .wait_with_output()
    .expect("failed to wait on child");

assert_eq!(b"test", output.stdout.as_slice());
Child 子进程的输入\输出可以通过 Child struct 的 stdin/stdout/stderr field 来获取到, 通过读写他们来获得子进程的输入/输出;
- Child 的 stdin/stdout/stderr 是通过 Command 的 stdin/stdout/stderr() 方法来设置的.
- 在使用 child.stdin/stdout/stderr 时,一般使用
let mut stdin = child.stdin.take().except("xxx"), take() 方法可以避免将 stdin field 从 Child 对象 move out, 而是将它设置为 None. - 当返回的对象被 drop 时,相应的文件描述符被关闭。
use std::process::{Command, Stdio};

// stdout must be configured with `Stdio::piped` in order to use
// `echo_child.stdout`
let echo_child = Command::new("echo")
    .arg("Oh no, a tpyo!")
    .stdout(Stdio::piped())
    .spawn()
    .expect("Failed to start echo process");

// Note that `echo_child` is moved here, but we won't be needing `echo_child` anymore
let echo_out = echo_child.stdout.expect("Failed to open echo stdout");

let mut sed_child = Command::new("sed")
    .arg("s/tpyo/typo/")
    .stdin(Stdio::from(echo_out)) // 从 echo_child 获得输入
    .stdout(Stdio::piped())
    .spawn()
    .expect("Failed to start sed process");

let output = sed_child.wait_with_output().expect("Failed to wait on sed");
assert_eq!(b"Oh no, a typo!\n", output.stdout.as_slice());
对于 Unix 系统,ExitStatus 还实现了 ExitStatusExt trait,可以返回进程因为 signal 而终止的情况
pub trait ExitStatusExt: Sealed {
    // Required methods
    fn from_raw(raw: i32) -> Self;
    fn signal(&self) -> Option<i32>; // If the process was terminated by a signal, returns that signal.
    fn core_dumped(&self) -> bool;
    fn stopped_signal(&self) -> Option<i32>; // If the process was stopped by a signal, returns that signal.
    fn continued(&self) -> bool;
    fn into_raw(self) -> i32;
}
std::process::Stdio 可以作为 Command 的 stdin()/stdout()/stderr() 的输入:
impl Stdio
// A new pipe should be arranged to connect the parent and child processes
// 这里的 parent 是指创建和执行 Command 的进程, child 进程是执行 Command 的进程
// 将 Command 进程的输出 pipeline 到 Child 对象的 stdin/stdout/stderr field, 这样 parent 进程可以读写
pub fn piped() -> Stdio
// The child inherits from the corresponding parent descriptor.
pub fn inherit() -> Stdio
// 关闭
pub fn null() -> Stdio
// 判断 Stdio 是否是 piped() 生成的.
pub fn makes_pipe(&self) -> bool

// 还可以从其他 Child 的 stdin/stdout/stderr 来创建 Stdio, 从而实现 Child 之间的串联
impl From<ChildStderr> for Stdio
impl From<ChildStdin> for Stdio
impl From<ChildStdout> for Stdio
impl From<File> for Stdio
impl From<Stderr> for Stdio // std::io::Stderr
impl From<Stdout> for Stdio // std::io::Stdout
示例:
use std::process::{Command, Stdio};

let output = Command::new("echo")
    .arg("Hello, world!")
    .stdout(Stdio::piped())  // Command 子进程的 stdout 被 pipe 到 output.stdout
    .output()
    .expect("Failed to execute command");
// 从 output.stdout 获取子进程输出
assert_eq!(String::from_utf8_lossy(&output.stdout), "Hello, world!\n");
// Nothing echoed to console


// 对于 stdin
use std::io::Write;
use std::process::{Command, Stdio};

let mut child = Command::new("rev")
    .stdin(Stdio::piped()) // 创建一个输入 pipe, Command 从它读取内容
    .stdout(Stdio::piped())
    .spawn()
    .expect("Failed to spawn child process");

// 父进程向 stdin 发送数据, 被 child 接收
// child.stdin 是 Option<ChildStdin> 类型
// child.stdin.take() 是 Takes the value out of the option, leaving a None in its place.
let mut stdin = child.stdin.take().expect("Failed to open stdin");
std::thread::spawn(move || {
    stdin.write_all("Hello, world!".as_bytes()).expect("Failed to write to stdin");
});

let output = child.wait_with_output().expect("Failed to read stdout");
assert_eq!(String::from_utf8_lossy(&output.stdout), "!dlrow ,olleH");
stdin inherit 举例:
use std::process::{Command, Stdio};

let output = Command::new("echo")
    .arg("Hello, world!")
    .stdout(Stdio::inherit())
    .output()
    .expect("Failed to execute command");

assert_eq!(String::from_utf8_lossy(&output.stdout), ""); // stdout 被打印到 console, 所以 Child.stdout 为空
// "Hello, world!" echoed to console

// https://play.rust-lang.org/?version=stable&mode=debug&edition=2021
#![allow(unused)]
fn main() {
use std::process::{Command, Stdio};
use std::io::{self, Write};
let output = Command::new("echo")
    .stdin(Stdio::inherit())  // 从 parent 进程的 stdout 读取内容作为 stdin
    .stdout(Stdio::piped()) // Command 的输出被 pipe 出来
    .output()
    .expect("Failed to execute command");
print!("You piped in the reverse of1:\n"); // 主进程输出到 stdout 的内容被 Command stdin 捕获
eprint!("You piped in the reverse of2:\n"); // 主进程输出到 stderr 不会被 Command stdin 捕获

let mut v = Vec::from("===");
v.extend(&output.stdout);
io::stdout().write_all(&v).unwrap(); // 打印 output 的 stdout
}

// 输出
// You piped in the reverse of1:
// ===
stdout 例子:
#![allow(unused)]
fn main() {
use std::process::{Command, Stdio};

let output = Command::new("echo")
    .arg("Hello, world!")
    .stdout(Stdio::inherit()) // 继承主进程的 stdout,默认输出到 console
    .output()
    .expect("Failed to execute command");

assert_eq!(String::from_utf8_lossy(&output.stdout), ""); // 由于已经输出到 console,所以 &output.stdout 内容为空。
}
Stdio 可以从 std::io 的 File/Stderr/Stdout 和 std::process::ChildStderr/ChildStdin/ChildStdout 来创建:
impl From<ChildStderr> for Stdio
impl From<ChildStdin> for Stdio
impl From<ChildStdout> for Stdio
impl From<File> for Stdio
impl From<Stderr> for Stdio
impl From<Stdout> for Stdio


// 将一个 Child Command 的 stdin/stdout/stderr 连接到其他 Child Command
use std::process::{Command, Stdio};
let hello = Command::new("echo")
    .arg("Hello, world!")
    .stdout(Stdio::piped()) // 必须 piped,后续才能获取到
    .spawn()
    .expect("failed echo command");
let reverse = Command::new("rev")
    .stdin(hello.stdout.unwrap())  // Converted into a Stdio here
    .output()
    .expect("failed reverse command");
assert_eq!(reverse.stdout, b"!dlrow ,olleH\n");


// 将 Command 的输入输出连接到 File
use std::fs::File;
use std::process::Command;
// With the `foo.txt` file containing "Hello, world!"
let file = File::open("foo.txt").unwrap();
let reverse = Command::new("rev")
    .stdin(file)  // Implicit File conversion into a Stdio
    .output()
    .expect("failed reverse command");
assert_eq!(reverse.stdout, b"!dlrow ,olleH");


// 将 Command 的 stdout/stderr 连接到 std::io::Stdout/Stderr
#![feature(exit_status_error)]
use std::io;
use std::process::Command;

let output = Command::new("whoami")
    .stdout(io::stdout())
    .stderr(io::stderr())
    .output()?;
output.status.exit_ok()?;
assert!(output.stdout.is_empty());
15 std::io #
std::io module 的读写返回通用错误 std::io::Result<T> 它是 std::io::Result<T, std::io::Error> 的别名.
Structs
- BufReader The BufReader<R> struct adds buffering to any reader.
- BufWriter Wraps a writer and buffers its output.
- Bytes An iterator over u8 values of a reader.
- Chain Adapter to chain together two readers.
- Cursor A Cursor wraps an in-memory buffer and provides it with a Seek implementation.
- Empty Empty ignores any data written via Write, and will always be empty (returning zero bytes) when read via Read.
- Error The error type for I/O operations of the Read, Write, Seek, and associated traits.
- IntoInnerError An error returned by BufWriter::into_inner which combines an error that happened while writing out the buffer, and the buffered writer object which may be used to recover from the condition.
- IoSlice A buffer type used with Write::write_vectored.
- IoSliceMut A buffer type used with Read::read_vectored.
- LineWriter Wraps a writer and buffers output to it, flushing whenever a newline (0x0a, ‘\n’) is detected.
- Lines An iterator over the lines of an instance of BufRead.
- Repeat A reader which yields one byte over and over and over and over and over and…
- Sink A writer which will move data into the void.
- Split An iterator over the contents of an instance of BufRead split on a particular byte.
- Stderr A handle to the standard error stream of a process.
- StderrLock A locked reference to the Stderr handle.
- Stdin A handle to the standard input stream of a process.
- StdinLock A locked reference to the Stdin handle.
- Stdout A handle to the global standard output stream of the current process.
- StdoutLock A locked reference to the Stdout handle.
- Take Reader adapter which limits the bytes read from an underlying reader.
- WriterPanicked Error returned for the buffered data from BufWriter::into_parts, when the underlying writer has previously panicked. Contains the (possibly partly written) buffered data.
- BorrowedBufExperimental A borrowed byte buffer which is incrementally filled and initialized.
- BorrowedCursorExperimental A writeable view of the unfilled portion of a BorrowedBuf.
Traits:
- BufRead A BufRead is a type of Reader which has an internal buffer, allowing it to perform extra ways of reading.
- IsTerminal Trait to determine if a descriptor/handle refers to a terminal/tty.
- Read The Read trait allows for reading bytes from a source.
- Seek The Seek trait provides a cursor which can be moved within a stream of bytes.
- Write A trait for objects which are byte-oriented sinks.
Functions
- copy Copies the entire contents of a reader into a writer.
- empty Creates a value that is always at EOF for reads, and ignores all data written.
- read_to_string Read all bytes from a reader into a new String.
- repeat Creates an instance of a reader that infinitely repeats one byte.
- sink Creates an instance of a writer which will successfully consume all data.
如下三个函数返回系统标准的 stderr/stdin/stdout
- stderr Constructs a new handle to the standard error of the current process.
- stdin Constructs a new handle to the standard input of the current process.
- stdout Constructs a new handle to the standard output of the current process.
Type Aliases
- Result A specialized Result type for I/O operations. std::io 自定义的 Result 别名类型
- RawOsErrorExperimental The type of raw OS error codes returned by Error::raw_os_error.
15.1 Read #
必须实现的方法:最多读取 buf 大小的数据。
- fn read(&mut self, buf: &mut [u8]) -> Result<usize>;
自动实现的常用的方法:
- fn read_to_end(&mut self, buf: &mut Vec<u8>) -> Result<usize> { … }
- fn read_to_string(&mut self, buf: &mut String) -> Result<usize> { … }
- bytes()
pub trait Read {
    // Required method
    fn read(&mut self, buf: &mut [u8]) -> Result<usize>;

    // Provided methods
    fn read_vectored(&mut self, bufs: &mut [IoSliceMut<'_>]) -> Result<usize> { ... }
    fn is_read_vectored(&self) -> bool { ... }
    fn read_to_end(&mut self, buf: &mut Vec<u8>) -> Result<usize> { ... }
    fn read_to_string(&mut self, buf: &mut String) -> Result<usize> { ... }
    fn read_exact(&mut self, buf: &mut [u8]) -> Result<()> { ... }
    fn read_buf(&mut self, buf: BorrowedCursor<'_>) -> Result<()> { ... }
    fn read_buf_exact(&mut self, cursor: BorrowedCursor<'_>) -> Result<()> { ... }
    fn by_ref(&mut self) -> &mut Self where Self: Sized { ... }
    fn bytes(self) -> Bytes<Self> where Self: Sized { ... }
    fn chain<R: Read>(self, next: R) -> Chain<Self, R> where Self: Sized { ... }
    fn take(self, limit: u64) -> Take<Self> where Self: Sized { ... }
}
实现 Read 的类型:
impl Read for &File
impl Read for &TcpStream
impl Read for &[u8]  // &Vec<T> 和 &[T;N] 都实现了 Read, &str.as_bytes 也返回 &[u8]
impl Read for File
impl Read for TcpStream
impl Read for UnixStream

impl Read for ChildStderr // std::process 下的 ChildStderr/ChildStdout
impl Read for ChildStdout

impl Read for Arc<File>
impl Read for Empty
impl Read for Repeat
impl Read for Stdin
impl Read for StdinLock<'_>

impl<'a> Read for &'a UnixStream
impl<A: Allocator> Read for VecDeque<u8, A>
impl<R: Read + ?Sized> Read for &mut R
impl<R: Read + ?Sized> Read for Box<R>
impl<R: ?Sized + Read> Read for BufReader<R>
impl<T> Read for Cursor<T> where T: AsRef<[u8]>,
impl<T: Read> Read for Take<T>
impl<T: Read, U: Read> Read for Chain<T, U>
例子:
use std::io;
use std::io::prelude::*;
use std::fs::File;

fn main() -> io::Result<()> {
    let mut f = File::open("foo.txt")?;
    let mut buffer = [0; 10]; // 指定 buf 大小为 10 bytes

    // read up to 10 bytes
    f.read(&mut buffer)?;

    let mut buffer = Vec::new();
    // read the whole file
    f.read_to_end(&mut buffer)?;

    // read into a String, so that you don't need to do the conversion.
    let mut buffer = String::new();
    f.read_to_string(&mut buffer)?;

    // and more! See the other methods for more details.
    Ok(())
}
15.2 BufRead #
BufRead 是内部包含一个 buffer 的 Reader,它是 Read 的子类型,它提供了几个好用的方法:
- read_line(&mut self);
- split(self): 消耗 BufRead
- lines(self) : 消耗 BufRead,迭代生成的 Lines 时,返回
io::Result<String>;
pub trait BufRead: Read {
    // Required methods
    fn fill_buf(&mut self) -> Result<&[u8]>;
    fn consume(&mut self, amt: usize);

    // Provided methods
    fn has_data_left(&mut self) -> Result<bool> { ... }
    fn read_until(&mut self, byte: u8, buf: &mut Vec<u8>) -> Result<usize> { ... }
    fn skip_until(&mut self, byte: u8) -> Result<usize> { ... }
    fn read_line(&mut self, buf: &mut String) -> Result<usize> { ... }
    fn split(self, byte: u8) -> Split<Self> ⓘ
       where Self: Sized { ... }
    fn lines(self) -> Lines<Self> ⓘ
       where Self: Sized { ... }
}
实现了 BufRead 的类型:
- &[u8]/StdinLock/BufReader/Cursor
impl BufRead for &[u8]
impl BufRead for Empty
impl BufRead for StdinLock<'_>
impl<A: Allocator> BufRead for VecDeque<u8, A>
BufRead is implemented for VecDeque<u8> by reading bytes from the front of the VecDeque.

impl<B: BufRead + ?Sized> BufRead for &mut B

impl<B: BufRead + ?Sized> BufRead for Box<B>

impl<R: ?Sized + Read> BufRead for BufReader<R>

impl<T> BufRead for Cursor<T>
where
    T: AsRef<[u8]>,

impl<T: BufRead> BufRead for Take<T>

impl<T: BufRead, U: BufRead> BufRead for Chain<T, U>
15.3 Write #
Write 是面向 byte 的输出:
- write() 将 buf 内容写入到 object,返回写出的字节数(所以一次 write 不一定写出了所有数据);
- flush() 确保 object 中 buff(如果有) 的数据写入到 true sink 中;
其他方法:
- fn write_all(&mut self, buf: &[u8]) -> Result<()> { … }
- fn write_fmt(&mut self, fmt: Arguments<’_>) -> Result<()> { … }
pub trait Write {
    // Required methods
    fn write(&mut self, buf: &[u8]) -> Result<usize>;
    fn flush(&mut self) -> Result<()>;

    // Provided methods
    fn write_vectored(&mut self, bufs: &[IoSlice<'_>]) -> Result<usize> { ... }
    fn is_write_vectored(&self) -> bool { ... }
    fn write_all(&mut self, buf: &[u8]) -> Result<()> { ... }
    fn write_all_vectored(&mut self, bufs: &mut [IoSlice<'_>]) -> Result<()> { ... }
    fn write_fmt(&mut self, fmt: Arguments<'_>) -> Result<()> { ... }
    fn by_ref(&mut self) -> &mut Self
       where Self: Sized { ... }
}
实现 Write 的类型:
impl Write for &File
impl Write for &TcpStream
impl Write for &ChildStdin
impl Write for &Empty
impl Write for &Sink
impl Write for &Stderr
impl Write for &Stdout
impl Write for &mut [u8]

impl Write for File
impl Write for TcpStream
impl Write for UnixStream
impl Write for ChildStdin
impl Write for Arc<File>
impl Write for Cursor<&mut [u8]>

impl Write for Empty
impl Write for Sink
impl Write for Stderr
impl Write for StderrLock<'_>
impl Write for Stdout
impl Write for StdoutLock<'_>

impl<'a> Write for &'a UnixStream
impl<'a> Write for BorrowedCursor<'a>
impl<A> Write for Cursor<&mut Vec<u8, A>> where A: Allocator,
impl<A> Write for Cursor<Box<[u8], A>> where A: Allocator,
impl<A> Write for Cursor<Vec<u8, A>> where A: Allocator,
impl<A: Allocator> Write for VecDeque<u8, A>
impl<A: Allocator> Write for Vec<u8, A>
impl<W: Write + ?Sized> Write for &mut W
impl<W: Write + ?Sized> Write for Box<W>
impl<W: ?Sized + Write> Write for BufWriter<W>
impl<W: ?Sized + Write> Write for LineWriter<W>
impl<const N: usize> Write for Cursor<[u8; N]>
示例:
use std::io::prelude::*;
use std::fs::File;

fn main() -> std::io::Result<()> {
    let data = b"some bytes";
    let mut pos = 0;
    let mut buffer = File::create("foo.txt")?;

    while pos < data.len() {
        let bytes_written = buffer.write(&data[pos..])?;
        pos += bytes_written;
    }
    Ok(())
}

use std::io::prelude::*;
use std::fs::File;

fn main() -> std::io::Result<()> {
    let mut buffer = File::create("foo.txt")?;

    // this call
    write!(buffer, "{:.*}", 2, 1.234567)?;
    // turns into this:
    buffer.write_fmt(format_args!("{:.*}", 2, 1.234567))?;
    Ok(())
}
15.4 Cursor #
pub struct Cursor<T> { /* private fields */ }
A Cursor wraps an in-memory buffer and provides it with a Seek implementation.
Cursors are used with in-memory buffers, anything implementing AsRef<[u8]>, to allow them to
implement Read and/or Write, allowing these buffers to be used anywhere you might use a reader or
writer that does actual I/O.
The standard library implements some I/O traits on various types which are commonly used as a
buffer, like Cursor<Vec<u8>> and Cursor<&[u8]>.
Cursor 实现了 BufRead/Read/Seek/Write trait。
impl<T> BufRead for Cursor<T> where T: AsRef<[u8]>
impl<T> Read for Cursor<T> where T: AsRef<[u8]>,
impl<T> Seek for Cursor<T> where T: AsRef<[u8]>,
impl Write for Cursor<&mut [u8]>
impl<A> Write for Cursor<&mut Vec<u8, A>> where A: Allocator,
impl<const N: usize> Write for Cursor<[u8; N]>
impl<A> Write for Cursor<Box<[u8], A>> where A: Allocator,
impl<A> Write for Cursor<Vec<u8, A>> where A: Allocator,
例子:
use std::io::prelude::*;
use std::io::{self, SeekFrom};
use std::fs::File;

// a library function we've written
fn write_ten_bytes_at_end<W: Write + Seek>(mut writer: W) -> io::Result<()> {
    writer.seek(SeekFrom::End(-10))?;

    for i in 0..10 {
        writer.write(&[i])?;
    }

    // all went well
    Ok(())
}

// Here's some code that uses this library function.
//
// We might want to use a BufReader here for efficiency, but let's
// keep this example focused.
let mut file = File::create("foo.txt")?;

write_ten_bytes_at_end(&mut file)?;

// now let's write a test
#[test]
fn test_writes_bytes() {
    // setting up a real File is much slower than an in-memory buffer,
    // let's use a cursor instead
    use std::io::Cursor;
    let mut buff = Cursor::new(vec![0; 15]); // 从 Vec<i32> 创建 Cursor

    write_ten_bytes_at_end(&mut buff).unwrap(); // Cursor 实现了 Seek/Write

    assert_eq!(&buff.get_ref()[5..15], &[0, 1, 2, 3, 4, 5, 6, 7, 8, 9]);
}
15.5 Empty #
使用 std::io:empty() 函数返回 Empty 对象。Empty 类型实现了 BufRead/Read/Write/Seek trait:
- 读返回 EOF;
- 写被丢弃;
use std::io::{self, Write};
let buffer = vec![1, 2, 3, 5, 8];
let num_bytes = io::empty().write(&buffer).unwrap();
assert_eq!(num_bytes, 5);

use std::io::{self, Read};
let mut buffer = String::new();
io::empty().read_to_string(&mut buffer).unwrap();
assert!(buffer.is_empty());
15.6 Repeat #
调用 std::io::repeat(byte: u8) 函数产生一个 Repeat 对象, 它实现了 Read trait,一直返回该byte:
use std::io::{self, Read};

let mut buffer = [0; 3];
io::repeat(0b101).read_exact(&mut buffer).unwrap();
assert_eq!(buffer, [0b101, 0b101, 0b101]);
15.7 Stdin/StdinLock/Stdout/StdoutLock/Stderr #
std::io::stdin()/stdout()/stderr() 分别返回上面三种类型:
stdin() -> Stdin: Each handle returned is a reference to a shared global buffer whose access is
synchronized via a mutex. If you need more explicit control over locking, see the Stdin::lock
method.
- Stdin 的方法自动获得 mutex lock 进行同步;
- 也可以调用 Stdin::lock() 来获得 StdinLock 对象, 然后调用他的 read_line 方法或者它实现的 BufRead/Read trait 方法;
// Using implicit synchronization:
use std::io;
fn main() -> io::Result<()> {
    let mut buffer = String::new();
    io::stdin().read_line(&mut buffer)?;
    Ok(())
}

// Using explicit synchronization:
use std::io::{self, BufRead};
fn main() -> io::Result<()> {
    let mut buffer = String::new();
    let stdin = io::stdin();
    let mut handle = stdin.lock();
    handle.read_line(&mut buffer)?;
    Ok(())
}

// pub fn lines(self) -> Lines<StdinLock<'static>>
use std::io;
let lines = io::stdin().lines();
for line in lines {
    println!("got a line: {}", line.unwrap());
}
pub fn stdout() -> Stdout :Constructs a new handle to the standard output of the current process.
Each handle returned is a reference to a shared global buffer whose access is synchronized via a
mutex. If you need more explicit control over locking, see the Stdout::lock method.
Stdout/StdoutLock 实现了 write trait, 其中 Stdout 的方法自动 mutex 同步, StdoutLock 不自动同步:
// Using implicit synchronization:
use std::io::{self, Write};
fn main() -> io::Result<()> {
    io::stdout().write_all(b"hello world")?;
    Ok(())
}

// Using explicit synchronization:
use std::io::{self, Write};
fn main() -> io::Result<()> {
    let stdout = io::stdout();
    let mut handle = stdout.lock();
    handle.write_all(b"hello world")?;
    Ok(())
}
pub fn stderr() -> Stderr : Constructs a new handle to the standard error of the current process.
This handle is not buffered .
// Using implicit synchronization:
use std::io::{self, Write};
fn main() -> io::Result<()> {
    io::stderr().write_all(b"hello world")?;

    Ok(())
}

// Using explicit synchronization:
use std::io::{self, Write};
fn main() -> io::Result<()> {
    let stderr = io::stderr();
    let mut handle = stderr.lock();

    handle.write_all(b"hello world")?;

    Ok(())
}
pub fn sink() -> Sink
Creates an instance of a writer which will successfully consume all data.
Sink 将丢弃写入的数据.
All calls to write on the returned instance will return Ok(buf.len()) and the contents of the buffer will not be inspected.
Examples
use std::io::{self, Write};

let buffer = vec![1, 2, 3, 5, 8];
let num_bytes = io::sink().write(&buffer).unwrap();
assert_eq!(num_bytes, 5);
16 std::env #
std::env module 提供了一些管理进程参数、环境变量、工作目录和临时目录的函数:
- args(): 获取进程命令行参数
- vars(): 获取进程环境变量列表
- var(): 获取进程特定环境变量
- remove_var/set_var: 删除和设置环境变量
- temp_dir(): 返回临时目录
- current_dir/current_exec: 当前工作目录和二进制路径
- set_current_dir: 设置进程当前工作目录;
- join_paths/split_paths(): 对 PATH 环境变量的路径进行处理;
use std::env;
use std::path::PathBuf;

fn main() -> Result<(), env::JoinPathsError> {
    if let Some(path) = env::var_os("PATH") {
        let mut paths = env::split_paths(&path).collect::<Vec<_>>();
        paths.push(PathBuf::from("/home/xyz/bin"));
        let new_path = env::join_paths(paths)?;
        env::set_var("PATH", &new_path);
    }

    Ok(())
}
Functions
- args Returns the arguments that this program was started with (normally passed via the command line).
- args_os Returns the arguments that this program was started with (normally passed via the command line).
- current_dir Returns the current working directory as a PathBuf.
- current_exe Returns the full filesystem path of the current running executable.
- home_dirDeprecated Returns the path of the current user’s home directory if known.
- join_paths Joins a collection of Paths appropriately for the PATH environment variable.
- remove_var Removes an environment variable from the environment of the currently running process.
- set_current_dir Changes the current working directory to the specified path.
- set_var Sets the environment variable key to the value value for the currently running process.
- split_paths Parses input according to platform conventions for the PATH environment variable.
- temp_dir Returns the path of a temporary directory.
- var Fetches the environment variable key from the current process.
- var_os Fetches the environment variable key from the current process, returning None if the variable isn’t set or if there is another error.
- vars Returns an iterator of (variable, value) pairs of strings, for all the environment variables of the current process.
- vars_os Returns an iterator of (variable, value) pairs of OS strings, for all the environment variables of the current process.
pub fn args() -> Args, Args 是可迭代对象, 返回 String:
use std::env;

// Prints each argument on a separate line
for argument in env::args() {
    println!("{argument}");
}
var/set_var/remove_var() 读取、设置和删除环境变量:
use std::env;

let key = "KEY";
env::set_var(key, "VALUE");
assert_eq!(env::var(key), Ok("VALUE".to_string()));

env::remove_var(key);
assert!(env::var(key).is_err());

match env::var(key) {
    Ok(val) => println!("{key}: {val:?}"),
    Err(e) => println!("couldn't interpret {key}: {e}"),
}
17 std::path #
Cross-platform path manipulation.
This module provides two types, PathBuf and Path (akin to String and str), for working with paths
abstractly. These types are thin wrappers around OsString and OsStr respectively, meaning that they
work directly on strings according to the local platform’s path syntax.
Paths can be parsed into Components by iterating over the structure returned by the components
method on Path. Components roughly correspond to the substrings between path separators (/ or
\). You can reconstruct an equivalent path from components with the push method on PathBuf; note
that the paths may differ syntactically by the normalization described in the documentation for the
components method.
Structs
-
Ancestors An iterator over Path and its ancestors.
-
Components An iterator over the Components of a Path.
-
Iter An iterator over the Components of a Path, as OsStr slices.
-
Display Helper struct for safely printing paths with format! and {}.
-
Path A slice of a path (akin to str).
-
PathBuf An owned, mutable path (akin to String).
-
PrefixComponent A structure wrapping a Windows path prefix as well as its unparsed string representation.
-
StripPrefixError An error returned from Path::strip_prefix if the prefix was not found.
Path/PathBuf 用于实现 OS 无关的路径字符串。
Path 是 unsized type,所以一般需要和 & 或 Box 使用。不可以改变,类似于 str
PathBuf 也是 OS 无关的路径字符串,是 owned 版本,可以改变,类似于 String。
Struct std::path::Path
pub struct Path { /* private fields */ }
A slice of a path (akin to str).
This type supports a number of operations for inspecting a path, including breaking the path into its components (separated by / on Unix and by either / or \ on Windows), extracting the file name, determining whether the path is absolute, and so on.
This is an unsized type, meaning that it must always be used behind a pointer like & or Box. For an
owned version of this type, see PathBuf.
More details about the overall approach can be found in the module documentation.
use std::path::Path;
use std::ffi::OsStr;

// Note: this example does work on Windows
let path = Path::new("./foo/bar.txt"); // 传入的类型需要实现 AsRef<OsStr>

let parent = path.parent();
assert_eq!(parent, Some(Path::new("./foo")));

let file_stem = path.file_stem();
assert_eq!(file_stem, Some(OsStr::new("bar")));

let extension = path.extension();
assert_eq!(extension, Some(OsStr::new("txt")));


use std::path::Path;
let string = String::from("foo.txt"); // &str,&String,&Path 都实现了 AsRef<OsStr>
let from_string = Path::new(&string);
let from_path = Path::new(&from_string);
assert_eq!(from_string, from_path);
Path 的方法:
- pub fn new<S: AsRef<OsStr> + ?Sized>(s: &S) -> &Path
- pub fn as_os_str(&self) -> &OsStr
- pub fn as_mut_os_str(&mut self) -> &mut OsStr
- pub fn to_str(&self) -> Option<&str>
- pub fn to_path_buf(&self) -> PathBuf // 转换为 PathBuf
- pub fn parent(&self) -> Option<&Path>
- pub fn file_name(&self) -> Option<&OsStr>
- pub fn strip_prefix<P>(&self, base: P) -> Result<&Path, StripPrefixError>
- pub fn extension(&self) -> Option<&OsStr>
- pub fn join<P: AsRef<Path>>(&self, path: P) -> PathBuf // Path 不可变,方法返回可变的 PathBuf
- pub fn with_extension<S: AsRef<OsStr>>(&self, extension: S) -> PathBuf
&str/&String/&Path/&PathBuf/&OsStr/&OsString 均实现了 AsRef<OsStr>,都可以作为 Path::new() 的参数:
- 这些类型也都实现了 AsRef<Path>,所以可以直接转换为 Path;
impl AsRef<OsStr> for Component<'_>
impl AsRef<OsStr> for str
impl AsRef<OsStr> for OsStr
impl AsRef<OsStr> for OsString
impl AsRef<OsStr> for Components<'_>
impl AsRef<OsStr> for std::path::Iter<'_>
impl AsRef<OsStr> for Path
impl AsRef<OsStr> for PathBuf
impl AsRef<OsStr> for String

impl AsRef<Path> for Cow<'_, OsStr>
impl AsRef<Path> for Component<'_>
impl AsRef<Path> for str
impl AsRef<Path> for OsStr
impl AsRef<Path> for OsString
impl AsRef<Path> for Components<'_>
impl AsRef<Path> for std::path::Iter<'_>
impl AsRef<Path> for Path
impl AsRef<Path> for PathBuf
impl AsRef<Path> for String
Struct std::path::PathBuf
pub struct PathBuf { /* private fields */ }
An owned, mutable path (akin to String).
use std::path::PathBuf;
let mut path = PathBuf::new();
path.push(r"C:\");
path.push("windows");
path.push("system32");
path.set_extension("dll");
Path 其他和文件系统相关方法:
- pub fn read_link(&self) -> Result<PathBuf>
- pub fn read_dir(&self) -> Result<ReadDir>, ReadDir 是一迭代器,返回 io::Result<fs::DirEntry>
- pub fn exists(&self) -> bool
- pub fn is_file(&self) -> bool
- pub fn is_dir(&self) -> bool
- pub fn is_symlink(&self) -> bool
- pub fn metadata(&self) -> Result<Metadata>, 返回的 Metadata 是 fs::metadata 的别名类型
- pub fn symlink_metadata(&self) -> Result<Metadata>
PathBuf 的方法:
- pub fn new() -> PathBuf
- pub fn with_capacity(capacity: usize) -> PathBuf
- pub fn as_path(&self) -> &Path // 转换为 Path
- pub fn push<P: AsRef<Path>>(&mut self, path: P)
- pub fn set_file_name<S: AsRef<OsStr>>(&mut self, file_name: S)
- pub fn set_extension<S: AsRef<OsStr>>(&mut self, extension: S) -> bool
PathBuf 实现了 Deref<Target=Path>,所以 PathBuf 可以使用 Path 的所有方法,并且 &PathBuf 可以当作 &Path 使用;
18 std::fs #
Path 是 unsized 对象,一般需要 &Path 使用。PathBuf 是 &Path 的 ownerd 对象,类似于 String 是 &str 的 owner 对象。
在 struct、enum 中一般使用 ownerd 类型 PathBuf 而非 &Path,这样可以避免生命周期的问题。
- 类似的情况还有,OsString -》&OsStr,CString -》CStr。
另外 Box::new(v) 也是 v 的拥有型智能指针,可以避免 &v 作为成员时的生命周期问题。
文件和目录操作, 于 std::path::Path/PathBuf 协作.
- std::fs 下的泛型函数, 如果输入是 path, 则是 AsRef<Path>, 所以实现了该 trait 的对象均可.
impl AsRef<Path> for Cow<'_, OsStr>
impl AsRef<Path> for Component<'_>
impl AsRef<Path> for str
impl AsRef<Path> for OsStr
impl AsRef<Path> for OsString
impl AsRef<Path> for Components<'_>
impl AsRef<Path> for std::path::Iter<'_>
impl AsRef<Path> for Path
impl AsRef<Path> for PathBuf
impl AsRef<Path> for String
Structs
- DirBuilder A builder used to create directories in various manners.
- DirEntry Entries returned by the ReadDir iterator.
- File An object providing access to an open file on the filesystem.
- FileTimes Representation of the various timestamps on a file.
- FileType A structure representing a type of file with accessors for each file type. It is returned by Metadata::file_type method.
- Metadata Metadata information about a file.
- OpenOptions Options and flags which can be used to configure how a file is opened.
- Permissions Representation of the various permissions on a file.
- ReadDir Iterator over the entries in a directory.
Functions
- canonicalize Returns the canonical, absolute form of a path with all intermediate components normalized and symbolic links resolved.
- copy Copies the contents of one file to another. This function will also copy the permission bits of the original file to the destination file.
- create_dir Creates a new, empty directory at the provided path
- create_dir_all Recursively create a directory and all of its parent components if they are missing.
- hard_link Creates a new hard link on the filesystem.
- metadata Given a path, query the file system to get information about a file, directory, etc.
- read Read the entire contents of a file into
a bytes vector. - read_dir Returns an iterator over the entries within a directory.
- read_link Reads a symbolic link, returning the file that the link points to.
- read_to_string Read the entire contents of a file
into a string. - remove_dir Removes an empty directory.
- remove_dir_all Removes a directory at this path, after removing all its contents. Use carefully!
- remove_file Removes a file from the filesystem.
- rename Rename a file or directory to a new name, replacing the original file if to already exists.
- set_permissions Changes the permissions found on a file or a directory.
- soft_linkDeprecated Creates a new symbolic link on the filesystem.
- symlink_metadata Query the metadata about a file without following symlinks.
- write Write a slice as the entire contents of a file.
重点:
- read_to_string;
- write;
use std::fs;
use std::fs::{File, OpenOptions};
use std::io;
use std::io::prelude::*;
#[cfg(target_family = "unix")]
use std::os::unix;
#[cfg(target_family = "windows")]
use std::os::windows;
use std::path::Path;

// A simple implementation of `% cat path`
fn cat(path: &Path) -> io::Result<String> {
    let mut f = File::open(path)?;
    let mut s = String::new();
    match f.read_to_string(&mut s) { // 将文件的内容读取到字符串中
        Ok(_) => Ok(s),
        Err(e) => Err(e),
    }
}

// A simple implementation of `% echo s > path`
fn echo(s: &str, path: &Path) -> io::Result<()> {
    let mut f = File::create(path)?;
    f.write_all(s.as_bytes()) // 将 &[u8] 的内容一次性写入文件
}

// A simple implementation of `% touch path` (ignores existing files)
fn touch(path: &Path) -> io::Result<()> {
    match OpenOptions::new().create(true).write(true).open(path) {
        Ok(_) => Ok(()),
        Err(e) => Err(e),
    }
}

fn main() {
    println!("`mkdir a`");
    // Create a directory, returns `io::Result<()>`
    match fs::create_dir("a") {
        Err(why) => println!("! {:?}", why.kind()),
        Ok(_) => {},
    }

    println!("`echo hello > a/b.txt`");
    // The previous match can be simplified using the `unwrap_or_else` method
    echo("hello", &Path::new("a/b.txt")).unwrap_or_else(|why| {
        println!("! {:?}", why.kind());
    });

    println!("`mkdir -p a/c/d`");
    // Recursively create a directory, returns `io::Result<()>`
    fs::create_dir_all("a/c/d").unwrap_or_else(|why| {
        println!("! {:?}", why.kind());
    });

    println!("`touch a/c/e.txt`");
    touch(&Path::new("a/c/e.txt")).unwrap_or_else(|why| {
        println!("! {:?}", why.kind());
    });

    println!("`ln -s ../b.txt a/c/b.txt`");
    // Create a symbolic link, returns `io::Result<()>`
    #[cfg(target_family = "unix")] {
        unix::fs::symlink("../b.txt", "a/c/b.txt").unwrap_or_else(|why| {
            println!("! {:?}", why.kind());
        });
    }
    #[cfg(target_family = "windows")] {
        windows::fs::symlink_file("../b.txt", "a/c/b.txt").unwrap_or_else(|why| {
            println!("! {:?}", why.to_string());
        });
    }

    println!("`cat a/c/b.txt`");
    match cat(&Path::new("a/c/b.txt")) {
        Err(why) => println!("! {:?}", why.kind()),
        Ok(s) => println!("> {}", s),
    }

    println!("`ls a`");
    // Read the contents of a directory, returns `io::Result<Vec<Path>>`
    match fs::read_dir("a") {
        Err(why) => println!("! {:?}", why.kind()),
        Ok(paths) => for path in paths {
            println!("> {:?}", path.unwrap().path());
        },
    }

    println!("`rm a/c/e.txt`");
    // Remove a file, returns `io::Result<()>`
    fs::remove_file("a/c/e.txt").unwrap_or_else(|why| {
        println!("! {:?}", why.kind());
    });

    println!("`rmdir a/c/d`");
    // Remove an empty directory, returns `io::Result<()>`
    fs::remove_dir("a/c/d").unwrap_or_else(|why| {
        println!("! {:?}", why.kind());
    });
}
19 std::time #
主要提供了如下类型:
- Duration
- 代表时间间隔;
- Instant
- 代表某一时刻, 可用于计算执行耗时;
- SystemTime
- 代表某一个时刻, 但和 Instant 不同的是,他不能确保是单调递增的。
let five_seconds = Duration::from_secs(5);
assert_eq!(five_seconds, Duration::from_millis(5_000));
assert_eq!(five_seconds, Duration::from_micros(5_000_000));
assert_eq!(five_seconds, Duration::from_nanos(5_000_000_000));
let ten_seconds = Duration::from_secs(10);
let seven_nanos = Duration::from_nanos(7);
let total = ten_seconds + seven_nanos;
assert_eq!(total, Duration::new(10, 7));


let now = Instant::now();
slow_function();
let elapsed_time = now.elapsed();
println!("Running slow_function() took {} seconds.", elapsed_time.as_secs());
Duration 代表时间跨度,由 second 和 nanoseconds 组成。他实现了 Default/Add/Sub 和其他 std::ops 的 trait。
- Duration 默认实现了 Debug 而非 Display;
use std::time::Duration;

let five_seconds = Duration::new(5, 0);
let five_seconds_and_five_nanos = five_seconds + Duration::new(0, 5);

assert_eq!(five_seconds_and_five_nanos.as_secs(), 5);
assert_eq!(five_seconds_and_five_nanos.subsec_nanos(), 5); // 只返回小数部分,单位是 nanos

let ten_millis = Duration::from_millis(10);
Duration 的方法或函数:
- Duration 实现了 Add/AddAssign/Sub/SubAssign/Div/DivAssign 等运算符,可以直接进行算术运算。
- Instant.elapsed() 返回 Duration,而且他的方法参数也是 Duration;
// 创建
pub const fn new(secs: u64, nanos: u32) -> Duration
pub const fn from_secs(secs: u64) -> Duration
pub const fn from_millis(millis: u64) -> Duration
pub const fn from_micros(micros: u64) -> Duration
pub const fn from_nanos(nanos: u64) -> Duration

pub const fn is_zero(&self) -> bool

// 返回
pub const fn as_secs(&self) -> u64
pub const fn as_millis(&self) -> u128
pub const fn as_micros(&self) -> u128
pub const fn as_nanos(&self) -> u128
// 返回不足一秒的小数部分
pub const fn subsec_millis(&self) -> u32
pub const fn subsec_micros(&self) -> u32
pub const fn subsec_nanos(&self) -> u32

pub const fn abs_diff(self, other: Duration) -> Duration

pub const fn checked_add(self, rhs: Duration) -> Option<Duration>
pub const fn saturating_add(self, rhs: Duration) -> Duration
pub const fn checked_sub(self, rhs: Duration) -> Option<Duration>
pub const fn saturating_sub(self, rhs: Duration) -> Duration
pub const fn checked_mul(self, rhs: u32) -> Option<Duration>
pub const fn saturating_mul(self, rhs: u32) -> Duration
pub const fn checked_div(self, rhs: u32) -> Option<Duration>
pub fn as_secs_f64(&self) -> f64
pub fn as_secs_f32(&self) -> f32
pub fn from_secs_f64(secs: f64) -> Duration
pub fn from_secs_f32(secs: f32) -> Duration
pub fn mul_f64(self, rhs: f64) -> Duration
pub fn mul_f32(self, rhs: f32) -> Duration
pub fn div_f64(self, rhs: f64) -> Duration
pub fn div_f32(self, rhs: f32) -> Duration
pub fn div_duration_f64(self, rhs: Duration) -> f64
pub fn div_duration_f32(self, rhs: Duration) -> f32

impl Duration
pub fn try_from_secs_f32(secs: f32) -> Result<Duration, TryFromFloatSecsError>
pub fn try_from_secs_f64(secs: f64) -> Result<Duration, TryFromFloatSecsError>
Instant 代表某一个时刻,在程序中是单调递增的,故可以用来测量代码执行时间。
use std::time::{Duration, Instant};
use std::thread::sleep;

fn main() {
   let now = Instant::now();
   // we sleep for 2 seconds
   sleep(Duration::new(2, 0));
   // it prints '2'
   println!("{}", now.elapsed().as_secs());
}
Instant 的方法或函数:
impl Instant
pub fn now() -> Instant

// 两个 Instant 之间的差距
pub fn duration_since(&self, earlier: Instant) -> Duration
pub fn checked_duration_since(&self, earlier: Instant) -> Option<Duration>
pub fn saturating_duration_since(&self, earlier: Instant) -> Duration

// 时间流逝
pub fn elapsed(&self) -> Duration

// 添加 Duration 后的新 Instant
pub fn checked_add(&self, duration: Duration) -> Option<Instant>
pub fn checked_sub(&self, duration: Duration) -> Option<Instant>
20 std::sync/thread #
Rust 标准库的 std::thread 使用 1:1 模型来运行 rust thread 和 os thread。
rust thread 使用 thread::spawn() 来运行一个 thread,它的参数是一个无输入/输出的函数,一般通过 FnOnce closure 来实现 move ownership 所需的外围环境中的对象。
use std::thread;
use std::time::Duration;

fn main() {
    let handle = thread::spawn(|| {
        for i in 1..10 {
            println!("hi number {} from the spawned thread!", i);
            thread::sleep(Duration::from_millis(1));
        }
    });

    for i in 1..5 {
        println!("hi number {} from the main thread!", i);
        thread::sleep(Duration::from_millis(1));
    }

    handle.join().unwrap();
}
由于该闭包函数在另一个 thread 中运行,rust 编译器不能推断闭包中引用的外部对象的声明周期是否有效,所以需要 thread clause 必须在引用外部对象时,必须使用 move 修饰符来转义外部对象的所有权,否则编译失败:
use std::thread;

fn main() {
    let v = vec![1, 2, 3];

    let handle = thread::spawn(|| {
        println!("Here's a vector: {:?}", v); // 编译失败,没有加 move 时默认是 reference
    });

    handle.join().unwrap();
}
正确形式:
use std::thread;

fn main() {
    let v = vec![1, 2, 3];

    let handle = thread::spawn(move || { // move 指示 closure 中捕获的外部对象都是 ownership 接管而非引用的方式
        println!("Here's a vector: {:?}", v);
    });

    handle.join().unwrap();
}
通过在线程闭包函数中 move 接管引用的外部对象,Rust 的 ownership 规则可以防止并发编程错误(编译时报错)。
use std::sync::mpsc;
use std::thread;

fn main() {
    let (tx, rx) = mpsc::channel();

    thread::spawn(move || {
        let val = String::from("hi");
        tx.send(val).unwrap();
        println!("val is {}", val); // 错误,val 的所有权已经转移到 tx.send() 方法中,不能再使用。
    });

    let received = rx.recv().unwrap();
    println!("Got: {}", received);
}


use std::thread;

fn main() {
    let v = vec![1, 2, 3];

    let handle = thread::spawn(move || { // move 指示 closure 中捕获的外部对象都是 ownership 接管而非引用的方式
        println!("Here's a vector: {:?}", v);
    });

    drop(v); // oh no! 错误,因为 v ownership 已经转义到线程闭包函数中,故这里不能再引用它。
    handle.join().unwrap();
}
由于 thread closure 中 不能使用外围对象的共享引用 :因为 rust 不能确定该 thread 和外围 thread 的生命周期关系,如果外围 thread 退出导致对象被 drop,则该 thread 的引用将失效。
解决办法是:使用线程安全的 Arc<T> 智能指针:
let value = Arc::new(myType);

for _ in 0..5 {
  // 每创建一个 thread 前,先 clone Arc,增加 value 的引用计数
  let value2 = Arc::clone(&value); // 或者 let value2 = value.clone();
  thread.spawn(move || {
      let f = value2.filed; // closure 函数捕获 value2 ownership
      // ...
      // 线程推出时,value2 被 drop,引用计数减少
  })
}
通过 clone 创建的 Arc<T> 都是 T 的共享引用,不能修改。但是由于 Mutext<T>/RWlock<T>/AutomicXX<T> 都是线程安全的 内部可变性对象 ,所以通过 Arc<Mutex<T>> Deref 生成的 mutex 共享引用,可以调用能修改它内部状态的 lock() 方法。

三方库 rayon 和 crossbeam 提供了更丰富的并发支持:
- rayon 提供了并行迭代器和 join()/scope() 并发机制, 底层使用 thread pool 和 workload-stealing 平衡机制来实现高性能并发;
- crossbeam 提供了丰富的线程安全原语, 如线程安全的 MSMR 的 Queue/Channel 等.
thread 的问题:
- 每个 thread 都有固定的 stack size 内存需求,成千上万各 thread 会消耗大量的内存;
- 内核调度 thread 运行的上下文切换开销也是很大的;
- thread 在执行 read/write 系统调用时,尤其是网络通信,会有大量的时间被 block 等待,此时该 thread 不能再执行其它事情,效率第。
async 通过创建大量异步 task,然后使用一个 thread pool 来执行它们,在某个 task 被阻塞时 executor 自动调度其它 task 到 thread 上运行,从而:
- task 相比 thread 更轻量化,没有了大量 thread stack 的开销,切换执行速度也更快,所以一个程序内部可以创建大量的异步 task;
- executor 可以在 task 阻塞时调度其它 task 到 thread 运行,从而执行效率和并发高;
20.1 mpsc #
let (tx, rx) = mpsc::channel();
- tx 支持 clone() 从而可以在多个线程中使用;而 rx 不支持 clone(),所以只能有一个实例。
- tx clone 后的多个对象必须都被 drop 后, rx.recv() 才不会继续被 blocking;
- tx 发送的所有数据都串行缓冲, 即使 tx 都被 drop, 内容还在, 直到 rx 接受完数据.
let (tx, rx) = mpsc::channel();

let tx1 = tx.clone();
thread::spawn(move || {
    let vals = vec![
        String::from("hi"),
        String::from("from"),
        String::from("the"),
        String::from("thread"),
    ];

    for val in vals {
        tx1.send(val).unwrap();
        thread::sleep(Duration::from_secs(1));
    }
});

thread::spawn(move || {
    let vals = vec![
        String::from("more"),
        String::from("messages"),
        String::from("for"),
        String::from("you"),
    ];

    for val in vals {
        tx.send(val).unwrap();
        thread::sleep(Duration::from_secs(1));
    }
});

for received in rx {
    println!("Got: {}", received);
}
20.2 mutex #
Mutex 支持内部可变性:mutex.lock().unwrap() 返回的是一个新 MutexGuard<’_, T> 对象, 所以可以给它赋值给 mut 类型变量(let mut data = data.lock().unwrap()), 进而可以对 MutexGuard 进行修改。
Mutex 可以作为全局 static 对象,用 Arc 包裹后可以在多线程环境中使用。
由于 MutexGuard 实现了 DerefMut<Target=T>,所以可以像 &mut T 一样使用 data 变量.
- Mutex 的内部可变性主要是由于 data.lock().unwarp() 返回了一个新 MutextGuard 对象, 所以可以用 mut 变量来代表它;
// file:///Users/zhangjun/.rustup/toolchains/nightly-x86_64-apple-darwin/share/doc/rust/html/std/sync/struct.Mutex.html#examples
use std::sync::{Arc, Mutex};
use std::thread;
use std::sync::mpsc::channel;

const N: usize = 10;

// Spawn a few threads to increment a shared variable (non-atomically), and
// let the main thread know once all increments are done.
//
// Here we're using an Arc to share memory among threads, and the data inside
// the Arc is protected with a mutex.
let data = Arc::new(Mutex::new(0)); // data 虽然不是 mut 对象,但是 Mutex 实现了内部可变性

let (tx, rx) = channel();
for _ in 0..N {
    let (data, tx) = (Arc::clone(&data), tx.clone());
    thread::spawn(move || {
        // The shared state can only be accessed once the lock is held.
        // Our non-atomic increment is safe because we're the only thread
        // which can access the shared state when the lock is held.
        //
        // We unwrap() the return value to assert that we are not expecting
        // threads to ever fail while holding the lock.

	// 虽然 move 进来的 data 不可变, 但是 data.lock().unwrap(); 返回了新对象 MutexGuard, 所
	// 以可以赋值给 mut 变量。
        let mut data = data.lock().unwrap();
        *data += 1;
        if *data == N {
            tx.send(()).unwrap();
        }
        // the lock is unlocked here when `data` goes out of scope.
    });
}

rx.recv().unwrap();
20.3 condvar #
Condvar 需要和 Mutex 一块使用.
use std::sync::{Arc, Mutex, Condvar};
use std::thread;

let pair = Arc::new((Mutex::new(false), Condvar::new()));
let pair2 = Arc::clone(&pair);

thread::spawn(move|| {
    let (lock, cvar) = &*pair2;  // deref
    let mut started = lock.lock().unwrap(); // started 是 MutexGuard 类型, 被 drop 时自动释放锁
    *started = true;
    cvar.notify_one();
});

// Wait for the thread to start up.
let (lock, cvar) = &*pair;
let mut started = lock.lock().unwrap(); // started 是 MutexGuard 类型
while !*started { // MutxtGuard 实现了 Deref, 所以 *started 返回内部的 bool 值
    // wait 需要传入 MutexGuard, 执行 wait() 时内部会使用 MutexGuard 释放锁, 然后在收到 notify 时会再次获得锁
    started = cvar.wait(started).unwrap();
}
20.4 atomic #
各种 atomic 类型如 AtomicBool, AtomicIsize, AtomicUsize, AtomicI8, AtomicU16 支持跨线程的原子更新, 主要实现无锁并发:
- 各方法, 如 load/store/swap/fetch 等, 都是 &self, 不需要 &mut self;
- 各 atomic 类型实现了 Sync 但没有实现 Send, 需要包裹在 Arc 中使用.
- rust atomic follow C++20 atomics 规范, 每个方法都接受一个 Ordering 参数来指定 memory barrier 类型.
use std::sync::Arc;
use std::sync::atomic::{AtomicUsize, Ordering};
use std::{hint, thread};

fn main() {
    let spinlock = Arc::new(AtomicUsize::new(1));

    let spinlock_clone = Arc::clone(&spinlock);
    let thread = thread::spawn(move|| {
        spinlock_clone.store(0, Ordering::SeqCst);
    });

    // Wait for the other thread to release the lock
    while spinlock.load(Ordering::SeqCst) != 0 {
        hint::spin_loop();
    }

    if let Err(panic) = thread.join() {
        println!("Thread had an error: {panic:?}");
    }
}
另外, atomic 支持内部可变性, 所以可以定义为全局变量, 后续可以原子修改. 也可以用 Arc 包裹后在多线程环境中使用。
// Keep a global count of live threads
use std::sync::atomic::{AtomicUsize, Ordering};

// 全局 static 变量, 即使不是 static mut 后续也可以更新(因为 atomic 的 fetch/load 的参数都是 &self
static GLOBAL_THREAD_COUNT: AtomicUsize = AtomicUsize::new(0);
let old_thread_count = GLOBAL_THREAD_COUNT.fetch_add(1, Ordering::SeqCst);
println!("live threads: {}", old_thread_count + 1);
通用方法:
pub fn compare_exchange(
    &self,
    current: bool,
    new: bool,
    success: Ordering,
    failure: Ordering,
) -> Result<bool, bool> {

pub fn compare_exchange_weak(
    &self,
    current: bool,
    new: bool,
    success: Ordering,
    failure: Ordering
) -> Result<bool, bool>

pub fn load(&self, order: Ordering) -> bool
pub fn store(&self, val: bool, order: Ordering)
pub fn swap(&self, val: bool, order: Ordering) -> bool
Ordering 类型:
pub enum Ordering {
    Relaxed,
    Release,
    Acquire,
    AcqRel,
    SeqCst,
}
- Relaxed: 最宽松;
- Release: store 写入操作时指定;
- Acquire: load 读取时指定;
- AcqRel: 同时 Acquire 和 Release, 在 load&store 时使用;
- SeqCst: 最严格的模式;
20.5 thread #
- 闭包一般使用 move 语法,除非没有捕获任何外围对象;
- 闭包的返回值可以通过 JoinHandler.join() 来获取;
- JoinHandler.join() 返回的是 std:🧵:Result, 如果子线程 panic 则对应 Err, 否则 Ok(value) 的 value 值为 spawn() 闭包函数的返回值;
- 可以使用 builder 模式来自定义 thread name/stack_size 参数(默认是 2MiB,也可以通过 RUST_MIN_STACK
环境变量来设置);
- thread name 是可选的。
use std::thread;

let thread_join_handle = thread::spawn(move || {
    // some work here
});
// some work here
let res = thread_join_handle.join().unwrap();


// 配置 thread, 如 name/stack_size
use std::thread;
let handler = thread::Builder::new().name("thread1".to_string()).spawn(move || {
    println!("Hello, world!");
}).unwrap();
handler.join().unwrap();
Thread 对象的方法:id()/name()/unpark()
- id() 返回的 std:🧵:ThreadId 可以通过 as_u64() 返回他的编号;
- 每个线程都有一个无锁的 blocking 机制,使用 std:🧵:park()/park_timeout() 来暂停,然后使用 Thread 对象的 unpark()方法来继续。如果在线程运行前,已经被 unpark(), 则线程运行到 thread::park() 时会直接返回。
use std::thread;
use std::time::Duration;

let parked_thread = thread::Builder::new()
    .spawn(|| {
        println!("Parking thread");
        thread::park(); // 暂停
        println!("Thread unparked");
    })
    .unwrap();

// Let some time pass for the thread to be spawned.
thread::sleep(Duration::from_millis(10));

println!("Unpark the thread");
parked_thread.thread().unpark(); // 继续
parked_thread.join().unwrap();


// 另一例子,使用 park/unpark 来进行初始化同步
use std::thread;
use std::sync::{Arc, atomic::{Ordering, AtomicBool}};
use std::time::Duration;

let flag = Arc::new(AtomicBool::new(false));
let flag2 = Arc::clone(&flag);

let parked_thread = thread::spawn(move || {
    // We want to wait until the flag is set. We *could* just spin, but using
    // park/unpark is more efficient.
    while !flag2.load(Ordering::Relaxed) {
        println!("Parking thread");
        thread::park();
        // We *could* get here spuriously, i.e., way before the 10ms below are over!
        // But that is no problem, we are in a loop until the flag is set anyway.
        println!("Thread unparked");
    }
    println!("Flag received");
});

// Let some time pass for the thread to be spawned.
thread::sleep(Duration::from_millis(10));

// Set the flag, and let the thread wake up.
// There is no race condition here, if `unpark`
// happens first, `park` will return immediately.
// Hence there is no risk of a deadlock.
flag.store(true, Ordering::Relaxed);
println!("Unpark the thread");
parked_thread.thread().unpark();

parked_thread.join().unwrap();
20.6 scope thread #
Rust 标准库 thread scope 的 RFC: https://rust-lang.github.io/rfcs/3151-scoped-threads.html#rationale-and-alternatives
- 在标准库提供 thread scope 之前, 社区的 crossbeam crate 已经提供了 thread scope 能力.
- Rayon also has scopes, but they work on a different abstraction level - Rayon
spawns tasks rather than threads. Its API is the same as the one proposed in this RFC.
标准的 thread 因为不能确保在主函数返回前 thread 一定执行完毕和被 join, 所以不能使用父线程 stack 上的变量引用:
use std::thread;

let people = vec![
    "Alice".to_string(),
    "Bob".to_string(),
    "Carol".to_string(),
];

let mut threads = Vec::new();

for person in &people {
    threads.push(thread::spawn(move || {
        println!("Hello, {}!", person);
    }));
}

for thread in threads {
    thread.join().unwrap();
}
报错:
error[E0597]: `people` does not live long enough
  --> src/main.rs:12:20
   |
12 |     for person in &people {
   |                    ^^^^^^ borrowed value does not live long enough
...
21 | }
   | - borrowed value only lives until here
   |
   = note: borrowed value must be valid for the static lifetime...
解决办法: 使用 scope thread, 它确保在 scope 函数返回前, 内部 spawn 的 thread 都被 join, 所以可以不使用 move 的情况下引用 stack 变量:
- std:🧵:scope() 的参数是一个传入 Scope 类型的闭包,使用 Scope 类型的 spawn() 来创建线程;
- Scope.spawn() 的参数是线程闭包函数 FnOnce(), 内部可以共享引用 stack 变量, 也可以 mut 引用 stack 变量, 但是要确保只能有一个 spawn() 闭包是 mut 使用该变量.
  use std::thread;

  let mut a = vec![1, 2, 3];
  let mut x = 0;

  thread::scope(|s| { // s 是一个 &std:🧵:Scope 类型对象
      s.spawn(|| {  // 使用 Scope.spawn() 来创建闭包
          println!("hello from the first scoped thread");
          // We can borrow `a` here.
          dbg!(&a);
      });
      s.spawn(|| {
          println!("hello from the second scoped thread");
          // We can even mutably borrow `x` here,
          // because no other threads are using it.
          x += a[0] + a[2];
      });
      println!("hello from the main thread");
  }); // thread::scope() 确保内部 spawn 的线程都执行返回后,再返回

  // After the scope, we can modify and access our variables again:
  a.push(4);
  assert_eq!(x, a.len());

  // 另一个例子
  fn main() {
      let mut data = vec![5];
      std::thread::scope(|s| {
          for _ in 0..5 {
              s.spawn(|| println!("{:?}", data));
          }
      });
  }
20.7 thread local storage #
Thread Local storage
- 一般使用 thread_local! 函数宏来创建 static LocalKey<T> 类型的全局变量;
- LocalKey<T> 提供了 get/set/with() 等方法,参数都是 &self, 所以
LocalKey 的泛型参数类型 T 需要实现内部可变性,一般使用 Cell/RefCell 来包裹(因为是线程本地存储,所以不会有并发问题)。- get() 返回 T, 所以 T 需要实现 Copy。
- take() 返回 T, T 需要实现 Default。
- LocalKey 只允许共享引用 &T, 为了获得可变引用 &mut T, 需要使用 Cell/RefCell;
use std::cell::RefCell;
use std::thread;

thread_local!(static FOO: RefCell<u32> = RefCell::new(1)); // FOO 类型需要支持内部可变性

FOO.with_borrow(|v| assert_eq!(*v, 1));
FOO.with_borrow_mut(|v| *v = 2);

// each thread starts out with the initial value of 1
let t = thread::spawn(move|| {
    FOO.with_borrow(|v| assert_eq!(*v, 1));
    FOO.with_borrow_mut(|v| *v = 3);
});

// wait for the thread to complete and bail out on panic
t.join().unwrap();

// we retain our original value of 2 despite the child thread
FOO.with_borrow(|v| assert_eq!(*v, 2));
Rust 为 LocalKey<RefCell<T>> 提供了特殊支持
- with_borrow()
- with_borrow_mut()
use std::cell::RefCell;

thread_local! {
    static X: RefCell<Vec<i32>> = RefCell::new(Vec::new());
}

X.with_borrow_mut(|v| v.push(1));

X.with_borrow(|v| assert_eq!(*v, vec![1]));
对于异步任务,Rust 提供了异步任务的本地存储。
20.8 fork-join 三方库 rayon #
标准库 thread 可以实现 fork-join 模式, 比如:
- 将并行任务拆分为多批, 每一批用一个 thread 来执行, 形成一个多 thread 并行执行的模式(具体 thread 数量取决于批次), 然后主线程在 join 这些 thread 来获取结果;
- 将任务发送到 FIFO 的 queue 或 channel, 然后起固定数量的线程, 从 FIFO 中获取任务, 在将结果发送到结果 channel, 主线程从结果 channel 获得结果, 并等待所有线程执行结束.
标准库 thread 实现 fork-join 的问题:
- 起的线程数量来源于批次, 需要选择合适的线程数量.
- 不同线程执行任务的负载不一样, 不能动态在线程间平衡负载;
基于 rayon 提供的 scope 来实现 fork-join 模式, 可以很好的解决上面的标准库实现模式的问题, 它们采用了 thread pool(线程数量和 CPU 数量一致) 和 work-stealing parallelism 算法, 可以很好的实现数据并行处理.
- crossbeam scope 只是提供了 spawn 多个 scope thread 的能力并不具有 thread pool 和 work-stealing 能力, 目前已经被标准库的 thread scope 所支持,而且标准库的 scope thread 性能更高, 所以不建议单纯使用
crossbeam scope 库.
- rayon/crossbeam scope 的另一个优势是支持 spawn() 嵌套, 但标准库 scope thread 不支持;
scope spawn 的闭包没有返回值, 但是可以通过 stack 变量和 channel 等机制来收集并行处理结果:
// https://docs.rs/rayon/latest/rayon/struct.Scope.html
let mut value_a = None;
let mut value_b = None;
let mut value_c = None;
rayon::scope(|s| {
    s.spawn(|s1| {
          // ^ this is the same scope as `s`; this handle `s1`
          //   is intended for use by the spawned task,
          //   since scope handles cannot cross thread boundaries.

        value_a = Some(22);

        // the scope `s` will not end until all these tasks are done
        s1.spawn(|_| {
            value_b = Some(44);
        });
    });

    s.spawn(|_| {
        value_c = Some(66);
    });
});
assert_eq!(value_a, Some(22));
assert_eq!(value_b, Some(44));
assert_eq!(value_c, Some(66));
It depends on what you want to do. If you are doing io-bound work, Tokio would be what you want – you would use it as a runtime for the async capabilities in Rust.
If you have cpu-bound work, then rayon is what you want to use. Rayon is a work-stealing parallelism crate – it will schedule work to be done, and different threads will schedule portions of it as
they become available to do work. It’s very easy to get 100% CPU utilization across all cores use
Rayon if your work is naturally paralellizable, and the interface is dead simple: anywhere you do a
.iter(), you can turn it into a .par_iter(), and Rayon will parallelize the work. Note there is some
overhead to using Rayon – you normally will be better off doing your work on a single thread unless
you have a large number of elements in your collection… I found for my application I needed more
than 1e6 elements before I saw an appreciable performance benefit to using Rayon.
As others said, Crossbeam is for sending and receiving messages across threads. I use it alongside of tokio and rayon.
You are right, threads have a noticeable cost when spawning. Depending on what you are trying to do,
it could be useful a thread pool or, even simpler, using rayon 122. The latter provides a good way
of handling parallelization and it is much more fine grained than a raw thread pool (i.e. it uses a
work stealing algorithm).
To give more background on this: https://news.ycombinator.com/item?id=31037971
- crossbeam is
a building block used in Rayon, which is Rust’s maindata parallelism library, roughly similar to OpenMP. - crossbeam channels are very fast. They’re in the same league as golang, sometimes faster (depending how you measure of course).
- crossbeam is an order of magnitude
faster than channelsin the Rust’s standard library, while being more powerful and simpler to use. This is an example where experimentation in a 3rd party crate paid off compared to the standard library where a basic implementation went to die. - it integrates with Rust’s borrow checker of course, so you can use complex multi-threaded
constructs (e.g.
share stack-allocated objectsbetween threads) without fear of data races or use-after-free.
https://users.rust-lang.org/t/scoped-threads-std-or-crossbeam/89248/2
FWIW, I’ve had a much better experience with rayon::scope 34 (and more generally
rayon::ThreadPool::scope 9) than with either crossbeam directly or the “new” std:🧵:scope.
It’s a larger dependency for sure.
20.9 How I learned to stop worrying and love the global state #
https://symbolica.io/posts/global_state/
Introduction
After the goto statement, mutable global variables may be the most frowned upon pattern in modern
programming. There is a reason for its infamy, as it is a canary in a coalmine for poor structural
design and because mutable global variables may easily lead to race conditions.
Thankfully, Rust makes scoped goto safe and reasonable to use (see my other blog post) and it achieves the same for mutable global variables. One cannot simply write
static MY_GLOBAL: Vec<usize> = Vec::new();
and expect to call MY_GLOBAL.push(5) from anywhere in the program, as globals (indicated with
static1) are immutable. We have to use wrappers that allow for interior mutability. In the end the
Rust compiler will take you by the hand and lead you to a setup such as:
static MY_GLOBAL: Mutex<MyData> = Mutex::new(MyData::new());
If write access is only needed upon initialization, it is more efficient to use a OnceLock over a Mutex.
Even though using global data is possible in Rust, there is a general preference to pass references
of ‘global’ data to functions that need it. For example:
fn main() {
    let my_data = MyData::new();
    some_function(&mut mydata);
}
Reference passing makes the function dependencies explicit and may be useful to avoid locking, in
scenarios where scoped threads only require immutable references. For example:
fn main() {
    let mut data = vec![5];
    std::thread::scope(|s| {
        for _ in 0..5 {
            s.spawn(|| println!("{:?}", data));
        }
    });
}
where the threads all access the same data, without any locking.
This approach is also more in line with the principle of pure functions: functions that yield the
same output if the input is the same. Accessing non-constant global variables is surely not pure!
In this blog post I will show how I embraced the global state and removed intrusive function
argument passing. Along the way we will encounter append-only structures, thread local storage, and custom garbage collection.
The state and the workspace
Symbolica is a computer algebra(代数) system, a library that can do symbolic mathematics (such as taking derivatives). Commonly, users define their own variables and functions (symbols) or they are defined automatically when an expression is parsed. For example:
let x = Atom::parse("x")?;
It would be extremely memory-inefficient to store the actual text string “x” (or worse, if the user
wanted to define a symbol with hundreds of characters!) into the internal representation of a
mathematical expression. Instead, these symbol names are identified with a number. A naive (and also
memory-inefficient) representation of an Atom would be
type Symbol = usize;

enum Atom {
    Variable(Symbol),
    Function(Symbol, Vec<Atom>),
    Num(i64),
    Mul(Vec<Atom>),
    Add(Vec<Atom>)
}
The association of the name (a string) and a symbol (a usize) needs to be stored somewhere and we
call this the state. (name 和 symbol 的映射表, 只读)
In early versions of Symbolica, the user created their own state and passed a mutable reference to
functions that may define new symbols, such as the parser, and passed immutable references to any
other function. For example:
let mut state = State::new();
let x = Atom::parse("(1+x)^2", &mut state)?;
As a consequence, any function that requires access to the name of the symbol, such as for printing the atom, needs to have the state passed as an argument. What makes matters worse is that the state also stores more information, such as whether a function is symmetric in its arguments. Due to this, the state has to be passed to virtually any function. Yikes…
As a result, straightforward operator overloading for adding and multiplyying two atoms was not possible anymore; atoms were to be wrapped together with a reference to the state in a new struct, which implemented the operator overloading.
The state is not the only object that had to be passed around. There is also the workspace, a global cache. Creating atoms is expensive, as it requires heap allocations. Therefore Symbolica has an automatic atom recycling system. The workspace will be described in more detail in the next section.
In the end, this is what a small Symbolica program looked like:
let mut state = State::new();
let workspace = Workspace::new();
let x = Atom::parse("(1+x)^2", &mut state, &workspace)?;
let y = x.expand(&state, &workspace);
println!("y={}", y.printer(&state)); // y = x^2 + 2*x + 1
Is there really no other way? It turns out there is, by going global! As the state and the workspace
require very different solutions, we will treat them separately. (通过全局变量来避免向每个函数方法传递共享的 state 和 workspace)
Enemy of the State
In principle, Symbolica could use the proposal from the Rust compiler and go with
static State: Mutex<State> = Mutex::new(State::new());
使用 Mutex 是因为为全局 static 变量提供了内部可变性, 带来的问题是性能开销.
where the State looks like:
pub struct State {
    name_to_symbol: HashMap<String, usize>,
    symbol_to_name: Vec<String>
}

impl State {
    pub fn get_symbol(&mut self, name: &str) -> usize {
        if let Some(id) = self.name_to_symbol.get(name) {
            *id
        } else {
            self.symbol_to_name.push(name.to_owned());
            let new_id = self.symbol_to_name.len() - 1;
            self.name_to_symbol.insert(name.to_owned(), new_id);
            new_id
        }
    }

    pub fn get_name(&self, id: usize) -> &str {
        &self.symbol_to_name[id]
    }
}
In this setup, the symbol of any new name is the index in symbol_to_name.
Going the Mutex route incurs a significant performance cost every time the state is accessed for
reading. However, we know that new variables and functions are only defined sporadically and often
at the start of the program, so this is wasteful. An RwLock may provide better performance, but it
does not remove synchronization overhead.
We want reading to be extremely cheap. Writing may have locks however, as defining new variables should never occur in performance-critical parts of the execution.
The key realization to solve this conundrum is that the state is append-only: new symbols can be
defined, but old symbols can never be removed, as that would invalidate previously constructed
atoms. Instead of considering the name_to_symbol and symbol_to_name to be part of the State, let us
try to extract the symbol_to_name vector and make it append-only.
Thus, I started my search for append-only crates and I stumbled upon elsa. elsa has sync::FrozenVec whose push function is push(&self), instead of push(&mut self). This is safe because elsa forces every element to live on the heap, therefore any reference to an element of the vector (pointing to the heap) will not change if the vector itself is moved. Sadly, there is still synchronization overhead, as internally a RwLock is used. Then I found the excellent append-only-vec crate which does exactly what I want: it is an array of pointers to dynamically allocated fixed-size arrays (chunks). Once a chunk is full, a new fixed-size chunk is allocated. The data structure looks like [UnsafeCell<*mut T>; MAX_FIXED_CHUNKS]. Since all arrays are fixed size, nothing will ever move in memory when adding new data and thus a reference to an existing element will never be invalid. Accessing an index is virtually free and writing into the AppendOnlyVec spinlocks, which is a nice bonus.
I can now move symbol_to_name out of the State, and make it global:
static SYMBOL_TO_NAME: AppendOnlyVec<String> = AppendOnlyVec::<String>::new();

pub struct State {
    name_to_symbol: HashMap<String, Symbol>,
}

impl State {
    pub fn get_symbol(&mut self, name: &str) -> usize {
        if let Some(id) = self.name_to_symbol.get(name) {
            *id
        } else {
            let new_id = SYMBOL_TO_NAME.push(name.to_owned());
            self.name_to_symbol.insert(name.to_owned(), new_id);
            new_id
        }
    }

    pub fn get_name(id: usize) -> &'static str {
        &SYMBOL_TO_NAME[id]
    }
}
Pushing into the SYMBOL_TO_NAME returns the (flattened) index it was inserted at.
We can now drop all dependencies on &State, since in order to get the name of a variable we can now
call State::get_name(my_id) instead!
The new setup has a problem though: if we have two states created by the user and they define the same symbol, it will be added twice to SYMBOL_TO_NAME, as we never check if the symbol already exists in SYMBOL_TO_NAME. Checking that array must require some kind of lock. The solution to this is simple and achieves exactly what we wanted in the first place: we will only allow one state (the constructor is private) and make it global:
static SYMBOL_TO_NAME: AppendOnlyVec<String> = AppendOnlyVec::<String>::new();
static STATE: Mutex<State> = Mutex::new(State::new());

impl State {
    const fn new() -> State {
        State {
            name_to_symbol: HashMap::new()
        }
    }

    pub fn get_symbol(name: &str) -> usize {
        let state = STATE.write().unwrap(); // 加锁

        if let Some(id) = state.name_to_symbol.get(name) {
            *id
        } else {
            let new_id = SYMBOL_TO_NAME.push(name.to_owned());
            state.name_to_symbol.insert(name.to_owned(), new_id);
            new_id
        }
    }

    pub fn get_name(id: usize) -> &'static str {
        &SYMBOL_TO_NAME[id]
    }
}
Now we have a truly global state, that uses a lock when defining new symbols, but no lock is required to access information about defined symbols! This means that we can also remove all &mut State in Symbolica as well, and use State::get_symbol(name) instead.
We now have one problem down, and one more to go.
Thread-local Storage Wars
A Symbolica expression, called an Atom, is represented by a vector of bytes, a Vec<u8>. For example, f(x, 2/5) is coded in only 15 bytes as
[3, 10, 0, 0, 0, 17, 1, 2, 2, 1, 0, 1, 17, 2, 5]
which allows for many expressions to fit in memory. The details of the representation is a story for
another blog post, but the important part for now is that creating a new atom requires a heap allocation.
Atom recycling
During symbolic computations, such as performing an expansion, temporary atoms are needed. It is
rather slow to allocate new vectors all the time, therefore Symbolica caches them. The way that
worked in earlier versions is by doing garbage collection and recycling. The idea is as follows:
We have a cache of objects that are resettable to their initial state and they implement the ResettableBuffer trait:
/// A buffer that can be reset to its initial state.
/// The `new` function may allocate, but the `reset` function must not.
pub trait ResettableBuffer: Sized {
    /// Create a new resettable buffer. May allocate.
    fn new() -> Self;
    /// Reset the buffer to its initial state. Must not allocate.
    fn reset(&mut self);
}
The cache looks like this:
pub struct Cache<T: ResettableBuffer>(RefCell<Vec<T>>);
The vector is wrapped in a RefCell for interior mutability. We use RefCell instead of Mutex as it
makes sense to have a memory cache per thread, to eliminate any synchronization overhead.
When an object is requested from the cache, we pop an element from the vector, and return it, wrapped in a handle:
/// A handle to an underlying resettable buffer. When this handle is dropped,
/// the buffer is returned to the cache it was created by.
pub struct BufferHandle<'a, T: ResettableBuffer> {
    buf: Option<T>,
    parent: &'a Cache<T>,
}
where parent is a reference to the cache it was created from. Here is the code to get a handle, and to add/return a ResettableBuffer to the cache.
impl<T: ResettableBuffer> Cache<T> {
    /// Get a buffer from the cache if the cache is not empty,
    /// else create a new one.
    #[inline]
    pub fn get_handle(&self) -> BufferHandle<T> {
        let b = if let Ok(mut a) = self.0.try_borrow_mut() {
            if let Some(b) = a.pop() {
                b
            } else {
                T::new()
            }
        } else {
            T::new() // should never happen
        };

        BufferHandle {
            buf: Some(b),
            parent: self,
        }
    }

    /// Return a buffer to the cache.
    #[inline]
    fn return_arg(&self, mut b: T) {
        if let Ok(mut a) = self.0.try_borrow_mut() {
            b.reset();
            a.push(b);
        }
    }
}
Note that I am using try_borrow_mut instead of borrow_mut().unwrap() for an additional few percent of performance. The case where the borrow fails should never happen, as the workspace is not shared between threads.
Now for the final trick: when the handle is dropped, return the object back to the cache
impl<'a, T: ResettableBuffer> Drop for BufferHandle<'a, T> {
    /// Upon dropping the handle, the buffer is returned to the cache it was created by.
    #[inline]
    fn drop(&mut self) {
        let buffer = std::mem::take(&mut self.buf).unwrap();
        self.parent.return_arg(buffer)
    }
}
This completes the fully automatic garbage collection and object recycling: one cannot accidentally
forget to return an atom to the cache, Rust will do it for you when the handle goes out of scope!
Using a cache makes real-world Symbolica code about 25% faster. The price to pay is that the cache
needs to be passed as an argument to virtually every function. Can we just use the same trick we did
for the state? Well, not quite. Contrary to the state, we want to have a workspace per thread and we
certainly don’t want any locking. Enter thread-local storage.
Thread-local storage
Thread-local storage (TLS) allows us to define static variables that have an independent copy per thread:
thread_local!(
    static WORKSPACE: Workspace = const { Workspace(RefCell::new(Vec::new())) }
);
type Atom = Vec<u8>;
pub struct Workspace(RefCell<Vec<Atom>>);
By defining the constructor Workspace::new() as a const function, the initialization check of the
thread-local storage will be compiled away.
Here is what the impl block looks like:
impl Workspace {
    /// Get a thread-local workspace.
    #[inline]
    pub const fn get_local() -> &'static LocalKey<Workspace> {
        &WORKSPACE
    }

    /// Create an atom that will be recycled.
    #[inline]
    pub fn new_atom(&self) -> RecycledAtom {
        if let Ok(mut a) = self.0.try_borrow_mut() {
            if let Some(b) = a.pop() {
                RecyledAtom(b)
            } else {
                RecycledAtom(Atom::default())
            }
        } else {
            RecycledAtom(Atom::default())
        }
    }
}
Contrary to a BufferHandle<‘a> that had a reference to the cache, we now return a RecycledAtom:
pub struct RecycledAtom(Atom);
which is simply a wrapper around an Atom that returns its content to the current thread-local workspace (which may be different from the one it was created in) upon dropping:
impl Drop for RecycledAtom {
    #[inline]
    fn drop(&mut self) {
        let _ = WORKSPACE.try_with(
            #[inline(always)]
            |ws| {
                if let Ok(mut a) = ws.0.try_borrow_mut() {
                    a.push(std::mem::take(&mut self.0));
                }
            },
        );
    }
}
Once again I use try_with instead of unwrapping for small performance gains. I also use #[inline(always)] on the inlined function to make sure it actually gets inlined.
Note that I could have also implemented a custom Drop on Atom directly instead of using RecycledAtom, but I have made a newtype to have a bit more control over which objects are made recyclable.
Whenever a new temporary atom is needed, Workspace::get_local() can now be called:
Workspace::get_local().with(|ws| {
    let atom = ws.new_atom();
    // some operations
});
Leaky optimizations
Since threads in Symbolica are long-lived, as long as the main process itself, we can remove the TLS overhead caused by the code that checks if we are in the clean-up phase of the thread-local storage. This can be achieved by wrapping the workspace in a ManuallyDrop:
thread_local!(
    static WORKSPACE: ManuallyDrop<Workspace> =
            const { ManuallyDrop::new(Workspace(RefCell::new(Vec::new()))) }
);
Buyer beware, as the workspace memory is leaked when the thread finishes (until all threads finish, after which the OS will clean it up). When a thread is short-lived, this memory leak can be avoided by clearing the workspace when the thread finishes.
Conclusion
We have achieved our goal of removing the intrusive passing of the state and cache as arguments to functions by making use of statics, append-only data structures and thread-local storage with minimal overhead. This allows for succinct code in Rust that resembles the use of Symbolica in Python:
use symbolica::{
    fun,
    representations::{Atom, FunctionBuilder},
    state::State,
};

fn main() -> Result<(), String> {
    let x = Atom::parse("x")?;
    let y = Atom::parse("y")?;
    let f_id = State::get_symbol("f");

    let f = fun!(f_id, x, y, Atom::new_num(2));

    let r = (-(&y + &x + 2) * &y * 6).npow(5) / &y * &f / 4;

    println!("{}", r); // (-6*y*(x+y+2))^5*f(x,y,2)/y/4
    Ok(())
}
I hope that the design techniques described in this blog are also useful outside of Symbolica. Please let me know in the comments!
20.10 Once&OnceLock #
Once 是一个用于只进行一次全局初始化的类型,特别适用于 FFI 等场景。
pub struct Once { /* private fields */ }

// 示例
use std::sync::Once;
static START: Once = Once::new();
START.call_once(|| {
    // run initialization here
});


// 另一个例子
use std::sync::Once;
static mut VAL: usize = 0;
static INIT: Once = Once::new();

// Accessing a `static mut` is unsafe much of the time, but if we do so
// in a synchronized fashion (e.g., write once or read all) then we're
// good to go!
//
// This function will only call `expensive_computation` once, and will
// otherwise always return the value returned from the first invocation.
fn get_cached_val() -> usize {
    unsafe {
        INIT.call_once(|| {
            VAL = expensive_computation();
        });
        VAL
    }
}
fn expensive_computation() -> usize {
    // ...
}


// 初始化和查询
use std::sync::Once;
static INIT: Once = Once::new();
assert_eq!(INIT.is_completed(), false);
INIT.call_once(|| {
    assert_eq!(INIT.is_completed(), false);
});
assert_eq!(INIT.is_completed(), true);
Once 类型实现的方法:
impl Once
pub const fn new() -> Once

// Performs an initialization routine once and only once. The given closure will be executed if this
// is the first time call_once has been called, and otherwise the routine will not be invoked.
pub fn call_once<F>(&self, f: F) where F: FnOnce(),
// Performs the same function as call_once() except ignores poisoning.
pub fn call_once_force<F>(&self, f: F) where F: FnOnce(&OnceState),

// Returns true if some call_once() call has completed successfully.
pub fn is_completed(&self) -> bool
Struct std::sync::OnceLock 是线程安全的 Struct std::cell::OnceCell 版本,用于封装 只能写入一次 的变量:
- OnceLock 内部基于 Once 实现,只是 Once 主要供了 call_once () 初始化方法,而 OnceLock 提供了 get/get_or_init/set/take() 等更方便的方法。
- OnceLock 实现了内部可变性,除了 get_mut() 方法是 &mut self 外,其他方法都是 &self 或 self, 而且
OnceLock 实现了 Send/Sync/Clone,所以可以
在多线程环境中无锁使用(不需要 move,也不需要加锁)。
OnceLock 的方法:
impl<T> OnceLock<T>
pub const fn new() -> OnceLock<T>

// Gets the reference to the underlying value.
// Returns None if the cell is empty, or being initialized. This method never blocks.
pub fn get(&self) -> Option<&T>

pub fn get_mut(&mut self) -> Option<&mut T>

// OnceLock 支持内部可变性,下面的方法都是 &self,所以可以同时在多个线程中无锁使用,也不需要 move。
pub fn set(&self, value: T) -> Result<(), T>
pub fn try_insert(&self, value: T) -> Result<&T, (&T, T)>
pub fn get_or_init<F>(&self, f: F) -> &T where F: FnOnce() -> T,
pub fn get_or_try_init<F, E>(&self, f: F) -> Result<&T, E> where F: FnOnce() -> Result<T, E>,

pub fn into_inner(self) -> Option<T>
pub fn take(&mut self) -> Option<T>
示例:
- 在函数内部定义 OnceLock 类型的 static 变量,实现 lazy static 或 memoizing ;
- 实现全局 static 变量;(不需要加锁)
// 在函数内部定义 OnceLock 类型的 static 变量,实现 lazy static 或 memoizing
use std::sync::OnceLock;

struct DeepThought {
    answer: String,
}

impl DeepThought {
    fn new() -> Self {
        Self {
            // M3 Ultra takes about 16 million years in --release config
            answer: Self::great_question(),
        }
    }
}

fn computation() -> &'static DeepThought {
    // n.b. static items do not call [`Drop`] on program termination, so if
    // [`DeepThought`] impls Drop, that will not be used for this instance.
    static COMPUTATION: OnceLock<DeepThought> = OnceLock::new(); // 静态变量,函数返回后还存在。
    COMPUTATION.get_or_init(|| DeepThought::new())
}

// The `DeepThought` is built, stored in the `OnceLock`, and returned.
let _ = computation().answer;
// The `DeepThought` is retrieved from the `OnceLock` and returned.
let _ = computation().answer;


// 另一个例子:在另一个线程中写入 OnceLock
use std::sync::OnceLock;

static CELL: OnceLock<usize> = OnceLock::new();

// `OnceLock` has not been written to yet.
assert!(CELL.get().is_none());

// Spawn a thread and write to `OnceLock`.
std::thread::spawn(|| { // 由于 CELL.get_or_init(&self, f: F) 是 &self,所以不需要 move
    let value = CELL.get_or_init(|| 12345);
    assert_eq!(value, &12345);
})
.join()
.unwrap();

// `OnceLock` now contains the value.
assert_eq!(
    CELL.get(),
    Some(&12345),
);