1 std::alloc #
标准库默认使用 std::alloc::System 作为 global 内存分配器来分配堆内存。
System 实现了 Allocator 和 GlobalAlloc trait:
- unix/linux:使用 malloc 实现。
- windows:使用 HeapAlloc 实现。
程序可以使用 #[global_allocator] 来指定一个实现 std::alloc::GlobalAlloc trait 的自定义 global 内存分配器。
use std::alloc::{GlobalAlloc, System, Layout};

struct MyAllocator;

unsafe impl GlobalAlloc for MyAllocator {
    unsafe fn alloc(&self, layout: Layout) -> *mut u8 {
        System.alloc(layout)
    }

    unsafe fn dealloc(&self, ptr: *mut u8, layout: Layout) {
        System.dealloc(ptr, layout)
    }
}

#[global_allocator]
static GLOBAL: MyAllocator = MyAllocator;

fn main() {
    let mut v = Vec::new(); // 使用 GLOBAL 内存分配器
    v.push(1);
}

// 使用 jemalloc 内存分配器
use jemallocator::Jemalloc;

#[global_allocator]
static GLOBAL: Jemalloc = Jemalloc; // Jemalloc 是 unit struct 类型

fn main() {}
std::alloc::Allocator trait 定义内存分配接口,根据传入的 std::alloc::Layout 的 align/size 等要求分配内存:
pub unsafe trait Allocator {
    // Required methods
    fn allocate(&self, layout: Layout) -> Result<NonNull<[u8]>, AllocError>;
    unsafe fn deallocate(&self, ptr: NonNull<u8>, layout: Layout);
    //...
}

pub struct Layout { /* private fields */ }

// 创建 T 类型的 Layout
pub const fn new<T>() -> Layout

// 从 T 的 value 创建 Layout
pub fn for_value<T>(t: &T) -> Layout where T: ?Sized
pub unsafe fn for_value_raw<T>(t: *const T) -> Layout where T: ?Sized

pub const fn from_size_align(size: usize, align: usize ) -> Result<Layout, LayoutError>
pub const unsafe fn from_size_align_unchecked( size: usize, align: usize ) -> Layout

// 获得 Layout 的 size 和 align 信息
pub const fn size(&self) -> usize
pub const fn align(&self) -> usize
pub fn dangling(&self) -> NonNull<u8>
pub fn align_to(&self, align: usize) -> Result<Layout, LayoutError>
pub fn padding_needed_for(&self, align: usize) -> usize
pub fn pad_to_align(&self) -> Layout
pub fn repeat(&self, n: usize) -> Result<(Layout, usize), LayoutError>
pub fn extend(&self, next: Layout) -> Result<(Layout, usize), LayoutError>
pub fn repeat_packed(&self, n: usize) -> Result<Layout, LayoutError>
pub fn extend_packed(&self, next: Layout) -> Result<Layout, LayoutError>
pub fn array<T>(n: usize) -> Result<Layout, LayoutError>
std::alloc module 提供如下内存分配函数(使用缺省的 Global 分配器,返回 raw pointer,如 *mut u8):
alloc: Allocate memory with the global allocator.alloc_zeroed: Allocate zero-initialized memory with the global allocator.dealloc: Deallocate memory with the global allocator.handle_alloc_error: Signal a memory allocation error.realloc: Reallocate memory with the global allocator.
这些函数没有返回错误,需要根据返回的 raw pointer 是否为 null 来判断是否分配成功:
- handle_alloc_error(layout) :用来处理分配错误情况,默认的行为是在 stderr 打印消息并
abort 进程。 - set_alloc_error_hook() 和 take_alloc_error_hook(): 设置调用 handle_alloc_error() 时的行为:panic 或 abort;
// Allocate memory with the global allocator.
pub unsafe fn alloc(layout: Layout) -> *mut u8

  use std::alloc::{alloc, dealloc, handle_alloc_error, Layout};
  unsafe {
      let layout = Layout::new::<u16>();
      let ptr = alloc(layout); // ptr 是 *mut u8 类型
      if ptr.is_null() {
          handle_alloc_error(layout);
      }

      *(ptr as *mut u16) = 42;
      assert_eq!(*(ptr as *mut u16), 42);

      dealloc(ptr, layout);
  }

// Allocate zero-initialized memory with the global allocator.
pub unsafe fn alloc_zeroed(layout: Layout) -> *mut u8

  use std::alloc::{alloc_zeroed, dealloc, Layout};
  unsafe {
      let layout = Layout::new::<u16>();
      let ptr = alloc_zeroed(layout);

      assert_eq!(*(ptr as *mut u16), 0);

      dealloc(ptr, layout);
  }

// Deallocate memory with the global allocator.
pub unsafe fn dealloc(ptr: *mut u8, layout: Layout)

// Reallocate memory with the global allocator.
pub unsafe fn realloc(ptr: *mut u8, layout: Layout, new_size: usize) -> *mut u8

// Registers a custom allocation error hook, replacing any that was previously registered.
pub fn set_alloc_error_hook(hook: fn(_: Layout))

  #![feature(alloc_error_hook)]
  use std::alloc::{Layout, set_alloc_error_hook};
  fn custom_alloc_error_hook(layout: Layout) {
      panic!("memory allocation of {} bytes failed", layout.size());
  }
  set_alloc_error_hook(custom_alloc_error_hook);
2 std::any #
std::any module 提供的函数(type 反射):
type_name::<T>(): 返回 T 类型名称字符串;type_name_of_value(&T): 返回值的类型名称字符串(必须传入 &T);
assert_eq!(std::any::type_name::<Option<String>>(), "core::option::Option<alloc::string::String>",);

use std::any::type_name_of_val;
let s = "foo";
let x: i32 = 1;
let y: f32 = 1.0;
assert!(type_name_of_val(&s).contains("str"));
assert!(type_name_of_val(&x).contains("i32"));
assert!(type_name_of_val(&y).contains("f32"));
std::any::Any trait : Rust 为 绝大部分类型实现了该 trait ,它的 type_id() 方法返回 TypeId 类型对象,表示该 trait object 的具体类型,可以用来进行比较/Hash 和显示:
pub trait Any: 'static {
    fn type_id(&self) -> TypeId;
}
Any: 'static 的含义:
- 这里的 ‘static 是一个 lifetime bound,表示实现 Any trait 的类型必须具有 ‘static 生命周期
- ‘static 意味着这个类型要么:
- 是一个拥有所有权的类型(比如 String, Vec, i32 等)
- 要么只包含 ‘static 引用(比如 &‘static str)
举例说明:
// 这些都是合法的
let x = 42i32;  // i32 满足 'static
let _ = &x as &dyn Any;  // 可以

let s = String::from("hello");  // String 满足 'static
let _ = &s as &dyn Any;  // 可以

let my_i8 = 1i8;
let _myi8 = &my_i8 as &dyn Any;
// 是合法的,因为:
// - i8 是一个具有所有权的类型,它满足 'static 约束
// - 虽然 `my_i8` 本身的生命周期是有限的,但 i8 类型本身满足 'static
// - `&dyn Any` 中的引用可以有任意生命周期,不需要是 'static

// 这个是不合法的
let mut value = String::new();
let ref_to_value = &value;
let _ = ref_to_value as &dyn Any;  // 编译错误,因为引用类型本身不满足 'static
借用类型满足 'static 时可以被转换为 &dyn Any~,对象自身可以转换为 ~Box<dyn Any> 。
use std::fmt::Debug;
use std::any::Any;

// Logger function for any type that implements `Debug`.
// T 实现了 Any,它是一个非借用的值类型,由于 T 实现了 dyn Any, 所以 &T 可以转换为 &dyn Any;
// 但是如果 T 是借用类型,则 &T 必须时 'static 类型的借用。
fn log<T: Any + Debug>(value: &T) {

    // 将借用转换为 &dyn Any
    let value_any = value as &dyn Any;

    // Try to convert our value to a `String`. If successful, we want to
    // output the `String`'s length as well as its value. If not, it's a
    // different type: just print it out unadorned.
    match value_any.downcast_ref::<String>() {
        Some(as_string) => {
            println!("String ({}): {}", as_string.len(), as_string);
        }
        None => {
            println!("{value:?}");
        }
    }
}

// This function wants to log its parameter out prior to doing work with it.
fn do_work<T: Any + Debug>(value: &T) {
    log(value);
    // ...do some other work
}

fn main() {
    let my_string = "Hello World".to_string();
    do_work(&my_string);

    let my_i8: i8 = 100;
    do_work(&my_i8);
}

// 例子
use std::any::{Any, TypeId};

fn is_string<T: ?Sized + Any>(_s: &T) -> bool {
    TypeId::of::<String>() == TypeId::of::<T>()
}
assert_eq!(is_string(&0), false);
assert_eq!(is_string(&"cookie monster".to_string()), true);

// 例子
use std::any::{Any, TypeId};
let boxed: Box<dyn Any> = Box::new(3_i32);

// You're more likely to want this:
let actual_id = (&*boxed).type_id();
// ... than this:
let boxed_id = boxed.type_id();
assert_eq!(actual_id, TypeId::of::<i32>());
assert_eq!(boxed_id, TypeId::of::<Box<dyn Any>>());
&dyn Any 实现了 is<T>()/downcast_ref<T>()/downcast_mut<T>() 方法,可以对 trait object 进行动态类型判断。
- T 必须是具体类型而不能是 trait 类型。
use std::any::Any;

fn is_string(s: &dyn Any) {
    if s.is::<String>() {
        println!("It's a string!");
    } else {
        println!("Not a string...");
    }
}
is_string(&0);
is_string(&"cookie monster".to_string());

fn modify_if_u32(s: &mut dyn Any) {
    if let Some(num) = s.downcast_mut::<u32>() {
        *num = 42;
    }
}

let mut x = 10u32;
let mut s = "starlord".to_string();
modify_if_u32(&mut x);
modify_if_u32(&mut s);
assert_eq!(x, 42);
assert_eq!(&s, "starlord");
三类 Box trait object 都实现了 downcast<T> 和 downcast_unchecked<T> 方法:
- impl<A> Box<dyn Any, A>
- impl<A> Box<dyn Any + Send, A>
- impl<A> Box<dyn Any + Sync + Send, A>
pub fn downcast<T>(self) -> Result<Box<T, A>, Box<dyn Any, A>> where T: Any
pub unsafe fn downcast_unchecked<T>(self) -> Box<T, A> where T: Any

// 示例
use std::any::Any;

fn print_if_string(value: Box<dyn Any>) {
    if let Ok(string) = value.downcast::<String>() {
        println!("String ({}): {}", string.len(), string);
    }
}

let my_string = "Hello World".to_string();
print_if_string(Box::new(my_string));
print_if_string(Box::new(0i8));

#![feature(downcast_unchecked)]
use std::any::Any;
let x: Box<dyn Any> = Box::new(1_usize);
unsafe {
    assert_eq!(*x.downcast_unchecked::<usize>(), 1);
}
3 std::backtrace #
捕获和打印线程的调用栈,捕获调用栈有一定的性能开销,默认是关闭的。
程序二进制需要包含 debug information,否则打印的 backtrace 不显示 filename/line number。
Rust 1.77.0 版本开始,release 默认开启了 strip, 故不包含 debug info 。
Backtrace::capture() 受两个环境变量控制,需要至少设置一个环境变量为非 0 值才会捕获调用栈,否则是关闭的:
RUST_LIB_BACKTRACE: 为 0 时Backtrace::capture不会捕获 backtrace,其它值则启用Backtrace::capture;RUST_BACKTRACE: 如果RUST_LIB_BACKTRACE没有设置,则使用该变量来判断是否捕获 backtrace;
pub fn capture() -> Backtrace // 受环境变量调控
pub fn force_capture() -> Backtrace // 强制捕获, 不参考上面两个环境变了

pub const fn disabled() -> Backtrace // 关闭捕获
pub fn status(&self) -> BacktraceStatus  // 返回是否开启了 Backtrace 捕获
pub fn frames(&'a self) -> &'a [BacktraceFrame]

// 示例
use std::backtrace::Backtrace

fn main() {
    let bt  = Backtrace::force_capture();
    println!("{}", bt); // Backtrace 实现了 Debug 和 Display,打印调用栈。
}
4 std::boxed #
std::boxed module 提供在堆中分配内存的 Box<T> 类型,在堆上分配内存可以避免栈上大内存拷贝。
Box 拥有分配内存的所有权,当 Box 离开作用域时 drop 对应的内存。
std::boxed::Box<T, A=Global> 使用 Global 内存分配器。泛型参数 A 有默认值, 所以一般只指定 T 类型即可, 如 Box<u8>。
Box<T> 大小是编译时已知的,可以保存大小未知的类型对象,如 trait object 以及自引用类型(如树形递归数据结构):
pub struct Box<T, A = Global>(/* private fields */) where A: Allocator, T: ?Sized;

let val: u8 = 5; // 栈变量,栈上分配内存
let boxed: Box<u8> = Box::new(val); // 堆上分配内存

// 使用 Box 保存递归数据类型对象
#[allow(dead_code)]
#[derive(Debug)]
enum List<T> {
    Cons(T, Box<List<T>>),
    Nil,
}

let list: List<i32> = List::Cons(1, Box::new(List::Cons(2, Box::new(List::Nil))));
println!("{list:?}");

// 使用 Box 保存 trait object
let _b: Box<dyn std::fmt::Display> = Box::new(123i32);

// trait object 的两种形式:

// 1. &dyn Trait, &(dyn Trait + 'static + Send + Sync),使用对象引用赋值。
let dsd: &dyn std::fmt::Display = &1i32;

// 2. Box<dyn Trait>,使用对象赋值。
let bo: Box<dyn std::fmt::Display> = Box::new(1i32);
let bo: Box<dyn std::any::Any> = Box::new(1i32);
let bo: Box<&dyn std::fmt::Display> = Box::new(&1i32);

// 以下是 CoerceUnsized trait 实现的 type coercion 转换, 将 &T 隐式转换为 &U(U 必须是 unsized type).
// 常见的 U 类型:1. trait object;2. slice [T];
//
// 当 T 可以 CoerceUnsized 到 U 时,支持 Box<T> -> Box<U>
//
let bo: Box<[i32]> = Box::new([1, 2, 3]); // [T; N] -> [T]
let b1 = Box::new(123i32); // i32 -> dyn std::fmt::Display
let b2: Box<dyn std::fmt::Display> = b1;
Box<T> 没有实现 Copy~,赋值时会被 ~move (其它智能指针 Rc/Arc/Cell/RefCell 类似):
use std::mem;

#[allow(dead_code)]
#[derive(Debug, Clone, Copy)]
struct Point {
    x: f64,
    y: f64,
}

#[allow(dead_code)]
struct Rectangle {
    top_left: Point,
    bottom_right: Point,
}

fn origin() -> Point {
    Point { x: 0.0, y: 0.0 }
}

fn boxed_origin() -> Box<Point> {
    // 在堆上分配 Point
    Box::new(Point { x: 0.0, y: 0.0 })
}

enum List {
    // 元组类型,由于 Box 没有实现 Copy,所以整个元组没有实现 Copy
    Cons(i32, Box<List>),
    Nil,
}

use crate::List::{Cons, Nil};

fn main() {
    let a = Cons(5, Box::new(Cons(10, Box::new(Nil))));

    // a 所有权转移。这里不能传入 &a, 否则只是分配一个指针的空间。
    let b = Cons(3, Box::new(a));

    // 编译器报错,解决办法是使用 Rc<T>
    // let c = Cons(4, Box::new(a));
}
Box<T> 是实现了 Deref<Target=T> 的智能指针,自动解引用和类型转换:
- 使用 * 运算符来解引用:
*v等效于*(v.deref()),返回T 值。而 &*v 来返回&T 值 - 在需要
&T的地方可以直接使用&Box<T>值;
let boxed: Box<u8> = Box::new(5);
let val: u8 = *boxed;

fn hello(name: &str) {
    println!("Hello, {name}!");
}

fn main() {
    let x = 5;
    let y = Box::new(x);
    assert_eq!(5, *y); // *y 等效为 *(y.deref()), 返回 5。

    let boxed: Box<u8> = Box::new(5);
    let val: u8 = *boxed;

    let m = MyBox::new(String::from("Rust"));
    // Rust 自动进行多级 Defer 解引用,也就是 deref coercion:
    //   MyBox<String> -> String -> str
    hello(&m);

    // 如果 Rust 不做 deref coercion,则需要做如下繁琐操作
    hello(&(*m)[..]);
}
只要 T: Sized, 则 Box<T> 将确保可以用一个 single pointer 来代表, 和 C 指针 T*)是 ABI 兼容的=。这意味着 =如果要在 C 中调用 Rust func ,可以在 Rust func 中使用 Box<T> 类型,而在 C side 当作 T* 来使用。但是如果在 Rust func 中调用 C func,则不建议对 C 指针使用 Box<T> 类型,否则是未定义行为。而是尽可能使用 raw pointer;
例如,Rust 实现的,供 C 调用的函数签名 的 header:
/* C header */

/* Returns ownership to the caller */
struct Foo* foo_new(void);

/* Takes ownership from the caller; no-op when invoked with null */
void foo_delete(struct Foo*);
这两个 C 函数的 Rust 实现如下:
#[repr(C)]
pub struct Foo;

#[no_mangle]
pub extern "C" fn foo_new() -> Box<Foo> {
    Box::new(Foo)
}

// foo_delete() 的参数可能是 nullable 指针,而 Box<Foo> 不可能是 null,故需要使用 Option
#[no_mangle]
pub extern "C" fn foo_delete(_: Option<Box<Foo>>) {}
raw pointer 和 Box 对象相互转换:
let value = &mut 32 as *mut i32;
let box = Box::<i32>::from_raw(value);

let value2 = &*box as *const i32;
5 std::cell #
Rust 对象只能有一个所有者,对象借用需要满足借用规则,如不能通过共享借用 &T 修改 T 值。
在不可变对象中引入可变性,称为 内部可变性(interior mutability) 。
std::cell module 提供了多种内部可变性类型, 即可以通过 &T 来修改引用的对象:
Cell<T>: T 类型必须实现 Copy trait;RefCell<T>: T 不需要实现 Copy,如果不满足规则会导致运行时 panic;OnceCell<T>: 对 T 只进行一次初始化。(不支持多线程,多线程版本是OnceLock);LazyCell<T>: 和 OnceCell 类似,但是通过 Deref 机制自动初始化一次。(不支持多线程,多线程版本是LazyLock);
各种 Cell 都没有实现 Sync,故只能在单线程环境中使用。
在多线程环境中,Mutex<T>, RwLock<T>, OnceLock<T>, LazyLock<T> 和各种 automic 类型实现了内部可变性,一般使用它们的 const 值作为全局变量,如 const count: AutomicUsize = AtomicUsize::new(1);,虽然 count 不是 static mut 类型,但是也可以修改。
Cell<T>:T 类型需要实现 Copy trait:
- Cell::new(value):转移 value 对象的所有权;
- cell.get():使用对象的 Copy trait 来返回 value;
- cell.set(&self, value: T):先使用 Copy trait 来返回旧对象,然后设置为传入的值,drop 旧对象;
use std::cell::Cell;

pub struct SpiderRobot {
    // ...
    hardware_error_count: Cell<u32>,
    // ...
}

impl SpiderRobot {
    pub fn add_hardware_error(&self) {
        let n = self.hardware_error_count.get();
        // self 是 & 而非 &mut。
        self.hardware_error_count.set(n + 1);
    }

    pub fn has_hardware_errors(&self) -> bool {
        self.hardware_error_count.get() > 0
    }
}
如果 T 类型没实现 Copy trait 则不能使用 Cell<T>,但可以使用 RefCell<T>:
- RefCell::new(value) : 转移 value 的所有权;
- ref_cell.borrow():返回对象的共享借用类型
Ref<T>, 如果该对象已经被可变借用,则运行时 panic; - ref_cell.borrow_mut() :返回对象的可变借用类型
RefMut<T>,如果对象已经被共享借用,则运行时 panic; - ref_cell.try_borrow() 和 ref_cell.try_borrow_mut():返回 Result 供运行时检查,可以避免 panic;
borrow()/borrow_mut() 返回的 Ref<T>/RefMut<T> 是智能指针,实现了 Deref/DerefMut<Target=T>, 故可以直接调用 T 的方法。
对于已经调用 .borrow() 的 r 不能再调用 borrow_mut(), 否则会导致运行时 panic,反之依然。
- Rust 对引用和智能指针进行
编译时检查, 但对 RefCell<T> 在在运行时检查,违反借用的情况下触发 panic 并终止程序。
use std::cell::RefCell;

let ref_cell: RefCell<String> =  RefCell::new("hello".to_string());

let r = ref_cell.borrow();
let count = r.len();
assert_eq!(count, 5);

let mut w = ref_cell.borrow_mut(); // panic: already borrowed
w.push_str(" world");

pub struct SpiderRobot {
    // ...
    log_file: RefCell<File>,
    // ...
}

impl SpiderRobot {
    pub fn log(&self, message: &str) {
        let mut file = self.log_file.borrow_mut(); // file 是 RefMut<&str> 类型
        writeln!(file, "{}", message).unwrap();
    }
}
OnceCell 只初始化一次,是具有内部可变性的智能指针:
- 一般使用
get_or_init()方法来进行初始化,传入的闭包函数返回保存的内部对象。 - 没有实现 Sync,故不能在多线程环境中使用,但可以使用
std::sync::OnceLock;
use std::cell::OnceCell;

let cell = OnceCell::new();

// get() 返回 Option,如果未设置则返回 None
assert!(cell.get().is_none());

// cell 虽然没加 mut,但具有内部可变性。
let value: &String = cell.get_or_init(|| {
    "Hello, World!".to_string() // 闭包返回保存的内部对象,get_or_init() 返回它的引用。
});
assert_eq!(value, "Hello, World!");
assert!(cell.get().is_some());

// set(): 如果已设置,则返回 Err
let cell = OnceCell::new();
assert!(cell.get().is_none());
assert_eq!(cell.set(92), Ok(()));
assert_eq!(cell.set(62), Err(62));
assert!(cell.get().is_some());
LazyCell 和 OnceCell 类似,但是在 new() 函数中传入初始化逻辑,通过实现 Deref<Target=T> 来 第一次解引用时自动调用 :
- LayCell 不支持在多线程环境中使用,可以使用
std::sync::LazyLock;
use std::cell::LazyCell;

let lazy: LazyCell<i32> = LazyCell::new(|| {
    println!("initializing");
    92
});
println!("ready");
println!("{}", *lazy);
println!("{}", *lazy);
Rc/Arc<T> 是引用计数实现的共享,T 只能是 共享引用类型 ,一般使用内部可变性类型对象来实现 可修改的单例模式 :
use std::cell::{RefCell, RefMut};
use std::collections::HashMap;
use std::rc::Rc;

fn main() {
    let shared_map: Rc<RefCell<_>> = Rc::new(RefCell::new(HashMap::new()));

    // Create a new block to limit the scope of the dynamic borrow
    {
        let mut map: RefMut<'_, _> = shared_map.borrow_mut();
        map.insert("africa", 92388);
        map.insert("kyoto", 11837);
        map.insert("piccadilly", 11826);
        map.insert("marbles", 38);
    }

    // Note that if we had not let the previous borrow of the cache fall out
    // of scope then the subsequent borrow would cause a dynamic thread panic.
    // This is the major hazard of using `RefCell`.
    let total: i32 = shared_map.borrow().values().sum();
    println!("{total}");
}

// 多线程安全的全局对象
static GLOBL :Arc<Mutex<i32>> = Arc::new(Mutex::New(1));
6 std::collector #
数组 [N; T] 和容器类型都没有实现 Display trait , 但实现了 Debug trait 。
Option/Result 是 enum 类型,支持迭代,效果就如一个或 0 个元素。
6.1 Vec #
Vec 是动态大小, 在堆上分配的连续内存块,可以被 index 操作。&v[a..b] 生成指向对应内存区域的 slice 的借用(v[a..b] 返回的 slice 是 unsized,故需要加引用)。有三个字段: 长度, 容量和指向堆内存首地址的指针。
Rust 自动扩充 Vec 大小, 这种扩容将老的 Vec 内容 move 到新的连续内存块, 所以:
- 有性能开销, 涉及到内存数据的复制移动;
- 会导致已有的 Vec Item 的引用失效, 所以在有共享引用的情况下不能修改 Vec;
为了避免容量增长带来的开销, 使用 Vec::with_capacity(n) 来一次性创建容量为 n 的 Vec。
Vec 能高效的在尾部 push/pop 操作, 如果在中间 insert/remove 元素则涉及后续元素的移动, 所以 Vec 越长, 中间插入和删除元素性能越差。
Vec 的 index 操作:
- vec[a..b] :a 和 b 是 usize 类型, 必须小于 vec.len(),否则 panic;
- vec.get(index):返回一个 Option, 当 index 不存在时返回 None;
// 创建一个空的 vector, len/capacity 均为 0
let mut numbers: Vec<i32> = vec![];

// 用给定的内容创建一个vector, len/capacity 等于元素数目
let words = vec!["step", "on", "no", "pets"];
let mut buffer = vec![0u8; 1024]; // 1024 个 0字节

// 将 set 转换成 Vec
let my_vec = my_set.into_iter().collect::<Vec<String>>();

// 获取一个元素的引用
let first_line = &lines[0];

// 获取一个元素的拷贝
let fifth_number = numbers[4];
let second_number = lines[1].clone();

// 获取一个切片的引用
let my_ref = &buffer[4..12];

// 获取一个切片的拷贝:slice.to_vec(), Clone 切片生成 Vec
let my_copy = buffer[4..12].to_vec(); // Vec<T>
let v = [1, 2, 3, 4, 5, 6, 7, 8, 9];
assert_eq!(v.to_vec(), vec![1, 2, 3, 4, 5, 6, 7, 8, 9]);
assert_eq!(v[0..6].to_vec(), vec![1, 2, 3, 4, 5, 6]);

// 将 iterable 的所有 item 按顺序添加到 vec 的末尾。iterable 参数可以是任何实现了 IntoIterator<Item=T>。
vec.extend(iterable);

// 类似于 vec.truncate(index),但返回一个 Vec 包含 index 及以后的元素, 原来的 vec 只包含 index 前的元素。
vec.split_off(index);

// 将 vec2 的内容添加到 vec, 然后 vec2 被清空. 类似于 vec.extend(vec2),除了调用之后 vec2 仍然存在,并且容量不变。
vec.append(&mut vec2);

// 从 vec 中移除范围 vec[range],并返回一个被移除元素的迭代器,其中 range 是一个范围值,例如 .. 或0..4。
vec.drain(range);

// 移除所有没有通过给定测试的方法。类似于 vec = vec.into_iter().filter(test).collect();
vec.retain(test);
借用 Vec 元素时,不能修改 Vec(修改 Vec 时可能会重新分配内存,从而导致借用失效),也不能同时 &mut 借用 Vec 的多个元素:
let mut v = vec![0, 1, 2, 3];
let a = &mut v[i];
let b = &mut v[j]; // error: 不能同时借用 v 的多个可变引用。

let first = &v[0];
v.push(6) // erorr:first 共享借用 Vec,不能再修改(需要可变借用)Vec
println!("{}", first);
如果 T 支持 = 和! 运算符,那么数组 [T; N]、切片 [T]、向量 Vec<T> 也支持这些运算符。
如果 T 支持运算符 <、<=、>、>=(PartialOrd trait,见顺序性比较),那么 T 的数组、切片和向量也支持。
由于 Vec<T> 可以被 Deref<Targe=[T]> , 所以 Vec 类型对象也可以使用 slice [T] 的方法:
Vec 方法:
// 创建
pub const fn new() -> Vec<T>
    let mut vec: Vec<i32> = Vec::new();

pub fn with_capacity(capacity: usize) -> Vec<T>
    let mut vec = Vec::with_capacity(10);
    assert_eq!(vec.len(), 0);
    assert!(vec.capacity() >= 10);

pub unsafe fn from_raw_parts( ptr: *mut T, length: usize, capacity: usize ) -> Vec<T>

pub const fn new_in(alloc: A) -> Vec<T, A>
pub fn with_capacity_in(capacity: usize, alloc: A) -> Vec<T, A>
pub unsafe fn from_raw_parts_in( ptr: *mut T, length: usize, capacity: usize, alloc: A ) -> Vec<T, A>

pub fn into_raw_parts(self) -> (*mut T, usize, usize)
pub fn into_raw_parts_with_alloc(self) -> (*mut T, usize, usize, A)

pub fn capacity(&self) -> usize

// 确保 capacity() >= len() + additional
pub fn reserve(&mut self, additional: usize)
    let mut vec = vec![1];
    vec.reserve(10);
    assert!(vec.capacity() >= 11);

pub fn reserve_exact(&mut self, additional: usize)
pub fn try_reserve(&mut self, additional: usize) -> Result<(), TryReserveError>
pub fn try_reserve_exact( &mut self, additional: usize ) -> Result<(), TryReserveError>

pub fn shrink_to_fit(&mut self)
    let mut vec = Vec::with_capacity(10);
    vec.extend([1, 2, 3]);
    assert!(vec.capacity() >= 10);
    vec.shrink_to_fit();
    assert!(vec.capacity() >= 3);

// 将 vector 的 capacity 收缩到指定的最小值
pub fn shrink_to(&mut self, min_capacity: usize)
    let mut vec = Vec::with_capacity(10);
    vec.extend([1, 2, 3]);
    assert!(vec.capacity() >= 10);
    vec.shrink_to(4);
    assert!(vec.capacity() >= 4);
    vec.shrink_to(0);
    assert!(vec.capacity() >= 3);

// 将 vec 转换为 Box<[T]> , 该方法会丢弃 capacity 超过 shink_to_fit 的空间
pub fn into_boxed_slice(self) -> Box<[T], A>
    let mut vec = Vec::with_capacity(10);
    vec.extend([1, 2, 3]);
    assert!(vec.capacity() >= 10);
    let slice = vec.into_boxed_slice();
    assert_eq!(slice.into_vec().capacity(), 3);

pub fn truncate(&mut self, len: usize)
    let mut vec = vec![1, 2, 3];
    vec.truncate(8);
    assert_eq!(vec, [1, 2, 3]);

// 等效于 &s[..]
pub fn as_slice(&self) -> &[T]
    use std::io::{self, Write};
    let buffer = vec![1, 2, 3, 5, 8];
    io::sink().write(buffer.as_slice()).unwrap();

pub fn as_mut_slice(&mut self) -> &mut [T]
pub fn as_ptr(&self) -> *const T
pub fn as_mut_ptr(&mut self) -> *mut T

// 返回底层使用的内存分配器
pub fn allocator(&self) -> &A

// 将长度设置为 new_len,一般使用安全方法 truncate, resize, extend, or clear.
// new_len 需要小于等于 capacity(), 而且 old_len..new_len must be initialized.
pub unsafe fn set_len(&mut self, new_len: usize)

// 使用 vec 最后一个元素替换 index 元素,返回 index 元素。
// 一般用于修改没有实现 Copy 的 Vec(不能 v[index] = value, 因为 v[index] 会部分转移元素,这是不允许的)
pub fn swap_remove(&mut self, index: usize) -> T
    let mut v = vec!["foo", "bar", "baz", "qux"];
    assert_eq!(v.swap_remove(1), "bar");
    assert_eq!(v, ["foo", "qux", "baz"]);
    assert_eq!(v.swap_remove(0), "foo");
    assert_eq!(v, ["baz", "qux"]);

// 插入和删除元素,会导致后续元素批量移动。
pub fn insert(&mut self, index: usize, element: T)
pub fn remove(&mut self, index: usize) -> T

// 只保留 f 返回 true 的元素
pub fn retain<F>(&mut self, f: F) where F: FnMut(&T) -> bool
    let mut vec = vec![1, 2, 3, 4];
    vec.retain(|&x| x % 2 == 0);
    assert_eq!(vec, [2, 4]);

pub fn retain_mut<F>(&mut self, f: F) where F: FnMut(&mut T) -> bool

// 使用指定 F 来过滤重复的元素,如果连续元素的 F 调用返回值相同则被过滤
pub fn dedup_by_key<F, K>(&mut self, key: F) where F: FnMut(&mut T) -> K, K: PartialEq
    let mut vec = vec![10, 20, 21, 30, 20];
    vec.dedup_by_key(|i| *i / 10);
    assert_eq!(vec, [10, 20, 30, 20]);

pub fn dedup_by<F>(&mut self, same_bucket: F) where F: FnMut(&mut T, &mut T) -> bool
    let mut vec = vec!["foo", "bar", "Bar", "baz", "bar"];
    vec.dedup_by(|a, b| a.eq_ignore_ascii_case(b));
    assert_eq!(vec, ["foo", "bar", "baz", "bar"]);

pub fn push(&mut self, value: T)
pub fn push_within_capacity(&mut self, value: T) -> Result<(), T>
pub fn pop(&mut self) -> Option<T>

// 将 other 的元素移动到 self,other 被清空(other 没有被 drop,容量不变):
pub fn append(&mut self, other: &mut Vec<T, A>)
    let mut vec = vec![1, 2, 3];
    let mut vec2 = vec![4, 5, 6];
    vec.append(&mut vec2);
    assert_eq!(vec, [1, 2, 3, 4, 5, 6]);
    assert_eq!(vec2, []);

// 从 self 删除 range 的元素,返回 range 元素的迭代器
pub fn drain<R>(&mut self, range: R) -> Drain<'_, T, A> where R: RangeBounds<usize>
    let mut v = vec![1, 2, 3];
    let u: Vec<_> = v.drain(1..).collect();
    assert_eq!(v, &[1]);
    assert_eq!(u, &[2, 3]);
    // A full range clears the vector, like `clear()` does
    v.drain(..);
    assert_eq!(v, &[]);

pub fn clear(&mut self)
pub fn len(&self) -> usize
pub fn is_empty(&self) -> bool

// 将 self 从 at 位置切分为两个,self 为 at 前元素,返回 at 及以后的元素
pub fn split_off(&mut self, at: usize) -> Vec<T, A> where A: Clone
    let mut vec = vec![1, 2, 3];
    let vec2 = vec.split_off(1);
    assert_eq!(vec, [1]);
    assert_eq!(vec2, [2, 3]);

// 调整 vec,使其长度达到 new_len, 新的元素使用 f 返回
pub fn resize_with<F>(&mut self, new_len: usize, f: F) where F: FnMut() -> T
    let mut vec = vec![1, 2, 3];
    vec.resize_with(5, Default::default);
    assert_eq!(vec, [1, 2, 3, 0, 0]);
    let mut vec = vec![];
    let mut p = 1;
    vec.resize_with(4, || { p *= 2; p });
    assert_eq!(vec, [2, 4, 8, 16]);

// 返回一个具有指定 lifetime 的 slice
pub fn leak<'a>(self) -> &'a mut [T] where A: 'a

pub fn spare_capacity_mut(&mut self) -> &mut [MaybeUninit<T>]
pub fn split_at_spare_mut(&mut self) -> (&mut [T], &mut [MaybeUninit<T>])

pub fn resize(&mut self, new_len: usize, value: T)
    let mut vec = vec!["hello"];
    vec.resize(3, "world");
    assert_eq!(vec, ["hello", "world", "world"]);
    let mut vec = vec![1, 2, 3, 4];
    vec.resize(2, 0);
    assert_eq!(vec, [1, 2]);

pub fn extend_from_slice(&mut self, other: &[T])
    let mut vec = vec![1];
    vec.extend_from_slice(&[2, 3, 4]);
    assert_eq!(vec, [1, 2, 3, 4]);

pub fn extend_from_within<R>(&mut self, src: R) where R: RangeBounds<usize>

// 将 range 元素用 replace_with 替换, 返回替换前的 range 元素
pub fn splice<R, I>( &mut self, range: R, replace_with: I) -> Splice<'_, <I as IntoIterator>::IntoIter, A>
  where R: RangeBounds<usize>, I: IntoIterator<Item = T>
    let mut v = vec![1, 2, 3, 4];
    let new = [7, 8, 9];
    let u: Vec<_> = v.splice(1..3, new).collect();
    assert_eq!(v, &[1, 7, 8, 9, 4]);
    assert_eq!(u, &[2, 3]);

pub fn extract_if<F>(&mut self, filter: F) -> ExtractIf<'_, T, F, A> where F: FnMut(&mut T) -> bool
    #![feature(extract_if)]
    let mut numbers = vec![1, 2, 3, 4, 5, 6, 8, 9, 11, 13, 14, 15];
    let evens = numbers.extract_if(|x| *x % 2 == 0).collect::<Vec<_>>();
    let odds = numbers;
    assert_eq!(evens, vec![2, 4, 6, 8, 14]);
    assert_eq!(odds, vec![1, 3, 5, 9, 11, 13, 15]);
6.2 VecDeque #
VecDeque 是动态大小, 在堆上分配的环形缓冲区, 有 start 和 end 指针。
VecDeque主要是能快速在开头和尾部 push/pop 元素。和 Vec 不同的是, 数据并不一定从内存区域的开始存储, 也可以在尾部自动回环, 所以内存不一定连续,故它没有实现 Deref<Target=[T]> ,不能通过 slice 操作来创建 slice 和调用 slice 的方法。
VecDeque 支持 index 操作, 如 deque[index],但是不支持 range slice。
pub fn front(&self) -> Option<&T>
pub fn front_mut(&mut self) -> Option<&mut T>

pub fn back(&self) -> Option<&T>
pub fn back_mut(&mut self) -> Option<&mut T>

pub fn pop_front(&mut self) -> Option<T>
pub fn pop_back(&mut self) -> Option<T>

pub fn push_front(&mut self, value: T)
pub fn push_back(&mut self, value: T)

pub fn binary_search(&self, x: &T) -> Result<usize, usize>

6.3 LinkedList #
LinkedList 是双端链接的 List,它允许从两端 push 和 pop 元素。
use std::collections::LinkedList;

let list = LinkedList::from([1, 2, 3]);
部分方法:
pub const fn new() -> LinkedList<T>
pub fn append(&mut self, other: &mut LinkedList<T>)

pub fn front(&self) -> Option<&T>
pub fn front_mut(&mut self) -> Option<&mut T>
pub fn back(&self) -> Option<&T>
pub fn back_mut(&mut self) -> Option<&mut T>
pub fn push_front(&mut self, elt: T)
pub fn pop_front(&mut self) -> Option<T>
pub fn push_back(&mut self, elt: T)
pub fn pop_back(&mut self) -> Option<T>
6.4 BinaryHeap #
BinaryHeap<T> 集合始终以某种形式组织元素,最大元素总是会被移动到队列的首部。
BinaryHeap 并不仅限于数字,它可以包含任何实现了 Ord trait 的类型。
BinaryHeap 可以用作一个工作队列:定义一个任务结构体,然后根据任务的优先级实现 Ord,让高优先的任务大于低优先级的任务。然后创建一个 BinaryHeap 来保存所有待办的任务。它的 .pop() 方法将总是返回最重要的任务。
heap.push(value); // 向堆中添加一个元素
heap.pop(); // 移除并返回堆中最大的值。返回 Option<T>,如果堆为空时返回 None。
heap.peek(); // 返回堆中最大的值的引用。返回类型是 Option<&T>。

if let Some(top) = heap.peek_mut() {
    if *top > 10 {
        PeekMut::pop(top);
    }
}

use std::collections::BinaryHeap;

let mut heap = BinaryHeap::from(vec![2, 3, 8, 6, 9, 5, 4]);
// 值 9 在堆的顶部:
assert_eq!(heap.peek(), Some(&9));
assert_eq!(heap.pop(), Some(9));
// 移除 9 也会重新排布其他元素,把 8 移动到头部等:
assert_eq!(heap.pop(), Some(8));
assert_eq!(heap.pop(), Some(6));
assert_eq!(heap.pop(), Some(5));
BinaryHeap 是可迭代的对象,并且它有 .iter() 方法,但这个迭代器 以任意顺序 产生堆中的元素。为了按照大小顺序消耗 BinaryHeap 中的值,可以使用 while-pop 循环:
while let Some(task) = heap.pop() {
    handle(task);
}
6.5 HashMap/BTreeMap #
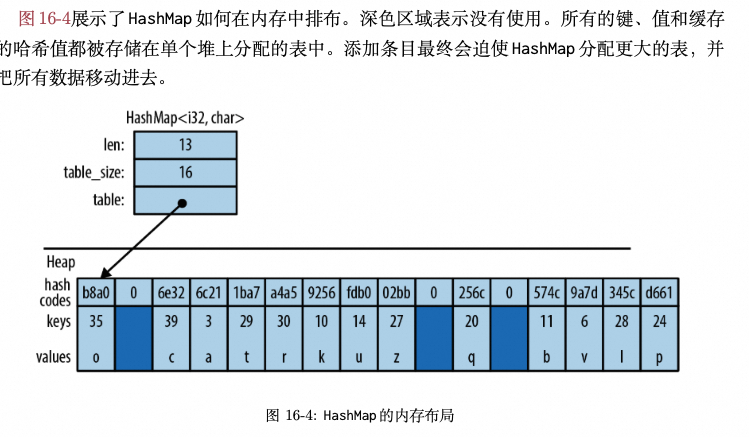
HashMap 是键值对(称为条目 entry)的集合,条目的键都不同,方便高效查找。
两种 map 类型: HashMap<K, V> 和 BTreeMap<K, V> ,共享了很多相同的方法, 不同之处在于它们组织条目的方式。
-
HashMap: 把键和值都存储在哈希表中,因此它要求键的类型 K 实现了
Hash 和 Eq:- bool、int、uint、String、&str 等;
- float 没有实现这两个 trait,不能用于 key;
- 对于 collection,如果它们的元素类型都实现了 Hash 和 Eq,则 collection 也实现了 Hash 和 Eq,例如 Vec<u8>;
-
BTreeMap: 按照键的顺序在
树形结构中存储条目,键的类型 K 需要实现Ord。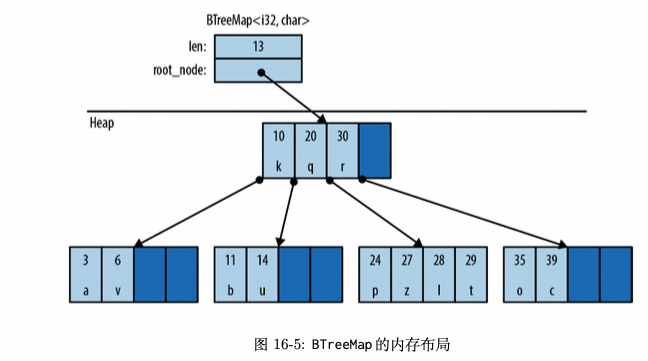
总结:
- HashMap 使用
一块连续的heap 来保存元素, map 容量增加时需要分配一块新的连续内存区域, 并将老的元素移动过去,有一定性能开销; - BTreeMap 是使用 Node 来保存元素, 不是连续内存区域,
便于随机插入和读取;
// 如果 map 里有给定 key 的条目则返回 true。
map.contains_key(&key);

// 在 map 中查找给定 key 的条目。如果找到了匹配的条目,就返回 Some(r),其中 r 是相应的值的引用。否则返回 None。
map.get(&key);
在查询 map 时,传入的 key 类型 B 和 map 定义的 key 类型 K 可以不一致,但需要满足 B = Borrow<K>; 。
Rust 为 &T/T/&mut T 都实现了 Borrow<T>,所以如果 K 是 String 类型,则 B 可以是 String、&String 或 &str 类型。
- impl<T> Borrow<T> for &T
- impl<T> Borrow<T> for &mut T
- impl<T> Borrow<T> for T
map 实现了 Index trait~,支持 ~map[&key] 操作,然而如果没有给定的 key 的条目存在,=则会 panic= ,就类似越界访问数组一样。
不支持 map[&key] = value 赋值 ,但可以使用 map.insert(key, value) 来插入和返回值(旧值)。
BTreeMap<K, V> 按照键的顺序保存条目,它支持一个附加的操作 btree_map.split_off(&key) :把 btree_map 分割成两个。键小于 key 的条目被留在 btree_map 中,返回一个包含其余条目的新BTreeMap<K, V>。
map 支持 Entry 操作:
let record = student_map.entry(name.to_string()).or_insert_with(Student::new);
student_map.entry(name.to_string()) 返回的 Entry 值类似于 可变引用 ,它指向 map 中一个已经被键值对占据 (occupied) 的位置或者是空的 (vacant) 的位置。如果为空,条目的 .or_insert_with() 方法会插入一个新的 Student。
- Entry 以 &mut 获得 map 的可变引用;
- entry(key) 的 key 类型必须和 map key 类型
一致,不支持 k = Borrowed<Q>; - or_insert()/or_insert_with()/or_default():用于确保当 entry key 不存在时,插入一个对象值并返回该值的 &mut 借用。
- entry(key).and_modify(fn).or_insert(value): 在 key 存在时,并不会先插入 value 再调用 fn,而是插入 value。
// 返回一个 Entry。如果 map 没有这个 key,返回一个空的 Entry。这个方法以 &mut 获取 self 参数,并返回一个生命周期相同的 Entry:
pub fn entry<'a>(&'a mut self, key: K) -> Entry<'a, K, V>

// Entry 类型有一个生命周期参数'a,因为它是 map 的 &mut 借用。只要 Entry 存在,它就有 map 的独占访问权限。
// entry() 方法的 key 是 K 类型,而不是 Borrow<Q> 类型, 所以如果 map key 是 String 类型就不能传入 &str 。
map.entry(key);

// 确保 map 包含给定的 key 的条目,如果需要的话用给定的 value 插入一个新的条目,它返回新插入的或者现有的值的 &mut。
map.entry(key).or_insert(value);

// 确保 map 包含给定的 key 的条目,如果需要的话用 Default::default() 返回的值插入一个新条目
map.entry(key).or_default();

// 除了当它需要创建新的条目时,它会调用 default_fn() 来产生默认值。
map.entry(key).or_insert_with(default_fn);

// 如果给定的 key 的条目存在就调用 closure,值的可变引用传进闭包, 返回 Entry,因此它可以和其它方法链式调用。
map.entry(key).and_modify(closure);

  let mut vote_counts: HashMap<String, usize> = HashMap::new();
  for name in ballots {
      // .or_insert() 返回一个可变引用,因此 count 的类型是 &mut usize。
      let count = vote_counts.entry(name).or_insert(0);
      *count += 1;
  }

  let mut word_occurrence: HashMap<String, HashSet<String>> = HashMap::new();
  for file in files {
      for word in read_words(file)? {
          let set = word_occurrence.entry(word).or_insert_with(HashSet::new);
          set.insert(file.clone());
      }
  }

  let mut word_frequency: HashMap<&str, u32> = HashMap::new();
  for c in text.split_whitespace() {
      word_frequency.entry(c)
          .and_modify(|count| *count += 1)
          .or_insert(1);
  }
迭代 map: 返回的 key 都是共享引用,不能对 key 进行修改。
for (k, v) in map: 产生(K, V)对, 消耗 map。for (k, v) in &map: 产生(&K, &V)对。for (k, v) in &mut map:产生(&K, &mut V)对。map.keys(): 返回一个只迭代键的迭代器,返回 &‘a K 。map.values():返回一个只迭代值的迭代器,返回 &‘a V。map.values_mut():返回一个只迭代值的迭代器,返回 &‘a mut V。
HashMap 迭代器都会以 任意顺序 访问条目。BTreeMap 的迭代器按照 键顺序 访问。
6.6 HashSet/BTreeSet #
Rust 的 HashSet<T> 和 BTreeSet<T> 被实现为 HashMap<T, ()> 和 BTreeMap<T, ()> 的浅包装。
HashMap 和 HashSet 的 key 必须要实现 Hash 和 Eq。
两种迭代 set 的方法:
- 以值迭代: for v in set,产生成员(消耗 set)。
- 以共享引用迭代:for v in &set 或 for v in set.iter(), 产生成员的共享引用。
不支持以 &mut 迭代 set,也没有方法获取 set 中值的 &mut 引用。
- 这是因为 set 是值为 () 的 HashMap,而 HashMap 是不支持修改 key 的。
HashSet 迭代器类似于 HashMap 的迭代器,以任意顺序产生值。
BTreeSet 迭代器按顺序产生值,类似于一个排序过的 Vec。
set 的方法:
- set.get(&value): 返回 value 的共享引用,类型是 Option<&T>;
- set.take(&value): 与 set.remove(&value) 类似,返回移除的值,类型是 Option<&T>;
- set.replace(value);
两个 set 间的方法:
- set1.intersection(&set2) : 返回同时出现在 set1 和 set2 中的值的迭代器;
- &set1 & &set2: 返回一个新 set,是 set1 和 set2 的交集;
- set1.union(&set2): 返回并集迭代器;等效于&set1 | &set2
- set1.difference(&set2): 返回差集迭代器; 等效于 &set1 - &set2
- set1.symmetric_difference(&set2): 返回对称差(异或)迭代器,等效于: &set1 ^ &set2;
7 std::convert #
Enum std::convert::Infallible 用于 Result 中的 error type, 表示不可能发生的错误(也就是 Result 只能一直是 Ok), 这是通过定义没有 variant 的 enum Infallible 类型来实现的:
pub enum Infallible {}

impl<T, U> TryFrom<U> for T where U: Into<T> {
    type Error = Infallible;

    fn try_from(value: U) -> Result<Self, Infallible> {
        Ok(U::into(value))  // 从不会返回 Err
    }
}
8 std::panic #
panic 是最简单的异常处理机制,它先打印 error message,然后开始 unwinding stack,如果是 main thread panic,则程序退出, 否则,对应的子线程终止,但程序不退出。
unwinding stack 时,Rust 回溯调用栈,drop 调用栈中所有对象和资源。
使用 RUST_BACKTRACE=1 cargo run 命令在 panic 是打印调用栈详情。
如果 panic 是 FFI 调用的外部库函数导致的,则 Rust 不会进行 unwinding stack,而是直接 panic。
在 Cargo.toml 里设置 panic 时不 unwinding stack,而是直接 abort 退出(如果设置了 panic hook,则 abort 退出前会先调用该 hook):
[profile.release]
panic = 'abort'
std::panic::cach_unwind() 捕获闭包中的 panic 并返回一个 Result,当闭包内 panic 时,返回 Err, 否则返回 Ok;
- 如果 panic 使用 unwinding 则会捕获,如果是 abort 则不会捕获;
- 如果设置了 panic hook, 则该 hook 在 panic 被捕获前被 unwinding 先调用;
pub fn catch_unwind<F: FnOnce() -> R + UnwindSafe, R>(f: F) -> Result<R>

// 示例
use std::panic;

let result = panic::catch_unwind(|| {
    println!("hello!");
});
assert!(result.is_ok());

let result = panic::catch_unwind(|| {
    panic!("oh no!");
});
assert!(result.is_err());
std::panic::resume_unwind() 触发一个 不执行 panic hook 的 panic。如果 panic 被配置使用 abort,则该函数会 abort 程序而不是 unwinding:
pub fn resume_unwind(payload: Box<dyn Any + Send>) -> !

// 示例
use std::panic;

let result = panic::catch_unwind(|| {
    panic!("oh no!");
});

if let Err(err) = result {
    panic::resume_unwind(err);
}
std::panic::panic_any(msg: M) 触发执行 panic hook 的 panic,M 可以是任意类型。但 panic!() 的参数只能是和 println!() 类似的格式化字符串。
// msg 可以任意类型(Any + Send)而不只是 string。后续可以使用 PanicInfo::payload() 来获取传入的 msg 对象。
pub fn panic_any<M: 'static + Any + Send>(msg: M) -> !

  panic!();
  panic!("this is a terrible mistake!");
  panic!("this is a {} {message}", "fancy", message = "message");
  std::panic::panic_any(4);
std::panic::set_hook() 设置自定义 panic hook:
- 在 panic runtime 被调用前执行,对于 aborting 和 unwinding
都适用; - 只能生效一个,取代以前的 hook;
- 缺省 hook 是在程序启动时自动注册的,在 stderr 打印 message,并按需打印 backtrace(取决于 RUST_BACKTRACE 环境变量);
pub fn set_hook(hook: Box<dyn Fn(&PanicInfo<'_>) + Sync + Send + 'static>)

// 示例
use std::panic;

panic::set_hook(Box::new(|_| {
    println!("Custom panic hook");
}));

panic!("Normal panic");
std::panic::take_hook() :将 panic hook 设置为缺省 hook:
pub fn take_hook() -> Box<dyn Fn(&PanicInfo<'_>) + Sync + Send + 'static>

use std::panic;

panic::set_hook(Box::new(|_| {
    println!("Custom panic hook");
}));

let _ = panic::take_hook();

panic!("Normal panic");
std::panic::update_hook() :是 take_hook/set_hook() 的原子操作,用来替换当前 hook 并返回以前的 hook:
#![feature(panic_update_hook)]
use std::panic;

// Equivalent to
// let prev = panic::take_hook();
// panic::set_hook(move |info| {
//     println!("...");
//     prev(info);
// );

panic::update_hook(move |prev, info| {
    println!("Print custom message and execute panic handler as usual");
    prev(info);
});

panic!("Custom and then normal");
set_hook/get_hook() 使用的 std::panic::PanicInfo 对象提供了 location()/message()/payload() 方法,用于获得 panic 信息:
use std::panic;

panic::set_hook(Box::new(|panic_info| {
    if let Some(location) = panic_info.location() {
        println!("panic occurred in file '{}' at line {}", location.file(), location.line(), );
    } else {
        println!("panic occurred but can't get location information...");
    }
}));

panic!("Normal panic");
std::panic::set_backtrace_style/get_backtrace_style() :设置和返回 panic 时 panic hook 是否能捕获和显示 backtrace。
- get_backtrace_style() 先查找 set_backtrace_style() 设置的值,如果没有设置则查找
RUST_BACKTRACE环境变量。
#[non_exhaustive]
pub enum BacktraceStyle {
    Short,
    Full,
    Off,
}

pub fn set_backtrace_style(style: BacktraceStyle)
pub fn get_backtrace_style() -> Option<BacktraceStyle>
缺省值使用环境变量 RUST_BACKTRACE 来配置;
- 0 : for BacktraceStyle::Off
- 1 : for BacktraceStyle::Short
- full : for BacktraceStyle::Full
9 std::error #
Rust 提供了两种错误处理机制:
- panic runtime 和接口;
- Result, std::error::Error trait 和用户自定义错误类型;
将 Error 转换为 panic:
- Result::unwrap()
- Result::expect(&str)
Trait std::error::Error 是 Debug + Display 子 trait,Debug 可以由 #derive[Debug] 自动实现,但是 Display 需要手动实现。
pub trait Error: Debug + Display {
    // 返回引发该 Error 的深层次错误,该错误类型必须也实现了 Error trait。
    fn source(&self) -> Option<&(dyn Error + 'static)> { ... }

    // description 和 cause 方法已被弃用。
    fn description(&self) -> &str { ... } // 用 to_string() 代替
    fn cause(&self) -> Option<&dyn Error> { ... } // 用 source() 代替

    // 目前仅标准库内部使用(std::error::Report 的 show_backtrace() 方法需要)
    fn provide<'a>(&'a self, request: &mut Request<'a>) { ... }
}

let err = "NaN".parse::<u32>().unwrap_err();
assert_eq!(err.to_string(), "invalid digit found in string");
自定义实现 Error trait 类型:
- 必须实现 Display 和 Debug trait;
- 可选的,重新定义
Error::source()方法,后续调用该方法获得下一层错误信息;
use std::error::Error;
use std::fmt;

// 自定义错误类型必须同时实现 Debug 和 Display trait
#[derive(Debug)]
struct SuperError {
    source: SuperErrorSideKick,
}

impl fmt::Display for SuperError {
    fn fmt(&self, f: &mut fmt::Formatter<'_>) -> fmt::Result {
        write!(f, "SuperError is here!")
    }
}

impl Error for SuperError {
    fn source(&self) -> Option<&(dyn Error + 'static)> {
        Some(&self.source)
    }
}

#[derive(Debug)]
struct SuperErrorSideKick;

impl fmt::Display for SuperErrorSideKick {
    fn fmt(&self, f: &mut fmt::Formatter<'_>) -> fmt::Result {
        write!(f, "SuperErrorSideKick is here!")
    }
}

// Error 都是可选方法或函数,所以可以不实现。
impl Error for SuperErrorSideKick {}

fn get_super_error() -> Result<(), SuperError> {
    Err(SuperError { source: SuperErrorSideKick })
}

fn main() {
    match get_super_error() {
        Err(e) => {
            println!("Error: {e}");
            // 手动调用 source() 方法来返回内部根因
            println!("Caused by: {}", e.source().unwrap());
        }
        _ => println!("No error"),
    }
}
标准库为实现 Error 的 trait object 提供了 is/downcase_xx<T>() 方法,用于对 Error 类型进行 下钻处理 :
// 下面 3 种类型均提供了如下 4 个方法。
impl dyn Error
impl dyn Error + Send
impl dyn Error + Send + Sync

// 以 impl dyn Error 为例
pub fn is<T>(&self) -> bool where T: Error + 'static
pub fn downcast_ref<T>(&self) -> Option<&T> where T: Error + 'static
pub fn downcast_mut<T>(&mut self) -> Option<&mut T> where T: Error + 'static
pub fn downcast<T>(self: Box<dyn Error> ) -> Result<Box<T>, Box<dyn Error>> where T: Error + 'static
也可以使用 std::error module 提供的两个函数来返回 trait object 的类型引用或值:
- request_ref
- Request a reference of type T from the given impl Error.
- request_value
- Request a value of type T from the given impl Error.
// 从 trait object 返回引用
pub fn request_ref<T, 'a>(err: &'a (impl Error + ?Sized)) -> Option<&'a T> where T: 'static + ?Sized,
  use core::error::Error;
  use core::error::request_ref;

  fn get_str(err: &impl Error) -> &str {
      request_ref::<str>(err).unwrap()
  }

// 从 trait object 返回 value
pub fn request_value<T, 'a>(err: &'a (impl Error + ?Sized)) -> Option<T> where T: 'static,
  use std::error::Error;
  use core::error::request_value;

  fn get_string(err: &impl Error) -> String {
      request_value::<String>(err).unwrap()
  }
Struct std::error::Report<<E=Box<dyn Error>> 用来打印 E 的信息:
pub fn new(error: E) -> Report<E>
pub fn pretty(self, pretty: bool) -> Self
pub fn show_backtrace(self, show_backtrace: bool) -> Self

// 示例
#![feature(error_reporter)]
use std::error::Report;

fn main() -> Result<(), Report<SuperError>> {
    get_super_error()
        .map_err(Report::from)
        .map_err(|r| r.pretty(true).show_backtrace(true))?;
    Ok(())
}

// 输出
// Error: SuperError is here!

// Caused by:
//       SuperErrorSideKick is here!


#![feature(error_reporter)]
use std::error::Report;

let source = SuperErrorSideKickSideKick;
let source = SuperErrorSideKick { source };
let error = SuperError { source };
let report = Report::new(error).pretty(true);
eprintln!("Error: {report:?}");

// 输出
// Error: SuperError is here!

// Caused by:
//    0: SuperErrorSideKick is here!
//    1: SuperErrorSideKickSideKick is here!
std::error::Report 的 show_backtrace() 方法使用 Error 实现的 provide() 方法来打印 backtrace:
#![feature(error_reporter)]
#![feature(error_generic_member_access)]
use std::error::Request;
use std::error::Report;
use std::backtrace::Backtrace;

#[derive(Debug)]
struct SuperErrorSideKick {
    backtrace: Backtrace,
}

impl SuperErrorSideKick {
    fn new() -> SuperErrorSideKick {
        SuperErrorSideKick { backtrace: Backtrace::force_capture() }
    }
}

impl Error for SuperErrorSideKick {
    fn provide<'a>(&'a self, request: &mut Request<'a>) {
        request.provide_ref::<Backtrace>(&self.backtrace);
    }
}

let source = SuperErrorSideKick::new();
let error = SuperError { source };
// show_backtrace 依赖于 Error 实现 provide() 方法。
let report = Report::new(error).pretty(true).show_backtrace(true);
eprintln!("Error: {report:?}");

// 输出:
// Error: SuperError is here!

// Caused by:
//       SuperErrorSideKick is here!

// Stack backtrace:
//    0: rust_out::main::_doctest_main_src_error_rs_1158_0::SuperErrorSideKick::new
//    1: rust_out::main::_doctest_main_src_error_rs_1158_0
//    2: rust_out::main
//    3: core::ops::function::FnOnce::call_once
//    4: std::sys_common::backtrace::__rust_begin_short_backtrace
//    5: std::rt::lang_start::{{closure}}
//    6: std::panicking::try
//    7: std::rt::lang_start_internal
//    8: std::rt::lang_start
//    9: main
//   10: __libc_start_main
//   11: _start
标准库提供了从 &str/String/Cow<'_, str> 到 Box<dyn Error> 的 From trait 实现:
impl<'a> From<&str> for Box<dyn Error + 'a>
impl<'a> From<&str> for Box<dyn Error + Sync + Send + 'a>
impl<'a, 'b> From<Cow<'b, str>> for Box<dyn Error + 'a>
impl<'a, 'b> From<Cow<'b, str>> for Box<dyn Error + Sync + Send + 'a>
impl<'a, E> From<E> for Box<dyn Error + 'a> where E: Error + 'a
impl<'a, E> From<E> for Box<dyn Error + Sync + Send + 'a>  where E: Error + Send + Sync + 'a
impl<'a> From<String> for Box<dyn Error + 'a>
impl<'a> From<String> for Box<dyn Error + Sync + Send + 'a>
10 std::hash #
std::hash module 提供了对 Rust 类型计算 hash 值的支持。hash 值在 HashMap 和 HashSet 中被广泛使用。
std::hash::Hash 是标准库用于可哈希类型的 trait。HashMap 的键和 HashSet 的元素必须实现 Hash 和 Eq。
大多数实现了 Eq 的内建类型也都实现了 Hash。整数类型、char、String 都是可哈希类型。当元素是可哈希类型时,元组、数组、切片、vector 也是可哈希类型。
标准库的原则是不管把一个值存储到哪里或者如何指向它,=它必须有相同的哈希值= ,因此:
- 引用和被引用的值有相同的哈希值。
- Box 和被装箱的值有相同的哈希值。
- 一个 vec 和包含它的所有元素的切片 &vec[..] 有相同的哈希值。
- 一个 String 和一个有相同字符的 &str 有相同的哈希值。
在实现 std::hash::Hash trait 时,使用 std::hash::Hasher 来计算 hash 值:
- 对于任意实现了 Hash 和 Eq 类型,
k1 == k2 -》hash(k1) == hash(k2), HashMap 和 HashSet 都依赖于这个语义; - Rust 为绝大部分标准类型实现了 Hash trait, 如 str/String/Path/PathBuf/Cow 等。
pub trait Hash {
    // Required method
    fn hash<H>(&self, state: &mut H) where H: Hasher;

    // Provided method
    fn hash_slice<H>(data: &[Self], state: &mut H) where H: Hasher, Self: Sized
}

// Hash 基本类型
use std::hash::{DefaultHasher, Hash, Hasher};

let mut hasher = DefaultHasher::new();
7920.hash(&mut hasher);
println!("Hash is {:x}!", hasher.finish());

let numbers = [6, 28, 496, 8128];
Hash::hash_slice(&numbers, &mut hasher);
println!("Hash is {:x}!", hasher.finish());
结构和枚举默认没有实现 Hash,可以派生实现(前提是所有字段实现了 Hash):
use std::hash::{DefaultHasher, Hash, Hasher};

#[derive(Hash)]
struct Person {
    id: u32,
    name: String,
    phone: u64,
}

let person1 = Person {
    id: 5,
    name: "Janet".to_string(),
    phone: 555_666_7777,
};

let person2 = Person {
    id: 5,
    name: "Bob".to_string(),
    phone: 555_666_7777,
};

assert!(calculate_hash(&person1) != calculate_hash(&person2));

fn calculate_hash<T: Hash>(t: &T) -> u64 {
    let mut s = DefaultHasher::new();
    t.hash(&mut s);
    s.finish() // 返回计算的 hash 值,是 u64 类型。
}
也可以手动实现 Hash trait :
use std::hash::{DefaultHasher, Hash, Hasher};

struct Person {
    id: u32,
    name: String,
    phone: u64,
}

impl Hash for Person {
    fn hash<H: Hasher>(&self, state: &mut H) {
        // Rust 已经为基本类型实现了 Hash trait,故可以挨个调用各 field 来计算 hash 值。注意:
        //  1. hash() 方法没有返回值, 传入的 state 对应的 Hasher 内部维护有状态;
        //  2. 不需要调用 state 的 finish() 方法,而在后续对 Person 计算整体 hash 值时才调用该方法。
        self.id.hash(state);
        self.phone.hash(state);
    }
}

let person1 = Person {
    id: 5,
    name: "Janet".to_string(),
    phone: 555_666_7777,
};

let person2 = Person {
    id: 5,
    name: "Bob".to_string(),
    phone: 555_666_7777,
};

assert_eq!(calculate_hash(&person1), calculate_hash(&person2));

fn calculate_hash<T: Hash>(t: &T) -> u64 {
    let mut s = DefaultHasher::new();
    t.hash(&mut s);
    s.finish()
}
Trait std::hash::Hasher 定义了一个 Hash 算法类型需要实现的接口。Hasher 内部包含状态 ,可以多次调用 Hasher 的 write/write_xx() 方法,最终调用 finish() 返回 hash 值:
pub trait Hasher {
    // Required methods
    fn finish(&self) -> u64;
    fn write(&mut self, bytes: &[u8]); // 计算任意字节序列的 hash 值。

    // Provided methods
    fn write_u8(&mut self, i: u8) { ... }
    fn write_u16(&mut self, i: u16) { ... }
    fn write_u32(&mut self, i: u32) { ... }
    fn write_u64(&mut self, i: u64) { ... }
    fn write_u128(&mut self, i: u128) { ... }
    fn write_usize(&mut self, i: usize) { ... }
    fn write_i8(&mut self, i: i8) { ... }
    fn write_i16(&mut self, i: i16) { ... }
    fn write_i32(&mut self, i: i32) { ... }
    fn write_i64(&mut self, i: i64) { ... }
    fn write_i128(&mut self, i: i128) { ... }
    fn write_isize(&mut self, i: isize) { ... }
    fn write_length_prefix(&mut self, len: usize) { ... }
    fn write_str(&mut self, s: &str) { ... } // 计算字符串 hash
}

// 举例
use std::hash::{DefaultHasher, Hasher};

let mut hasher = DefaultHasher::new();
hasher.write_u32(1989);
hasher.write_u8(11);
hasher.write_u8(9);
hasher.write(b"Huh?");
hasher.write(&[1, 2, 3, 4]);
hasher.write(&[5, 6]);
println!("Hash is {:x}!", hasher.finish());
std::hash::DefaultHasher 类型实现了 std::hash::Hasher trait ,它是 HashMap 的 RandomState 的缺省实现。
由于 Hasher 内部包含状态(多次 write,最后 finish() 返回 hash 值),所以对于 HashMap 需要为每一个 key 创建一个 Hasher 来计算这个 key 自己的 hash 值。std:#️⃣:BuildHasher trait 就是来创建该 Hasher 对象的。对于 build_hasher() 返回的 Hasher,相同的输入应该产生相同的 hash 值。
pub trait BuildHasher {
    type Hasher: Hasher;

    // Required method
    fn build_hasher(&self) -> Self::Hasher;

    // Provided method
    fn hash_one<T>(&self, x: T) -> u64
       where T: Hash,
             Self: Sized,
             Self::Hasher: Hasher { ... }
}
std::hash::RandomState struct 实现了 BuildHahser trait, 它是 HashMap 默认的 Hasher:
use std::hash::{BuildHasher, Hasher, RandomState};

let s = RandomState::new();
let mut hasher_1 = s.build_hasher();
let mut hasher_2 = s.build_hasher();

hasher_1.write_u32(8128);
hasher_2.write_u32(8128);

assert_eq!(hasher_1.finish(), hasher_2.finish());
创建 HashMap 时可以指定 BuildHasher:
use std::collections::HashMap;
use std::hash::RandomState;

let s = RandomState::new(); // RandomState 实现了 Trait std::hash::BuildHasher
let mut map = HashMap::with_hasher(s); // s 需要实现 Trait std::hash::BuildHasher
map.insert(1, 2);
11 std::fmt #
std::fmt module 提供的宏函数:
- format!
- write!
- writeln!
- print!
- println!
- eprint!
- eprintln!
- format_args!
format!("{1} {} {0} {}", 1, 2); // => "2 1 1 2"
format!("{argument}", argument = "test");   // => "test"
format!("{name} {}", 1, name = 2);          // => "2 1"
format!("{a} {c} {b}", a="a", b='b', c=3);  // => "a 3 b"

use std::fmt;
use std::io::{self, Write};
let mut some_writer = io::stdout();
write!(&mut some_writer, "{}", format_args!("print with a {}", "macro"));

fn my_fmt_fn(args: fmt::Arguments<'_>) {
    write!(&mut io::stdout(), "{args}");
}
my_fmt_fn(format_args!(", or a {} too", "function"));
使用 write!() 实现 Display trait :
use std::io::Write;

let mut w = Vec::new();
// write!() 返回 std::io::Result, 不能忽略。
let _ = write!(&mut w, "Hello {}!", "world");
格式化:
字符串默认是左对齐,数字是右对齐;- 位置参数和命名参数可以混用,但命名参数必须位于位置参数后面;
- 命名参数的名称也可以是上下文中的变量名称;
语法:
- {:04} 表示显示长度至少为 4(含 0x 前缀,符号位,小数点),但是不限制大于 4 位后的显示长度。
- {:04.3} 的 .3 限制字符串长度为 3,浮点数后的数字为 3 位。
format_string := text [ maybe_format text ] *
maybe_format := '{' '{' | '}' '}' | format
format := '{' [ argument ] [ ':' format_spec ] [ ws ] * '}'
argument := integer | identifier

format_spec := [[fill]align][sign]['#']['0'][width]['.' precision]type
fill := character
align := '<' | '^' | '>'
sign := '+' | '-'
width := count
precision := count | '*'
type := '' | '?' | 'x?' | 'X?' | identifier
count := parameter | integer
parameter := argument '$'
示例:
format!("Hello");                 // => "Hello"
format!("Hello, {}!", "world");   // => "Hello, world!"
format!("The number is {}", 1);   // => "The number is 1"
format!("{:?}", (3, 4));          // => "(3, 4)"
format!("{value}", value=4);      // => "4"
let people = "Rustaceans";
format!("Hello {people}!");       // => "Hello Rustaceans!"
format!("{} {}", 1, 2);           // => "1 2"
format!("{:04}", 42);             // => "0042" with leading zeros
format!("{:#?}", (100, 200));     // #? 表示 pretty print
// => "(
//       100,
//       200,
//     )"

format!("{name} {}", 1, name = 2);          // => "2 1"
format!("{a} {c} {b}", a="a", b='b', c=3);  // => "a 3 b"

// width
// All of these print "Hello x    !"
println!("Hello {:5}!", "x");
println!("Hello {:1$}!", "x", 5);  // N$ 表示取第 N 个参数值为宽度,所以 1$ 取 5
println!("Hello {1:0$}!", 5, "x"); // 0$ 取值 5
println!("Hello {:width$}!", "x", width = 5); // width$ 取值变量 width
let width = 5;
println!("Hello {:width$}!", "x");

// 4.3 中的 4 表示最小宽度,3 表示字符串宽度,小数点后的位数
println!("{:4.3} {:4.3}", "abcde", 11.223333);  // abc  11.223
println!("{:4.3} {:6.3}", "abcde", 11.22); // abc  11.220

// align
assert_eq!(format!("Hello {:<5}!", "x"),  "Hello x    !");
assert_eq!(format!("Hello {:-<5}!", "x"), "Hello x----!");
assert_eq!(format!("Hello {:^5}!", "x"),  "Hello   x  !");
assert_eq!(format!("Hello {:>5}!", "x"),  "Hello     x!");

// Sign/#/0
assert_eq!(format!("Hello {:+}!", 5), "Hello +5!"); // + 显示正负号前缀
assert_eq!(format!("{:#x}!", 27), "0x1b!"); // #x 显示 0x 前缀
assert_eq!(format!("Hello {:05}!", 5),  "Hello 00005!"); // 0 表示宽度不足时补 0
assert_eq!(format!("Hello {:05}!", -5), "Hello -0005!"); // 宽度包含前缀符号和后缀
assert_eq!(format!("{:#010x}!", 27), "0x0000001b!");  // 010 显式 10 位宽度,包括前缀 0x 和后缀 b。

// 精度
//  .5 精度
println!("Hello {0} is {1:.5}", "x", 0.01);
// .N$ 表示取第 N 个位置参数值为精度
println!("Hello {1} is {2:.0$}", 5, "x", 0.01);
println!("Hello {0} is {2:.1$}", "x", 5, 0.01);

// .* 有 3 种风格(建议使用 .N$ 风格):
// 1. {:.*} 表示: 下一个 position arg 为精度(5),后续为要打印的值(0.01)
println!("Hello {} is {:.*}",    "x", 5, 0.01);
// 2. {arg:.*} 表示:先取 arg 为要打印的值(0.01),再去下一个 position arg 为精度(5)
println!("Hello {1} is {2:.*}",  5, "x", 0.01);
println!("Hello {} is {2:.*}",   "x", 5, 0.01);
// 3. 直接指定两个参数
println!("Hello {} is {number:.prec$}", "x", prec = 5, number = 0.01);

// 转义
assert_eq!(format!("Hello {{}}"), "Hello {}");
assert_eq!(format!("{{ Hello"), "{ Hello");
Format trait
- nothing ⇒ Display
- ? ⇒ Debug
- x? ⇒ Debug with lower-case hexadecimal integers
- X? ⇒ Debug with upper-case hexadecimal integers
- o ⇒ Octal
- x ⇒ LowerHex
- X ⇒ UpperHex
- p ⇒ Pointer
- b ⇒ Binary
- e ⇒ LowerExp
- E ⇒ UpperExp
Debug 只能通过 #[derive(Debug)] 宏由编译器自动实现,而 Display trait 需要自己手动实现。
对于实现了 Display trait ,Rust 自动为其实现 ToString trait , to_string() 方法返回一个 String。例如实现 std::error:Error trait 时,同时需要实现 Display + Debug~,所以所有 ~Error 对象都可以直接显示和生成字符串。
let i = 5;
let five = String::from("5");
assert_eq!(five, i.to_string());
12 std::mem #
std::mem module 提供了各类型的 size/aligment/take/replace() 等操作函数:
align_of::<T>()/align_of_val(&v): 返回类型 T,或 v(需要传入借用类型) 指向的对象的对齐方式;size_of::<T>()/size_of_val(&v): 返回类型 T 或值 v 的类型大小;drop(T): drop 对象 T, 执行 T 实现的 Drop trait 方法;(不能直接调用对象实现的 Drop 的 drop() 方法);forget(T): drop 对象 T, 但是不执行它的 Drop trait 方法;
注:如果需要类型名称,可以使用 std::any::TypeId 类型的 of() 方法。
align_of_val()/size_of_val() 的主要使用场景是获得 动态类型 对应的实际类型的对齐方式或大小,如 [T] 和 trait object 。
replace()/swap()/take() 用来获取或替换 Array/Vec 中没有实现 Copy trait 的单个元素(因为 Array 和 Vec 不支持 partial move,当元素类型没有实现 Copy 时,不能获得元素的值,这是如果要替换或者获得元素的值,就需要使用这三个函数)
replace(&mut T1, T2): 用 T2 值替换 &mut T1 对象,返回旧的 T1 值;swap(&mut T1, &mut T2): 交换 T1 和 T2 的值;take(&mut T1): 返回 T1 的值,将原来 &mut T1 的值用 T1 的Default 值填充;
pub const fn align_of<T>() -> usize
pub fn align_of_val<T>(val: &T) -> usize where T: ?Sized
  assert_eq!(4, mem::align_of::<i32>());
  assert_eq!(4, mem::align_of_val(&5i32)); // 参数必须是值引用

// 回收 T 值(其实是获得 T 的所有权后丢弃)
pub fn drop<T>(_x: T)

// Takes ownership and “forgets” about the value without running its destructor.
pub const fn forget<T>(t: T)
  let file = File::open("foo.txt").unwrap();
  mem::forget(file);

// Moves src into the referenced dest, returning the previous dest value.
pub fn replace<T>(dest: &mut T, src: T) -> T
  use std::mem;
  let mut v: Vec<i32> = vec![1, 2];
  // 新的值替换传入的 &mut 值 v,返回 v 对象。
  let old_v = mem::replace(&mut v, vec![3, 4, 5]);
  assert_eq!(vec![1, 2], old_v);
  assert_eq!(vec![3, 4, 5], v);
  // replace 的场景场景是替换容器中的元素
  impl<T> Buffer<T> {
      fn replace_index(&mut self, i: usize, v: T) -> T {
          mem::replace(&mut self.buf[i], v) // 可以避免从 &mut self 中转移所有权而报错
      }
  }

// 返回指定类型 T 的大小
pub const fn size_of<T>() -> usize
  assert_eq!(4, mem::size_of::<i32>());
  assert_eq!(8, mem::size_of::<f64>());
  assert_eq!(0, mem::size_of::<()>());
  assert_eq!(8, mem::size_of::<[i32; 2]>());
  assert_eq!(12, mem::size_of::<[i32; 3]>());
  assert_eq!(0, mem::size_of::<[i32; 0]>());
  assert_eq!(mem::size_of::<&i32>(), mem::size_of::<*const i32>());
  assert_eq!(mem::size_of::<&i32>(), mem::size_of::<Box<i32>>());
  assert_eq!(mem::size_of::<&i32>(), mem::size_of::<Option<&i32>>());
  assert_eq!(mem::size_of::<Box<i32>>(), mem::size_of::<Option<Box<i32>>>());

//  返回借用指向的 T 的大小,与 size_of::<T>() 的区别是该方法也适用于动态类型大小,如 [T] 和 trait object
pub fn size_of_val<T>(val: &T) -> usize where T: ?Sized
  assert_eq!(4, mem::size_of_val(&5i32));
  let x: [u8; 13] = [0; 13];
  let y: &[u8] = &x;
  assert_eq!(13, mem::size_of_val(y));

// Swaps the values at two mutable locations, without deinitializing either one.
pub fn swap<T>(x: &mut T, y: &mut T)
  let mut x = 5;
  let mut y = 42;
  mem::swap(&mut x, &mut y);
  assert_eq!(42, x);
  assert_eq!(5, y);

// Replaces dest with the default value of T, returning the previous dest value.
pub fn take<T>(dest: &mut T) -> T where T: Default,
  let mut v: Vec<i32> = vec![1, 2];
  let old_v = mem::take(&mut v);
  assert_eq!(vec![1, 2], old_v);
  assert!(v.is_empty());
std::mem::offset_of!() 宏返回 struct filed 或 enum variant field 的字节偏移量:
#![feature(offset_of_enum, offset_of_nested)]
#[repr(C)]
struct FieldStruct {
    first: u8,
    second: u16,
    third: u8
}
assert_eq!(mem::offset_of!(FieldStruct, first), 0);
assert_eq!(mem::offset_of!(FieldStruct, second), 2);
assert_eq!(mem::offset_of!(FieldStruct, third), 4);

#[repr(C)]
struct NestedA {
    b: NestedB
}

#[repr(C)]
struct NestedB(u8);
assert_eq!(mem::offset_of!(NestedA, b.0), 0);

#[repr(u8)]
enum Enum {
    A(u8, u16),
    B { one: u8, two: u16 },
}
assert_eq!(mem::offset_of!(Enum, A.0), 1);
assert_eq!(mem::offset_of!(Enum, B.two), 2);
assert_eq!(mem::offset_of!(Option<&u8>, Some.0), 0);
std::mem::discriminant() 返回 enum variant 的 tag 值,也可以使用 as 运算符来获取:
enum Foo {
    A(&'static str),
    B(i32),
    C(i32)
}
assert_eq!(mem::discriminant(&Foo::A("bar")), mem::discriminant(&Foo::A("baz")));
assert_eq!(mem::discriminant(&Foo::B(1)), mem::discriminant(&Foo::B(2)));
assert_ne!(mem::discriminant(&Foo::B(3)), mem::discriminant(&Foo::C(3)));

enum Enum {
    Foo,
    Bar,
    Baz,
}
assert_eq!(0, Enum::Foo as isize);
assert_eq!(1, Enum::Bar as isize);
assert_eq!(2, Enum::Baz as isize);
类型大小(byte):
- () : 1;
- bool :1;
- char :4(unicode point);
- *const T, &T, Box<T>, Option<&T> 和 Option<Box<T>> :都具有相同大小。如果 T 是 Sized, 则这些类型大小和 usize 一致;
- [T; n]: 大小为
n * size_of::<T>() - Enums: 如果 Enum 的各 variant 除了 tag 外都没有 data, 则大小和 C enum 一致;
- Unions: 取决于最大 field 的大小;
类型的大小还受 #[repr(C)], repr(align(N)) 和 #[repr(u16)] 等属性影响。
=std::mem::transmute<Src,Dst>(src:Src) -> Dst = :将 Src 类型的 value 解释为 Dst 类型的 value,然后 forget 但不 drop Src 值。
- 这里的解释是
bit 级别的 copy,Src 和 Dst 类型必须具有相同的长度,否则编译错误。 - src 已经被 forget,不能再使用;
两个常用场景:
- 在 *const 指针和函数指针间转换;
扩充或缩短 lifetime;
pub const unsafe extern "rust-intrinsic" fn transmute<Src, Dst>(src: Src) -> Dst

let a: i64 = 42;
let a_ptr: *const i64 = &a as *const i64;

// 将 a_ptr 解释为 usize,然后可以地址进行纯算术运算
let a_addr: usize = unsafe {std::mem::transmute(a_ptr)};
println!("a: {} ({:p}...0x{:x})", a, a_ptr, a_addr + 7);

// transmute 的两个常用场景:
//
// 1. 在 *const 指针和函数指针间转换
fn foo() -> i32 { 0 }
// Crucially, we `as`-cast to a raw pointer before `transmute`ing to a function pointer.
// This avoids an integer-to-pointer `transmute`, which can be problematic.
// Transmuting between raw pointers and function pointers (i.e., two pointer types) is fine.
let pointer = foo as *const ();
let function = unsafe {
    std::mem::transmute::<*const (), fn() -> i32>(pointer)
};
assert_eq!(function(), 0);

// 2. 扩充或缩短 lifetime
struct R<'a>(&'a i32);

unsafe fn extend_lifetime<'b>(r: R<'b>) -> R<'static> {
    std::mem::transmute::<R<'b>, R<'static>>(r)
}

unsafe fn shorten_invariant_lifetime<'b, 'c>(r: &'b mut R<'static>) -> &'b mut R<'c> {
    std::mem::transmute::<&'b mut R<'static>, &'b mut R<'c>>(r)
}
当前绝大部分使用 transmute 的场景可以使用更安全的 APIs 来代替:
// 1. 将 4 个 u8 解释为 u32
let raw_bytes = [0x78, 0x56, 0x34, 0x12];
let num = unsafe {
    std::mem::transmute::<[u8; 4], u32>(raw_bytes)
};
// use `u32::from_ne_bytes` instead
let num = u32::from_ne_bytes(raw_bytes);
// or use `u32::from_le_bytes` or `u32::from_be_bytes` to specify the endianness
let num = u32::from_le_bytes(raw_bytes);
assert_eq!(num, 0x12345678);
let num = u32::from_be_bytes(raw_bytes);
assert_eq!(num, 0x78563412);


// 2. 将指针转为 usize
let ptr = &0;
let ptr_num_transmute = unsafe {
    std::mem::transmute::<&i32, usize>(ptr)
};
// 使用更安全的 as 转换
let ptr_num_cast = ptr as *const i32 as usize;


// 3. 将 *mut T 转换为 &mut T
let ptr: *mut i32 = &mut 0;
let ref_transmuted = unsafe {
    std::mem::transmute::<*mut i32, &mut i32>(ptr)
};
// Use a reborrow instead
let ref_casted = unsafe { &mut *ptr };


// 4. 将 &mut T 转换为 &mut U:
let ptr = &mut 0;
let val_transmuted = unsafe {
    std::mem::transmute::<&mut i32, &mut u32>(ptr)
};
// Now, put together `as` and reborrowing - note the chaining of `as` `as` is not transitive
let val_casts = unsafe { &mut *(ptr as *mut i32 as *mut u32) };


// 5. 将 &str 转换为 &[u8]
let slice = unsafe { std::mem::transmute::<&str, &[u8]>("Rust") };

assert_eq!(slice, &[82, 117, 115, 116]);
let slice = "Rust".as_bytes();
assert_eq!(slice, &[82, 117, 115, 116]);
assert_eq!(b"Rust", &[82, 117, 115, 116]);
pub const unsafe fn transmute_copy<Src, Dst>(src: &Src) -> Dst :将 src 解释为 &Dst,然后将 Src 的内容 byte copy 形成 Dst 类型对象(不移动 src 值)。
- src 是 &Src 引用类型,而 transmute(src: Src) 的 src 是值类型。调用后,src 引用来可以继续使用;
- Src 和 Dst 不共享内存,不需要像 transmute() 那样要求 Src 和 Dst 大小必须一致:
use std::mem;

#[repr(packed)]
struct Foo {
    bar: u8,
}

let foo_array = [10u8];

unsafe {
    // Copy the data from 'foo_array' and treat it as a 'Foo'
    let mut foo_struct: Foo = mem::transmute_copy(&foo_array);
    assert_eq!(foo_struct.bar, 10);

    // Modify the copied data
    foo_struct.bar = 20;
    assert_eq!(foo_struct.bar, 20);
}

// The contents of 'foo_array' should not have changed
assert_eq!(foo_array, [10]);
pub const unsafe fn zeroed<T>() -> T :返回用 0 填充的 T 值(建议用 std::mem::MaybeUninit::<T>::zerod()):
use std::mem;
let x: i32 = unsafe { mem::zeroed() };
assert_eq!(0, x);

// 错误的用法
let _x: &i32 = unsafe { mem::zeroed() }; // Undefined behavior!
let _y: fn() = unsafe { mem::zeroed() }; // And again!
Struct std::mem::ManuallyDrop<T> :获得 T 对象所有权,阻止编译器自动调用 T 的 Drop,而在需要时手动 Drop 对象(std::mem::drop(T)):
let mut x = std::mem::ManuallyDrop::new(String::from("Hello World!"));
x.truncate(5);
assert_eq!(*x, "Hello");
// But `Drop` will not be run here
12.1 MaybeUninit #
Rust 在创建对象时为其分配内存并初始化,然后才能借用对象,否则是 undefined behavior (对于未初始化的内存区域,每次读的结果可能不一致)。
// OK
let x: i32 = unsafe { mem::zeroed() };
assert_eq!(0, x);

// UB:返回 &i32 指针,指向 0 地址的内存区域
let x: &i32 = unsafe { mem::zeroed() }; // undefined behavior!
let x: &i32 = unsafe { MaybeUninit::zeroed().assume_init() }; // undefined behavior!

let b: bool = unsafe { mem::uninitialized() }; // undefined behavior!
let b: bool = unsafe { MaybeUninit::uninit().assume_init() }; // undefined behavior!
std::mem::MaybeUninit<T> 使用 unsafe 代码来使用未初始化内存区域。编译器不对它进行 runtime tracking 和 safety check, Drop MaybeUninit<T> 对象时 不会调用 T 的 drop() 方法, 而需要手动 drop T 对象。
创建 MaybeUninit<T> 对象:
- new(T):使用传入的 T 值来初始化内存,后续可以安全的调用
assume_init()来返回这个值。 - uninit(): 为 T 类型分配一块未初始化内存;
- uninit_array<const N: usize>():返回一个 N 个元素的未初始化数组内存,再将它转换为 slice 来使用;
- zeroed(): 返回一个用 zero 填充的对象 T,对于数值、bool 是有意义的,对于指针类型是无意义的(UB)。
对 MaybeUninit<T> 值进行修改:
- write(value): 使用 value 设置
MaybeUninit<T>内存数据,不Drop原对象(故多次重复调用时可能导致内存泄露),返回&mut T; - as_ptr/as_mut_ptr(): 转换为 raw pointer,使用它的 read/write 等方法来读写内存;
返回 MaybeUninit<T> 中 T 值:
- assume_init(self) -> T:返回内存的
T 类型值,转移该内存区域所有权; - assume_init_read(&self) -> T:对内存区域 bit-wise copy(不管 T 是否实现 Copy)来返回一个 T 类型值;
- 内部通过 std::ptr::read() 实现的
浅拷贝,共享同一个内存区域。 - 多次调用
assume_init_read()返回的 T共享同一个内存区域,当各 T 被 Drop 时会导致多次内存释放的错误。 - 建议使用
assume_init()来返回包含对应内存区域所有权的 T 值,从而避免多次释放。
- 内部通过 std::ptr::read() 实现的
pub union MaybeUninit<T> { /* private fields */}

// 使用 val 创建一个已初始化的内存对象
pub const fn new(val: T) -> MaybeUninit<T>
    use std::mem::MaybeUninit;
    let v: MaybeUninit<Vec<u8>> = MaybeUninit::new(vec![42]);

// Creates a new MaybeUninit<T> in an uninitialized state.
pub const fn uninit() -> MaybeUninit<T>
    use std::mem::MaybeUninit;
    let v: MaybeUninit<String> = MaybeUninit::uninit();

pub fn uninit_array<const N: usize>() -> [MaybeUninit<T>; N]
    #![feature(maybe_uninit_uninit_array, maybe_uninit_slice)]
    use std::mem::MaybeUninit;

    extern "C" {
        fn read_into_buffer(ptr: *mut u8, max_len: usize) -> usize;
    }

    /// Returns a (possibly smaller) slice of data that was actually read
    fn read(buf: &mut [MaybeUninit<u8>]) -> &[u8] {
        unsafe {
            let len = read_into_buffer(buf.as_mut_ptr() as *mut u8, buf.len());
            MaybeUninit::slice_assume_init_ref(&buf[..len])
        }
    }

    let mut buf: [MaybeUninit<u8>; 32] = MaybeUninit::uninit_array();
    let data = read(&mut buf);

// Creates a new MaybeUninit<T> in an uninitialized state, with the memory being filled with 0 bytes.
pub const fn zeroed() -> MaybeUninit<T>
    let x = MaybeUninit::<(u8, bool)>::zeroed();
    let x = unsafe { x.assume_init() };
    assert_eq!(x, (0, false));

pub fn write(&mut self, val: T) -> &mut T
    let mut x = MaybeUninit::<Vec<u8>>::uninit();
    {
        let hello = x.write((&b"Hello, world!").to_vec());
        // Setting hello does not leak prior allocations, but drops them
        *hello = (&b"Hello").to_vec();
        hello[0] = 'h' as u8;
    }
    // x is initialized now:
    let s = unsafe { x.assume_init() };
    assert_eq!(b"hello", s.as_slice());


// Gets a pointer to the contained value. Reading from this pointer or turning it into a reference is
// undefined behavior unless the MaybeUninit<T> is initialized.
pub const fn as_ptr(&self) -> *const T
pub fn as_mut_ptr(&mut self) -> *mut T

    use std::mem::MaybeUninit;
    let mut x = MaybeUninit::<Vec<u32>>::uninit();
    x.write(vec![0, 1, 2]);
    // Create a reference into the `MaybeUninit<T>`. This is okay because we initialized it.
    let x_vec = unsafe { &*x.as_ptr() };
    assert_eq!(x_vec.len(), 3);

// Extracts the value from the MaybeUninit<T> container. This is a great way to ensure that the data will
// get dropped, because the resulting T is subject to the usual drop handling.
pub const unsafe fn assume_init(self) -> T // 转移所有权,返回 T
pub const unsafe fn assume_init_read(&self) -> T // 对内存区域 bit-copy 返回 T 类型对象,它们共享相同的内存区域

pub unsafe fn assume_init_drop(&mut self) // in-place Drop 包含的值

pub const unsafe fn assume_init_ref(&self) -> &T // 返回 &T,不转移所有权
pub unsafe fn assume_init_mut(&mut self) -> &mut T // 返回 &mut T

pub unsafe fn array_assume_init<const N: usize>(array: [MaybeUninit<T>; N] )-> [T; N] // 返回 array
pub unsafe fn slice_assume_init_ref(slice: &[MaybeUninit<T>]) -> &[T]
pub unsafe fn slice_assume_init_mut(slice: &mut [MaybeUninit<T>]) -> &mut [T]

    let mut x = MaybeUninit::<bool>::uninit();
    x.write(true);
    let x_init = unsafe { x.assume_init() };
    assert_eq!(x_init, true);

pub fn slice_as_ptr(this: &[MaybeUninit<T>]) -> *const T
pub fn slice_as_mut_ptr(this: &mut [MaybeUninit<T>]) -> *mut T

pub fn write_slice<'a>(this: &'a mut [MaybeUninit<T>], src: &[T]) -> &'a mut [T] where T: Copy
pub fn write_slice_cloned<'a>( this: &'a mut [MaybeUninit<T>], src: &[T] ) -> &'a mut [T] where T: Clone

pub fn as_bytes(&self) -> &[MaybeUninit<u8>]
pub fn as_bytes_mut(&mut self) -> &mut [MaybeUninit<u8>]

pub fn slice_as_bytes(this: &[MaybeUninit<T>]) -> &[MaybeUninit<u8>]
pub fn slice_as_bytes_mut(this: &mut [MaybeUninit<T>]) -> &mut [MaybeUninit<u8>]
MaybeUninit<T> 为 T 分配未初始化的内存并拥有该内存区域, 但不做任何操作:
- 先使用 as_ptr()/as_mut_ptr() 转换为 raw pointer,将它传递给 FFI 函数使用。例如,C 常见情况是:给函数传递一个内存指针, 函数内的逻辑来修改指针指向的内容。
- 或者使用
MaybeUninit::write()或者 raw pointer 的read/write()来对未初始化内存区域进行读写;- write() 不会 drop 内存区域原来的值(内存区域是为初始化的,drop 是 UB 的), 而普通的赋值运算符 = 会 drop 原来的值。
- 然后调用
MaybeUninit.assume_init()来将内存区域标记为已初始化,转移返回 T 的值;
// 分配一个保存 &i32 类型的内存,但是不初始化
let mut x = MaybeUninit::<&i32>::uninit();

// 使用 MaybeUninit 类型的 write() 方法写入数据
x.write(&0);

// 提取数据,只有当对 x 做过初始化处理后才有意义
let x = unsafe { x.assume_init() };

// undefined behavior :x 内存未被初始化,assume_init() 返回的 x 值是 UB 的。
let x = MaybeUninit::<Vec<u32>>::uninit();
let x_init = unsafe { x.assume_init() };

// 传入未初始化内存区域的 raw pointer,然后使用它的 write() 方法来填充内存区域的值
unsafe fn make_vec(out: *mut Vec<i32>) {
    // `write` does not drop the old contents, which is important.
    out.write(vec![1, 2, 3]);
}

// 未指定类型,由编译器自动推导。
let mut v = MaybeUninit::uninit();
unsafe { make_vec(v.as_mut_ptr()); }
let v = unsafe { v.assume_init() };
assert_eq!(&v, &[1, 2, 3]);

// 使用 MaybeUninit 来初始化 array:
let data = {
    // Create an uninitialized array of `MaybeUninit`. The `assume_init` is
    // safe because the type we are claiming to have initialized here is a
    // bunch of `MaybeUninit`s, which do not require initialization.
    let mut data: [MaybeUninit<Vec<u32>>; 1000] = unsafe {
        MaybeUninit::uninit().assume_init()
    };
    for elem in &mut data[..] {
        elem.write(vec![42]);
    }
    // Everything is initialized. Transmute the array to the initialized type.
    unsafe { mem::transmute::<_, [Vec<u32>; 1000]>(data) }
};
assert_eq!(&data[0], &[42]);

// 使用 MaybeUninit 来初始化 struct field
#[derive(Debug, PartialEq)]
pub struct Foo {
    name: String,
    list: Vec<u8>,
}

let foo = {
    let mut uninit: MaybeUninit<Foo> = MaybeUninit::uninit();
    let ptr = uninit.as_mut_ptr();

    // Initializing the `name` field. Using `write` instead of assignment via `=` to not call `drop` on the
    // old, uninitialized value.
    unsafe { std::ptr::addr_of_mut!((*ptr).name).write("Bob".to_string()); }

    // Initializing the `list` field. If there is a panic here, then the `String` in the `name` field leaks.
    unsafe { std::ptr::addr_of_mut!((*ptr).list).write(vec![0, 1, 2]); }

    unsafe { uninit.assume_init() }
};
assert_eq!( foo, Foo { name: "Bob".to_string(), list: vec![0, 1, 2]});
MaybeUninit<T>: 保证和 T 同样的大小、对齐和 ABI:
use std::mem::{MaybeUninit, size_of, align_of};

assert_eq!(size_of::<MaybeUninit<u64>>(), size_of::<u64>());
assert_eq!(align_of::<MaybeUninit<u64>>(), align_of::<u64>());
assert_eq!(size_of::<Option<bool>>(), 1);
assert_eq!(size_of::<Option<MaybeUninit<bool>>>(), 2);
13 std::ptr #
std::ptr module 提供操作 raw pointer 的函数。raw pointer 类型,如 *const T 或 *mut T ,本身也提供一些操作方法。
通过 *const T 或 *mut T 来存取 T 值,大小一般是 std::mem::size_of::<T>() 字节。
packed struct:默认情况下,struct field 会被 pading 对齐。通过添加 packed attr,可以关闭 padding 对齐。
#[derive(Debug, Default, Copy, Clone)]
#[repr(C, packed)]
struct S {
    aligned: u8,
    unaligned: u32,
}

let s = S::default();

// not allowed with coercion
let p = std::ptr::addr_of!(s.unaligned);
使用 std::ptr::addr_of!() 和 std::ptr::addr_of_mut!() 返回 ~expr 如 struct field ~ 地址:
- std::mem::offset_of!() 返回 struct field 的偏移量。
std::ptr::addr_of!(expr)/addr_of_mut!(expr) 宏返回 expr 的 raw pointer,也可以用于 未对齐的 raw pointer
- 这两个宏等效于 &raw const expr,和 &mut raw const expr。
- 相比 &mut expr as * mut _ 的好处是,省去创建了一个引用。
- 未对齐的 field 不能创建引用。
raw pointer 和引用都是指针,包括两部分:
- data pointer:指向 value 内存地址的指针;
- 可选的 metadata 指针;
对于编译时可知的固定大小类型(实现 Sized trait)或 extern 类型的指针,是 thin 指针 ,metadata 是零内存的 () 类型,所以 thin 指针是只占用一个机器字 usize 的变量。
对于动态大小类型(DST),它的指针是 fat 指针 ,这时 metadata 非空,如 *const [u8] 或 *mut dyn std::io::Write :
- 对于最后一个 field 是 DST 的 struct,struct 的 metadata 是最后一个 field 的 metadata;
- 对于 str 类型,metadata 是字符串字节数量(usize);
- 对于 slice 类型,metadata 是元素的数量(usize);
- 对于 trait object,如 dyn SomeTrait,metadata 是
DynMetadata<Self>(e.g. DynMetadata<dyn SomeTrait>)
std::ptr::Pointee trait 为任意指针提供 metadata type 信息, Rust 为所有类型实现了该 trait 。其中的 Metadata 关联类型可能是 () 或 usize 或 DynMetadata<_> 类型;
- (): 零大小,对应没有 Metadata 的 thin 指针;
- usize:对应 lenght in bytes(如 &str)或 length in items(如 [T]);
- DynMetadata: 对应 trait object,其实也是个 usize 大小的指针;
std::ptr::to_raw_parts() 返回对象的 data pointer 和 Pointee 对象。
std::ptr::metadata() 方法返回对象的 Metadata 类型对象;
std::ptr::from_raw_parts()/from_raw_parts_mut() 函数来使用 data pointer 和 Metadata 类型对象创建 raw pointer:
pub trait Pointee {
    // Metadata 类型可能是:() 或 usize 或 DynMetadata<Dyn>
    type Metadata: Copy + Send + Sync + Ord + Hash + Unpin;
}

pub struct DynMetadata<Dyn> where Dyn: ?Sized

// Decompose a (possibly wide) pointer into its data pointer and metadata components.
pub fn to_raw_parts(self) -> (*const (), <T as Pointee>::Metadata)

// Forms a (possibly-wide) raw pointer from a data pointer and metadata.
pub fn from_raw_parts<T>(data_pointer: *const (), metadata: <T as Pointee>::Metadata) -> *const T where T: ?Sized,
std::ptr::DynMetadata 是 trait object 的 metadata,vtable(virtual call table)的指针,指向 trait object 对应的具体值类型的实现,vtable 包括:
- type size
- type alignment
- a pointer to the
type’s drop_in_place impl(may be a no-op for plain-old-data) - pointers to
all the methodsfor the type’s implementation of the trait
Rust 的 type coercion 机制为引用和 raw pointer 提供了隐式自动转换:
- &mut T to &T <- 可变引用可以转换为不可变引用
- *mut T to *const T <– 可变 raw pointer 可以转换为不可变 raw pointer
- &T to *const T <– 不可变引用 可以转换为 不可变 raw pointer
- &mut T to *mut T <– 可变引用 可以转换为 可变 raw pointer
对于 type coercion 支持的转换,也可以使用 as 运算符来显式的进行。
// &mut T -> &T
let r: &i32 = &mut 1i32;

// &T -> *const T
let rp: *const i32 = &1i32;

// &mut T -> *const T 或 *mut T
let r: *const i32 = &mut 1i32;
let r: *mut i32 = &mut 1i32;

// *mut T -> *const T
// 对支持 type coercion 的转换类型,也可以使用 as 运算符显式转换.
let rp: *const i32 = &mut 1i32 as *mut i32 as *const i32;
std::ptr::read(): pub const unsafe fn read<T>(src: *const T) -> T ,创建 src 的一个 bitwise copy 值(返回的 T 和 src 指向 同一个内存区域 ),而不管 T 是否实现了 Copy,=不影响和移动 src 内容= ,src 和返回的 T 值内存是独立的。如果 T 实现了 Copy,则 read() 使用 Copy 实现。否则 src 和返回的 T 由于指向同一个内存区域,在返回的 T 对象被 drop 后,后续如果再释放 src 会出现 多重释放的问题 。
std::ptr::write()~:~pub unsafe fn write<T>(dst: *mut T, src: T) ,=不会 drop dst(有可能导致 dst 内存泄露),将 src 所有权转移到 dst= 。
*src = value; 会 Drop src 的值,而 std::ptr::write(dst, src) 在将 src 转移到 dst 中的同时不 drop dst 的值。这点对于通过 raw pointer 操作 MybeUninit 的内存区域很重要(因为未初始化,所以 drop UB)。
let x = 12;
let y = &x as *const i32;
unsafe {
    assert_eq!(std::ptr::read(y), 12);
}

fn swap<T>(a: &mut T, b: &mut T) {
    unsafe {
        // Create a bitwise copy of the value at `a` in `tmp`.
        let tmp = std::ptr::read(a);

        // Exiting at this point (either by explicitly returning or by calling a function which panics) would cause the value in `tmp` to be dropped while the same value is still referenced by `a`. This could trigger undefined behavior if `T` is not `Copy`.

        // Create a bitwise copy of the value at `b` in `a`.  This is safe because mutable references cannot alias.
        std::ptr::copy_nonoverlapping(b, a, 1);

        // As above, exiting here could trigger undefined behavior because the same value is referenced by `a` and `b`.

        // Move `tmp` into `b`.
        std::ptr::write(b, tmp);

        // `tmp` has been moved (`write` takes ownership of its second argument), so nothing is dropped implicitly here.

        // tmp 和 a 虽然指向同一个内存区域,但由于 tmp 已经被 write() 转移所有权,所以这里不会释放 tmp,不会有双重释放的问题。
    }
}

let mut foo = "foo".to_owned();
let mut bar = "bar".to_owned();
swap(&mut foo, &mut bar);
assert_eq!(foo, "bar");
assert_eq!(bar, "foo");

let mut s = String::from("foo");
unsafe {
    // s2 和 s 共享相同的内存区域
    let mut s2: String = ptr::read(&s);
    assert_eq!(s2, "foo");

    // 向 s2 赋值时,会 Drop 对应内存区域的原始值,所以 s 不能再使用(因其内存已经被释放)
    s2 = String::default();
    assert_eq!(s2, "");

    // Assigning to `s` would cause the old value to be dropped again, resulting in undefined behavior.
    // s = String::from("bar"); // ERROR

    // ptr::write() 覆盖 s 中的值但不 Drop 它,所以 OK。
    ptr::write(&mut s, String::from("bar"));
}
assert_eq!(s, "bar");
异常的情况:s 和 spr 都指向同一个内存区域,=会导致双重释放= ,从而出错。
let mut s = "abcd".to_string();
let sp = &mut s as *mut String;
let mut spr = unsafe {std::ptr::read(sp)};
spr.push_str(" test");
println!("s {}, spr {}", s, spr);

// 报错:
// s abcd, spr abcd test
// foo(85413,0x1f2d40f40) malloc: *** error for object 0x600003238060:
// pointer being freed was not allocated
// foo(85413,0x1f2d40f40) malloc: *** set a breakpoint in malloc_error_break to debug
std::ptr module 提供的其它操作 raw pointer 的函数:
- copy<T>(src, dst, count) 的 src、dst 内存可以重叠,如果 T 未实现 Copy,则是 bit-copy;
- copy_nonoverlapping<T>(src, dst, count) 的 src、dst 是不能重叠的;
- drop_in_place<T>(to_drop: *mut T): 调用 T 的 drop 来丢弃它,特别适合于 unsized 的 trait object 等对象;
- std::ptr::null()/null_mut() 创建一个 null raw pointer *const T 或 *mut T,等效于:
- MaybeUninit::<*const T>::zeroed().assume_init()
- MaybeUninit::<*mut T>::zeroed().assume_init()
- std::ptr::read(src: *const T)-> T: 从 src 读取 T 值(bit-copy),但是不移动它,src 内存不变;
- pub const unsafe fn write_bytes<T>(dst: *mut T, val: u8, count: usize):将 dst 开始的 count * size_of::<T>() 字节设置为 val。
copy 的 count 用于指定从 src 拷贝 count * size_of::<T>() 内存字节到 dst。
// Copies count * size_of::<T>() bytes from src to dst. The source and destination may overlap.
// Like read, copy creates a bitwise copy of T, regardless of whether T is Copy.
// If T is not Copy, using both the values in the region beginning at *src and the region beginning
// at *dst can violate memory safety.
pub const unsafe fn copy<T>(src: *const T, dst: *mut T, count: usize)
  unsafe fn from_buf_raw<T>(ptr: *const T, elts: usize) -> Vec<T> {
      let mut dst = Vec::with_capacity(elts);

      // SAFETY: Our precondition ensures the source is aligned and valid,
      // and `Vec::with_capacity` ensures that we have usable space to write them.
      ptr::copy(ptr, dst.as_mut_ptr(), elts);

      // SAFETY: We created it with this much capacity earlier,
      // and the previous `copy` has initialized these elements.
      dst.set_len(elts);
      dst
  }

// Copies count * size_of::<T>() bytes from src to dst. The source and destination must not overlap.
pub const unsafe fn copy_nonoverlapping<T>( src: *const T, dst: *mut T, count: usize,)

let p: *const i32 = ptr::null();
assert!(p.is_null());
assert_eq!(p as usize, 0); // this pointer has the address 0

let mut vec = vec![0u32; 4];
unsafe {
    let vec_ptr = vec.as_mut_ptr();
    ptr::write_bytes(vec_ptr, 0xfe, 2);
}
assert_eq!(vec, [0xfefefefe, 0xfefefefe, 0, 0]);
14 std::process #
std::process module 提供的函数:
abort: 异常终止进程;exit: 使用指定的 exit code 终止进程;id: 返回 OS 相关的进程标识;
std::process::Command::new() 创建一个 Command, 默认行为如下:
- 程序不需要参数 arguments;
- 继承 environments;
- 继承当前工作目录;
- 对于
spawn()/status()继承stdin/stdout/stderr。 - 对于
output()则创建 pipe,这样后续可以获得 Output 对象的 stdout 和 stderr。
在执行 Command 前, 可以进一步设置子进程的参数, 工作目录, 环境变量等:
// 创建要执行的 program
pub fn new<S: AsRef<OsStr>>(program: S) -> Command

// 设置 program 参数,一次只能设置一个参数
pub fn arg<S: AsRef<OsStr>>(&mut self, arg: S) -> &mut Command
pub fn args<I, S>(&mut self, args: I) -> &mut Command where I: IntoIterator<Item = S>, S: AsRef<OsStr>,

// 设置和清理环境变量
pub fn env<K, V>(&mut self, key: K, val: V) -> &mut Command where K: AsRef<OsStr>, V: AsRef<OsStr>,
pub fn envs<I, K, V>(&mut self, vars: I) -> &mut Command where I: IntoIterator<Item = (K, V)>, K: AsRef<OsStr>, V: AsRef<OsStr>,
pub fn env_remove<K: AsRef<OsStr>>(&mut self, key: K) -> &mut Command
pub fn env_clear(&mut self) -> &mut Command

// 设置工作目录
pub fn current_dir<P: AsRef<Path>>(&mut self, dir: P) -> &mut Command

// 设置子进程的 stdin/stdout/stderr
//
// cfg 是可以转换为 Stdio 的类型, 例如 Stdio::null(), Stdio::inherit(), Stdio::piped(), Stdio::from() 等。
//
// 对于 spawn()/status() 默认是 Stdio::inherit(),
// 对于 output() 默认是 Stdio::piped(), 所以后续通过返回的 Output 对象可以读取 Command 的 stdout/stderr。
pub fn stdin<T: Into<Stdio>>(&mut self, cfg: T) -> &mut Command
pub fn stdout<T: Into<Stdio>>(&mut self, cfg: T) -> &mut Command
pub fn stderr<T: Into<Stdio>>(&mut self, cfg: T) -> &mut Command

// 获取进程信息
pub fn get_program(&self) -> &OsStr
pub fn get_args(&self) -> CommandArgs<'_>
pub fn get_envs(&self) -> CommandEnvs<'_>
pub fn get_current_dir(&self) -> Option<&Path>

// 上面创建的 Command 可以被重复执行, 实现复用。

// 执行 Command 并获得输出或退出状态:
// 1. spawn(): 立即返回一个 Child,后续调用 kill/wait/wait_with_output() 结束;
// 2. output/status(): 直接运行, 直到结束后返回;
pub fn spawn(&mut self) -> Result<Child>
// Output 中包含 status/stdout/stderr 内容。
pub fn output(&mut self) -> Result<Output>
pub fn status(&mut self) -> Result<ExitStatus>

// Linux/Unix 的 CommandExt 方法:
fn create_pidfd(&mut self, val: bool) -> &mut Command
fn uid(&mut self, id: u32) -> &mut Command
fn gid(&mut self, id: u32) -> &mut Command
fn groups(&mut self, groups: &[u32]) -> &mut Command
fn process_group(&mut self, pgroup: i32) -> &mut Command
// 准备好所有工作, 执行 execvp 系统调用
fn exec(&mut self) -> Error
// 为命令指定 arg0 参数,即 command name
fn arg0<S>(&mut self, arg: S) -> &mut Command
unsafe fn pre_exec<F>(&mut self, f: F) -> &mut Command where F: FnMut() -> Result<()> + Send + Sync + 'static
fn before_exec<F>(&mut self, f: F) -> &mut Command where F: FnMut() -> Result<()> + Send + Sync + 'static

// 例子
use std::process::Command;

let output = if cfg!(target_os = "windows") {
    Command::new("cmd")
    .args(["/C", "echo hello"])
    .output()
    .expect("failed to execute process")
} else {
  Command::new("sh")
  .arg("-c")
  .arg("echo hello")
  .args(["-l", "-a"])
	.current_dir("/bin")
  .env_remove("PATH")
	.env_clear()
  .env("PATH", "/bin")
  .stdin(Stdio::null())
  .stdout(Stdio::inherit())
  .stderr(Stdio::null())
  .output() // 立即执行命令并捕获输出,等待命令执行结束后返回
  .expect("failed to execute process")
};

io::stdout().write_all(&output.stdout).unwrap();
io::stderr().write_all(&output.stderr).unwrap();
assert!(output.status.success());
spawn() 立即返回 Child ,并不等待子进程执行结束, 使用 wait/try_wait/wait_with_output() 来等待执行结束, 或者 kill() 来终止子进程。Child 没有实现 Drop trait,需要自己确保进程运行结束。
pub struct Child {
    // 都是 Option 类型,后续可以通过 take() 方法转移所有权。
    pub stdin: Option<ChildStdin>, // 实现了 Write
    pub stdout: Option<ChildStdout>, // 实现了 Read
    pub stderr: Option<ChildStderr>, // 实现了 Read
    /* private fields */
}

pub fn id(&self) -> u32
pub fn kill(&mut self) -> Result<()>
// 等待直到程序退出
pub fn wait(&mut self) -> Result<ExitStatus>
// 不 block 调用线程,而是检查程序是否退出
pub fn try_wait(&mut self) -> Result<Option<ExitStatus>>
// 等待程序结束并捕获所有的 stdout/stderr,需要事先通过 Command.stdin()/stdout() 设置为 piped 才行。
pub fn wait_with_output(self) -> Result<Output>

// 示例
use std::process::{Command, Stdio};
use std::io::Write;
let mut child = Command::new("/bin/cat")
    .stdin(Stdio::piped()) // 设置 Child 的 stdin
    .stdout(Stdio::piped())
    .spawn()
    .expect("failed to execute child");

// stdin.take() 来获得 stdin 所有权,当返回的 stdin 被 Drop 时,程序输入被关闭。
let mut stdin = child.stdin.take().expect("failed to get stdin");
std::thread::spawn(move || {
    stdin.write_all(b"test").expect("failed to write to stdin");
});

let output = child
    .wait_with_output()
    .expect("failed to wait on child");
assert_eq!(b"test", output.stdout.as_slice());
Child 的输入/输出可以通过它的 stdin/stdout/stderr field 来读写:
- 通过 Command 的
stdin/stdout/stderr()方法来设置,参数是std::process::Stdio类型,通过 From trait 从各种其它类型转换而来; - child.stdin/stdout/stderr 都是 Option<Stdio> 类型,使用
let mut stdin = child.stdin.take().except("xxx")来获取 Stdio 对象所有权,当返回的对象被 Drop 时相应的文件描述符被关闭。
// 将程序 stdin/stdout/stderr 输出到 Child 的 stdin/stdout/stderr,父进程(如创建 Command 的主进程)就可以对它们进行读写。
pub fn piped() -> Stdio

// child 从 parent 继承
pub fn inherit() -> Stdio

// 关闭
pub fn null() -> Stdio

// 判断 Stdio 是否是 piped() 生成的
pub fn makes_pipe(&self) -> bool

// 从其它 Child 的 stdin/stdout/stderr 来创建 Stdio, 从而实现 Child 之间的串联。
impl From<ChildStderr> for Stdio
impl From<ChildStdin> for Stdio
impl From<ChildStdout> for Stdio

// 读写文件
impl From<File> for Stdio

// 从终端读写
impl From<Stderr> for Stdio // std::io::Stderr
impl From<Stdout> for Stdio // std::io::Stdout

// 例子
use std::process::{Command, Stdio};
let echo_child = Command::new("echo")
    .arg("Oh no, a tpyo!")
    .stdout(Stdio::piped()) // 设置为 piped(),后续可以通过 echo_child.stdout 获取程序输出。
    .spawn()
    .expect("Failed to start echo process");
let echo_out = echo_child.stdout.expect("Failed to open echo stdout");
assert_eq!(String::from_utf8_lossy(&echo_child.stdout), "Hello, world!\n");

use std::process::{Command, Stdio};
let output = Command::new("echo")
    .arg("Hello, world!")
    .stdout(Stdio::inherit())
    .output()
    .expect("Failed to execute command");
// stdout 被打印到 console, 所以 Child.stdout 为空
assert_eq!(String::from_utf8_lossy(&output.stdout), "");
// "Hello, world!" echoed to console

let mut sed_child = Command::new("sed")
    .arg("s/tpyo/typo/")
    .stdin(Stdio::from(echo_out)) // 从 echo_child 获得输入;
    .stdout(Stdio::piped())
    .spawn()
    .expect("Failed to start sed process");
let output = sed_child.wait_with_output().expect("Failed to wait on sed");
assert_eq!(b"Oh no, a typo!\n", output.stdout.as_slice());

// 将一个 Child Command 的 stdin/stdout/stderr 连接到其他 Child Command
use std::process::{Command, Stdio};
let hello = Command::new("echo")
    .arg("Hello, world!")
    // 必须 piped,后续才能从 Child 的 stdout field 获取到进程输出
    .stdout(Stdio::piped())
    .spawn()
    .expect("failed echo command");

let reverse = Command::new("rev")
    // Converted into a Stdio here。
    .stdin(hello.stdout.unwrap()) // 传入另一个进程的 stdout
    .output()
    .expect("failed reverse command");
assert_eq!(reverse.stdout, b"!dlrow ,olleH\n");

// 将 Command 的输入输出连接到 File
use std::fs::File;
use std::process::Command;
let file = File::open("foo.txt").unwrap();
let reverse = Command::new("rev")
    .stdin(file)
    .output()
    .expect("failed reverse command");
assert_eq!(reverse.stdout, b"!dlrow ,olleH");

// 将 Command 的 stdout/stderr 连接到 std::io::Stdout/Stderr
#![feature(exit_status_error)]
use std::process::Command;
let output = Command::new("whoami")
    .stdout(std::io::stdout())
    .stderr(std::io::stderr())
    .output()?;
output.status.exit_ok()?;
assert!(output.stdout.is_empty());

use std::fs::File;
use std::process::Command;
let file = File::open("foo.txt").unwrap();
let reverse = Command::new("rev")
    .stdin(file)  // 从文件中读取输入
    .output()
    .expect("failed reverse command");
assert_eq!(reverse.stdout, b"!dlrow ,olleH");

use std::io::Write;
use std::process::{Command, Stdio};
let mut child = Command::new("rev")
    .stdin(Stdio::piped())
    .stdout(Stdio::piped())
    .spawn()
    .expect("Failed to spawn child process");

// 父进程向 child.stdin 发送数据,  child.stdin 是 Option<ChildStdin> 类型,
// ChildStdin 实现了 Write trait,child.stdin.take() 获得 ChildStdin 的所有权,当它被 Drop 时关闭 stdin。
let mut stdin = child.stdin.take().expect("Failed to open stdin");
std::thread::spawn(move || {
    stdin.write_all("Hello, world!".as_bytes()).expect("Failed to write to stdin");
});
let output = child.wait_with_output().expect("Failed to read stdout");
assert_eq!(String::from_utf8_lossy(&output.stdout), "!dlrow ,olleH");
ExitStatus 的 code() 方法返回 Option<i32>, 当进程被 singal 终止时返回 None,这时可以使用 ExitStatusExt trait 的方法来获得信号值:
pub struct ExitStatus(/* private fields */);

// 示例:
use std::process::Command;

let status = Command::new("mkdir")
    .arg("projects")
    .status()
    .expect("failed to execute mkdir");

match status.code() {
    Some(code) => println!("Exited with status code: {code}"),
    None => println!("Process terminated by signal")
}
Unix 实现了 ExitStatusExt trait ,可以返回进程因为 signal 而终止的情况:
pub trait ExitStatusExt: Sealed {
    // Required methods
    fn from_raw(raw: i32) -> Self;

    // If the process was terminated by a signal, returns that signal.
    fn signal(&self) -> Option<i32>;

    fn core_dumped(&self) -> bool;

    // If the process was stopped by a signal, returns that signal.
    fn stopped_signal(&self) -> Option<i32>;
    fn continued(&self) -> bool;

    fn into_raw(self) -> i32;
}
15 std::io #
std::io module 定义的 std::io::Result<T> 类型是 std::io::Result<T, std::io::Error> 别名。
struct std::io::Error 实现了 std::error::Error trait ,它的 kind() 方法返回 std::io::ErrorKind 枚举类型,可以用来进一步判断错误的原因:
use std::io::{Error, ErrorKind};

fn print_error(err: Error) {
    println!("{:?}", err.kind());
}

fn main() {
    print_error(Error::last_os_error());
    print_error(Error::new(ErrorKind::AddrInUse, "oh no!"));
}
std::io::prelude 包含了 std::io module 中常用的 trait 和类型,需要使用 use 导入。
15.1 Read #
read() 最多读取 buf.len() 数据,所以传入的 buf 类型是有固定容量的 slice 而非动态大小的 Vec/String 。
read_to_end/read_to_string() 是读取全部内容,所以传入支持动态大小的 Vec/String 。
pub trait Read {
    // Required method
    fn read(&mut self, buf: &mut [u8]) -> Result<usize>;

    // Provided methods
    fn read_vectored(&mut self, bufs: &mut [IoSliceMut<'_>]) -> Result<usize>
    fn is_read_vectored(&self) -> bool { ... }

    fn read_to_end(&mut self, buf: &mut Vec<u8>) -> Result<usize>
    fn read_to_string(&mut self, buf: &mut String) -> Result<usize>

    fn read_exact(&mut self, buf: &mut [u8]) -> Result<()>
    fn read_buf(&mut self, buf: BorrowedCursor<'_>) -> Result<()>
    fn read_buf_exact(&mut self, cursor: BorrowedCursor<'_>) -> Result<()>
    fn by_ref(&mut self) -> &mut Self where Self: Sized
    fn bytes(self) -> Bytes<Self> where Self: Sized { ... }
    fn chain<R: Read>(self, next: R) -> Chain<Self, R> where Self: Sized { ... }
    fn take(self, limit: u64) -> Take<Self> where Self: Sized { ... }
}
实现 Read trait 的类型:
impl Read for &File
impl Read for &TcpStream
// &Vec<T> 和 &[T; N] 都实现了 Read,&str.as_bytes 也返回 &[u8]
impl Read for &[u8]
impl Read for File
impl Read for TcpStream
impl Read for UnixStream

// std::process 的 ChildStderr/ChildStdout 类型
impl Read for ChildStderr
impl Read for ChildStdout

impl Read for Arc<File>
impl Read for Empty
impl Read for Repeat
impl Read for Stdin
impl Read for StdinLock<'_>

impl<'a> Read for &'a UnixStream
impl<A: Allocator> Read for VecDeque<u8, A>
impl<R: Read + ?Sized> Read for &mut R
impl<R: Read + ?Sized> Read for Box<R>
impl<R: ?Sized + Read> Read for BufReader<R>

impl<T> Read for Cursor<T> where T: AsRef<[u8]>,
impl<T: Read> Read for Take<T>
impl<T: Read, U: Read> Read for Chain<T, U>


// 例子
use std::io;
use std::io::prelude::*;
use std::fs::File;

fn main() -> io::Result<()> {
    let mut f = File::open("foo.txt")?;
    let mut buffer = [0; 10]; // 指定 buf 大小为 10 bytes

    // read up to 10 bytes
    f.read(&mut buffer)?;

    let mut buffer = Vec::new();
    // read the whole file
    f.read_to_end(&mut buffer)?;

    // read into a String, so that you don't need to do the conversion.
    let mut buffer = String::new();
    f.read_to_string(&mut buffer)?;

    Ok(())
}
15.2 BufRead #
BufRead 是内部包含一个 buffer 的 Reader:
read_line(): 读取一行(包含换行符)存入传入的 String buf;split(byte): 返回一个迭代器,每次迭代 split 后的内容(不含分隔符 byte);lines(): 返回一个迭代器,迭代返回io::Result<String>,字符串末尾不包含换行;read_until(byte, buf): 一直读取,直到遇到字符 byte,读取的内容(包括 byte)写入Vec<u8>类型的 buf;
pub trait BufRead: Read {
    // Required methods
    fn fill_buf(&mut self) -> Result<&[u8]>;
    fn consume(&mut self, amt: usize);

    // Provided methods
    fn has_data_left(&mut self) -> Result<bool> { ... }
    fn read_until(&mut self, byte: u8, buf: &mut Vec<u8>) -> Result<usize> { ... }
    fn skip_until(&mut self, byte: u8) -> Result<usize> { ... }
    // 包含换行符,buf 内容会保留,需要手动 buf.clean() 清空。
    fn read_line(&mut self, buf: &mut String) -> Result<usize> { ... }
    fn split(self, byte: u8) -> Split<Self> where Self: Sized { ... }
    fn lines(self) -> Lines<Self> where Self: Sized { ... }
}
实现了 BufRead 的类型:&[u8]/StdinLock/BufReader/Cursor :
impl BufRead for &[u8]
impl BufRead for Empty
impl BufRead for StdinLock<'_>

impl<A: Allocator> BufRead for VecDeque<u8, A>
impl<B: BufRead + ?Sized> BufRead for &mut B
impl<B: BufRead + ?Sized> BufRead for Box<B>

impl<R: ?Sized + Read> BufRead for BufReader<R>

impl<T> BufRead for Cursor<T> where T: AsRef<[u8]>
impl<T: BufRead> BufRead for Take<T>
impl<T: BufRead, U: BufRead> BufRead for Chain<T, U>
示例:
use std::io;
use std::io::prelude::*;

let stdin = io::stdin();
// lines() 迭代返回 Result<String, Error>,String 不包含换行
for line in stdin.lock().lines() {
    println!("{}", line.unwrap());
}

use std::io::{self, BufReader};
use std::io::prelude::*;
use std::fs::File;

fn main() -> io::Result<()> {
    let f = File::open("foo.txt")?;
    let f = BufReader::new(f);

    for line in f.lines() {
        println!("{}", line.unwrap());
    }

    Ok(())
}
struct BufReader<R: ?Sized> 可以将任意 Reader 转换为 BufRead,如 File、TCPStream 等:
- pub fn with_capacity(capacity: usize, inner: R) -> BufReader<R> 指定内部 buffer 的大小,默认为 8KiB。
use std::io::{self, BufReader};
use std::io::prelude::*;
use std::fs::File;

fn main() -> std::io::Result<()> {
    let f = File::open("log.txt")?;
    let reader = BufReader::new(f); // 默认 8KiB buffer。
    Ok(())
}

fn main() -> io::Result<()> {
    let f = File::open("foo.txt")?;
    let f = BufReader::new(f);

    for line in f.lines() {
        println!("{}", line.unwrap());
    }

    Ok(())
}
15.3 Write #
Write 是面向 byte 的输出:
- write(): 写入 buf ,返回写出的字节数(所以一次 write 不一定写出了所有数据);
- write_all():将 buf 内容写入到 object,确保全部都写入,否则返回 Err;
- write_fmt(): 将传入的 Arguments(由 fmt!() 宏来生成)写入 object;
- flush() : 确保 object 中 buff(如果有) 的数据写入到 true sink 中;
pub trait Write {
    // Required methods
    fn write(&mut self, buf: &[u8]) -> Result<usize>;
    fn flush(&mut self) -> Result<()>;

    // Provided methods
    fn write_vectored(&mut self, bufs: &[IoSlice<'_>]) -> Result<usize>
    fn is_write_vectored(&self) -> bool
    fn write_all(&mut self, buf: &[u8]) -> Result<()>
    fn write_all_vectored(&mut self, bufs: &mut [IoSlice<'_>]) -> Result<()>
    fn write_fmt(&mut self, fmt: Arguments<'_>) -> Result<()>
    fn by_ref(&mut self) -> &mut Self where Self: Sized
}
实现 Write 的类型:
// 注意:都是共享借用,而非 &mut 可变借用
impl Write for &File
impl Write for &TcpStream
impl Write for &ChildStdin
impl Write for &Empty
impl Write for &Sink
impl Write for &Stderr
impl Write for &Stdout
impl Write for &mut [u8]

impl Write for File
impl Write for TcpStream
impl Write for UnixStream
impl Write for ChildStdin
impl Write for Arc<File>
impl Write for Cursor<&mut [u8]>

impl Write for Empty
impl Write for Sink
impl Write for Stderr
impl Write for StderrLock<'_>
impl Write for Stdout
impl Write for StdoutLock<'_>

impl<'a> Write for &'a UnixStream
impl<'a> Write for BorrowedCursor<'a>
impl<A> Write for Cursor<&mut Vec<u8, A>> where A: Allocator,
impl<A> Write for Cursor<Box<[u8], A>> where A: Allocator,
impl<A> Write for Cursor<Vec<u8, A>> where A: Allocator,
impl<A: Allocator> Write for VecDeque<u8, A>
impl<A: Allocator> Write for Vec<u8, A>
impl<W: Write + ?Sized> Write for &mut W
impl<W: Write + ?Sized> Write for Box<W>
impl<W: ?Sized + Write> Write for BufWriter<W>
impl<W: ?Sized + Write> Write for LineWriter<W>
impl<const N: usize> Write for Cursor<[u8; N]>
示例:
use std::io::prelude::*;
use std::fs::File;

fn main() -> std::io::Result<()> {
    let data = b"some bytes";
    let mut pos = 0;
    let mut buffer = File::create("foo.txt")?;
    while pos < data.len() {
        let bytes_written = buffer.write(&data[pos..])?;
        pos += bytes_written;
    }

    let mut buffer = File::create("foo2.txt")?;
    write!(buffer, "{:.*}", 2, 1.234567)?;
    buffer.write_fmt(format_args!("{:.*}", 2, 1.234567))?;

    Ok(())
}
15.4 Cursor #
Cursor 是一个泛型类型,它包装了一个 buf:
- AsRef<[u8]>
- Vec<u8>
- &[u8]
- &mut [u8]
- [u8; N]
- Box<[u8]>
Cursor 实现了 BufRead/Read/Seek/Write trait :
pub struct Cursor<T> { /* private fields */ }

impl<T> BufRead for Cursor<T> where T: AsRef<[u8]>
impl<T> Read for Cursor<T> where T: AsRef<[u8]>
impl<T> Seek for Cursor<T> where T: AsRef<[u8]>

impl Write for Cursor<&mut [u8]>
impl<A> Write for Cursor<&mut Vec<u8, A>> where A: Allocator,
impl<const N: usize> Write for Cursor<[u8; N]>
impl<A> Write for Cursor<Box<[u8], A>> where A: Allocator,
impl<A> Write for Cursor<Vec<u8, A>> where A: Allocator,
例子:
use std::io::prelude::*;
use std::io::{self, SeekFrom};
use std::fs::File;

fn write_ten_bytes_at_end<W: Write + Seek>(mut writer: W) -> io::Result<()> {
    writer.seek(SeekFrom::End(-10))?;
    for i in 0..10 {
        writer.write(&[i])?;
    }
    Ok(())
}

let mut file = File::create("foo.txt")?;
write_ten_bytes_at_end(&mut file)?;

#[test]
fn test_writes_bytes() {
    use std::io::Cursor;
    let mut buff = Cursor::new(vec![0; 15]); // 从 Vec<i32> 创建 Cursor
    write_ten_bytes_at_end(&mut buff).unwrap(); // Cursor 实现了 Seek/Write
    assert_eq!(&buff.get_ref()[5..15], &[0, 1, 2, 3, 4, 5, 6, 7, 8, 9]);
}
15.5 Empty #
std::io:empty() 函数返回 Empty 类型对象,它实现了 BufRead/Read/Write/Seek trait ,读返回 EOF, 写被丢弃。
use std::io::{self, Write};

let buffer = vec![1, 2, 3, 5, 8];
let num_bytes = io::empty().write(&buffer).unwrap();
assert_eq!(num_bytes, 5);

use std::io::{self, Read};

let mut buffer = String::new();
io::empty().read_to_string(&mut buffer).unwrap();
assert!(buffer.is_empty());
15.6 Repeat #
std::io::repeat(byte: u8) 创建一个 Repeat 对象, 它实现了 Read trait ,一直返回该 byte:
use std::io::{self, Read};

let mut buffer = [0; 3];
io::repeat(0b101).read_exact(&mut buffer).unwrap();
assert_eq!(buffer, [0b101, 0b101, 0b101]);
15.7 Stdin/StdinLock/Stdout/StdoutLock/Stderr #
std::io::stdin()/stdout()/stderr() 分别返回上面三种类型。
Stdin 对象方法自动获得内部受 mutex 保护的 shared global buffer 锁,也可以调用 Stdin::lock() 来获得 StdinLock 类型对象, 它实现了 BufRead trait 。
// Using implicit synchronization:
use std::io;

fn main() -> io::Result<()> {
    let mut buffer = String::new();
    io::stdin().read_line(&mut buffer)?;
    Ok(())
}

// Using explicit synchronization:
use std::io::{self, BufRead};

fn main() -> io::Result<()> {
    let stdin = io::stdin();
    let mut handle = stdin.lock();
    let mut buffer = String::new();
    handle.read_line(&mut buffer)?;
    Ok(())
}

use std::io;
let lines = io::stdin().lines();
for line in lines {
    println!("got a line: {}", line.unwrap());
}
Stdout/StdoutLock 实现了 Write trait , 其中 Stdout 的方法自动 mutex 同步, StdoutLock 不自动同步:
// Using implicit synchronization:
use std::io::{self, Write};
fn main() -> io::Result<()> {
    io::stdout().write_all(b"hello world")?;
    Ok(())
}

// Using explicit synchronization:
use std::io::{self, Write};
fn main() -> io::Result<()> {
    let stdout = io::stdout();
    let mut handle = stdout.lock();
    handle.write_all(b"hello world")?;
    Ok(())
}

// Using implicit synchronization:
use std::io::{self, Write};
fn main() -> io::Result<()> {
    io::stderr().write_all(b"hello world")?;
    Ok(())
}

// Using explicit synchronization:
use std::io::{self, Write};
fn main() -> io::Result<()> {
    let stderr = io::stderr();
    let mut handle = stderr.lock();
    handle.write_all(b"hello world")?;
    Ok(())
}
Sink 将丢弃写入的数据, 返回 Ok(buf.len()) :
use std::io::{self, Write};

let buffer = vec![1, 2, 3, 5, 8];
let num_bytes = io::sink().write(&buffer).unwrap();
assert_eq!(num_bytes, 5);
16 std::env #
std::env module 提供管理进程参数、环境变量、工作目录和临时目录的函数:
- args(): 获取进程命令行参数
- vars(): 获取环境变量列表
- var(): 获取特定环境变量
- remove_var/set_var(): 删除和设置环境变量
- temp_dir(): 返回临时目录
- current_dir/current_exec(): 当前工作目录和二进制路径
- set_current_dir(): 设置进程当前工作目录;
- join_paths/split_paths(): 对 PATH 环境变量的路径进行处理;
use std::env;
use std::path::PathBuf;

fn main() -> Result<(), env::JoinPathsError> {
    if let Some(path) = env::var_os("PATH") {
        let mut paths = env::split_paths(&path).collect::<Vec<_>>();
        paths.push(PathBuf::from("/home/xyz/bin"));
        let new_path = env::join_paths(paths)?;
        env::set_var("PATH", &new_path);
    }
    Ok(())
}
args() 返回可迭代类型值 Args,迭代产生 String,第一个元素为命令名称:
use std::env;
for argument in env::args() {
    println!("{argument}");
}
var/set_var/remove_var() 读取、设置和删除环境变量:
use std::env;

let key = "KEY";
env::set_var(key, "VALUE");
assert_eq!(env::var(key), Ok("VALUE".to_string()));

env::remove_var(key);
assert!(env::var(key).is_err());

match env::var(key) {
    Ok(val) => println!("{key}: {val:?}"),
    Err(e) => println!("couldn't interpret {key}: {e}"),
}
17 std::path #
Path/PathBuf 支持系统无关的路径字符串, 它们是 OsString/OsStr 的瘦包装类型。
Path 类似于 str,是 unsized type 和不可变类型,一般和 & 或 Box 联合使用。
PathBuf 类似于 String,是 Path 的 owned 版本,可以修改。
pub struct Path { /* private fields */ }

// 示例
use std::path::Path;
use std::ffi::OsStr;

// 传入的值类型需要实现 AsRef<OsStr>
let path = Path::new("./foo/bar.txt");

// &str,&String,&Path 都实现了 AsRef<OsStr>
let string = String::from("foo.txt");
let from_string = Path::new(&string);

let from_path = Path::new(&from_string);
assert_eq!(from_string, from_path);

let parent = path.parent();
assert_eq!(parent, Some(Path::new("./foo")));

let file_stem = path.file_stem();
assert_eq!(file_stem, Some(OsStr::new("bar")));

let extension = path.extension();
assert_eq!(extension, Some(OsStr::new("txt")));
&str/&String/&Path/&PathBuf/&OsStr/&OsString 均实现了 AsRef<OsStr>~,都可以作为 ~Path::new() 的参数。
impl AsRef<OsStr> for Component<'_>
impl AsRef<OsStr> for str
impl AsRef<OsStr> for OsStr
impl AsRef<OsStr> for OsString
impl AsRef<OsStr> for Components<'_>
impl AsRef<OsStr> for std::path::Iter<'_>
impl AsRef<OsStr> for Path
impl AsRef<OsStr> for PathBuf
impl AsRef<OsStr> for String

impl AsRef<Path> for Cow<'_, OsStr>
impl AsRef<Path> for Component<'_>
impl AsRef<Path> for str
impl AsRef<Path> for OsStr
impl AsRef<Path> for OsString
impl AsRef<Path> for Components<'_>
impl AsRef<Path> for std::path::Iter<'_>
impl AsRef<Path> for Path
impl AsRef<Path> for PathBuf
impl AsRef<Path> for String
Path 方法:
- pub fn new<S: AsRef<OsStr> + ?Sized>(s: &S) -> &Path
- pub fn as_os_str(&self) -> &OsStr
- pub fn as_mut_os_str(&mut self) -> &mut OsStr
- pub fn to_str(&self) -> Option<&str>
- pub fn to_path_buf(&self) -> PathBuf // 返回可修改的 PathBuf 类型值
- pub fn parent(&self) -> Option<&Path>
- pub fn file_name(&self) -> Option<&OsStr>
- pub fn strip_prefix<P>(&self, base: P) -> Result<&Path, StripPrefixError>
- pub fn extension(&self) -> Option<&OsStr>
- pub fn join<P: AsRef<Path>>(&self, path: P) -> PathBuf // 返回可修改的 PathBuf 类型值
- pub fn with_extension<S: AsRef<OsStr>>(&self, extension: S) -> PathBuf
Path 与文件系统相关的方法:
- pub fn read_link(&self) -> Result<PathBuf>
- pub fn read_dir(&self) -> Result<ReadDir>
- pub fn exists(&self) -> bool
- pub fn is_file(&self) -> bool
- pub fn is_dir(&self) -> bool
- pub fn is_symlink(&self) -> bool
- pub fn metadata(&self) -> Result<Metadata>
- pub fn symlink_metadata(&self) -> Result<Metadata>
Struct std::path::PathBuf 类型:
// An owned, mutable path (akin to String).
pub struct PathBuf { /* private fields */ }

use std::path::PathBuf;
let mut path = PathBuf::new();
path.push(r"C:\");
path.push("windows");
path.push("system32");
path.set_extension("dll");
PathBuf 的方法:
- pub fn new() -> PathBuf
- pub fn with_capacity(capacity: usize) -> PathBuf
- pub fn as_path(&self) -> &Path // 转换为 Path
- pub fn push<P: AsRef<Path>>(&mut self, path: P)
- pub fn set_file_name<S: AsRef<OsStr>>(&mut self, file_name: S)
- pub fn set_extension<S: AsRef<OsStr>>(&mut self, extension: S) -> bool
PathBuf 实现了 Deref<Target=Path> ,所以 PathBuf 可以使用 Path 的所有方法,并且 &PathBuf 可以当作 &Path 使用。
18 std::fs #
std::fs module 的泛型函数一般使用 AsRef<Path> 作为路径参数:
impl AsRef<Path> for Cow<'_, OsStr>
impl AsRef<Path> for Component<'_>
impl AsRef<Path> for str
impl AsRef<Path> for OsStr
impl AsRef<Path> for OsString
impl AsRef<Path> for Components<'_>
impl AsRef<Path> for std::path::Iter<'_>
impl AsRef<Path> for Path
impl AsRef<Path> for PathBuf
impl AsRef<Path> for String

// 例子
use std::fs;

fn main() -> Result<(), Box<dyn std::error::Error + 'static>> {
    let data: Vec<u8> = fs::read("image.jpg")?;
    assert_eq!(data[0..3], [0xFF, 0xD8, 0xFF]);
    Ok(())

    let message: String = fs::read_to_string("message.txt")?;
    println!("{}", message);
    Ok(())
}

// A simple implementation of `% cat path`
fn cat(path: &Path) -> io::Result<String> {
    let mut f = File::open(path)?;
    let mut s = String::new();
    match f.read_to_string(&mut s) { // 将文件的内容读取到字符串中
        Ok(_) => Ok(s),
        Err(e) => Err(e),
    }
}

// A simple implementation of `% echo s > path`
fn echo(s: &str, path: &Path) -> io::Result<()> {
    let mut f = File::create(path)?;
    f.write_all(s.as_bytes()) // 将 &[u8] 的内容一次性写入文件
}

// A simple implementation of `% touch path` (ignores existing files)
fn touch(path: &Path) -> io::Result<()> {
    match OpenOptions::new().create(true).write(true).open(path) {
        Ok(_) => Ok(()),
        Err(e) => Err(e),
    }
}

fn main() {
    println!("`mkdir a`");
    // Create a directory, returns `io::Result<()>`
    match fs::create_dir("a") {
        Err(why) => println!("! {:?}", why.kind()),
        Ok(_) => {},
    }

    println!("`echo hello > a/b.txt`");
    // The previous match can be simplified using the `unwrap_or_else` method
    echo("hello", &Path::new("a/b.txt")).unwrap_or_else(|why| {
        println!("! {:?}", why.kind());
    });

    println!("`mkdir -p a/c/d`");
    // Recursively create a directory, returns `io::Result<()>`
    fs::create_dir_all("a/c/d").unwrap_or_else(|why| {
        println!("! {:?}", why.kind());
    });

    println!("`touch a/c/e.txt`");
    touch(&Path::new("a/c/e.txt")).unwrap_or_else(|why| {
        println!("! {:?}", why.kind());
    });

    println!("`ln -s ../b.txt a/c/b.txt`");
    // Create a symbolic link, returns `io::Result<()>`
    #[cfg(target_family = "unix")] {
        unix::fs::symlink("../b.txt", "a/c/b.txt").unwrap_or_else(|why| {
            println!("! {:?}", why.kind());
        });
    }
    #[cfg(target_family = "windows")] {
        windows::fs::symlink_file("../b.txt", "a/c/b.txt").unwrap_or_else(|why| {
            println!("! {:?}", why.to_string());
        });
    }

    println!("`cat a/c/b.txt`");
    match cat(&Path::new("a/c/b.txt")) {
        Err(why) => println!("! {:?}", why.kind()),
        Ok(s) => println!("> {}", s),
    }

    println!("`ls a`");
    // Read the contents of a directory, returns `io::Result<Vec<Path>>`
    match fs::read_dir("a") {
        Err(why) => println!("! {:?}", why.kind()),
        Ok(paths) => for path in paths {
            println!("> {:?}", path.unwrap().path());
        },
    }

    println!("`rm a/c/e.txt`");
    // Remove a file, returns `io::Result<()>`
    fs::remove_file("a/c/e.txt").unwrap_or_else(|why| {
        println!("! {:?}", why.kind());
    });

    println!("`rmdir a/c/d`");
    // Remove an empty directory, returns `io::Result<()>`
    fs::remove_dir("a/c/d").unwrap_or_else(|why| {
        println!("! {:?}", why.kind());
    });
}
19 std::time #
提供如下类型:
- Duration : 代表时间间隔;
- Instant : 代表某一时刻, 可用于计算执行耗时;(一般用于记录进程时间,保证单调递增);
- SystemTime : 代表某一个时刻, 不能确保是单调递增的(一般用于保存文件时间);
let five_seconds = Duration::from_secs(5);
assert_eq!(five_seconds, Duration::from_millis(5_000));
assert_eq!(five_seconds, Duration::from_micros(5_000_000));
assert_eq!(five_seconds, Duration::from_nanos(5_000_000_000));
let ten_seconds = Duration::from_secs(10);
let seven_nanos = Duration::from_nanos(7);
let total = ten_seconds + seven_nanos; // Duration 实现了算术运算符重载
assert_eq!(total, Duration::new(10, 7)); // new() 参数是秒和纳秒

let now = Instant::now();
slow_function();
let elapsed_time = now.elapsed();
println!("Running slow_function() took {} seconds.", elapsed_time.as_secs());
Duration 代表时间间隔,由 second 和 nanoseconds 组成,它实现了 Add/AddAssign/Sub/SubAssign/Div/DivAssign 等运算符重载 trait,可以直接进行算术运算。
// 创建
pub const fn new(secs: u64, nanos: u32) -> Duration
pub const fn from_secs(secs: u64) -> Duration
pub const fn from_millis(millis: u64) -> Duration
pub const fn from_micros(micros: u64) -> Duration
pub const fn from_nanos(nanos: u64) -> Duration

pub const fn is_zero(&self) -> bool

// 返回
pub const fn as_secs(&self) -> u64
pub const fn as_millis(&self) -> u128
pub const fn as_micros(&self) -> u128
pub const fn as_nanos(&self) -> u128

// 返回不足一秒的小数部分
pub const fn subsec_millis(&self) -> u32
pub const fn subsec_micros(&self) -> u32
pub const fn subsec_nanos(&self) -> u32

pub const fn abs_diff(self, other: Duration) -> Duration

// 例子
use std::time::Duration;

// new() 参数是秒和纳秒
let five_seconds = Duration::new(5, 0);
let five_seconds_and_five_nanos = five_seconds + Duration::new(0, 5);

assert_eq!(five_seconds_and_five_nanos.as_secs(), 5);
assert_eq!(five_seconds_and_five_nanos.subsec_nanos(), 5);
Instant 代表某一个时刻,在程序中是单调递增的,可以用来测量执行时间。Instant.elapsed() 返回 Duration~,而且方法参数也是 ~Duration ;
pub fn now() -> Instant

// 两个 Instant 之间的差距
pub fn duration_since(&self, earlier: Instant) -> Duration
pub fn checked_duration_since(&self, earlier: Instant) -> Option<Duration>
pub fn saturating_duration_since(&self, earlier: Instant) -> Duration

// 时间流逝
pub fn elapsed(&self) -> Duration

// 添加 Duration 后的新 Instant
pub fn checked_add(&self, duration: Duration) -> Option<Instant>
pub fn checked_sub(&self, duration: Duration) -> Option<Instant>

// 示例:
use std::time::{Duration, Instant};
use std::thread::sleep;

fn main() {
   let now = Instant::now();
   sleep(Duration::new(2, 0));
   println!("{}", now.elapsed().as_secs());
}
20 std::sync #
Arc 的 clone 返回共享一个单例对象的引用计数对象,所以只能获得该对象的 =共享借用=。如果要修改 Arc 包含的对象,则需要使用 RefCell、Mutex 等具有内部可变性的类型。
20.1 mpsc #
let (tx, rx) = mpsc::channel():
- tx 支持 clone() ,可以在多个线程使用, 而 rx 不支持 clone(), 只能有一个实例。如果要在多个线程中访问 rx,需要 Arc + Mutext;
- tx clone 后的多个对象必须都被 drop 后, rx.recv() 才不会继续被 blocking;
- tx 发送的所有数据都串行缓冲, 即使 tx 都被 drop, 内容还在, 直到 rx 接受完数据;
- 数据发往 tx 后,所有权被转移;
let (tx, rx) = mpsc::channel();

let tx1 = tx.clone();
thread::spawn(move || {
    let vals = vec![
        String::from("hi"),
        String::from("from"),
        String::from("the"),
        String::from("thread"),
    ];

    for val in vals {
        tx1.send(val).unwrap(); // val 所有权被转移到 channel
        thread::sleep(Duration::from_secs(1));
    }
});

thread::spawn(move || {
    let vals = vec![
        String::from("more"),
        String::from("messages"),
        String::from("for"),
        String::from("you"),
    ];

    for val in vals {
        tx.send(val).unwrap();
        thread::sleep(Duration::from_secs(1));
    }
});

// 所有权转移给接收者。
for received in rx {
    println!("Got: {}", received);
}
20.2 mutex #
Mutex 可以作为全局 static 对象,用 Arc 包裹后可以在多线程环境中使用。
Mutex 支持内部可变性:mutex.lock().unwrap() 返回的是一个新 MutexGuard<'_, T> 类型对象, 所以可以给它赋值给 mut 类型变量(let mut data = data.lock().unwrap()), 进而可以对 MutexGuard 进行修改。
由于 MutexGuard 实现了 DerefMut<Target=T> , 所以可以像 &mut T 一样使用 data 变量.
use std::sync::{Mutex, Arc};
use std::thread;

fn main() {
    let counter = Arc::new(Mutex::new(0));
    let mut handles = vec![];

    for _ in 0..10 {
        let counter = Arc::clone(&counter); // 惯例是使用 Arc 类型的 clone 方法
        let handle = thread::spawn(move || {
            let mut num = counter.lock().unwrap();
            *num += 1;
        });
        handles.push(handle);
    }

    for handle in handles {
        handle.join().unwrap();
    }

    // 这里 counter 前的 * 是可选的。
    println!("Result: {}", *counter.lock().unwrap());
}
20.3 RWLock #
use std::sync::RwLock;

let lock = RwLock::new(5);

// many reader locks can be held at once
{
    // r1 和 r2 都是 std::sync::RwLockReadGuard,实现了 Deref<Target=T> 的智能指针。
    let r1 = lock.read().unwrap();
    let r2 = lock.read().unwrap();
    assert_eq!(*r1, 5);
    assert_eq!(*r2, 5);
} // read locks are dropped at this point

// only one write lock may be held, however
{
    let mut w = lock.write().unwrap();
    *w += 1;
    assert_eq!(*w, 6);
} // write lock is dropped here
20.4 condvar #
Condvar 需要和 Mutex 一块使用:
use std::sync::{Arc, Mutex, Condvar};
use std::thread;

let pair = Arc::new((Mutex::new(false), Condvar::new()));
let pair2 = Arc::clone(&pair);

thread::spawn(move|| {
    // 使用 &* 来获得 Deref<Targe=T> 的 &T 值。
    let (lock, cvar) = &*pair2;  // deref,lock 和 cvar 都是借用类型
    // started 是 MutexGuard 类型, 被 drop 时自动释放锁
    let mut started = lock.lock().unwrap();
    *started = true;
    cvar.notify_one();
});

// Wait for the thread to start up.
let (lock, cvar) = &*pair;
let mut started = lock.lock().unwrap();
// started 时 MutexGuard 类型,MutxtGuard 实现了 Deref, 所以 *started 返回内部的 bool 值
while !*started {
    // wait 需要传入 MutexGuard, 执行 wait() 时内部会使用 MutexGuard 释放锁, 然后在收到 notify 时会再次获得锁
    started = cvar.wait(started).unwrap();
}
20.5 atomic #
各种 atomic 类型,如 AtomicBool, AtomicIsize, AtomicUsize, AtomicI8, AtomicU16 支持多线程原子更新, 用于实现无锁并发:
- 各方法, 如 load/store/swap/fetch 等, 都是 &self, 不需要 &mut self;
- 各 atomic 类型实现了 Sync 但没有实现 Send, 需要包裹在 Arc 中使用;
- rust atomic follow C++20 atomics 规范, 每个方法都接受一个 Ordering 参数来指定 memory barrier 类型.
use std::sync::Arc;
use std::sync::atomic::{AtomicUsize, Ordering};
use std::{hint, thread};

fn main() {
    let spinlock = Arc::new(AtomicUsize::new(1));

    let spinlock_clone = Arc::clone(&spinlock);
    let thread = thread::spawn(move|| {
        spinlock_clone.store(0, Ordering::SeqCst);
    });

    // Wait for the other thread to release the lock
    while spinlock.load(Ordering::SeqCst) != 0 {
        hint::spin_loop();
    }

    if let Err(panic) = thread.join() {
        println!("Thread had an error: {panic:?}");
    }
}
atomic 支持内部可变性, 可以定义为全局变量,但 atomic 不支持 Send,需要用 Arc 包裹后在多线程环境中使用。
use std::sync::atomic::{AtomicUsize, Ordering};

// 全局 static 变量, 即使不是 static mut 后续也可以更新(因为 atomic 的 fetch/load 的参数都是 &self)
static GLOBAL_THREAD_COUNT: AtomicUsize = AtomicUsize::new(0);

let old_thread_count = GLOBAL_THREAD_COUNT.fetch_add(1, Ordering::SeqCst);
println!("live threads: {}", old_thread_count + 1);
通用方法:
pub fn compare_exchange(
    &self,
    current: bool,
    new: bool,
    success: Ordering,
    failure: Ordering,
) -> Result<bool, bool> {

pub fn compare_exchange_weak(
    &self,
    current: bool,
    new: bool,
    success: Ordering,
    failure: Ordering
) -> Result<bool, bool>

pub fn load(&self, order: Ordering) -> bool
pub fn store(&self, val: bool, order: Ordering)
pub fn swap(&self, val: bool, order: Ordering) -> bool
Ordering 类型:
- Relaxed: 最宽松;
- Release: store 写入操作时指定;
- Acquire: load 读取时指定;
- AcqRel: 同时 Acquire 和 Release, 在 load&store 时使用;
- SeqCst: 最严格的模式,不确定时默认使用该类型即可。
pub enum Ordering {
    Relaxed,
    Release,
    Acquire,
    AcqRel,
    SeqCst,
}
20.6 Once/OnceCell/OnceLock #
Once 是一个用于只进行一次全局初始化的类型,特别适用于 FFI 场景。第一次调用 Once 类型值的 方法时,执行对应闭包中的初始化逻辑,后续调用时不会再执行该函数。Once 类型本身不会拥有初始化值,而只是确保 的闭包只会执行一次。
// Once 是一个普通的结构体类型
pub struct Once { /* private fields */ }

pub const fn new() -> Once
pub fn call_once<F>(&self, f: F) where F: FnOnce(),
pub fn call_once_force<F>(&self, f: F) where F: FnOnce(&OnceState),
pub fn is_completed(&self) -> bool
pub fn wait(&self)
pub fn wait_force(&self)

// 示例
use std::sync::Once;

static START: Once = Once::new();

START.call_once(|| {
    // run initialization here
});

// 另一个例子,用于设置全局变量 VAL
use std::sync::Once;

static mut VAL: usize = 0;
static INIT: Once = Once::new();

// Accessing a `static mut` is unsafe much of the time, but if we do so in a synchronized fashion
// (e.g., write once or read all) then we're good to go!
//
// This function will only call `expensive_computation` once, and will otherwise always return the
// value returned from the first invocation.
fn get_cached_val() -> usize {
    unsafe {
        INIT.call_once(|| {
            VAL = expensive_computation();
        });
        VAL
    }
}
fn expensive_computation() -> usize {
    // ...
}


// 初始化和查询
use std::sync::Once;

static INIT: Once = Once::new();
assert_eq!(INIT.is_completed(), false);

INIT.call_once(|| {
    assert_eq!(INIT.is_completed(), false);
});

assert_eq!(INIT.is_completed(), true);
Struct std::sync::OnceLock 是线程安全的 Struct std::cell::OnceCell 版本,用于封装 只能写入一次 的变量:
- OnceLock 基于 Once 实现,但 OnceLock 提供了 get/get_or_init/set/take() 等更方便的方法。
- OnceLock
实现了内部可变性,除了 get_mut() 方法是 &mut self 外,其他方法都是 &self 或 self, 而且 OnceLock 实现了 Send/Sync/Clone,所以可以在多线程环境中无锁使用(不需要 move,也不需要加锁)。
OnceLock 的方法:
- 使用 set()/get_or_init()/get_or_try_init() 方法来设置一次 OnceLock。
- static 常量具有 ‘static , 可以在多个线程里并发访问。(线程里不允许有非 ‘static 的引用,需要使用 move 闭包拥有所有权)
pub struct OnceLock<T> { /* private fields */ }

impl<T> OnceLock<T>

pub const fn new() -> OnceLock<T>

// Gets the reference to the underlying value.
// Returns None if the cell is empty, or being initialized. This method never blocks.
pub fn get(&self) -> Option<&T>
pub fn get_mut(&mut self) -> Option<&mut T>

// OnceLock 支持内部可变性,下面的方法都是 &self,所以可以同时在多个线程中无锁使用,也不需要 move。
pub fn set(&self, value: T) -> Result<(), T>
pub fn try_insert(&self, value: T) -> Result<&T, (&T, T)>
pub fn get_or_init<F>(&self, f: F) -> &T where F: FnOnce() -> T
pub fn get_or_try_init<F, E>(&self, f: F) -> Result<&T, E> where F: FnOnce() -> Result<T, E>

pub fn into_inner(self) -> Option<T>
pub fn take(&mut self) -> Option<T>
示例:
- 在函数内部定义 OnceLock 类型的 static 变量,实现 lazy static 或 memoizing ;
- 实现全局 static 常量;(因为只能初始化一次,后续都只读,故不需要加锁。另外具有内部可变性,故不需要是 static mut 静态变量。)
// 在函数内部定义 OnceLock 类型的 static 变量,实现 lazy static 或 memoizing
use std::sync::OnceLock;

struct DeepThought {
    answer: String,
}

impl DeepThought {
    fn new() -> Self {
        Self {
            // M3 Ultra takes about 16 million years in --release config
            answer: Self::great_question(),
        }
    }
}

fn computation() -> &'static DeepThought {
    // n.b. static items do not call [`Drop`] on program termination, so if
    // [`DeepThought`] impls Drop, that will not be used for this instance.

    // 静态常量(不是 static mut 静态变量),函数返回后还存在。
    static COMPUTATION: OnceLock<DeepThought> = OnceLock::new();

    // COMPUTATION 具有内部可变性,所以在共享借用情况下,调用 get_or_init() 方法,只会执行一次 init。
    COMPUTATION.get_or_init(|| DeepThought::new())
}

// The `DeepThought` is built, stored in the `OnceLock`, and returned.
let _ = computation().answer;

// The `DeepThought` is retrieved from the `OnceLock` and returned.
let _ = computation().answer;


// 另一个例子:在另一个线程中写入 OnceLock
use std::sync::OnceLock;

// 全局静态常量(具有内部可变性)
static CELL: OnceLock<usize> = OnceLock::new();

// `OnceLock` has not been written to yet.
assert!(CELL.get().is_none());

// Spawn a thread and write to `OnceLock`.
std::thread::spawn(|| {
    // 由于 CELL.get_or_init(&self, f: F) 是 &self,所以不需要 move
    let value = CELL.get_or_init(|| 12345);
    assert_eq!(value, &12345);
})
    .join()
    .unwrap();

// `OnceLock` now contains the value.
assert_eq!(
    CELL.get(),
    Some(&12345),
);
20.7 LazyCell/LazyLock #
Rust 1.80 开始支持 LazyLock, 广泛使用的 lazy_static 可以使用 std::sync::LazyLock 来代替。
相比 OnceLock, 更建议使用 LazyLock<T, F>,因为 LazyLock 在首次 Deref<Target=T> 自动调用 F 闭包 进行初始化,而 OnceLock 需要显式的调用 get_or_init() 方法来进行初始化。
std::sync::LazyLock 是 std::cell::LazyCell 的线程安全版本,封装了 Once 和 UnsafeCell, 也具有内部可变性 ,可用于定义 static 常量。
use std::sync::LazyLock;

// 创建 LazyLock 时指定初始化闭包函数,闭包返回内部保存值。
// DEEP_THOUGHT 具有内部可变性,不需要定义为 static mut 类型。
static DEEP_THOUGHT: LazyLock<String> = LazyLock::new(|| {
    another_crate::great_question()
});

// 第一个 Deref 时自动调用初始化闭包。
let _ = &*DEEP_THOUGHT;

// 后续返回已初始化的值。
let _ = &*DEEP_THOUGHT;


// Lazyock 用在 struct field 中
use std::sync::LazyLock;

#[derive(Debug)]
struct UseCellLock {
    number: LazyLock<u32>,
}

fn main() {
    let lock: LazyLock<u32> = LazyLock::new(|| 0u32);

    let data = UseCellLock { number: lock }; // 此时 number field 未被初始化
    println!("{}", *data.number); // number field 被初始化
}
21 std::thread #
并发编程(concurrent programming)与并行编程(parallel programming)这两种概念随着计算机设备的多核心化而变得越来越重要。前者允许程序中的不同部分相互独立地运行,而后者则允许程序中的不同部分同时执行。
由于绿色线程的 M:N 模型需要一个较大的运行时来管理线程,所以 Rust 标准库只提供了 1:1 线程模型的实现。
Rust thread 使用 thread::spawn() 来运行一个 thread,传入的闭包函数必须满足 Send + 'static :
pub fn spawn<F, T>(f: F) -> JoinHandle<T>
where
    F: FnOnce() -> T + Send + 'static,
    T: Send + 'static,
由于闭包函数 F 在某个 thread 中运行, 它不能使用外围对象的共享引用 。因为编译器不能确定该 thread 和外围 thread 的生命周期关系,如果外围 thread 退出导致对象被 drop,则该 thread 的引用将失效。所以,一般使用 move 来将引用对象的所有权转移到闭包中, 从而满足 ‘static 要求。
例外情况是,闭包中只引用 static 静态(全局)常量,由于全局常量具有 ‘static 生命周期,这时不需要 move 转移所有权。常见的使用场景是跨进程访问的,具有内部可变性的全局静态变量 static GLOBAL_VAR = Arc<Mutex<T>>;
// 错误
use std::thread;

fn main() {
    let v = vec![1, 2, 3];

    let handle = thread::spawn(|| {
        // 编译失败,没有加 move 时默认是 reference
        println!("Here's a vector: {:?}", v);
    });

    handle.join().unwrap();
}

// 正确
fn main() {
    let v = vec![1, 2, 3];
    // move 指示 closure 捕获的外部对象,都是 ownership 接管,而非引用的方式。
    let handle = thread::spawn(move || {
        println!("Here's a vector: {:?}", v);
    });
    // 错误,因为 v ownership 已经转义到线程闭包函数中,故这里不能再引用它。
    // drop(v);
    handle.join().unwrap();
}
通过在闭包函数中 move 接管外部对象,Rust 的 ownership 规则可以防止并发编程错误(编译时报错)。
如果只能有一个变量拥有对象所有权,当要在多个线程中共享同一个对象时,可以使用线程安全的 Arc<T> 智能指针,通过 clone 创建的 Arc<T> 都是 T 的共享引用,不能修改(但可以使用内部可变性对象)。
let value = Arc::new(myType);

for _ in 0..5 {
    // 每创建一个 thread 前,先 clone Arc,增加 value 的引用计数
    let value2 = Arc::clone(&value); // 或者 let value2 = value.clone();

    // move closure 函数捕获 value2 ownership
    thread.spawn(move || {
        let f = value2.filed;
        // ...
        // 线程推出时,value2 被 drop,引用计数减少
    })
}
由于 Mutext<T>/RWlock<T>/AutomicXX<T> 都是线程安全的 内部可变性对象 ,所以通过 Arc<Mutex<T>> Deref 生成的 mutex 共享引用,然后调用 lock() 方法来修改。
闭包的返回值可以通过 JoinHandler.join() 获取, 它返回的是 std::thread::Result 类型,如果子线程 panic 则对应 Err, 否则 Ok(value) ,value 值为 spawn() 闭包函数的返回值。
可以使用 builder 模式来自定义 thread name/stack_size 参数(默认是 2MiB,也可以通过 RUST_MIN_STACK 环境变量来设置); thread name 是可选的。
thread 默认没有 name,如果指定了 name。则在 panic 时显示 thread name。同时会调用 OS 的 pthread_setname_np() 函数来设置系统的线程名,这样在 top、ps 时会显示该 thread 的名称。
- 例如 tokio 的 worker thread 会设置自己的名称,可以通过 ps、top 命令看到。
use std::thread;

let thread_join_handle = thread::spawn(move || {
    // some work here
});

// some work here
let res = thread_join_handle.join().unwrap();


// 配置 thread, 如 name/stack_size
use std::thread;
let handler = thread::Builder::new().name("thread1".to_string()).spawn(
  move || {
    println!("Hello, world!");
  }).unwrap();
handler.join().unwrap();
Thread 对象的方法:id()/name()/unpark()
- id() 返回的 std:🧵:ThreadId 可以通过 as_u64() 返回编号;
- 每个线程都有一个无锁的 blocking 机制,使用 std:🧵:park()/park_timeout() 来暂停,然后使用 Thread 对象的 unpark()方法来继续。如果在线程运行前,已经被 unpark(), 则线程运行到 thread::park() 时会直接返回。
use std::thread;
use std::time::Duration;

let parked_thread = thread::Builder::new()
    .spawn(|| {
        println!("Parking thread");
        thread::park(); // 暂停
        println!("Thread unparked");
    })
    .unwrap();

// Let some time pass for the thread to be spawned.
thread::sleep(Duration::from_millis(10));

println!("Unpark the thread");
parked_thread.thread().unpark(); // 继续
parked_thread.join().unwrap();


// 另一例子,使用 park/unpark 来进行初始化同步。
use std::thread;
use std::sync::{Arc, atomic::{Ordering, AtomicBool}};
use std::time::Duration;

let flag = Arc::new(AtomicBool::new(false));
let flag2 = Arc::clone(&flag);

let parked_thread = thread::spawn(move || {
    // We want to wait until the flag is set. We *could* just spin, but using park/unpark is more efficient.
    while !flag2.load(Ordering::Relaxed) {
        println!("Parking thread");
        thread::park();
        // We *could* get here spuriously, i.e., way before the 10ms
        // below are over! But that is no problem, we are in a loop until the
        // flag is set anyway.
        println!("Thread unparked");
    }
    println!("Flag received");
});

// Let some time pass for the thread to be spawned.
thread::sleep(Duration::from_millis(10));

// Set the flag, and let the thread wake up.
// There is no race condition here, if `unpark` happens first, `park` will return immediately.
// Hence there is no risk of a deadlock.
flag.store(true, Ordering::Relaxed);

println!("Unpark the thread");
parked_thread.thread().unpark();
parked_thread.join().unwrap();
21.1 scope thread #
thread closure 的签名是 dyn FnOnce() -> T + Send + 'static , 因为不能确保在主函数返回前 thread 一定执行完毕和被 join, 所以不能使用父线程 stack 上的变量引用(不满足 ‘static 要求):
use std::thread;

let people = vec![
    "Alice".to_string(),
    "Bob".to_string(),
    "Carol".to_string(),
];

let mut threads = Vec::new();

for person in &people {
    threads.push(thread::spawn(move || {
        println!("Hello, {}!", person);
    }));
}

for thread in threads {
    thread.join().unwrap();
}
报错:
error[E0597]: `people` does not live long enough
  --> src/main.rs:12:20
   |
12 |     for person in &people {
   |                    ^^^^^^ borrowed value does not live long enough
...
21 | }
   | - borrowed value only lives until here
   |
   = note: borrowed value must be valid for the static lifetime...
解决办法: 使用 scope thread , 它确保在 scope 函数返回前, 内部 spawn 的 thread 都被 join(显式或自动), 可以不使用 move 的情况下引用 stack 变量:
- std:🧵:scope() 参数是 Scope 类型闭包,使用 scope.spawn() 来创建线程;
- scope() 函数返回前自动 join 所有内部 spawn 的线程;
- Scope.spawn() 的参数是线程闭包函数 FnOnce(), 内部可以共享引用 stack 变量, 也可以 &mut 引用 stack 变量, 但是要确保只能有一个 spawn() 闭包是 mut 使用该变量;
pub fn scope<'env, F, T>(f: F) -> T
where
    // 没有 Send + 'static 的要求
    F: for<'scope> FnOnce(&'scope Scope<'scope, 'env>) -> T,

// 示例
use std::thread;

let mut a = vec![1, 2, 3];
let mut x = 0;

thread::scope(|s| { // s 是一个 &std::thread::Scope 类型对象
    s.spawn(|| {  // 使用 Scope.spawn() 来创建闭包
        println!("hello from the first scoped thread");
        dbg!(&a); // 共享借用 a
    });

    s.spawn(|| {
        println!("hello from the second scoped thread");
        x += a[0] + a[2]; // 共享借用 a ,可变借用 x
    });

    println!("hello from the main thread");
}); // thread::scope() 确保内部 spawn 的线程都执行返回后,再返回。

a.push(4);
assert_eq!(x, a.len());

let mut data = vec![5];
std::thread::scope(|s| {
    for _ in 0..5 {
        s.spawn(|| println!("{:?}", data));
    }
});
21.2 thread local storage #
使用 thread_local!() 宏来创建 static LocalKey<T> 类型全局常量(具有内部可变性)。
LocalKey<T> 提供了 get/set/with() 等方法,参数都是 &self, 所以为了修改值,=LocalKey 的泛型参数类型 T 需要实现内部可变性= ,一般使用 Cell/RefCell 来包裹(因为是线程本地存储,所以不会有并发问题)。
- get() 返回 T,T 需要实现 Copy;
- take() 返回 T,T 需要实现 Default;
- Rust 为 LocalKey<RefCell<T>> 提供了特殊支持:with_borrow() 和 with_borrow_mut();
use std::cell::RefCell;
use std::thread;

// FOO 类型需要支持内部可变性, 所以使用 Cell/RefCell
thread_local!(static FOO: RefCell<u32> = RefCell::new(1));

FOO.with_borrow(|v| assert_eq!(*v, 1));
FOO.with_borrow_mut(|v| *v = 2);

// 每个线程都有自己的 FOO 对象

let t = thread::spawn(move|| {
    // 子线程的 FOO 对象
    FOO.with_borrow(|v| assert_eq!(*v, 1));
    FOO.with_borrow_mut(|v| *v = 3);
});

t.join().unwrap();

// 主线程的 FOO 对象
FOO.with_borrow(|v| assert_eq!(*v, 2));
22 std::net #
std::net::ToSocketAddrs trait 用于实现域名解析,它的 to_socket_addrs() 方法返回解析后的 IP :
use std::net::{SocketAddr, ToSocketAddrs};

// assuming 'localhost' resolves to 127.0.0.1
let mut addrs_iter = "localhost:443".to_socket_addrs().unwrap();
assert_eq!(addrs_iter.next(), Some(SocketAddr::from(([127, 0, 0, 1], 443))));