一个 LCD 小游戏:esp32-spooky-maze-game
- 使用的是 mipidsi::Builder::st7789,需要修改为 st7735s,支持按键。
- xtensa-esp32s3-none-elf non_std 应用。
另外一个 LCD 项目样例: https://github.com/georgik/esp32-rust-multi-target-template/blob/main/esp32-s3-usb-otg/src/main.rs
ESP Display Interface with SPI and DMA: https://github.com/georgik/esp-display-interface-spi-dma/blob/main/README.md
参考文档:
- https://docs.espressif.com/projects/esp-iot-solution/en/latest/display/lcd/index.html
- https://www.makerfabs.com/esp32-3-5-inch-tft-touch-capacitive-with-camera.html
LCD 和 Touch 一般集成在一块屏幕上(部分 Touch 还支持固定的触摸按钮),所以 esp-idf 提供了 lcd_panel 对象来综合管理 LCD 和 Touch。
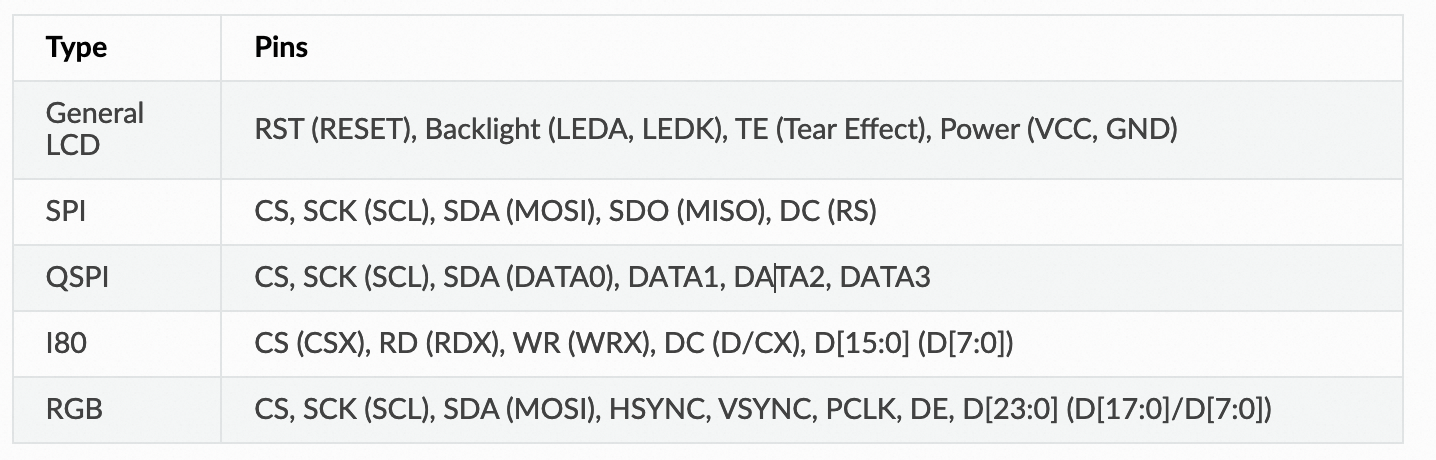
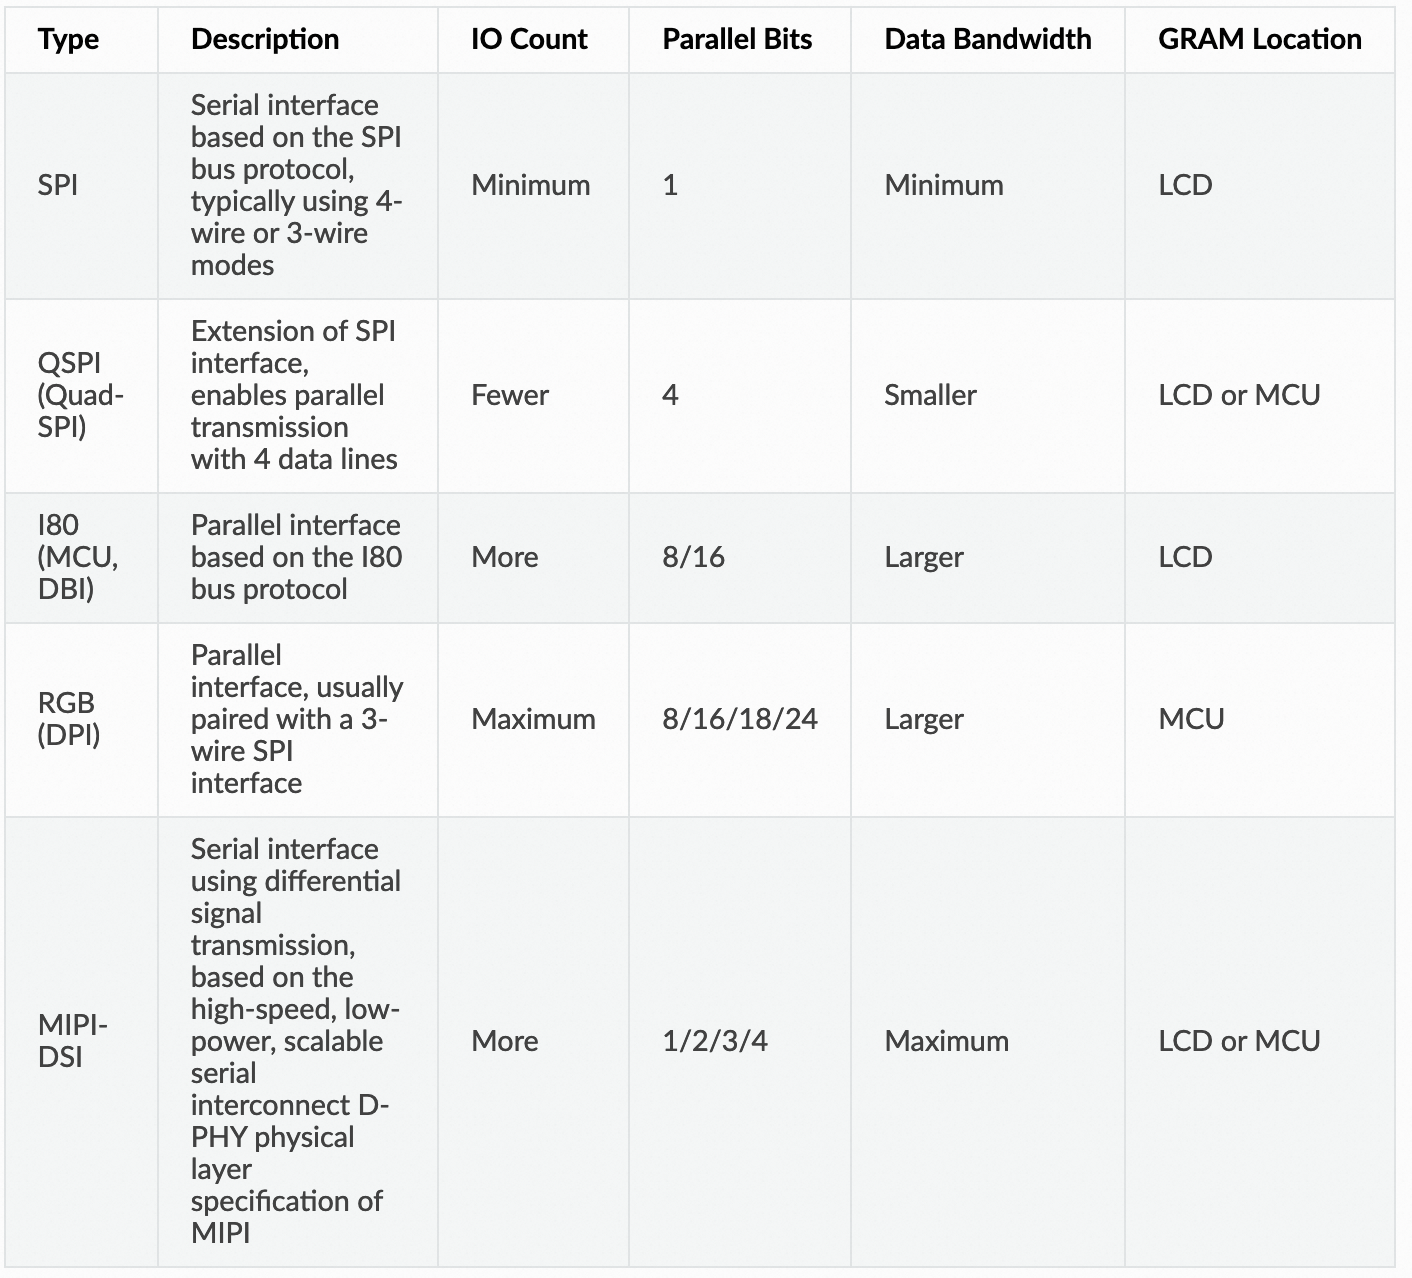
常用 LCD 接口:
- SPI:1 bit 数据线,LCD 需要支持 GRAM;
- QSPI(Quad-SPI):4 bit 数据线,LCD 或 MCU 需要支持 GRAM;
- I80 或称 I8080(DBI): 8/16 bit 数据线,基于 I80 总线协议,
LCD 需要支持 GRAM; - RGB(DPI):8/16/18/24 bit 数据线,LCD 不需要支持 GRAM,
一般和 3线 SPI 共用。- Camera 一般也使用 RGB 接口,包含 HSYNC/VSYNC 信号,所以在 esp-idf 库中 module 为 lcd_camera.
- MIPI-DSI:1/2/3/4 bit 串行接口,使用高速差分信号和 D-PHY 收发器(类似于 USB),目前只有 ESP32-P4 支持。属于传输速率最快的接口
https://docs.espressif.com/projects/esp-iot-solution/en/latest/display/lcd/lcd_guide.html
esp-idf/examples/peripherals/lcd/ 目录包含这些接口的 LCD 驱动:
- i2c_oled:一般是小型的 OLED LCD 屏幕使用 I2C;
- i80_controller:Intel 8080 interfaced
- mipi_dsi:最高效的串行接口;
- rgb_panel
- spi_lcd_touch
- tjpgd :JPEG 软解压库;
esp-iot-solution/examples/display/lcd/ 目录也包含一些 LCD 例子:
- lcd_with_te
- qspi_with_ram
- qspi_without_ram
- rgb_avoid_tearing
- rgb_lcd_8bit
显示 raw 图片 #
raw 图片是指 RGB888/RGB565 等格式的图片。
像素格式主要分为 YUV 和 RGB 两种大类:
- YUV422: 也称为 YCbCr:Y 亮度,U/Cb:蓝色浓度,V/Cr:红色浓度;
- 为了节省带宽 YUV frame 一般使用采样,如 YUV422 表示 2:1的水平取样,垂直完全采样;
- RGB888:也称 24-bit RGB,各使用 8bit 来表示 red/green/blue;
- RGB666: 也称 18-bit RGB
- RGB565:也称 16-bit RGB,5 bits for the red channel, 6 bits for the green channel, and 5 bits for the blue channel. 相比 RGB888,更节省资源;
YUV 和 RGB 之间可以相互转换。
LCD 一般使用 RGB 像素格式,而且是比较节省空间的 16-bit 的 RGB565 像素格式:
- camera 可以直接产生 RGB565 数据,可以直接在 LCD 显示;
- bmp/png/jpeg 等图片格式,需要将像素转换为 RGB565 后才能供 LCD 显示;
需要将 JPEG 解码或 bmp 中的像素数据转换为 RGB888, RGB565 等格式的 raw picture 后,LCD 才能直接显示。
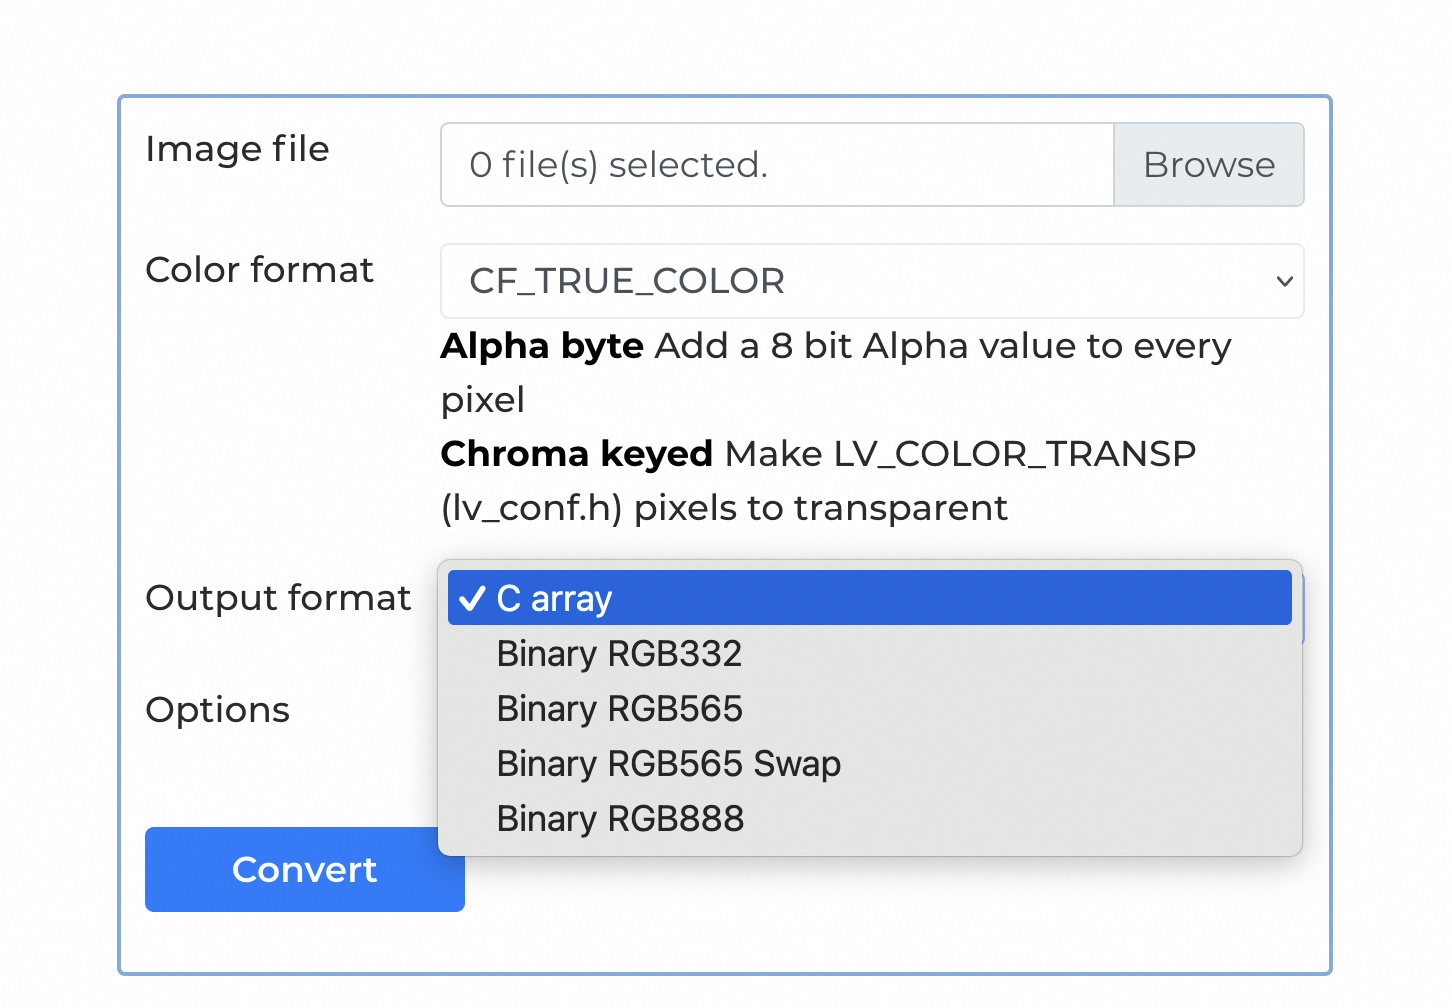
或者使用 LVGL 提供的在线转换工具:https://lvgl.io/tools/imageconverter
可以使用 OpenCV 库来显示 raw data picutre:
# https://github.com/espressif/esp-idf/blob/master/examples/peripherals/jpeg/jpeg_decode/open_raw_picture.py

# SPDX-FileCopyrightText: 2024 Espressif Systems (Shanghai) CO LTD
# SPDX-License-Identifier: Unlicense OR CC0-1.0
import argparse

import cv2 as cv
import numpy as np
from numpy.typing import NDArray


def open_picture(path):  # type: (str) -> list[int]
    with open(path, 'rb') as f:
        data = f.read()
        f.close()
    new_data = [int(x) for x in data]
    return new_data


def picture_show_rgb888(data, h, w):  # type: (list[int], int, int) -> None
    data = np.array(data).reshape(h, w, 3).astype(np.uint8)
    cv.imshow('data', data)
    cv.waitKey()


def picture_show_rgb565(data, h, w):  # type: (list[int], int, int) -> None

    new_data = [0] * ((len(data) // 2) * 3)
    for i in range(len(data)):
        if i % 2 != 0:
            new_data[3 * (i - 1) // 2 + 2] = (data[i] & 0xf8)
            new_data[3 * (i - 1) // 2 + 1] |= (data[i] & 0x7) << 5
        else:
            new_data[3 * i // 2] = (data[i] & 0x1f) << 3
            new_data[3 * i // 2 + 1] |= (data[i] & 0xe0) >> 3

    new_data = np.array(new_data).reshape(h, w, 3).astype(np.uint8)
    cv.imshow('data', new_data)
    cv.waitKey()


def picture_show_gray(data, h, w):  # type: (list[int], int, int) -> None
    new_data = np.array(data).reshape(h, w, 1).astype(np.uint8)
    cv.imshow('data', new_data)
    cv.waitKey()


def convert_YUV_to_RGB(Y, U, V):  # type: (NDArray, NDArray, NDArray) -> tuple[NDArray, NDArray, NDArray]
    B = np.clip(Y + 1.7790 * (U - 128), 0, 255).astype(np.uint8)
    G = np.clip(Y - 0.3455 * (U - 128) - 0.7169 * (V - 128), 0, 255).astype(np.uint8)
    R = np.clip(Y + 1.4075 * (V - 128), 0, 255).astype(np.uint8)

    return B, G, R


def picture_show_yuv420(data, h, w):  # type: (list[int], int, int) -> None
    new_u = [0] * (h * w)
    new_v = [0] * (h * w)
    new_y = [0] * (h * w)

    for i in range(int(h * w * 1.5)):
        is_even_row = ((i // (w * 1.5)) % 2 == 0)
        if is_even_row:
            if (i % 3 == 0):
                new_u[(i // 3) * 2] = data[i]
                new_u[(i // 3) * 2 + 1] = data[i]
        else:
            if (i % 3 == 0):
                new_u[(i // 3) * 2] = new_u[int((i - (w * 1.5)) // 3) * 2]
                new_u[(i // 3) * 2 + 1] = new_u[int((i - (w * 1.5)) // 3) * 2 + 1]

    for i in range(int(h * w * 1.5)):
        if (i // (w * 1.5)) % 2 != 0 and (i % 3 == 0):
            idx = (i // 3) * 2
            new_v[idx] = data[i]
            new_v[idx + 1] = data[i]

    for i in range(int(h * w * 1.5)):
        if (i // (w * 1.5)) % 2 == 0 and (i % 3 == 0):
            idx = (i // 3) * 2
            new_v[idx] = new_v[int((i + (w * 1.5)) // 3) * 2]
            new_v[idx + 1] = new_v[int((i + (w * 1.5)) // 3) * 2 + 1]

    new_y = [data[i] for i in range(int(h * w * 1.5)) if i % 3 != 0]

    Y = np.array(new_y)
    U = np.array(new_u)
    V = np.array(new_v)

    B, G, R = convert_YUV_to_RGB(Y, U, V)
    # Merge channels
    new_data = np.stack((B, G, R), axis=-1)
    new_data = np.array(new_data).reshape(h, w, 3).astype(np.uint8)

    # Display the image
    cv.imshow('data', new_data)
    cv.waitKey()


def picture_show_yuv422(data, h, w):  # type: (list[int], int, int) -> None
    # Reshape the input data to a 2D array
    data_array = np.array(data).reshape(h, w * 2)

    # Separate Y, U, and V channels
    Y = data_array[:, 1::2]
    U = data_array[:, 0::4].repeat(2, axis=1)
    V = data_array[:, 2::4].repeat(2, axis=1)

    # Convert YUV to RGB
    B, G, R = convert_YUV_to_RGB(Y, U, V)

    # Merge channels
    new_data = np.stack((B, G, R), axis=-1)

    # Display the image
    cv.imshow('data', new_data)
    cv.waitKey()


def picture_show_yuv444(data, h, w):  # type: (list[int], int, int) -> None
    # Reshape the input data to a 2D array
    data_array = np.array(data).reshape(h, w * 3)

    # Separate Y, U, and V channels
    Y = data_array[:, 2::3]
    U = data_array[:, 1::3]
    V = data_array[:, 0::3]

    # Convert YUV to RGB
    B, G, R = convert_YUV_to_RGB(Y, U, V)

    # Merge channels
    new_data = np.stack((B, G, R), axis=-1)

    # Display the image
    cv.imshow('data', new_data)
    cv.waitKey()


def main():  # type: () -> None
    parser = argparse.ArgumentParser(description='which mode need to show')

    parser.add_argument(
        '--pic_path',
        type=str,
        help='What is the path of your picture',
        required=True)

    parser.add_argument(
        '--pic_type',
        type=str,
        help='What type you want to show',
        required=True,
        choices=['rgb565', 'rgb888', 'gray', 'yuv422', 'yuv420', 'yuv444'])

    parser.add_argument(
        '--height',
        type=int,
        help='the picture height',
        default=480)

    parser.add_argument(
        '--width',
        type=int,
        help='the picture width',
        default=640)

    args = parser.parse_args()

    height = args.height
    width = args.width

    data = open_picture(args.pic_path)
    if (args.pic_type == 'rgb565'):
        picture_show_rgb565(data, height, width)
    elif (args.pic_type == 'rgb888'):
        picture_show_rgb888(data, height, width)
    elif (args.pic_type == 'gray'):
        picture_show_gray(data, height, width)
    elif (args.pic_type == 'yuv420'):
        picture_show_yuv420(data, height, width)
    elif (args.pic_type == 'yuv422'):
        picture_show_yuv422(data, height, width)
    elif (args.pic_type == 'yuv444'):
        picture_show_yuv444(data, height, width)
    else:
        print('This type is not supported in this script!')


if __name__ == '__main__':
    main()
显示 png 图片 #
使用如下 python 代码将 png 图片转换为 raw RGB 565 format:
#!/usr/bin/python

import sys
from PIL import Image

if len(sys.argv) == 3:
    # print "\nReading: " + sys.argv[1]
    out = open(sys.argv[2], "wb")
elif len(sys.argv) == 2:
    out = sys.stdout
else:
    print "Usage: png2fb.py infile [outfile]"
    sys.exit(1)

im = Image.open(sys.argv[1])

if im.mode == "RGB":
    pixelSize = 3
elif im.mode == "RGBA":
    pixelSize = 4
else:
    sys.exit('not supported pixel mode: "%s"' % (im.mode))

pixels = im.tostring()
pixels2 = ""
for i in range(0, len(pixels) - 1, pixelSize):
    pixels2 += chr(ord(pixels[i + 2]) >> 3 | (ord(pixels[i + 1]) << 3 & 0xe0))
    pixels2 += chr(ord(pixels[i]) & 0xf8 | (ord(pixels[i + 1]) >> 5 & 0x07))
out.write(pixels2)
out.close()
显示 bmp 图片 #
bmp 图片是未经压缩的像素 bit 文件,包含 header + 像素数据,不需要解压缩和转码,可以直接读取,转换为 RGB 565 格式:
// https://github.com/Makerfabs/Project_Touch-Screen-Camera/blob/master/example/SD2TFT/SD2TFT.ino#L205

int print_img(fs::FS &fs, String filename)
{
    SPI_ON_SD;
    File f = fs.open(filename);
    if (!f)
    {
        Serial.println("Failed to open file for reading");
        return 0;
    }

    f.seek(54);
    int X = 480;
    int Y = 320;
    uint8_t RGB[3 * X];
    for (int row = 0; row < Y; row++)
    {
        f.seek(54 + 3 * X * row);
        f.read(RGB, 3 * X);
        SPI_OFF_SD;
        SPI_ON_TFT;
        for (int col = 0; col < X; col++)
        {
            tft.drawPixel(col, row, tft.color565(RGB[col * 3 + 2], RGB[col * 3 + 1], RGB[col * 3]));
        }
        SPI_OFF_TFT;
        SPI_ON_SD;
    }

    f.close();
    SPI_OFF_SD;
    return 0;
}
显示 jpeg 图片 #
JPEG 是压缩图片格式,在 LCD 显示前需要先对其进行解压缩和解码,转换为 LCD 上显示的 RGB 像素数据(raw picture),如 JPEG_RAW_TYPE_RGB565_BE:
// https://github.com/espressif/esp-box/blob/master/examples/usb_camera_lcd_display/main/main.c#L56

// 将 JPEG 解码为 JPEG_RAW_TYPE_RGB565_BE 输出格式
static jpeg_error_t esp_jpeg_decoder_one_picture(uint8_t *input_buf, int len, uint8_t *output_buf)
{
    esp_err_t ret = ESP_OK;
    // Generate default configuration
    jpeg_dec_config_t config = DEFAULT_JPEG_DEC_CONFIG();
    config.output_type = JPEG_RAW_TYPE_RGB565_BE;
    // Empty handle to jpeg_decoder
    jpeg_dec_handle_t jpeg_dec = NULL;

    // Create jpeg_dec
    jpeg_dec = jpeg_dec_open(&config);

    // Create io_callback handle
    jpeg_dec_io_t *jpeg_io = calloc(1, sizeof(jpeg_dec_io_t));
    if (jpeg_io == NULL)
    {
        return ESP_FAIL;
    }

    // Create out_info handle
    jpeg_dec_header_info_t *out_info = calloc(1, sizeof(jpeg_dec_header_info_t));
    if (out_info == NULL)
    {
        return ESP_FAIL;
    }
    // Set input buffer and buffer len to io_callback
    jpeg_io->inbuf = input_buf;
    jpeg_io->inbuf_len = len;

    // Parse jpeg picture header and get picture for user and decoder
    ret = jpeg_dec_parse_header(jpeg_dec, jpeg_io, out_info);
    if (ret < 0)
    {
        goto _exit;
    }

    jpeg_io->outbuf = output_buf;
    int inbuf_consumed = jpeg_io->inbuf_len - jpeg_io->inbuf_remain;
    jpeg_io->inbuf = input_buf + inbuf_consumed;
    jpeg_io->inbuf_len = jpeg_io->inbuf_remain;

    // Start decode jpeg raw data
    ret = jpeg_dec_process(jpeg_dec, jpeg_io);
    if (ret < 0)
    {
        goto _exit;
    }

_exit:
    // Decoder deinitialize
    jpeg_dec_close(jpeg_dec);
    free(out_info);
    free(jpeg_io);
    return ret;
}


static void _camera_display(uint8_t *lcd_buffer)
{
    bsp_display_lock(0);
    // 使用 LVGL 显示解码后的 JPEG 数据
    lv_canvas_set_buffer(camera_canvas, lcd_buffer, current_width, current_height, LV_IMG_CF_TRUE_COLOR);
    lv_label_set_text_fmt(label, "#FF0000 %d*%d#", current_width, current_height);
    bsp_display_unlock();
}


static void camera_frame_cb(uvc_frame_t *frame, void *ptr)
{
    ESP_LOGI(TAG, "uvc callback! frame_format = %d, seq = %" PRIu32 ", width = %" PRIu32 ", height = %" PRIu32 ", length = %u, ptr = %d",
             frame->frame_format, frame->sequence, frame->width, frame->height, frame->data_bytes, (int)ptr);
    if (current_width != frame->width || current_height != frame->height)
    {
        current_width = frame->width;
        current_height = frame->height;
        adaptive_jpg_frame_buffer(current_width * current_height * 2);
    }

    esp_jpeg_decoder_one_picture((uint8_t *)frame->data, frame->data_bytes, jpg_frame_buf); // 解码 JPEG
    _camera_display(jpg_frame_buf); // 显示
    vTaskDelay(pdMS_TO_TICKS(1));
}
上面代码使用的 esp_jpeg 软件解码库 JPEG Decoder: TJpgDec -Tiny JPEG Decompressor
- Output Pixel Format: RGB888, RGB565
- Scaling Ratio: 1/1, 1/2, 1/4 or 1/8 Selectable on Decompression
另一个 LCD tjpgd example:This example shows how to decode a jpeg image and display it on an SPI-interfaced LCD, and rotates the image periodically.
// https://github.com/espressif/esp-idf/blob/master/examples/peripherals/lcd/tjpgd/main/decode_image.c

//Decode the embedded image into pixel lines that can be used with the rest of the logic.
esp_err_t decode_image(uint16_t **pixels)
{
    *pixels = NULL;
    esp_err_t ret = ESP_OK;

    //Alocate pixel memory. Each line is an array of IMAGE_W 16-bit pixels; the `*pixels` array itself contains pointers to these lines.
    *pixels = calloc(IMAGE_H * IMAGE_W, sizeof(uint16_t));
    ESP_GOTO_ON_FALSE((*pixels), ESP_ERR_NO_MEM, err, TAG, "Error allocating memory for lines");

    //JPEG decode config
    esp_jpeg_image_cfg_t jpeg_cfg = {
        .indata = (uint8_t *)image_jpg_start,
        .indata_size = image_jpg_end - image_jpg_start,
        .outbuf = (uint8_t*)(*pixels),
        .outbuf_size = IMAGE_W * IMAGE_H * sizeof(uint16_t),
        .out_format = JPEG_IMAGE_FORMAT_RGB565,
        .out_scale = JPEG_IMAGE_SCALE_0,
        .flags = {
            .swap_color_bytes = 1,
        }
    };

    //JPEG decode
    esp_jpeg_image_output_t outimg;
    esp_jpeg_decode(&jpeg_cfg, &outimg);

    ESP_LOGI(TAG, "JPEG image decoded! Size of the decoded image is: %dpx x %dpx", outimg.width, outimg.height);

    return ret;
err:
    //Something went wrong! Exit cleanly, de-allocating everything we allocated.
    if (*pixels != NULL) {
        free(*pixels);
    }
    return ret;
}
对于 JPEG 解码生成的可以 LCD 显示的 RGB888, RGB565 等格式的 raw picture, 可以使用 OpenCV 库来显示:
# https://github.com/espressif/esp-idf/blob/master/examples/peripherals/jpeg/jpeg_decode/open_raw_picture.py

# SPDX-FileCopyrightText: 2024 Espressif Systems (Shanghai) CO LTD
# SPDX-License-Identifier: Unlicense OR CC0-1.0
import argparse

import cv2 as cv
import numpy as np
from numpy.typing import NDArray


def open_picture(path):  # type: (str) -> list[int]
    with open(path, 'rb') as f:
        data = f.read()
        f.close()
    new_data = [int(x) for x in data]
    return new_data


def picture_show_rgb888(data, h, w):  # type: (list[int], int, int) -> None
    data = np.array(data).reshape(h, w, 3).astype(np.uint8)
    cv.imshow('data', data)
    cv.waitKey()


def picture_show_rgb565(data, h, w):  # type: (list[int], int, int) -> None

    new_data = [0] * ((len(data) // 2) * 3)
    for i in range(len(data)):
        if i % 2 != 0:
            new_data[3 * (i - 1) // 2 + 2] = (data[i] & 0xf8)
            new_data[3 * (i - 1) // 2 + 1] |= (data[i] & 0x7) << 5
        else:
            new_data[3 * i // 2] = (data[i] & 0x1f) << 3
            new_data[3 * i // 2 + 1] |= (data[i] & 0xe0) >> 3

    new_data = np.array(new_data).reshape(h, w, 3).astype(np.uint8)
    cv.imshow('data', new_data)
    cv.waitKey()


def picture_show_gray(data, h, w):  # type: (list[int], int, int) -> None
    new_data = np.array(data).reshape(h, w, 1).astype(np.uint8)
    cv.imshow('data', new_data)
    cv.waitKey()


def convert_YUV_to_RGB(Y, U, V):  # type: (NDArray, NDArray, NDArray) -> tuple[NDArray, NDArray, NDArray]
    B = np.clip(Y + 1.7790 * (U - 128), 0, 255).astype(np.uint8)
    G = np.clip(Y - 0.3455 * (U - 128) - 0.7169 * (V - 128), 0, 255).astype(np.uint8)
    R = np.clip(Y + 1.4075 * (V - 128), 0, 255).astype(np.uint8)

    return B, G, R


def picture_show_yuv420(data, h, w):  # type: (list[int], int, int) -> None
    new_u = [0] * (h * w)
    new_v = [0] * (h * w)
    new_y = [0] * (h * w)

    for i in range(int(h * w * 1.5)):
        is_even_row = ((i // (w * 1.5)) % 2 == 0)
        if is_even_row:
            if (i % 3 == 0):
                new_u[(i // 3) * 2] = data[i]
                new_u[(i // 3) * 2 + 1] = data[i]
        else:
            if (i % 3 == 0):
                new_u[(i // 3) * 2] = new_u[int((i - (w * 1.5)) // 3) * 2]
                new_u[(i // 3) * 2 + 1] = new_u[int((i - (w * 1.5)) // 3) * 2 + 1]

    for i in range(int(h * w * 1.5)):
        if (i // (w * 1.5)) % 2 != 0 and (i % 3 == 0):
            idx = (i // 3) * 2
            new_v[idx] = data[i]
            new_v[idx + 1] = data[i]

    for i in range(int(h * w * 1.5)):
        if (i // (w * 1.5)) % 2 == 0 and (i % 3 == 0):
            idx = (i // 3) * 2
            new_v[idx] = new_v[int((i + (w * 1.5)) // 3) * 2]
            new_v[idx + 1] = new_v[int((i + (w * 1.5)) // 3) * 2 + 1]

    new_y = [data[i] for i in range(int(h * w * 1.5)) if i % 3 != 0]

    Y = np.array(new_y)
    U = np.array(new_u)
    V = np.array(new_v)

    B, G, R = convert_YUV_to_RGB(Y, U, V)
    # Merge channels
    new_data = np.stack((B, G, R), axis=-1)
    new_data = np.array(new_data).reshape(h, w, 3).astype(np.uint8)

    # Display the image
    cv.imshow('data', new_data)
    cv.waitKey()


def picture_show_yuv422(data, h, w):  # type: (list[int], int, int) -> None
    # Reshape the input data to a 2D array
    data_array = np.array(data).reshape(h, w * 2)

    # Separate Y, U, and V channels
    Y = data_array[:, 1::2]
    U = data_array[:, 0::4].repeat(2, axis=1)
    V = data_array[:, 2::4].repeat(2, axis=1)

    # Convert YUV to RGB
    B, G, R = convert_YUV_to_RGB(Y, U, V)

    # Merge channels
    new_data = np.stack((B, G, R), axis=-1)

    # Display the image
    cv.imshow('data', new_data)
    cv.waitKey()


def picture_show_yuv444(data, h, w):  # type: (list[int], int, int) -> None
    # Reshape the input data to a 2D array
    data_array = np.array(data).reshape(h, w * 3)

    # Separate Y, U, and V channels
    Y = data_array[:, 2::3]
    U = data_array[:, 1::3]
    V = data_array[:, 0::3]

    # Convert YUV to RGB
    B, G, R = convert_YUV_to_RGB(Y, U, V)

    # Merge channels
    new_data = np.stack((B, G, R), axis=-1)

    # Display the image
    cv.imshow('data', new_data)
    cv.waitKey()


def main():  # type: () -> None
    parser = argparse.ArgumentParser(description='which mode need to show')

    parser.add_argument(
        '--pic_path',
        type=str,
        help='What is the path of your picture',
        required=True)

    parser.add_argument(
        '--pic_type',
        type=str,
        help='What type you want to show',
        required=True,
        choices=['rgb565', 'rgb888', 'gray', 'yuv422', 'yuv420', 'yuv444'])

    parser.add_argument(
        '--height',
        type=int,
        help='the picture height',
        default=480)

    parser.add_argument(
        '--width',
        type=int,
        help='the picture width',
        default=640)

    args = parser.parse_args()

    height = args.height
    width = args.width

    data = open_picture(args.pic_path)
    if (args.pic_type == 'rgb565'):
        picture_show_rgb565(data, height, width)
    elif (args.pic_type == 'rgb888'):
        picture_show_rgb888(data, height, width)
    elif (args.pic_type == 'gray'):
        picture_show_gray(data, height, width)
    elif (args.pic_type == 'yuv420'):
        picture_show_yuv420(data, height, width)
    elif (args.pic_type == 'yuv422'):
        picture_show_yuv422(data, height, width)
    elif (args.pic_type == 'yuv444'):
        picture_show_yuv444(data, height, width)
    else:
        print('This type is not supported in this script!')


if __name__ == '__main__':
    main()
除了软件解码外,esp32p4(目前只有该信号 MCU 支持) 也提供了 JPEG 的硬件编码和解码: https://docs.espressif.com/projects/esp-idf/en/latest/esp32p4/api-reference/peripherals/jpeg.html
- 硬件 jpeg decode (*.jpg -> *.rgb,如 RGB888, RGB565)
- 硬件 jpeg encode (*.rgb -> *.jpg)
对应的 ESP32 JPEG 硬件 codec engine driver: https://github.com/espressif/esp-idf/tree/master/components/esp_driver_jpeg
其他 jpeg encode:
- https://github.com/bitbank2/JPEGENC 高性能解码库
- https://github.com/tobozo/ESP32-Raytracer/tree/master
- https://github.com/espressif/esp-adf-libs/blob/master/esp_codec/include/codec/esp_jpeg_enc.h
- 没有提供 C 源代码,只提供了头文件和 lib 库;
显示 gif 图片 #
使用 Rust tinygif 库和系统定时器来显示 GIF 图片:
// https://github.com/MabezDev/mkey/blob/main/firmware/src/main.rs
let image =
        tinygif::Gif::<Rgb565>::from_slice(include_bytes!("../Ferris-240x240.gif")).unwrap();
    let mut start = SystemTimer::now();
    let mut frames = 0;
    loop {
        for frame in image.frames() {
            let frame = Image::with_center(
                &frame,
                Point::new(WIDTH as i32 / 2, (HEIGHT as i32 / 2) - 40),
            );
            frame.draw(pixels).unwrap();

            // TE_READY won't get set until we mark that we're ready to flush a buffer
            critical_section::with(|cs| {
                TE_READY.store(false, Ordering::SeqCst);
                TE.borrow_ref_mut(cs).as_mut().unwrap().clear_interrupt();
            });
            // wait for next sync
            while !TE_READY.load(Ordering::SeqCst) {}

            let pixels = unsafe {
                core::slice::from_raw_parts(
                    pixels.data().as_ptr() as *const u8,
                    pixels.data().len(),
                )
            };
            let now = SystemTimer::now();
            lcd_fill(&mut spi, pixels);
            log::trace!(
                "Time to fill display: {}ms",
                (SystemTimer::now() - now) / (SystemTimer::TICKS_PER_SECOND / 1024)
            );
            frames += 1;
            let now = SystemTimer::now();
            if now.wrapping_sub(start) > SystemTimer::TICKS_PER_SECOND {
                start = now;
                log::info!("FPS: {}", frames);
                frames = 0;
            }
        }
    }
使用 LVGL 显示图片 #
https://docs.lvgl.io/8.2/widgets/core/img.html
Images are the basic object to display images from flash (as arrays) or from files. Images can display symbols (LV_SYMBOL_…) too.
Using the Image decoder interface custom image formats can be supported as well.
Image source:To provide maximum flexibility, the source of the image can be:
- a variable in code (a C array with the pixels).
- a file stored externally (e.g. on an SD card).
- a text with Symbols.
To set the source of an image, use lv_img_set_src(img, src).
To generate a pixel array from a PNG, JPG or BMP image, use the Online image converter tool and set
the converted image with its pointer: lv_img_set_src(img1, &converted_img_var); To make the variable
visible in the C file, you need to declare it with LV_IMG_DECLARE(converted_img_var).
To use external files, you also need to convert the image files using the online converter tool but now you should select the binary output format. You also need to use LVGL’s file system module and register a driver with some functions for the basic file operation. Go to the File system to learn more. To set an image sourced from a file, use lv_img_set_src(img, “S:folder1/my_img.bin”).
You can also set a symbol similarly to Labels. In this case, the image will be rendered as text according to the font specified in the style. It enables to use of light-weight monochrome “letters” instead of real images. You can set symbol like lv_img_set_src(img1, LV_SYMBOL_OK).
使用 embeded-graphics 显示图片 #
https://red.implrust.com/embedded-graphics/index.html
Embedded-graphics is a 2D graphics library that is focused on memory constrained embedded devices.
https://crates.io/crates/embedded-graphics
https://github.com/j-g00da/mousefood?tab=readme-ov-file
embedded-graphics backend for Ratatui
https://github.com/j-g00da/mousefood-esp32-demo
使用 slint 显示图片 #
使用 image crate 可以将各种照片转换称 RGBA8 格式:
let mut cat_image = image::open("cat.png").expect("Error loading cat image").into_rgba8();
Integration with OpenCV #2480: https://github.com/slint-ui/slint/discussions/2480
You would basically need to convert the pixel into SharedPixelBuffer and use the slint::Image
constructor to convert it to an image. Then you can use a property to pass that image to the slint
view.
export component View {
   in property <image> img <=> i.source;
   i := Image { }
}
参考:
- https://github.com/opsnull/rust-slint-opencv
- https://releases.slint.dev/1.5.1/docs/rust/slint/struct.image
LCD 播放视频 #
LCD 播放视频是通过连续播放静态图片来实现的,每张图片为一个 frame,播放图片的速率为 FPS。
影响 LCD FPS 快慢的因素:
- rendering:处理器生成一帧数据 image 数据的过程;
- transmission:处理其通过物理接口发送给 LCD 的速率,称为 interface frame rate;
- display:LCD 显示一帧图片的速率,称为 screen refresh rate;
interface 和 screen refresh rate 的关系:
- For LCDs with SPI/I80 interfaces, the screen refresh rate is determined by the
LCD driver ICand can typically be set by sending specific commands, such as the ST7789 command FRCTRL2 (C6h). - For LCDs with RGB interfaces, the screen refresh rate is determined by
the main controllerand isequivalent tothe interface frame rate.
RGB 接口是微控制器 driver 控制的数据发送&传输;
slint #
FFmpeg 项目:
- brew install ffmpeg , 则会安装 ffmpet 7 版本;
- 依赖的 rust FFmpeg-next 项目有 bug, 编译失败;
提高 UI 渲染速度:
-
使用 DMA 来做 LCD SPI 加速;
- [[https://github.com/slint-ui/slint/pull/1344][rp2040 backend: use DMA to send pixels to the screen via SPI #1344]]
-
部分渲染:
- Add a method to obtain the changed parts. #2389 : https://github.com/slint-ui/slint/issues/2389
- [[https://github.com/slint-ui/slint/discussions/4251][Partial screen rendering - more than single line but less then entire screen? #4251]]
-
双 linebuffer: https://github.com/slint-ui/slint/blob/master/examples/mcu-board-support/pico_st7789.rs#L402
https://github.com/slint-ui/slint/blob/master/api/rs/slint/mcu.md?plain=1#L404 https://github.com/slint-ui/slint/discussions/4251 We have two lines buffer in memory, and we do the following:
- render the line into the rendering buffer
- wait for the previous DMA operation to be finished.
- swap the rendering buffer and the other buffer
- setup a DMA operation to send that buffer (where we just rendered the line into at step1) to the screen asynchronously
Async Image Loading #5140: https://github.com/slint-ui/slint/discussions/5140
https://github.com/sambenko/esp32s3-box-examples https://github.com/playfulFence/esp-gallery