esp32-camera 和 ov3660: https://shop.m5stack.com/products/esp32-psram-timer-camera-ov3660
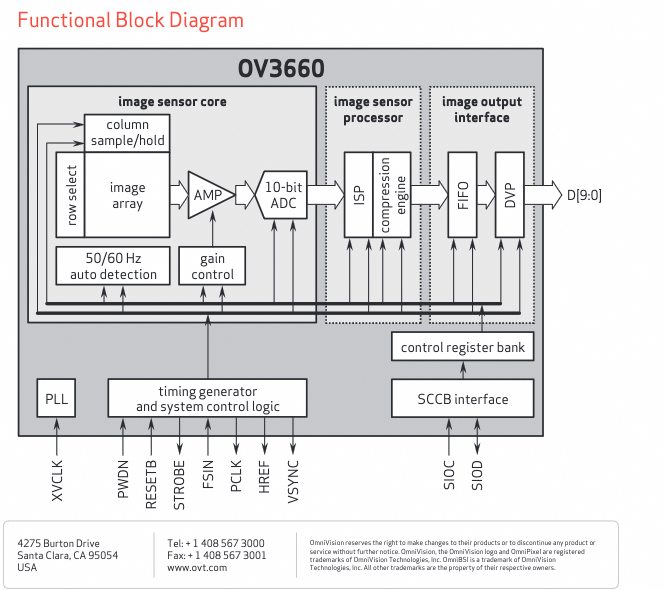
OV3660(pdf datasheet) 是 3MP 像素的 CMOS 图像传感器,最高 30FPS 720P(2048*1536)的照片(OV2660 可以提供 2MP 像素)。
Camera 一般使用 RGB DVP 接口, 部分 LCD 也使用该 RGB 接口类型.
OV3660 引脚说明:
- VDDA, VDDD, VDDIO - 电源引脚,分别为模拟电源、数字电源和I/O电源。
- GND - 地(Ground),电源的负极。
- SCL, SDA - 用于I2C通信的串行时钟线(SCL)和串行数据线(SDA),用于传感器配置。
- SIOC # SCCB input clock
- SIOD # SCCB data
- VS, HS, PCLK - 视频同步信号(VS,垂直同步),水平同步信号(HS),像素时钟(PCLK)。
- VS: video output vertical sync signal
- HS: video output horizontal sync signal
- PCLK: image output clock
- D0-D9 - 数字图像数据输出引脚,用于传输图像数据,具体位数根据传感器配置和模式可能有所不同。
- RESET_BAR - 复位引脚,通常用于硬件复位传感器。
- PWDN - 电源关闭(Power Down)控制,用于控制传感器的电源模式。
- XCLK - 外部时钟输入,提供给传感器的工作时钟,system input clock/scan clock input。对于 ESP32 是 10 MHz。
通过 I2C 等通信接口(也称为 SCCB,serial camera control bus),外部控制器可以读写 OV3660 的内部寄存器,以配置其工作模式、分辨率、曝光参数、增益等。
- automatic exposure control (AEC)
- automatic white balance (AWB)
- automatic flicker detection
- automatic black level calibration (ABLC)
- 图像质量,如 JPEG 质量;
- 可编程 frame rate;
- 支持的输出格式:
raw RGB data, RGB565/555/444, CCIR656, YCbCr422,and JPEG compression
ATTR_HTML: :width 400 :align center
驱动程序通过发送 VSYNC 信号来从 OV3660 获取恒定的 frame rate 输出。
- 驱动发起 VSYNC 采集,OV3660 在 VSYNC 采集结束后,发送 VSYNC ISR 中断请求,驱动使用 DMA 来获取 OV3660 输出的一个 frame 数据;
最大图片传输速率:maximum image transfer rate:
- 2048x1536: 15 fps (3MP 像素)
- 1080p: 20 fps
- 720p: 45 fps
- XGA (1024x768): 45 fps
- VGA (640x480): 60 fps
- QVGA (320x240): 120 fps
esp32-camera 和 MJPEG 流式输出 #
esp32-camera 项目是 ESP32 官方维护的摄像头驱动和 APIs 库:
- https://github.com/espressif/esp32-camera
- https://github.com/espressif/esp-video-components/tree/master/esp_cam_sensor
主要原理:将摄像头像素输出设置为 JEPG 格式,一个 frame 为一个 JPEG 格式数据的 frame buffer,然后通过读取 frame buffer 来获得单张照片。通过 loop 获取 frame buffer 的数据来形成 video stream。
esp32-camera 摄像头驱动的配置参数:
- 使用 LEDC timer 来产生 XCLK 所需的频率信号;
- 像素格式,也即摄像头输出的像素数据格式:
PIXFORMAT_ + YUV422|GRAYSCALE|RGB565|JPEG- YUV 也称为 YCbCr:Y 亮度,U/Cb:蓝色浓度,V/Cr:红色浓度,它也是一种压缩格式。
- 为了节省带宽 YUV frame 一般使用采样,如 YUV422 表示 2:1的水平取样,垂直完全采样;
- 每个像素只需要 2Bytes,这样 3MP 大概是 6MB 存储需求,8 PSRAM 还有 2MB 可用。
- RGB 输出格式:
- RGB888,也称 24-bit RGB,各使用 8bit 来表示 red/green/blue,在 3MP 2048x1536 分辨率的情况下,需要 9437184 bytes 存储空间来保存一个 frame,超过了 8
PSRAM的容量。所以一般使用 RGB565/YUV/JPEG 等压缩格式 - RGB565,也称 16-bit RGB,5 bits for the red channel, 6 bits for the green channel, and 5 bits for the blue channel. 相比 RGB888,更节省资源;
- RGB 和 YUV 之间可以相互转换;
- RGB888,也称 24-bit RGB,各使用 8bit 来表示 red/green/blue,在 3MP 2048x1536 分辨率的情况下,需要 9437184 bytes 存储空间来保存一个 frame,超过了 8
- JPEG 输出格式:为了节省空间,
建议使用JPEG 压缩格式,一个 frame 照片的大小大概是原始 raw 的 1/5 空间需求;
- YUV 也称为 YCbCr:Y 亮度,U/Cb:蓝色浓度,V/Cr:红色浓度,它也是一种压缩格式。
- 帧大小,也即一幅照片的分辨率:FRAMESIZE_ + QVGA|CIF|VGA|SVGA|XGA|SXGA|UXGA
- 保存照片数据的 frame buffer 位置:PSRAM 或 DRAM;
- ESP32 需要有至少 8MB 的 PSRAM 来作为 framebuffer 保存照片,同时需要启用 JPEG 压缩格式,OV3660 支持 on-chip 的 JPEG video stream 输出。
- PSRAM 也称为 SPI RAM;
- 启用 PSRAM:
echo 'CONFIG_ESP32_SPIRAM_SUPPORT=y' >> sdkconfig.defaults
// https://github.com/espressif/esp32-camera/blob/master/driver/include/esp_camera.h#L115

/**
 * @brief Configuration structure for camera initialization
 */
typedef struct {
    int pin_pwdn;                   /*!< GPIO pin for camera power down line */
    int pin_reset;                  /*!< GPIO pin for camera reset line */
    int pin_xclk;                   /*!< GPIO pin for camera XCLK line */
    union {
        int pin_sccb_sda;           /*!< GPIO pin for camera SDA line */
        int pin_sscb_sda __attribute__((deprecated("please use pin_sccb_sda instead")));           /*!< GPIO pin for camera SDA line (legacy name) */
    };
    union {
        int pin_sccb_scl;           /*!< GPIO pin for camera SCL line */
        int pin_sscb_scl __attribute__((deprecated("please use pin_sccb_scl instead")));           /*!< GPIO pin for camera SCL line (legacy name) */
    };
    int pin_d7;                     /*!< GPIO pin for camera D7 line */
    int pin_d6;                     /*!< GPIO pin for camera D6 line */
    int pin_d5;                     /*!< GPIO pin for camera D5 line */
    int pin_d4;                     /*!< GPIO pin for camera D4 line */
    int pin_d3;                     /*!< GPIO pin for camera D3 line */
    int pin_d2;                     /*!< GPIO pin for camera D2 line */
    int pin_d1;                     /*!< GPIO pin for camera D1 line */
    int pin_d0;                     /*!< GPIO pin for camera D0 line */
    int pin_vsync;                  /*!< GPIO pin for camera VSYNC line */
    int pin_href;                   /*!< GPIO pin for camera HREF line */
    int pin_pclk;                   /*!< GPIO pin for camera PCLK line */

    int xclk_freq_hz;               /*!< Frequency of XCLK signal, in Hz. EXPERIMENTAL: Set to 16MHz on ESP32-S2 or ESP32-S3 to enable EDMA mode */

    ledc_timer_t ledc_timer;        /*!< LEDC timer to be used for generating XCLK  */
    ledc_channel_t ledc_channel;    /*!< LEDC channel to be used for generating XCLK  */

    pixformat_t pixel_format;       /*!< Format of the pixel data: PIXFORMAT_ + YUV422|GRAYSCALE|RGB565|JPEG  */
    framesize_t frame_size;         /*!< Size of the output image: FRAMESIZE_ + QVGA|CIF|VGA|SVGA|XGA|SXGA|UXGA  */

    int jpeg_quality;               /*!< Quality of JPEG output. 0-63 lower means higher quality  */
    size_t fb_count;                /*!< Number of frame buffers to be allocated. If more than one, then each frame will be acquired (double speed)  */
    camera_fb_location_t fb_location; /*!< The location where the frame buffer will be allocated */
    camera_grab_mode_t grab_mode;   /*!< When buffers should be filled */
#if CONFIG_CAMERA_CONVERTER_ENABLED
    camera_conv_mode_t conv_mode;   /*!< RGB<->YUV Conversion mode */
#endif

    int sccb_i2c_port;              /*!< If pin_sccb_sda is -1, use the already configured I2C bus by number */
} camera_config_t;


/**
 * @brief Camera frame buffer location
 */
typedef enum {
    CAMERA_FB_IN_PSRAM,         /*!< Frame buffer is placed in external PSRAM */
    CAMERA_FB_IN_DRAM           /*!< Frame buffer is placed in internal DRAM */
} camera_fb_location_t;


#if CONFIG_CAMERA_CONVERTER_ENABLED
/**
 * @brief Camera RGB\YUV conversion mode
 */
typedef enum {
    CONV_DISABLE,
    RGB565_TO_YUV422,

    YUV422_TO_RGB565,
    YUV422_TO_YUV420
} camera_conv_mode_t;
#endif
对于 RAW RGB 和 YUV 像素,一般使用 8-10 位并行数字接口(DVP)输出,该接口和 RGB LCD 接口类型一致,所以 LCD 和 Camera 在 esp-hal 仓库中属于同一个 module:lcd_camera;
LCD 显示器一般使用 RGB 像素格式,而且是比较节省空间的 16-bit 的 RGB565 像素格式:
- camera 可以直接产生 RGB565 数据,故可以直接在 LCD 显示;
- bmp/png/jpeg 等图片格式,需要将像素转换为 RGB565 后才能供 LCD 显示;
https://github.com/esp-rs/esp-hal/blob/main/esp-hal/src/lcd_cam/cam.rs LCD_CAM peripheral driver 支持 8/16 bit DVP 信号的 master 或 slave mode。在 master mode 时 LCD_CAM peripheral driver 为 camera 提供 master clock,反之在 slave mode 时,不提供。这可以通过 driver 的with_master_clock() 方法来设置。
- 为了提高数据传输效率,这个 driver 使用了 DMA 机制。
- DMA 传输结束的通知方式:ByteLen 或 Signal。
// https://github.com/esp-rs/esp-hal/blob/main/esp-hal/src/lcd_cam/cam.rs

//! ## Examples
//!/Following code shows how to receive some bytes from an 8 bit DVP stream in
//! master mode.
//!
//! ```no_run
//! let mclk_pin = io.pins.gpio15;
//! let vsync_pin = io.pins.gpio6;
//! let href_pin = io.pins.gpio7;
//! let pclk_pin = io.pins.gpio13;
//! let data_pins = RxEightBits::new(
//!     io.pins.gpio11,
//!     io.pins.gpio9,
//!     io.pins.gpio8,
//!     io.pins.gpio10,
//!     io.pins.gpio12,
//!     io.pins.gpio18,
//!     io.pins.gpio17,
//!     io.pins.gpio16,
//! );
//!
//! let lcd_cam = LcdCam::new(peripherals.LCD_CAM);
//! let mut camera = Camera::new(lcd_cam.cam, channel.rx, data_pins, 20u32.MHz(), &clocks)
//!     .with_master_clock(mclk_pin) // Remove this for slave mode.
//!     .with_ctrl_pins(vsync_pin, href_pin, pclk_pin);
//! ```

/// Generation of GDMA SUC EOF
#[derive(Debug, Clone, Copy, PartialEq, Eq)]
#[cfg_attr(feature = "defmt", derive(defmt::Format))]
pub enum EofMode {
    /// Generate GDMA SUC EOF by data byte length
    ByteLen,
    /// Generate GDMA SUC EOF by the external enable signal
    EnableSignal,
}

    /// Perform a DMA read.
    ///
    /// This will return a [RxDmaTransfer]
    ///
    /// The maximum amount of data is 32736 bytes when using [EofMode::ByteLen].
    ///
    /// It's only limited by the size of the DMA buffer when using
    /// [EofMode::EnableSignal].
通过将 ESP32 设置为 camera 的 master 模式,可以由 esp32 发送 VSYNC 信号给摄像头来作为采集 frame buffer 开始的控制信号,当 VSYNC 采集结束时,通过中断的方式得到通知;
- 如果只有 1 个 frame buffer,则 drvier 需要等待当前 frame finish(VSYNC) 然后启动 I2S DMA,然后app 才能获得 frame buffer 数据。这种单 frame buffer 的方式,会给应用造成等待延迟。
- 所以,建议使用 2 个或更多 fram buffer, 这时 I2S 工作在 continuous mode,自动将各 frame push 到 app 可以方位的 queue,这样会给 CPU/Memory 造成压力,但是可以 double frame rate,建议和 JPEG 一起使用。
esp_err_t camera_capture(){
    //acquire a frame
    camera_fb_t * fb = esp_camera_fb_get();
    if (!fb) {
        ESP_LOGE(TAG, "Camera Capture Failed");
        return ESP_FAIL;
    }
    //replace this with your own function
    process_image(fb->width, fb->height, fb->format, fb->buf, fb->len);

    //return the frame buffer back to the driver for reuse
    esp_camera_fb_return(fb);
    return ESP_OK;
}
提供的 API 支持:
- 摄像头硬件设置(I2C 接口);
- JPEG HTTP Capture:提供一个 http handler,请求时获从 fb 获取一张 JPEG 图片并返回;
- JPEG HTTP Stream:提供一个 http handler,在 while true 循环中不断获取 fb 中 JPEG 图片,通过
multipart/x-mixed-replace 编码的方式返回给客户端。
- 也称为
Motion JPEG,主流浏览器,QuickTime,VLC 都支持 HTTP Stream播放。
- 也称为
- BMP HTTP Capture:将捕获的 JPEG 转码为 BMP,再返回;
开发调试:My initial idea for this (which is the example I have in my project) was to dump the JPEG from the camera as HEX onto the console and use xxd -r -p uart.txt image.jpg to convert it to JPEG
file. Somewhat tedious but it works haha.
将 esp-camera 驱动的摄像头进行 RTSP+RTP(Over UDP) 进行流式输出的例子:camera-streamer:Example for
ESP32 TimerCam rebuilt using ESPP to stream video over the network. It uses RTSP + RTP (over UDP) to
perform real-time streaming of the camera data over the network to multiple clients.
- 使用 RTSP+REP 将 OV2660 capture 的 JPEG 图片转换成流式输出;
- 初始化摄像头配置:
- 控制和 data 引脚;
像素输出格式:pixel_format = PIXFORMAT_JPEG, // YUV422,GRAYSCALE,RGB565,JPEG分辨率(frame size):frame_size = FRAMESIZE_QVGA- JPEG 质量:越小质量越高;
- fb_count:frame buffer 数量;
// https://github.com/esp-cpp/camera-streamer/blob/main/main/main.cpp

// initialize camera
/**
 * @note display sizes supported:
 * *  QVGA:  320x240
 * *  WQVGA: 400x240
 * *  HVGA:  480x320
 * *  VGA:   640x480
 * *  WVGA:  768x480
 * *  FWVGA: 854x480
 * *  SVGA:  800x600
 * *  DVGA:  960x640
 * *  WSVGA: 1024x600
 * *  XGA:   1024x768
 * *  WXGA:  1280x800
 * *  WSXGA: 1440x900
 * *  SXGA:  1280x1024
 * *  UXGA:  1600x1200
 */

static camera_config_t camera_config = {
	.pin_pwdn = -1,
	.pin_reset = 15,
	.pin_xclk = 27,
	.pin_sccb_sda = 25,
	.pin_sccb_scl = 23,

	.pin_d7 = 19,
	.pin_d6 = 36,
	.pin_d5 = 18,
	.pin_d4 = 39,
	.pin_d3 = 5,
	.pin_d2 = 34,
	.pin_d1 = 35,
	.pin_d0 = 32,
	.pin_vsync = 22,
	.pin_href = 26,
	.pin_pclk = 21,

	.xclk_freq_hz =	10000000, // EXPERIMENTAL: Set to 16MHz on ESP32-S2 or ESP32-S3 to enable EDMA mode
	.ledc_timer = LEDC_TIMER_0,
	.ledc_channel = LEDC_CHANNEL_0,

	.pixel_format = PIXFORMAT_JPEG, // YUV422,GRAYSCALE,RGB565,JPEG
	.frame_size = FRAMESIZE_QVGA,   // QVGA-UXGA, For ESP32, do not use sizes above QVGA when not
	// JPEG. The performance of the ESP32-S series has improved a
	// lot, but JPEG mode always gives better frame rates.

	.jpeg_quality = 15, // 0-63, for OV series camera sensors, lower number means higher quality
	.fb_count = 2, // When jpeg mode is used, if fb_count more than one, the driver will work in
	// continuous mode.
	.grab_mode =
	CAMERA_GRAB_LATEST // CAMERA_GRAB_WHEN_EMPTY // . Sets when buffers should be filled
};


// create the camera and rtsp server, and the cv/m they'll use to communicate
int server_port = CONFIG_RTSP_SERVER_PORT;
logger.info("Creating RTSP server at {}:{}", server_address, server_port);
espp::RtspServer rtsp_server({.server_address = server_address,
		.port = server_port,
		.path = "mjpeg/1",
		.log_level = espp::Logger::Verbosity::WARN});
rtsp_server.set_session_log_level(espp::Logger::Verbosity::WARN);
rtsp_server.start();


// initialize the camera
logger.info("Creating camera task");
auto camera_task_fn = [&rtsp_server, &logger](auto &m, auto &cv) -> bool {
	// take image
	static camera_fb_t *fb = NULL;
	static size_t _jpg_buf_len;
	static uint8_t *_jpg_buf;

	fb = esp_camera_fb_get();  // 调用 esp camera 库的 esp_camera_fb_get() 来获得 JPEG 图片
	if (!fb) {
		logger.error("Camera capture failed");
		return false;
	}

	_jpg_buf_len = fb->len;
	_jpg_buf = fb->buf;

	if (!(_jpg_buf[_jpg_buf_len - 1] != 0xd9 || _jpg_buf[_jpg_buf_len - 2] != 0xd9)) {
		esp_camera_fb_return(fb);
		return false;
	}

	espp::JpegFrame image(reinterpret_cast<const char *>(_jpg_buf), _jpg_buf_len);
	rtsp_server.send_frame(image);  // 将 JPEG 图片发送给 rtsp_server 进行流式输出

	esp_camera_fb_return(fb);
	return false;
};


auto camera_task = espp::Task::make_unique({.name = "Camera Task", .callback = camera_task_fn, .priority = 10});
camera_task->start(); // 启动 camera task
另一个支持 RTSP + HTTP JPEG Streamer + image Capture 的 强大的库 :
https://github.com/rzeldent/esp32cam-rtsp/tree/main
- 相当于在官方 esp32-camera 的基础上,加了 RTSP 的功能
- Flashing this software on a ESP32CAM module will make it
a RTSP streaming camera server, a HTTP Motion JPEG streamer and a HTTP image server. - RTSP The RTSP protocol is an industry standard and allows many CCTV systems and applications (like
for example VLC) to connect directly to the ESP32CAM camera stream. It is also possible to stream
directly to a server using ffmpeg. This makes the module a camera server allowing recording and
the stream can be stored on a disk and replayed later. The URL is
rtsp://<ip address>:554/mjpeg/1 - HTTP Motion JPEG The HTTP JPEG streamer makes it possible to watch the camera stream directly in
your browser. The URL is
http://<ip address>/stream - HTTP image The HTTP Image returns an HTTP JPEG image of the camera. The URL is
http://<ip address>/snapshot - 同时提供了 web 界面来设置 camera 参数,截图功能。
可以使用 opencv 来显示 RTSP 内容:
# https://github.com/esp-cpp/camera-streamer/blob/main/opencv_rtsp_client.py
import sys
import cv2

def stream(addr, port):
    vcap = cv2.VideoCapture(f"rtsp://{addr}:{port}/mjpeg/1")
    while(1):
        ret, frame = vcap.read()
        cv2.imshow('VIDEO', frame)
        cv2.waitKey(1)

if __name__ == "__main__":
    if len(sys.argv) != 3:
        print("Usage: python ./opencv_rtsp_client <address> <rtsp_port>")
        sys.exit(1)
    stream(sys.argv[1], sys.argv[2])
使用 camera-display 项目来从 RTSP+RTP 拉流显示 JPEG 图片:
RTSP clientthat receives mjpeg frames split intoRTP packets, turns them back intoJPEG images, and pushes them into a queue.- Display task, which pulls image data from the queue,
decodes the jpeg, and displays it on the screen.
其他 Streaming JPEG 或任何文件的方式:
# 使用 Gstreamer 将 webcam 发送的串行 JPEG image 捕获为 mp4 视频输出:
$ gst-launch-1.0 v4l2src ! jpegdec ! xvimagesink
# Capture a single image and save it in JPEG format.
$ gst-launch v4l2src num-buffers=1 ! jpegenc ! filesink location=/tmp/test.jpg
# Stream video from a webcam.
$ gst-launch v4l2src ! xvimagesink
# if camera supports MJPG
$ gst-launch-1.0 v4l2src num-buffers=1 ! image/jpeg,framerate=5/1,width=1280,height=960 ! jpegparse
! filesink location=/tmp/test2.jpg
# raw image
$ gst-launch-1.0 v4l2src num-buffers=1 ! videoconvert ! 'video/x-raw,width=1280,height=960,format=RGBx' ! filesink location=image.raw
关于 Streaming 的解释: Playing media straight from the Internet without storing it locally is known
as Streaming. We have been doing it throughout the tutorials whenever we used a URI starting with
http://. This tutorial shows a couple of additional points to keep in mind when streaming. In
particular:
information Embedding multiple streams inside a single file is called “multiplexing” or
“muxing”, and such file is then known as a “container”. Common container formats are Matroska
(.mkv), Quicktime (.qt, .mov, .mp4), Ogg (.ogg) or Webm (.webm).
Retrieving the individual streams from within the container is called “demultiplexing” or “demuxing”.
像素格式:YUV 和 RGB #
YUV 是一种颜色编码方法 。常使用在各个影像处理组件中。 YUV 在对照片或影片编码时,考虑到人类的感知能力,允许降低色度的带宽。
YUV是编译true-color颜色空间(color space)的种类, Y'UV, YUV, YCbCr,YPbPr等专有名词都可以称为YUV ,彼此有重叠。
- “Y”表示明亮度(Luminance、Luma)
- “U”和“V”则是色度、浓度(Chrominance、Chroma),
Y′UV, YUV, YCbCr, YPbPr所指涉的范围,常有混淆或重叠的情况。从历史的演变来说,其中:
YUV和Y'UV通常用来编码电视的模拟信号YCbCr 则是用来描述数字的影像信号,适合影片与图片压缩以及传输,例如 MPEG、JPEG。
彩色图像记录的格式,常见的有 RGB、YUV、CMYK 等。彩色电视最早的构想是使用 RGB 三原色来同时传输。这种设计方式是原来黑白带宽的3倍,在当时并不是很好的设计。
RGB诉求于人眼对色彩的感应,YUV则着重于视觉对于亮度的敏感程度,Y代表的是亮度,UV代表的是彩度(因此黑白电影可省略UV,相近于RGB),分别用Cr和Cb来表示,因此YUV的记录通常以Y:UV的格式呈现。
- Y:表示亮度,也称流明;
- Cb:蓝色浓度偏移量;
- Cr:红色浓度偏移量;
为节省带宽起见,大多数YUV格式平均使用的每像素位数都少于24位。主要的抽样(subsample)格式有 YCbCr 4:2:0、YCbCr 4:2:2、YCbCr 4:1:1和YCbCr 4:4:4 。YUV的表示法称为A:B:C表示法:
- 4:4:4表示完全取样。
- 4:2:2表示2:1的水平取样,垂直完全采样。
- 4:2:0表示2:1的水平取样,垂直2:1采样。
- 4:1:1表示4:1的水平取样,垂直完全采样。
最常用Y:UV记录的比重通常1:1或2:1,DVD-Video是以YUV 4:2:0的方式记录,也就是我们俗称的 I420,YUV4:2:0
并不是说只有U(即Cb), V(即Cr)一定为0,而是指U:V互相援引,时见时隐,也就是说对于每一个行,只有U或者V分量,如果一行是4:2:0的话,下一行就是4:0:2,再下一行是4:2:0…以此类推。至于其他常见的YUV格式有
YUY2、YUYV、YVYU、UYVY、AYUV、Y41P、Y411、Y211、IF09、IYUV、YV12、YVU9、YUV411、YUV420等。
Y’代表明亮度(luma; brightness)而U与V存储色度(色讯; chrominance; color)部分; 亮度(luminance)记作Y,而 Y’的prime符号记作伽玛校正。
YUV Formats分成两个格式:
- 紧缩格式(packed formats):将Y、U、V值存储成Macro Pixels数组,和RGB的存放方式类似。
- 平面格式(planar formats):将Y、U、V的三个分量分别存放在不同的矩阵中。
紧缩格式(packed format)中的YUV是混合在一起的,对于YUV4:2:2格式而言,用紧缩格式很合适的,因此就有了 UYVY、YUYV等。平面格式(planar formats)是指每Y分量,U分量和V分量都是以独立的平面组织的,也就是说所有的U分量必须在Y分量后面,而V分量在所有的U分量后面,此一格式适用于采样(subsample)。平面格式(planar format)有I420(4:2:0)、YV12、IYUV等。
RTSP 协议:Real-Time Streaming Protocol #
https://antmedia.io/rtsp-explained-what-is-rtsp-how-it-works/
The Real-Time Streaming Protocol (RTSP) is an application-level network protocol designed for
multiplexing and packetizing multimedia transport streams (such as interactive media, video and
audio) over a suitable transport protocol. RTSP is used in entertainment and communications systems
to control streaming media servers. The protocol is used for establishing and controlling media
sessions between endpoints. Clients of media servers issue commands such as play, record and pause, to facilitate real-time control of the media streaming from the server to a client (video on demand)
or from a client to the server (voice recording).
Like HTTP, RTSP uses TCP to maintain an end-to-end connection and, while most RTSP control messages are sent by the client to the server, some commands travel in the other direction (i.e. from server to client).
PLAY:
C->S: PLAY rtsp://example.com/media.mp4 RTSP/1.0 CSeq: 4 Range: npt=5-20 Session: 12345678
S->C: RTSP/1.0 200 OK CSeq: 4 Session: 12345678 RTP-Info: url=rtsp://example.com/media.mp4/streamid=0;seq=9810092;rtptime=3450012
PAUSE:
C->S: PAUSE rtsp://example.com/media.mp4 RTSP/1.0 CSeq: 5 Session: 12345678
S->C: RTSP/1.0 200 OK CSeq: 5 Session: 12345678
RTP:
The transmission of streaming data itself is not a task of RTSP. Most RTSP servers use the Real-time Transport Protocol (RTP) in conjunction with Real-time Control Protocol (RTCP) for media stream
delivery . However, some vendors implement proprietary transport protocols. The RTSP server software
from RealNetworks, for example, also used RealNetworks’ proprietary Real Data Transport (RDT).
RTP VS RTSP
RTSP is a realtime streaming protocol. Meaning, you can stream whatever you want in real time. So
you can use it to stream LIVE content (no matter what it is, video, audio, text,
presentation…). RTP is a transport protocol which is used to transport media data which is
negotiated over RTSP.
You use RTSP to control media transmission over RTP. You use it to setup, play, pause, teardown the
stream…
So, if you want your server to just start streaming when the URL is requested, you can implement
some sort of RTP-only server. But if you want more control and if you are streaming live video, you
must use RTSP, because it transmits SDP and other important decoding data.
总结:
- RTSP 提供了丰富的流媒体控制能力;
- 如果不需要控制,只是 stream,可以只实现 RTP server;
RTSP is widely used in IP camera, running as RTSP server in camera, so that user could play(pull)
the RTSP stream from camera. It is a low cost solution, because we don’t need a central media server
(think about thousands of camera streams). The arch is bellow:
IP Camera —-RTSP(pull)—> Player (RTSP server) (User Agent)
The RTSP protocol actually contains: A signaling over TCP, at port 554, used to exchange the SDP
(also used in WebRTC), about media capabilities. UDP/TCP streams over serval ports, generally
two ports, one for RTCP and one for RTP (also used in WebRTC).
Comparing to WebRTC, which is now available in H5:
A signaling over HTTP/WebSocket or exchange by any other protocols, used to exchange the SDP. UDP streams(RTP/RTCP) over one or many ports, generally bind to one port, to make cloud services load balancer happy.
In protocol view, RTSP and WebRTC are similar, but the use scenario is very different, because it’s off the topic, let’s grossly simplified, WebRTC is design for web conference, while RTSP is used for IP camera systems.
So it’s clear both RTSP and WebRTC are solution and protocol, used in different scenario. While RTP is transport protocol, also it can be used in live streaming by WebRTC.
服务端:
Darwin Streaming Server: Open-sourced version of QuickTime Streaming Server maintained by Apple.GStreamerbased RTSP Server and client.- Many CCTV / Security cameras, often called
IP cameras, support RTSP streaming too, especially those with ONVIF (the Open Network Video Interface Forum) profiles G, S, T.
使用 GStreamer 的 gst-launch-1.0 来做 RTP streaming (audio+video):
- 发送端:gst-launch-1.0 -v uridecodebin name=uridec uri=</C:\video.mp4> ! videoconvert ! x264enc noise-reduction=10000 tune=zerolatency byte-stream=true threads=4 key-int-max=15 intra-refresh=true ! mpegtsmux alignment=7 name=mux ! rtpmp2tpay ! queue ! udpsink host=127.0.0.1 port=5000 sync=true uridec. ! audioconvert ! voaacenc ! audio/mpeg ! queue ! mux.
- 接收端:
- gst-launch-1.0 -v playbin uri=udp://127.0.0.1:5000
- VLC:vlc rtp://@:5000, Open Network Stream (CTRL+N)
使用 GStraemer 的 gst-launch-1.0 将本地 jpg 图片转换为 RTP 流:
- gst-launch-1.0 multifilesrc location=“C:\\Pictures\\Photo.jpg” loop=true start-index=0 stop-index=0 ! image/jpeg,width=640,height=512,type=video,framerate=30/1 ! identity ! jpegdec ! videoscale !videoconvert ! x264enc ! h264parse ! mpegtsmux ! rtpmp2tpay ! udpsink host=127.0.0.1 port=5000
RTSP 是可以 streaming 任何数据的交互式控制协议。
关于RTSP_RTP_RTCP协议的深刻初步介绍: https://zhuanlan.zhihu.com/p/72917813
前记
作为一个软件工程师,特别是偏向安防应用或者互联网对接,都应该听说RTSP,RTP,RTCP等协议的概念。本篇博文详细介绍一下关于RTSP等协议,让读者更加方便的理解透彻。另外后续还会从RTSP的应用方面继续编写。三个协议简单描述
RTSP(Real Time Streaming Protocol),RFC2326,实时流传输协议,是TCP/IP协议体系中的一个应用层协议,由哥伦比亚大学、网景和RealNetworks公司提交的IETF RFC标准。该协议定义了一对多应用程序如何有效地通过IP网络传送多媒体数据。RTSP在体系结构上位于RTP和RTCP之上,它使用TCP或UDP完成数据传输。
Real-time Transport Protocol或简写RTP,它是由IETF的多媒体传输工作小组1996年在RFC 1889中公布的。RTP协议详细说明了在互联网上传递音频和视频的标准数据包格式。它是创建在UDP协议上的。
Real-time Transport Control Protocol或RTP Control Protocol或简写RTCP)是实时传输协议(RTP)的一个姐妹协议。RTCP由RFC 3550定义(取代作废的RFC 1889)。RTP 使用一个 偶数 UDP port ;而RTCP 则使用 RTP 的下一个 port,也就是一个奇数 port。RTCP与RTP联合工作,RTP实施实际数据的传输,RTCP则负责将控制包送至电话中的每个人。其主要功能是就RTP正在提供的服务质量做出反馈。
简单的说,以上三个协议就是负责以下图片内容:
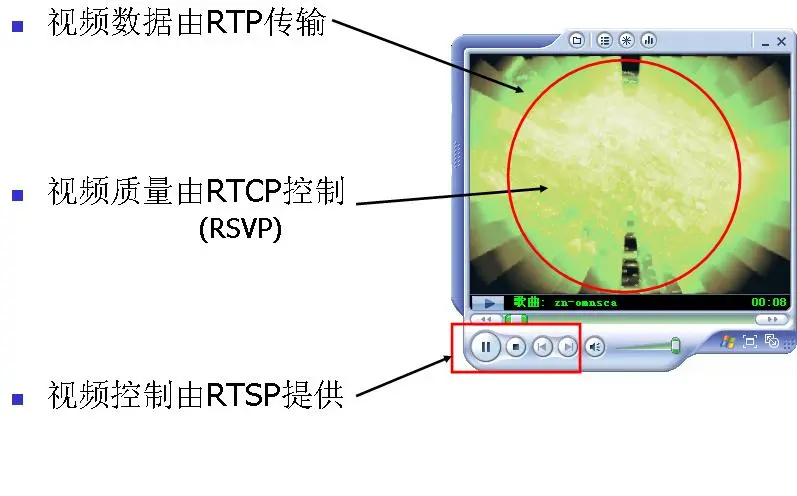
三个协议其实相辅相成,只是读完简单介绍其实并不能深刻理解其协议的深刻内涵或者使用方法以及其架构。下面我们对其协议进行详细拆分深刻挖掘。
参考:
- Micro-RTSP 将 ESP32-CAM boards 的 OV2640 jpeg frame 通过 RTSP Streaming: https://github.com/enesbcs/ESP32_RTSP_Cam/tree/master/lib
Motion JPEG/webcam 和 HTTP Video Streaming #
Motion JPEG (M-JPEG or MJPEG) is a video compression format in which each video frame or interlaced
field of a digital video sequence is compressed separately as a JPEG image.
Originally developed for multimedia PC applications, Motion JPEG enjoys broad client support: most
major web browsers and players provide native support, and plug-ins are available for the
rest. Software and devices using the M-JPEG standard include web browsers, media players, game
consoles, digital cameras, IP cameras, webcams, streaming servers, video cameras, and non-linear
video editors
M-JPEG is now used by video-capture devices such as digital cameras, IP cameras, and webcams, as
well as by non-linear video editing systems. It is natively supported by the QuickTime Player, the
PlayStation console, and web browsers such as Safari, Google Chrome, Mozilla Firefox and Microsoft
Edge.
Video streaming
HTTP streaming separates each image into individual HTTP replies on a specified marker. HTTP
streaming creates packets of a sequence of JPEG images that can be received by clients such as
QuickTime or VLC. In response to a GET request for a MJPEG file or stream, the server streams the sequence of JPEG frames over HTTP .
A special mime-type content type multipart/x-mixed-replace;boundary=<boundary-name> informs the
client to expect several parts (frames) as an answer delimited by The TCP connection is not closed as long as the client wants to receive new frames and the server wants to provide new frames.
Two basic implementations of a M-JPEG streaming server are cambozola and MJPG-Streamer. The more
robust ffmpeg-server also provides M-JPEG streaming support.
Native web browser support includes: Safari, Google Chrome, Microsoft Edge[8] and Firefox.[9] Other
browsers, such as Internet Explorer can display M-JPEG streams with the help of external
plugins. Cambozola is an applet that can show M-JPEG streams in Java-enabled browsers. M-JPEG is
also natively supported by PlayStation and QuickTime. Most commonly, M-JPEG is used in IP based security cameras.[10]
Video4Linux: v4l2, v4l
- Linux Kernel 提供的 video capture 的设备驱动和 APIs;
- ffmpeg 使用 V4L 驱动和 APIs 来捕获视频;
- gstreamer 的 gst-launch-1.0 工具可以从 v4l 设备 stream 视频:
- gst-launch-1.0 v4l2src ! xvimagesink: This pipeline shows the video captured from /dev/video0 tv card and for webcams.
- gst-launch-1.0 v4l2src ! jpegdec ! xvimagesink :This pipeline shows the video captured from a webcam that delivers jpeg images.
Video4Linux (V4L for short) is a collection of device drivers and an API for supporting realtime
video capture on Linux systems.[1] It supports many USB webcams, TV tuners, and related devices,
standardizing their output, so programmers can easily add video support to their applications.
Video4Linux is responsible for creating V4L2 device nodes aka a device file (/dev/videoX, /dev/vbiX and /dev/radioX ) and tracking data from these nodes. The device node creation is handled by V4L device drivers using the video_device struct (v4l2-dev.h) and it can either be allocated dynamically
or embedded in another larger struct.
Video4Linux was named after Video for Windows (which is sometimes abbreviated “V4W”), but is not technically related to it.[2][3]
h264 和 h265 视频编码 #
H264 和 H265 也是视频压缩格式,常用在 rtsp/rtmp 视频流中。和 MP4 类似,需要 frame 间的连续处理和预 测能力,所以更耗资源。
ESP32-S3 不支持硬件加速的 H264/H265 编解码,但是可以使用软件方案,如 FFmpeg 库或其它库,将从 OV2640 生成的 MJPEG frame 转换为 H264/H265 编码的 frame,例如 [[https://components.espressif.com/components/espressif/esp_h264/versions/1.0.3?language=en][ESP_H264]] 提供了软件编解码方案。
ESP32P4 支持硬件的 H264/H265 编解码。
格式转换:
- Convert to PCM audio
- ffmpeg -i input.mp4 -f u16be -acodec pcm_u16le -ar 44100 -ac 1 44100_u16le.pcm
- Convert to MP3 audio
- ffmpeg -i input.mp4 -ar 44100 -ac 1 -q:a 9 44100.mp3
- Convert to RGB565
- ffmpeg -i input.mp4 -vf “fps=9,scale=-1:176:flags=lanczos,crop=220:in_h:(in_w-220)/2:0” -c:v rawvideo -pix_fmt rgb565be 220_9fps.rgb
- Convert to Animated GIF
- ffmpeg -i input.mp4 -vf “fps=15,scale=-1:176:flags=lanczos,crop=220:in_h:(in_w-220)/2:0,split[s0][s1];[s0]palettegen[p];[s1][p]paletteuse” -loop -1 220_15fps.gif
- Convert to Motion JPEG
- ffmpeg -i input.mp4 -vf “fps=30,scale=-1:176:flags=lanczos,crop=220:in_h:(in_w-220)/2:0” -q:v 9 220_30fps.mjpeg
HTTP Live Streaming(HLS) #
参考:
HLS 使用 HTTP 协议来提供 video + audio 的流式输出。
- video:使用 H.264 编码;
- audio:使用 AAC/MP3/AC-3/EC-3 编码;
[[https://developer.apple.com/documentation/http-live-streaming][HTTP Live Streaming Overview]]:
#+ATTR_HTML: :width 400 :align center [[file:static/images/HTTP_Live_Streaming/2024-09-04_15-02-36_screenshot.png]]
In a typical configuration, a hardware encoder takes audio-video input, encodes it as =HEVC 或 H.264 video and ACC 或 AC-3 audio= , and outputs =a fragmented MPEG-4 file or an MPEG-2 transport stream=.
A software =stream segmenter= then breaks the stream into a series of short media files, which are placed on a web server. The segmenter also creates and maintains =an index file= containing a list of the media files. The URL of the index file is published on the web server.
Client software reads the index, then requests the listed media files in order and displays them without any pauses or gaps between segments.
Architecture:https://en.wikipedia.org/wiki/HTTP_Live_Streaming
HTTP Live Streaming uses a conventional web server, that implements support for HTTP Live Streaming (HLS), to distribute audiovisual content and requires specific software, such as OBS to fit the content into a proper format (codec) for transmission in real time over a network. The service architecture comprises:
Server
Codify and encapsulate the input video flow in a proper format for the delivery. Then it is
prepared for distribution by =segmenting it into different files=. In the process of intake, the
video is encoded and segmented to generate =video fragments and index file=.

    Encoder: codify =video files in H.264 format= and =audio in AAC, MP3, AC-3 or EC-3=.[10] This
    is encapsulated by =MPEG-2 Transport Stream or MPEG-4_Part_14= to carry it.

    Segmenter: divides the stream into fragments of equal length. It also creates an index
    file that contains references of the fragmented files, saved as =.m3u8= .
Distributor
Formed by a standard web server, accepts requests from clients and delivers all the resources
(=.m3u8 playlist file and .ts segment files=) needed for streaming.
Client
Request and download all the files and resources, assembling them so that they can be
presented to the user as a continuous flow video. The client software =downloads first the
index file= through a URL and then the several media files available. The playback software
assembles the sequence to allow continued display to the user.
Adaptability
To enable a player to adapt to the bandwidth of the network, the original video is encoded in =several distinct quality levels=. The server serves an index, called a master playlist, of these encodings, called =variant streams=. The player can then choose between the variant streams during playback, changing back and forth seamlessly as network conditions change.
Using fragmented MP4
At WWDC 2016 Apple announced[11] the inclusion of =byte-range addressing for fragmented MP4 files, or fMP4=, allowing content to be played via HLS without the need to multiplex it into MPEG-2 Transport Stream. The industry considered this as a step towards compatibility between HLS and MPEG-DASH.[12][13]
# http://open.ls.qingting.fm/live/274/64k.m3u8?format=aac

#EXTM3U
#EXT-X-VERSION:3
#EXT-X-ALLOW-CACHE:YES
#EXT-X-MEDIA-SEQUENCE:1254989
#EXT-X-TARGETDURATION:8
#EXTINF:7.01, no desc
//ls-hw-ot.qtfm.cn/live/274/64k/20240904/15/2751-833-189021.aac
#EXTINF:7.01, no desc
//ls-hw-ot.qtfm.cn/live/274/64k/20240904/15/2756-649-189022.aac
#EXTINF:7.01, no desc
//ls-hw-ot.qtfm.cn/live/274/64k/20240904/15/2802-272-189023.aac
#EXTINF:7.01, no desc
//ls-hw-ot.qtfm.cn/live/274/64k/20240904/15/2810-361-189024.aac
#EXTINF:7.01, no desc
//ls-hw-ot.qtfm.cn/live/274/64k/20240904/15/2818-820-189025.aac
#EXTINF:7.01, no desc
//ls-hw-ot.qtfm.cn/live/274/64k/20240904/15/2823-520-189026.aac
#EXTINF:7.01, no desc
//ls-hw-ot.qtfm.cn/live/274/64k/20240904/15/2833-761-189027.aac
#EXTINF:7.01, no desc
//ls-hw-ot.qtfm.cn/live/274/64k/20240904/15/2839-072-189028.aac
esp-adf 也支持这种 HTTP Live Stream 的 aac 音频编解码: https://github.com/espressif/esp-adf/blob/master/examples/player/pipeline_living_stream/main/play_living_stream_example.c