介绍安装和配置 blowfish 主题的内容。
安装和更新主题 #
# 安装
cd mywebsite
git init
git submodule add -b main https://github.com/nunocoracao/blowfish.git themes/blowfish

# 更新
git submodule update --remote --merge
配置主题 #
从 theme 目录复制配置文件:
$ tree ~/blog/blog.opsnull.com/themes/blowfish/config
/Users/zhangjun/blog/blog.opsnull.com/themes/blowfish/config
└── _default
    ├── config.toml
    ├── languages.en.toml
    ├── markup.toml
    ├── menus.en.toml
    ├── module.toml
    └── params.toml

1 directory, 6 files
$ cp -r ~/blog/blog.opsnull.com/themes/blowfish/config/_default/ ~/blog/blog.opsnull.com/config/
配置 config/_default/config.toml 文件中的 languageCode 参数,设置为 "zh-CN" (与 blowfish/i18n 目录下的文件名前缀一致)。
配置 config/_default/makrup.toml 参数:
[goldmark]
[goldmark.renderer]
  unsafe = true # 开启非安全渲染

[highlight]
  guessSyntax = true # 部分不支持的 code language 使用猜测。
  noClasses = false

[tableOfContents]
  startLevel = 1
  endLevel = 3 # 不包含 endLevel,所以只显示 1-2 级别。
browser icon #
自定义浏览器图标:使用 https://favicon.io 网站将自己的图片生成为各种尺寸的 icon,然后将下载的 icon 压缩包解压到 /static 目录下即可。
$ ls -l ~/blog/blog.opsnull.com/static/
total 332K
-rw-rw-r--  1 zhangjun  40K  5 17 13:42 android-chrome-192x192.png
-rw-rw-r--  1 zhangjun 227K  5 17 13:42 android-chrome-512x512.png
-rw-rw-r--  1 zhangjun  36K  5 17 13:42 apple-touch-icon.png
drwxr-xr-x  2 zhangjun   64  5 13 17:07 css/
-rw-rw-r--  1 zhangjun  771  5 17 13:42 favicon-16x16.png
-rw-rw-r--  1 zhangjun 2.1K  5 17 13:42 favicon-32x32.png
-rw-rw-r--  1 zhangjun  16K  5 17 13:42 favicon.ico
drwxr-xr-x  3 zhangjun   96  5 13 17:23 js/
drwxr-xr-x 85 zhangjun 2.7K  5 13 21:16 ox-hugo/
-rw-rw-r--  1 zhangjun  263  5 17 13:42 site.webmanifest
$
custom icon #
自定义 icon:将自定义的 svg 文件放在 /asserts/icons 目录下,为了使 icon 和主题自适应,需要在 svg
文件中添加属性 fill="currentColor" 如下:
<svg>
    <<path fill="currentColor" d="xxx"/>
</svg>
$ mkdir assets/icons
$ ls ~/Downloads/*.svg
/Users/zhangjun/Downloads/wechat.svg  /Users/zhangjun/Downloads/weibo.svg
$ mv ~/Downloads/*.svg  assets/icons/
内置 icon #
https://blowfish.page/samples/icons/
Blowfish has built-in support for a number of FontAwesome 6 icons. These can be included in your
website through either the icon partial or icon shortcode.
插入静态内容 #
以图片为例,现将图片等静态内容放到 static 的子目录下,如 static/images/made-with-emacs.svg,然后在自定义 html 页面片段
如 layouts/partials/extend-footer.html 中使用相对于 static 目录的绝对路径来引用图片。
<div class="flex flex-col items-center justify-center">
  <img src="/images/made-with-emacs.svg" width="150">
</div>
调大文档内容宽度 #
创建 assets/css/custom.css 文件,内容如下:
.max-w-fit, .max-w-prose {
    max-width: 100%;
}
百度统计分析 #
从
百度统计分析站点获取自己网站的分析统计代码片段,然后添加到
layouts/partials/extend-head.html 页面中。
<!-- 百度统计 -->
<script>
    var _hmt = _hmt || [];
    (function () {
        var hm = document.createElement("script");
        hm.src = "https://hm.baidu.com/hm.js?082a73fca2e9377d493b621777923a28";
        var s = document.getElementsByTagName("script")[0];
        s.parentNode.insertBefore(hm, s);
    })();
</script>
umami analytics #
最简单的是直接使用 umami 的 cloud 云服务。
- 注册账号并获得 website id: https://cloud.umami.is/
- 下载 https://cloud.umami.is/script.js 文件,并保存到
static/js/umami.js中; - 在
layouts/partials/extend-head.html中添加如下内容,注意:需要修改data-website-id值;
<script defer src="{{ "js/umami.js" | relURL }}"
data-website-id="XXXXXX"></script>
登录 https://cloud.umami.is/ 查看统计数据.
网站评论 #
三种选择:
- utterances
- gisscus:
- cusdis;
gisscus 的配置方式:
- 新建一个
layouts/partials/comments.html文件; - 在 https://giscus.app/ 配置基于 github repo 的 comment 评论系统;
- 将自动生成的代码贴入上面的 comments.html 文件;
Google 站点内容索引 #
- 打开 Google Search Console 站点;
- 选择 “网站前缀” 提交方式,输入网站首页,如 https://blog.opsnull.com;
- 选择 htttp meta header 验证方式,获得一段
google-site-verificationmeta 代码; - 将上面的 meta 代码贴到
layouts/partials/extend-head.html文件中;
百度网站内容提交 #
在 百度 搜索资源平台 的 “资源提交” -》 “普通收录” 页面 ”手动提交“ 博客站点的 URL(一次最多提交 20 条)。
curl -s https://blog.opsnull.com/sitemap.xml |grep loc |sed -e '/<loc>/ s///' -e '/<\/loc>/ s///'> urls.txt
cat urls.txt | awk '{if (NR % 19 == 0) {print "\n"}; print $0 }'
相关文章 #
在 config/_default/config.toml 文件中设置,主要是根据文件的 tags、categories、series 等标准来判断:
# 相关文档,weight 值越大越相关
[related]
  threshold = 0
  toLower = false

    [[related.indices]]
        name = "tags"
        weight = 100

    [[related.indices]]
        name = "categories"
        weight = 100

    [[related.indices]]
        name = "series"
        weight = 50

    [[related.indices]]
        name = "authors"
        weight = 20

    [[related.indices]]
        name = "date"
        weight = 10

    [[related.indices]]
      applyFilter = false
      name = 'fragmentrefs'
      type = 'fragments'
      weight = 10
阅读计数器 #
这里使用 busuanzi 阅读计数器方案。
在 config/_default/params.toml 尾部添加配置参数:
[busuanzi]
  enable = true
在 layouts/partials/extend-footer.html 文件中添加如下内容,显示 site PV 次数:
<!-- busuanzi -->
<div class="busuanzi-footer">
  <span id="busuanzi_container_site_pv">
    本站总访问量: <span id="busuanzi_value_site_pv"></span> 次
  </span>
  <span id="busuanzi_container_site_uv">
    本站访客数: <span id="busuanzi_value_site_uv"></span> 人次
  </span>
</div>
在 layouts/partials/extend-head.html 中添加如下内容:
  <script async src="//busuanzi.ibruce.info/busuanzi/2.3/busuanzi.pure.mini.js"></script>
  <meta name="referrer" content="no-referrer-when-downgrade">
创建和修改指定 article-meta 目录:
mkdir layouts/partials/article-meta/
cp themes/blowfish/layouts/partials/article-meta/basic.html layouts/partials/article-meta/
修改 basic.html 文件,添加需要显示 page PV 阅读次数的 meta 字符串:
{{ if and (eq $scope "single") (.Params.showZenMode | default (.Site.Params.article.showZenMode | default false)) }}
  {{ $meta.Add "partials" (slice (partial "meta/zen-mode.html" .)) }}
{{ end }}

<!-- busuanzi -->
{{ $meta.Add "partials" (slice "<span id=\"busuanzi_container_page_pv\">浏览: <span id=\"busuanzi_value_page_pv\"></span>次</span>") }}
rss #
访问地址:http://blog.opsnull.com/index.xml
TOC #
全局控制 TOC 显示级别:
[tableOfContents]
  startLevel = 1
  endLevel = 3 # 不包含 endLevel,所以只显示 1-2 级别。
文件级别控制是否显示:
- showTableOfContents: true
页面和配置 Branch Pages #
各种页面的 title:设置页面标题。
---
title: 分类列表
---
Blowfish 支持一些定制一些 taxonomies 页面。

Blowfish has full support for Hugo taxonomies and will adapt to any taxonomy set up. Taxonomy listings like this one also support custom content to be displayed above the list of terms.

---
Homepage 主页。
- Layout: layouts/index.html
- Content: content/_index.md
List/Branch pages:显示该 branch 下的所有文章。
- Layout: layouts/_default/list.html
- Content: content/
/_index.md
.
└── content
    └── projects
        ├── _index.md          # /projects
        ├── first-project.md   # /projects/first-project
        └── another-project
            ├── index.md       # /projects/another-project
            └── project.jpg
可以在 _index.md 中设置适合该 List/Branch 下的所有文档的通用参数:例如添加目录项:
---
title: CloudNative
menu:
  main:
    name: CloudNative # 菜单项名称
    weight: 100
    identifier: "cloudnative" # 必须配置该字段才显示
---

---
title: "Projects"
description: "Learn about some of my projects."
cascade: # 对该目录下的 sub-page 都生效
  showReadingTime: false
---
This section contains all my current projects.
Taxonomy pages:较特殊的 branch pages,因为它显示的是一组预定义的列表(term list),后续可以用于对文档指定 taxonomy 的 term,用于对文档进行归类。某个 Taxonomy List 页面显示一组 term list,terms list 页面显示归属到该 term 的文档列表。
- 编辑文件 config/_default/config.toml 中的 taxonomies
- key = value: key 是单数,values 是复数。
[taxonomies] # 预定义的 taxnomies,如 tags 和 categories
  tag = "tags"
  category = "categories"
  author = "authors"
  series = "series"
然后就可以在 front mattter 中指定复数的 taxonomies,例如:categories/tags/series:
# org-mode 文档配置
#+HUGO_TAGS: ebpf
#+HUGO_CATEGORIES: ebpf
#+HUGO_CUSTOM_FRONT_MATTER: :series '("ebpf") :series_order 1

# 生成的 front matter:
---
title: "Linux 内核追踪和 eBPF 介绍"
author: ["张俊([email protected])"]
date: 2023-08-20T00:00:00+08:00
lastmod: 2024-02-19T21:32:19+08:00
tags: ["ebpf"]
categories: ["ebpf"]
draft: false
series: ["ebpf"]
series_order: 1
---
tags 和 categories 是通过预定义的 taxonomies 来实现的:
- content/categories/_index.md # categories terms 列表,列表文件名固定为 _index.md
- content/tags/_index.md # tags terms 列表
- content/categories/emacs/_index.md # categories 下的具体分类 emacs 页面,title 可以设置页面标题。
---
title: Emacs
---
Emacs 分类下的页面

可以自定义呀!

---
Although it’s not obvious at this point, Hugo will now be generating list and term pages for this
new taxonomy. By default the listing can be accessed at /animals/ and the term pages can be found at
/animals/lion/ and /animals/cat/. The list page will list all the terms contained within the
taxonomy. In this example, navigating to /animals/ will show a page that has links for “lion” and
“cat” which take visitors to the individual term pages. The term pages will list all the pages contained within that term. These term lists are essentially the same as normal list pages and
behave in much the same way. In order to add custom content to taxonomy pages, simply create
_index.md files in the content folder using the taxonomy name as the sub-directory name. Anything in
these content files will now be placed onto the generated taxonomy pages. As with other content, the
front matter variables can be used to override defaults. In this way you could have a tag named lion
but override the title to be “Lion”.
.
└── content
    └── animals
        ├── _index.md       # /animals,文件名必须是 _index.md
        └── lion
            └── _index.md   # /animals/lion
leaf pages:Leaf pages in Hugo are basically standard content pages. They are defined as pages that
don’t contain any sub-pages. These could be things like an about page, or an individual blog post
that lives in the blog section of the website. The most important thing to remember about leaf pages
is that unlike branch pages, leaf pages should be named ~index.md~ without an underscore. Leaf pages
are also special in that they can be grouped together at the top level of the section and named with
a unique name. Leaf pages have a wide variety of front matter parameters that can be used to
customise how they are displayed.
- 两种形式:普通的 standalone 格式 file-name.md 或则 bundled 格式。
.
└── content
    └── blog  # section 名称,用于对 leaf page 进行分组
        ├── first-post.md     # /blog/first-post  # 访问时不带文件名后缀
        ├── second-post.md    # /blog/second-post
        └── third-post        # bundle package,访问路径 /blog/third-post,文件名必须是 index.md
            ├── index.md
            └── image.jpg
single page:文章页面:
- Layout: layouts/_default/single.html # 文章页面
- Content (standalone): content/
/page-name.md # standalone 格式 - Content (bundled): content/
/page-name/index.md # bundled 格式
simple page:
- Layout: layouts/_default/simple.html
- Front Matter: layout: “simple”
通过在 front matter 中添加配置 layout: “simple” 可以对当前页面启用 simple layout。simple layout 默认会以 full-width template 来显示当前页面内容。
---
title: "My landing page"
date: 2022-03-08
layout: "simple"
---
This page content is now full-width.
External links
- 点击时跳转到外部页面
---
title: "My Medium post"
date: 2022-01-25
externalUrl: "https://medium.com/"
summary: "I wrote a post on Medium."
showReadingTime: false
_build:
  render: "false"
  list: "local"
---
导航菜单 #
https://gohugo.io/content-management/menus/
---
menu:
  main:  #  main:header 导航,footer:页末导航
    params:
      class: center
    parent: Products
    pre: <i class="fa-solid fa-code"></i>
    weight: 20
title: Software
---
菜单显示位置(可以在博文的 fronter matter 部分设置):
- menu:“main” # header 导航菜单
- menu:“footer” # 页末导航菜单
排序:
- wight:值越大越靠右
定义方式:section 级别、文档级别或站点级别。
-
section 级别:在 section 的 _index.md 文件中定义,后续所有在该目录下创建的文件,都可以通过
localhost:1313/ebpf/来访问(/ebpf/是 contenxt 下的子目录名称,例如 http://127.0.0.1:1313/ebpf/linux-tracing-and-ebpf-introduction/)# cat content/ebpf/_index.md --- title: eBPF # menu: main: name: eBPF # 菜单项名称 weight: 100 identifier: "ebpf" # 必须配置该字段才显示 --- Blowfish 支持一些定制一些 taxonomies 页面。 Blowfish has full support for Hugo taxonomies and will adapt to any taxonomy set up. Taxonomy listings like this one also support custom content to be displayed above the list of terms. --- -
文档级别:在文档的 foront matter 部分定义,如在 header 导航栏显示一个 now 链接,点击时显示所在的文档:
# aritle front matter menu: main: # 头部 name: now # 菜单项名称 weight: 40 -
站点级别: config/_default/menus.zh-cn.toml,可以通过 pageRef 来引用 section(显示为一个 lsit)或 page(显示具体的文章)。
      [[main]]    # main 表示 header 导航菜单
        name = "标签"   # 菜单名称
        pageRef = "tags"  # 相对于 content 目录的子目录或文件,这里为 content/tags 目录,故显示为一个列表
        weight = 30

      [[main]]
        pre = "github" # icon
        name = "Now"
        pageRef = "now.md"  # 引用 content/now.md 页面,可以不加文件名后缀
        weight = 40

      [[footer]]  # footer menu
        name = "标签"
        pageRef = "tags"
        weight = 10

      [[footer]]
        name = "分类"
        pageRef = "categories"
        weight = 20
Cloudflare Pages #
配置和使用 Cloudflare Pages 来自动发布 push 到 github 的网站。
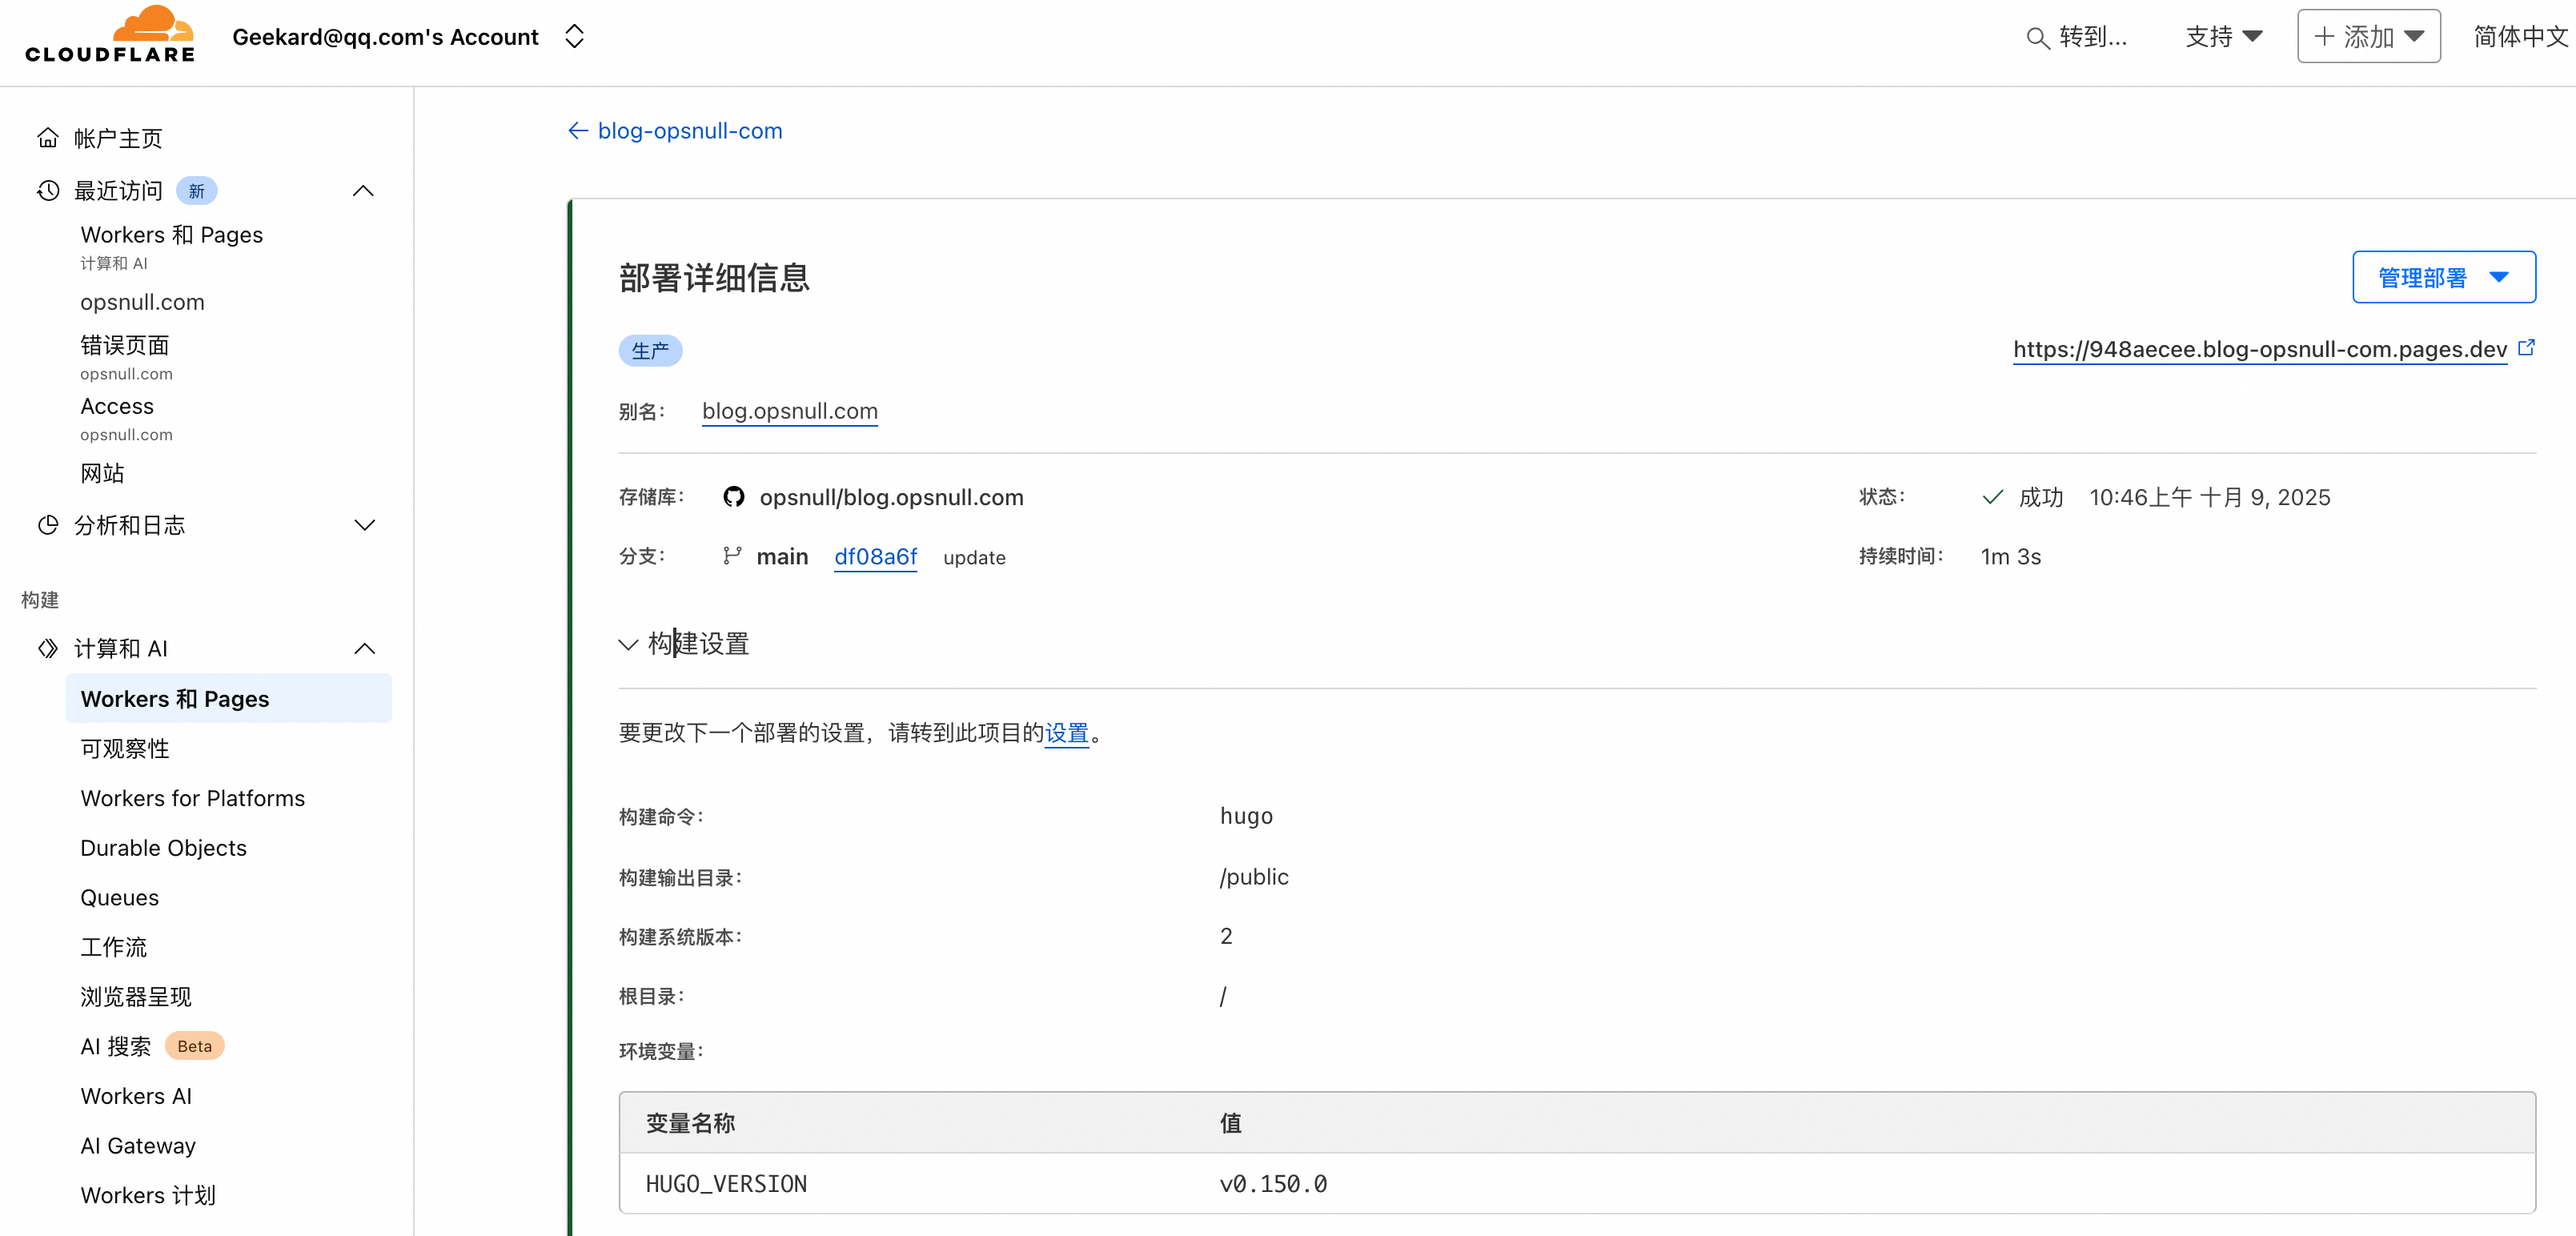
关键配置参数: 1. 使用环境变量 HUGO_VERSION 来指定 hugo 版本,如 v0.150.0。这个版本需要和 blowfish theme 的
config.toml 文件中的 [module.hugoVersion] section 下的 min、max 值兼容,否则可能导致不能正确渲染。