1 文件 #
| 按键 | 函数 | 功能 |
|---|---|---|
| C-x i | insert-file | 在当前位置插入文件 |
| C-x C-r | find-file-read-only | 只读模式打开文件(C-x r是矩形编辑和寄存器的快捷键前缀) |
| C-x C-f | find-file | 打开文件(C-x f 是设置 fill column) |
| C-x 4 C-f | find-file-other-window | 在一个新窗口中打开文件 |
| C-x 4 f | find-file-other-window | 同上 |
| C-x 5 C-f | find-file-other-frame | 在一个新 frame 中打开文件 |
| C-x 5 f | find-file-other-frame | 同上 |
| C-x 5 r | find-file-read-only-other-frame | 在另一个 frame 中只读模式打开文件 |
| C-x t f | find-file-other-tab | 在另一个 tab 中打开文件 |
| C-x t C-f | find-file-other-tab | 在另一个 tab 中打开文件 |
| C-x C-v | find-alternate-file | 打开一个文件,取代当前缓冲区(C-x v 是 VC 的前缀) |
| C-x C-s | save-buffer | 保存当前缓冲区文件 |
| C-x s | save-some-buffers | 保存某个缓冲区文件(依次询问) |
| C-x C-w | write-file | 另存为新文件 |
| C-x C-c | save-buffers-kill-emacs | 退出 Emacs |
C-x C-f 快速切换目录:
//: 根目录;~: 家目录;- TRAMP 模式下,三个连续
///打开本地文件;
save-some-buffers 可以使用的快捷键:
- n、y、q、!
- C-r:view 模式查看要保存的 buffer;
2 重复 #
| 按键 | 函数 | 功能 |
|---|---|---|
| M-N | digit-argument | |
| C-u | universal-argument | |
| C-x z | repeat | 重复执行上一次名称,每按一次 z 字符就多执行一次 |
| C-x M-: | repeat-complex-command | 重复执行需要从 minibuff 读取输入的命令(可以和命令历史记录结合使用) |
| C-M-; | consult-complex-command | 重复执行复杂命令。 |
| M–CMD | 反向执行 CMD 一次 | |
| C-u– CMD | 同上 | |
| C-u–N CMD | 反向执行 CMD N 次 |
C-x ESC ESC 或 C-M-;适合于快速重复执行需要从 minibuff 读取输入的命令。univeral-argument与digit-argument的区别是:- 它可以不带数字参数,表示重复 4 次;
- 除了表示重复次数,不带数字的
univeral-argument还有改变命令行为的特殊含义;
3 光标 #
| 按键 | 函数 | 功能 |
|---|---|---|
| C-f | forward-char | 前进一个字符 |
| C-b | backward-char | 后退一个字符 |
| M-f | forward-word | 前进一个单词 |
| M-b | backward-word | 后退一个单词 |
| c-a | beginning-of-line | 移到行首 |
| C-e | end-of-line | 移到行尾 |
| M-a | backward-sentence | 移到句首 |
| M-e | forward-sentence | 移到句尾 |
| C-p | previous-line | 后退一行 |
| C-n | next-line | 前进一行 |
| M-m | back-to-indentation | 移到当前行非空首字符 |
| M-g M-g | goto-line | 跳转到指定行号 |
| M-g g | goto-line | 同上 |
| M-g c | goto-char | 跳转到指定字符位置 |
| C-v | scroll-up-command | 向下翻页 |
| M-v | scroll-down-command | 向上翻页 |
| C-M-v | 将临近的窗口中内容前翻 | |
| C-M-S-v | 后翻 | |
| C-M-f | forward-sexp | 向前匹配光标右侧的记号(如字符串,括号) |
| C-M-b | backward-sexp | 向后匹配光标左侧的记号 |
| C-M-a | beginning-of-defun | 向后移动光标到函数定义的开始 |
| C-M-e | end-of-defun | 向前移动光标到函数定义的结束 |
| C-M-n | forward-list | 按照括号向前移动 |
| C-M-p | backward-list | 按照括号向后移动 |
| C-M-u | backward-up-list | 跳转到当前括号的上一层次 |
| C-M-d | down-list | 深入到当前行所在的下一级括号层次 |
| C-M-k | kill-sexp | 删除当前 S 表达式 |
| C-M-@ | mark-sexp | 标记当前 S 表达式 |
| C-M-SPC | 标记当前 S 表达式 | |
| C-M-h | mark-defun | 标记函数 |
| C-M-q | prog-indent-sexp | 格式化当前 S 表达式 |
| M-< | beginning-of-buffer | 缓冲区头部 |
| M-> | end-of-buffer | 缓冲区尾部 |
| M-r | move-to-window-top-buttom | 移到光标到中间行、屏幕头部、屏幕底部 |
| C-u M-r | move-to-window-top-buttom | 移到光标到屏幕头部 |
| M– M-r | move-to-window-top-buttom | 移到光标到屏幕底部 |
| C-l | recenter-top-bottom | 将光标位置置于屏幕中间、头部、底部 |
| C-u C-l | 将光标居中 | |
| C-M-l | reposition-window | 将窗口调整到最佳大小 |
| M-. | lsp-bridge-find-def | 跳转到定义位置 |
| M-, | lsp-bridge-find-def-return | 跳转到上一次位置 |
| M-? | lsp-bridge-find-references | 查找符号引用 |
| M-g n | next-problem | |
| M-g p | previous-problem | |
| C-x = | what-cursor-position | 显示光标位置 |
| C-\ | toogle-input-method | 切换输入法(M-\ 是删除光标附近的空格) |
| M-g TAB | move-to-column | 移动光标到当前行的第 N 列 |
对于 M-r ,数字参数指定了光标的位置:
- 数值参数是正值:从 window 头部开始的第 n 行;
- 数字参数是负值:从 windown 尾部开始的第 n 行;
- 特殊的 C-u – 或 M– M-r 则移动到 windown 尾部;
consult 提供跳转到 mark 和 global mark 的功能:
M-g m: 跳转到 mark;M-g k: 跳转到全局 mark;
4 撤销 #
| 按键 | 函数 | 功能 |
|---|---|---|
| C-_ | undo | 撤消操作 |
| C-/ | 同上 | |
| C-x u | 同上 | |
| C-x / | 同上 |
连续按 undo 时一直撤销,但是中间可以用非 undo 命令如 C-f 来终止,这样后续再 undo 时会撤销刚才的 undo,达到 redo 的效果。
5 缓冲区 #
| 按键 | 函数 | 功能 |
|---|---|---|
| c-x b | 选择当前窗口的缓冲区 | |
| C-x C-b | ibuffer | 打开分组缓冲区列表 |
| C-x 4 b | switch-to-buffer-other-window | 选择当前窗口的缓冲区 |
| C-x 5 b | switch-to-buffer-other-frame | 选择当前窗口的缓冲区 |
| C-x k | kill-buffer | |
| kill-some-buffers | 提示删除一些 buffers | |
| eval-buffer | 执行当前缓冲区中的 lisp 语句 | |
| rename-buffer | 重命名 buffer,当要打开多个 eshell 或 info 时需要 | |
| rename-uniquely | 唯一重命名 | |
| revert-buffer | 丢弃缓冲区自上次保存以来的所有改变 | |
| M-~ | not-modified | 清除当前缓冲区的修改标志(保存时不会提示保存该文件) |
| C-x C-q | read-only-mode | 切换缓冲区为只读或者读写模式 |
| C-q | quoted-insert | quoted-insert |
| M-/ | dabbrev-expand | 自动提示扩充当前单词 |
| insert-buffer | 选择一个 Buffer,然后将它的内容插入当前 Buffer | |
| C-M-/ | dabbrev-completion | 动态补全 |
ibuffer 操作:两个快捷键前缀:/ 和 *
6 窗口 #
| 按键 | 函数 | 功能 |
|---|---|---|
| C-x 0 | 关闭本窗口 | |
| C-x 1 | 只留当前窗口 | |
| C-x 2 | 垂直均分窗口 | |
| C-x 3 | 水平均分窗口 | |
| C-x o | 切换到别的窗口 | |
| C-x 4 o | 切换到别的窗口 | |
| C-x 5 o | other-frame | 切换到别的 frame |
| C-x 5 0 | delete-frame | deletes the selected frame |
| C-x 5 1 | delete-other-frames | deletes all other frames |
| C-x 5 2 | make-frame-command | 为当前 buffer 创建新的 frame |
| C-x + | balance-windows | 把所有窗口调整为同样 大小 |
| C-x - | shrink-window-if-larger-than-buffer | 如果编辑缓冲区比窗口小就压缩窗口面积 |
| C-x { | shrink-window-horizontally | 水平缩小窗口 |
| C-x } | enlarge-window-horizontally | 水平扩大窗口 |
| C-x ^ | enlarge-window | 垂直扩大窗口 |
| C-x < | scroll-left | 向左滚动窗口 |
| C-x > | scroll-right | 向右滚动窗口 |
| M-o | ace-window | 根据窗口编号切换 |
M-x winner-mode: 启动 frame 窗口布局记忆机制,当一种窗口布局改变后可以用:
- C-c ←
- 命令恢复上一个布局
- C-c →
- 恢复下一个窗口布局
也可以使用寄存器来保存 frame 和 window 的布局:
C-c r f: 保存 frame 布局;C-c r w: 保存 window 布局;
consult 提供了两个更方便和通用的 register 操作:
- M-x consult-register
- M-x consult-register-store
7 显示 #
| C-xnb | org-narrow-to-block | |
|---|---|---|
| C-xns | org-narrow-to-subtree | |
| C-xnn | narrow-to-region | |
| C-xnp | narrow-to-page | |
| C-xnd | narrow-to-defun | |
| C-xnw | widen | |
| C-x C-+、s - + | text-scale-increase | 放大显示的字体大小 |
| C-x C–、s - - | text-scale-decrease | 缩小显示的字体大小 |
| C-x C-0、s - 0 | text-scale-adjust | 恢复显示的字体大小 |
| M-s h r regexp RET face RET | highlight-regexp | |
| M-s h u regexp RET | unhighlight-regexp | |
| M-s h l regexp RET face RET | highlight-lines-matching-regexp | |
| M-s h . | highlight-symbol-at-point | |
| M-x whitespace-mode | 显示 buffer 的空白字符(包括换行符) |
按一次 C-x C-+ 后,可以一直按 C-+,这样就持续放大或缩小。
8 标记 #
| 按键 | 函数 | 功能 |
|---|---|---|
| C-SPC | set-mark-command | 在当前位置设置标记,并激活 |
| C-@ | 同上 | |
| C-SPC C-SPC | 设置标记,push 到 mark ring,但不激活 | |
| C-u C-SPC | 跳转到上一个标记环中的位置 | |
| C-u C-@ | 同上 | |
| C-x C-SPC | pop-global-mark | 使用 global mark ring 跳转到对应 buffer 中的位置 |
| C-x C-x | exchange-point-and-mark | 交换当前光标位置到上一个标记位置 |
| M-@ | mark-word | |
| C-M-@ | mark-sexp | |
| C-M-SPC | mark-sexp | 标记语法区域 |
| M-SPC | just-one-space | 只保留一个空格(M-\ 是删除光标附近所有空格和TAB) |
| C-x C-o | delete-blank-lines | 将多个空行合并为一个空行 |
| M-h | mark-paragraph | |
| C-M-h | mark-defun | |
| M-= | count-words-region | 统计 region 内的字符数、行数等信息 |
| C-x h | mark-whole-buffer |
在特定 buffer 中添加位置标记时,也会被自动添加到全局的标记环,使用它可以在多个buffer 中跳转。如果要临时跳转到其它位置,后续再返回当前位置,则通过 C-SPC C-SPC 做个快速标记,后续再通过 C-u C-SPC 返回是个不错的方案。一般情况下,引起光标位置改变的操作,都会自动记录上一次位置,可以通过 C-u C-SPC 跳转到以前的历史位置。
Shift-Selection :按住 Shift 键的同时执行一些光标移动命令,如 S-C-f S-C-n 等,也可以用来标记区域。
consult 提供跳转到 mark 和 global mark 的功能:
M-g m: 跳转到 mark;M-g k: 跳转到全局 mark;
9 寄存器 #
Emacs 寄存器可以保存多种类型记录:
- 光标位置记录;
- frame 或 window 配置记录;
- bookmark 记录;
- rectangle 内容记录等;
| 按键 | 函数 | 功能 |
|---|---|---|
| C-x r SPC r | point-to-register | |
| C-x r j r | jump-to-register | Jump to the position and buffer saved in register r |
| C-x r s r | copy-to-register | Copy region into register r |
| C-x r i r | insert-register | Insert text from register r |
| M-x append-to-register <RET> r | Append region to text in register r. | |
| M-x prepend-to-register <RET> r | Prepend region to text in register r. | |
| C-x r f r | frameset-to-register | 保存当前 frame 配置,后续可以恢复当前 frame 布局 |
| C-x r w r | window-configuration-to-register | 将当前 window 配置保存到寄存器 |
| C-x r d | delete-rectangle | |
| C-x r k | kill-rectangle | |
| C-x r M-w | copy-rectangle-as-kill | |
| C-x r y | yank-rectangle | 粘贴上一次删除的矩形区块,注意插入点位矩形的左上角 |
| C-x r o | open-rectangle | 用空格插入选择的矩形块,选择的内容右移 |
| C-x r N | rectangle-number-lines | 在选中的矩形块前插入序号 |
| C-x r c | clear-rectangle | 用空格填充选择的矩形块 |
| C-x r t | string-rectangle | 用指定字符填充选定的矩形区域 |
| C-x r r | 拷贝矩形区域到寄存器中 | |
| C-x r i r | 使用寄存器 r 的内容 | |
| C-x r m <RET> | Set the bookmark for the visited file, at point. | |
| C-x r m <bookmark> | bookmark-set | 在当前位置设置书签 |
| C-x r b | bookmark-jump | 跳转到书签 |
| M-x bookmark-rename | 重命名书签 | |
| M-x bookmard-delete | 删除书签 | |
| M-x bookmark-load | 从指定文件中加载书签 | |
| M-x bookmark-insert | 将书签指向的文件的内容插到光标处 | |
| M-x bookmard-write | 把书签全部保存到指定文件 | |
| M-x bookmark-save | 将书签内容保存到文件,缺省为 ~/.emacs.d/bookmarks | |
| C-x r l | bookmark-menu-list | 列出所有的书签 |
| M-x view-register RET r | 查看寄存器 r 的内容 |
对于保存的 frame 或 window,可以使用 C-x r j 来恢复,从而实现类似于多 frame 切换且保持 window 布局的效果。
可以使用寄存器快速保存部分临时内容, 如:
- C-x r s
- 将 region 内容保存到寄存器;
- C-x r i
- 将寄存器内容插入到当前位置;
安装 consult 包后,在进行寄存器和书签跳转前,可以自动预览和过滤。同时还支持如下快捷特性:
- M-x consult-register-store, 根据上下文保存到寄存器;支持文件、window、frame、point;
- M-x consult-register-load, Do what I mean with a REG;
10 删除 #
| 按键 | 函数 | 功能 |
|---|---|---|
| C-d | delete-char | 删除插入点右边一个字符即光标所在的字符 |
| M-d | kill-word | 删除一个单词 |
| C-k | kill-line | 删除一行,注意:不删除行尾的换行符。 |
| M-BACKSPACE | 反向删除一个 word | |
| M-k | kill-sentence | 删除一句 |
| M–C-k | 从行首删除到光标位置 | |
| C-w | kill-region | 删除标记区域 |
| M-w | kill-region-save | 复制标记区域 |
| C-y | yank | 粘贴删除的内容 |
| M-y | yank-pop | 循环粘贴粘贴板内容 |
| C-M-k | kill-sexp | 向前剪切某个表达式,跨越的区域和 C-M-f 相同 |
| C-o | open-line | 插入一个空行 |
| C-x C-o | delete-blank-line | 删除光标附近的空行 |
| M-^ | delete-indentation | 将当前行和上一行连接 |
| M-\ | delete-horizontal-sapce | 删除光标附近的空格(C-\ 切换输入法,C-/ 撤销) |
| M-SPC | just-one-space | 删除光标附近的空格,仅保留一个空格 |
| C-S-Backspace | kill-whole-line | 删除当前行 |
| M-z Char | zap-to-char | 向前删除到 Char 字符 |
| M-x prepend-to-buffer | 将区域内容添加到缓冲区首 | |
| M-x append-to-buffer | ||
| M-x copy-to-buffer | 将内容拷贝到 buffer,删除 buffer 以前的内容 | |
| M-x insert-buffer | 将内容插入到 buffer 当前位置 | |
| M-x append-to-file |
- M– 和 M-z 反向命令前缀联合使用,可以实现快速的删除光标前面连续字符的功能。
- embark find-file 时,可以使用
C-M-Backspace删除上级目录。
11 格式化 #
如果想在行内容达到指定长度(而非默认的 window edge)自动添加回车,则可以使用 Auto-Fill Mode (modeline 显示
Fill) 。
Fill Paragraph 有两个功能:
- 为各行添加 Fill 前缀字符串;
- 为 Paragraph 的各行按照该 Paragraph 第一行缩进;
Auto-Fill 或 fill-paragraph 都是针对当前 paragraph 的,而 Emacs 使用缩进或至少两个空行来识别
paragraph 的。如果一个region 是多个缩进的行,则 Emacs 认为它们是多个 paragraph,这时如果想整体 Fill,
则需要使用使用 fill-indiviual-paragraphs 命令。
与 fill 相关的还有 indented-text-mode, 它是一个编辑 text 的 major mode(modeline 显示 Indented Text Fill), 且必须和Auto-Fill minor mode 结合使用,只要把第一行缩进, Emacs 就会把整段文字都自动缩进。如果要退出该 Mode, 则可以调用 M-x text-mode 命令。
如果一行内容超过了屏幕长度,Emacs 会自动将它作多行显示,这时每行行尾有一个箭头示意。每行的原始内容称为 logical line,展示的多行称为 screen line,这种行为也称为 line wrapping or continuation(一般是在 window edge 开始wrapping 的。)
Emacs 命令,如 C-a、C-e, 是按照 screen line 来移动的。如果想在 window edge 自动 line wrapping,但是
C-n、C-p等按照 logical line 来移动,则可以使用 Visual Line Mode 。
如果安装了 visual-fill-column ,则它提供的 visual-fill-column-mode 则结合了 Visual Line Mode 和
Auto-Fill Mode的特性,可以在行内容达到指定长度(默认使用fill-column,但如果设置了
visual-fill-column-width 则以它为准)后自动 line wrapping,同时按照 logical line 来执行命令。
| 按键 | 函数 | 功能 |
|---|---|---|
| M-x auto-fill-mode | 自动 fill 模式,只对输入的段落有效。 | |
| C-x . | set-fill-prefix | 设置 Fill 前缀字符串 |
| C-x f | set-fill-column | 设置列边界 |
| M-q | fill-paragraph | fill 当前段落 |
| M-x fill-individual-paragraphs | fill 多个段落 | |
| M-x refill-mode | 自动 fill 模式,对整个文件有效 | |
| M-x display-fill-column-indicator-mode | 展示 fill-column 位置的边界线 | |
| C-M-\ | indent-region | 按照一定的代码风格格式化当前段落。 |
| C-x <TAB> | indent-rigidly | 对选中区域使用左右箭头进行缩进 |
| M-^ | 删除当前行的缩进,与上一行连接 | |
| M-m | 跳转到当前行第一个缩进字符 | |
| C-j | 换行并缩进 | |
| M-j | default-indent-new-line | |
| C-M-j | indent-new-comment-line | 换行,如果位于注释中,则继续插入一个注释行 |
| C-M-o | split-line | 将行拆分为台阶排列的两行 |
| C-x ; | comment-set-column | 设置 comment 列位置 |
| C-x C-; | comment-line | |
| M-; | comment-dwim | |
| M-x white-space-mode | 显示当前 buffer 中的空白字符 | |
| M-x tabify | 将当前选中的内容中连续的空格转变为 tab | |
| M-x untabify | 将当前选中的内容中的 tab 转换为空格 | |
| M-x center-line | 将行内容居中 | |
| M-x center-paragraph | 将段落居中 | |
| M-x center-region | 将选中的区域内容居中 |
Lisp 注释:如果是两个以上 ; 开头,则格式化的时候不移动注释位置。否则,按照 comment-set-column 的位置来移动注释。
12 调换 #
| 按键 | 函数 | 功能 |
|---|---|---|
| C-t | transport-chars | 将光标所在的字符和前一个字符对调 |
| M-t | transport-words | 将光标所在 word 与前一个 word 对调 |
| C-M-t | transport-sexps | Transpose two balanced expressions |
| C-x C-t | transport-lines | 将光标所在的行与上一行对调 |
13 大小写 #
| 按键 | 函数 |
|---|---|
| M-u | upcase-word |
| M-l | downcase-word |
| M-c | capitalize-word |
| C-x C-u | upcase-region |
| C-x C-l | downcase-region |
14 搜索 #
- C-s key isearch-forward 向前增量搜索
- C-r key isearch-backward 反向搜索
Search 默认大小写不敏感,但如果搜索字符串中包含大写字母,则大小写敏感。
搜索过程中可以使用的快捷键:
- C-s 查找下一个,ENTER 停止搜索
- C-r 查找上一个,ENTER 停止搜索
- C-g C-g isearch-abort 停止搜索
- M-n、M-p 查找命令历史记录
- C-y isearch-yank-kill 粘贴删除环中文本
- M-y isearch-yank-pop 循环粘贴删除环中的文本
- C-w isearch-yank-word-or-char 将光标所在位置到下一个标点符号或空格符间的文本添加到搜索字符串中
- C-M-w isearch-yank-symbol-or-char appends the next character or symbol at point to the search string.
- C-M-y isearch-yank-char appends the character after point to the search string
- C-M-z isearch-yank-until-char appends to the search string everything from point until the next occurrence of a specified character
- C-M-d isearch-del-char deletes the last character from the search string
- M-s C-e isearch-yank-line 将光标所在的位置到行尾的内容添加到搜索字符串中
- M-s o (isearch-occur): in incremental search invokes isearch-occur, which runs occur with the current search string
- M-s h r (isearch-highlight-regexp): exit the search while leaving the matches highlighted
- M-c 大小写敏感模式切换
- M-r 正则匹配模式切换
- M-% 切换到替换模式
搜索过程中,可以使用 M-e(isearch-edit-string) 编辑搜索字符串。
- C-s ENTER search-forward
- 非增量搜索模式
- C-r ENTER search-backward
- 进入反向非增量搜索模式
单词搜索模式:上面都是字符串完整匹配的搜索模式,如果要搜索多个字符串,同时忽略它们之间的标点和换行符,则可以使用单词搜索模式:
- M-s w 是单词搜索模式命令前缀:
- M-s w isearch-forward-word 增量式单词搜索(在 C-s 或 C-r 命令中使用时切换到单词搜索模式)。
- M-s w <RET> words <RET> 非增量式单词搜索
- M-s w C-r words 反向增量式单词搜索
- M-s w C-r <RET> words <RET> 反向非增量式单词搜索
标识符(symbol)搜索模式:按照 symbol 搜索(非常适合搜索代码的标识符和字符串):
- M-s . isearch-forward-symbol-at-point 搜索光标附近的 Symbol
- M-s _ isearch-forward-symbol 按照 symbol 进行增量搜索
- M-s _ RET symbol RET: Search forward for symbol, nonincrementally.
- M-s _ C-r RET symbol RET: Search backward for symbol, nonincrementally.
按照正则表达式搜索:
- C-M-s isearch-forward-regexp 向前增量式正则搜索
- C-M-r isearch-backward-regexp 向后增量式正则搜索
- C-M-s <RET> 向前非增量式正则搜索
- C-M-r <RET> 向后非增量式正则搜索
Occur:
- M-s o:Prompt for a regexp, and display a list showing each line in the buffer that con- tains a match for it
- M-x multi-occur:和 occur 类似,但是可以选择多个 buffer 来进行搜索
- M-x multi-occur-in-matching-buffers:先执行 buffer name 的 regexp,然后搜索
Occur Buffer 快捷键:
- M-n、M-p:跳转到下一个或上一个匹配记录;
- 回车、C-c C-c:在新窗口显示当前记录对应的文件;
- o:在新窗口打开当前记录对应的文件,并移动光标到对应窗口;
- C-o:在新窗口打开当前记录对应的文件,光标不移动;
- e:编辑 Occur Buffer,然后 C-c C-c 保存;C-g 丢弃修改;
- q: 终止 buffer;
- c:clone Occur buffer;
- r: rename buffer;
- g:刷新 buffer;
- h:显示帮助
- C-c C-f: next-error-follow-minor-mode
安装 consult 后,可以通过 M-s m 来执行 consult-multi-occur ,利用它的自动补全功能快速选择多个 buffer。
Grep mode:
- M-x grep、M-x lgrep (local grep) Run grep asynchronously under Emacs, listing matching lines in the buffer named grep.
- M-x grep-find、M-x find-grep、M-x rgrep (recursive grep) Run grep via find, and collect output in the grep buffer.
- M-x zrgrep Run zgrep and collect output in the grep buffer.
- M-x kill-grep Kill the running grep subprocess.
Your command need not simply run grep; you can use any shell command that produces output in the
same format. For instance, you can chain grep commands, like this: grep -nH -e foo *.el | grep bar | grep toto
The output from grep goes in the grep buffer. You can find the corresponding lines in the original files using M-g M-n, RET, and so forth, just like compilation errors. See Section 24.2 [Compilation Mode], page 290, for detailed description of commands and key bindings available in the grep buffer.
grep、occur、riggrep 都是继承自 compile mode,它们的 buffer 快捷键类似:
- TAB
- compilation-next-error
- RET
- compile-goto-error
- C-o
- compilation-display-error
- <
- beginning-of-buffer
- >
- end-of-buffer
- ?
- describe-mode
- e
- consult-compile-error
- g
- recompile
- h
- describe-mode
- q
- quit-window
- C-c C-f
- next-error-follow-minor-mode
- C-c C-p
- wgrep-change-to-wgrep-mode
- n、p
- 上一个或下一个 error,会在其它窗口显示对应内容
- M-n
- compilation-next-error,不显示内容
- M-p
- compilation-previous-error,不显示内容
- { 或 M-{
- compilation-previous-file
- } 或 M-}
- compilation-next-file
- C-c C-c
- compile-goto-error
- C-c C-k
- kill-compilation
14.1 搜索文件内容:deadgrep #
<f5>:运行 deadgrep 搜索命令。搜索结果页面会列出所有匹配的文件和行,可以使用的快捷键如下:
- TAB:折叠当前文件匹配的内容
- Enter:查看当前文件
- o:在另一个 window 中查看光标位置的内容
- n、p: 移动到下一行和上一行
- N、P:移动到下一个匹配位置或上一个匹配位置
- M-n、M-p:移动到下一个文件或上一个文件
- g:刷新搜索内容
- C-c C-k:kill deadgrep 使用的 rg 命令
- q:关闭搜索结果 buffer
如果结果列表中文件比较多,可以使用 M-g i (consult-imenu) 展示文件列表,然后 C-m 跳转到对应的文件。
deadgrep 也支持 TRAMP 模式。
14.2 搜索文件内容 consult-*grep #
- M-s g: consult-grep
- M-s G: consult-git-grep
- M-s r: consult-ripgrep
对于上述搜索结果 Buffer,可以使用 embark-export 将其保存到一个 Grep 类型的 buffer,然后就可以使用 Grep Mode 的快捷键和命令进行处理,如 批量编辑(C-c C-p,切换到wgrep 模式)。
consult 也支持 TRAMP 模式。
15 替换 #
Replace 是从光标到 buffer 尾部,但如果有选中 Region,则只会替换该 Region 内容。
- M-x replace-string 从光标到 buff 尾全局字符串替换
- C-u M-x replace-string 同上,但是只在 word 边界处替换
- M-x replace-regexp 从光标到 buff 尾全局符合正则表达式的字符串替换
- M-% query-replace 交互替换
- C-M-% query-regexp 交互式正则表达式替换
Query replace 过程中可以使用的快捷键:
- e 编辑替换字符串
- y 或 SPACE 确定替换当前位置,然后前进到下一个
- n 或 DEL 不替换,前进到下一位置
- . 在当前位置替换后退出查询替换操作
- , 替换并显示替换情况(按空格或 y 继续,适合替换过程中先暂停的情况)
- ! 对后面的内容全部替换,不再询问回车或 q 退出查找替换
- ^ 返回上一次替换位置
- u to undo the last replacement and go back to where that replacement was made.
- U to undo all the replacements and go back to where the first replacement was made.
进入查找-替换模式后,按 C-r 进入递归编辑,或 C-w 删除此次内容并进入递归编辑模式:
- C-M-x 退出递归编辑模式,返回到查找/替换模式 (exist)
- C-M-c 同上(cancel)
- C-] 退出递归编辑和查找替换模式
其它替换命令:
- M-x projectile-replace:在 project 级别搜索或替换文件。
- M-x dired-do-find-regexp-and-replace:在 dired mode 上选中文件,按 Q 进行查询替换;
16 定制 #
Emacs 支持 5 种 Modify key:
- Control:C-
- Meta:M-
- Super:s-
- Alt:A-
- Hyper:H-
例如: (global-set-key (kbd "s-n") #'next-line) 。这些 keybinding 默认是不区分大小写的,例如 C-a 和
C-A 是一致的,但是在定义快捷键时可以使用 Shift,例如:(global-set-key (kbd “C-S-n”) #’next-line)
- C-x 8 RET:插入 unicode 字符。
17 tramp #
- C-c C-f /sudo::/path/to/file
- 以管理员权限编辑本地文件,:: 中的空格表示本地
- C-c C-f /sudo:user@host:filepath
- 以管理员权限打开本地编辑远程文件
- C-c C-f /ssh:phil@remotehost#port:records/pizza-toppings.txt
- 远程编辑文件
- C-c C-f /ssh:phil@remotehost#port|ssh:root@hostB:records/pizza-toppings.txt
- 多跳远程编辑文件
tramp 一般和 projectile 联合使用,对于远程项目,如果不是 git 类型,则最好在项目根目录创建一个空的.projectile/.project 文件,这样 projectile 能正确识别项目根目录。另外,为了加快查找效率,一般需要在远程机器上安装 fd 和 rg 命令。
编辑远程文件时,tramp 自动将 auto-save 文件保存到本地。可以打开 ssh 的 ControlPersist 特性,这样编辑远程多个文件更高效。
如果远程是 zsh,因为它一般会重新定义 PS1,则 tramp 会因为匹配不到 PS1 而 hang,解决办法是在远程机器的 ~/.zprofile 文件头部(而非 ~/.zshrc,因为 zsh 会首先执行~/.zprofile 文件) 添加如下内容:
  ➜ multiarch cat ~/.zprofile if [ $TERM = "tramp" ]; then unset RPROMPT unset RPS1 unset PROMPT_COMMAND PS1="$ " unsetopt
  zle unsetopt rcs # Inhibit loading of further config files fi ➜ multiarch
- 上面有效的前提是为 tramp 设置了如下变量:(setq tramp-terminal-type “tramp”)
tramp 支持通过多跳的方式打开远程文件: /ssh:bird@bastion|ssh:you@remotehost:/path 而且这个 proxy 的方式会被emacs 自动保存到变量 tramp-default-proxies-alist 中,后续可以直接 /ssh:you@remotehost:/path
而不需再指定前面的跳板机。但是这种自动添加 proxy 的方式对于多个目的 IP 都相同的 VPC 环境会有问题,
tramp 会使用最近一次添加的proxy 来代理这些所有目标 IP 相同的机器,解决办法:
In your .emacs config file add the following:
(add-to-list 'tramp-default-proxies-alist '("HOSTB" nil "/ssh:USERA@HOSTA:"))
Where HOSTB is the destination host behind HOSTA. Then type /ssh:USERB@HOSTB: and emacs will prompt for the HOSTA password then the HOSTB password.
参考文档: https://www.gnu.org/software/tramp/#Ad_002dhoc-multi_002dhops
支持 TRAMP 的常用命令:
- dired-async-do-copy 支持 TRAMP,可以异步快速将本地或远程 dired 中选择的文件拷贝到本地或远程。
- find-file-in-poroject 支持使用 fd 在 TRAMP 远程查找匹配正则的文件名。
- 在 TRAMP 模式下,关闭了 projectile,否则有性能问题。所以,projectile-find-file 不能再使用。
- deadgrep 和 consult-rg 都支持在 TRAMP 在远程查找文件内容。
经验:
- 配置 tramp-terminal-type 为 “tramp”,这时远程 shell 中 $TERM 值为 tramp。如果是通过 vterm 登录远程 shell,则远程 shell 中 $INSIDE_EMACS 值为 vterm。(如果通过 emacs shell 登录远程 shell,则远程 shell 中 $INSIDE_EMACS值为‘version,comint’。
- tramp 通过
shell-prompt-pattern和tramp-shell-prompt-pattern来匹配远程 shell,如果匹配不上可能会一直 hang,这时可以在远程 shell 的启动文件中重新定义 PS1。 - tramp-default-method 定义传输文件的方法,默认为 scp,如果设置为 ssh,则无论文件大小都用 ssh,会影响大文件传输效率。
- 当不涉及多 hop 来 Dired 远程机器时,建议使用 /scp: 而非 /ssh: ,这样可以大大提高文件传输效率。特别是使用
M-x copy-file和M-x dired-async-do-copy来拷贝文件时,使用 /scp: 会大大提高效率。 - 为了加快远程文件查找,可以在远程机器添加 rg 和 fd 命令。
- 关闭远程 buffer 的 projectile 探测:
;; Disable projectile on remote buffers ;; https://www.murilopereira.com/a-rabbit-hole-full-of-lisp/ ;; https://github.com/syl20bnr/spacemacs/issues/11381#issuecomment-481239700 ;;(defadvice projectile-project-root (around ignore-remote first activate) ;; (unless (file-remote-p default-directory 'no-identification) ad-do-it)) - 为了避免 preview TRAMP 书签时 hang,可以关闭 consult 的自动 preview 功能。
;; 按 C-l 激活预览,否则 buffer 列表中有大文件或远程文件时会卡住。 (setq consult-preview-key (kbd "C-l")) - treemacs 会变慢, 在打开远程文件时需要关闭 treemacs:
(add-hook 'buffer-list-update-hook (lambda () (when (file-remote-p default-directory) ;; 关闭 treemacs, 避免建立新连接耗时。 (require 'treemacs) (if (string-match "visible" (symbol-name (treemacs-current-visibility))) (delete-window (treemacs-get-local-window)))))) - 与 projectile 协作时, 在远程机器的常见目录下创建 .projectile 文件, 在远程机器上安装 rg 和 fd 命令.
在 TRAMP 模式下,有两种方式 tailf 远程文件:
- 在 vterm buffer 中直接执行 tail 命令;
- 或者,打开 dired,在要 tail 的文件上执行异步 shell 命令,即 & 命令,可以用 *表示当前或标记的文件;
- 注意,M-& 不是 dired 命令,它是 emacs 的异步命令,这时 * 表示 shell 匹配的文件;
通过 ssh JumpProxy 来实现跳板即登录:
ssh -t -J 100.67.27.224:50023 10.122.1.1 VTERM_TRAMP=true bash -li
18 shell #
- M-! cmd RET
- Run the shell command cmd and display the output (shell-command).
- M-| cmd RET
- Run the shell command cmd with region contents as input; optionally replace the region with the output (shell-command-on-region).
- M-& cmd RET
- Run the shell command cmd asynchronously, and display the output (async-shell-command).
- M-x shell
- Run a subshell with input and output through an Emacs buffer. You can then give commands interactively.
- M-x term
- Run a subshell with input and output through an Emacs buffer. You can then give commands interactively. Full terminal emulation is available.
A numeric argument to shell-command, e.g., M-1 M-!, causes it to insert terminal output into the current buffer instead of a separate buffer.
To make multiple subshells, invoke M-x shell with a prefix argument (e.g., C-u M-x shell). Then the
command will read a buffer name, and create (or reuse) a subshell in that buffer. You can also
rename the shell buffer using M-x rename-uniquely, then create a new shell buffer using plain M-x
shell. Subshells in different buffers run independently and in parallel.
Shell mode:不支持终端转义字符, 不建议使用 ;
- M-x shell: emacs 设置环境变量
INSIDE_EMACSin the subshell to ‘version,comint’, 这样可以针对性的初始化 shell。 - C-c C-u、C-c C-w、C-c C-c、C-c C-\、C-c C-z
- C-c C-o:删除上一个命令的输出
- C-c C-s:将上一个命令的输出保存到指定 buffer
- C-c C-r 或 C-M-l:将上一个命令的输出置到 window 的顶部;
- M-p、M-n、M-r、C-c C-n、C-c C-p:命令历史记录
- C-c C-l:在另一个 buffer 中展示当前 shell buffer 的历史记录; 然后可以搜索,回车确定;
Term mode: 建议使用, 可以使用 top、vim 等:
- C-c C-j:term-line-mode,切换到 Emacs 编辑模式,直到按回车键(将当前行发送给终端)。在粘贴拷贝的内容前,不能按回车。
- C-c C-k:term-char-mode,切换到终端模式,输入的任何字符都会直接发送给终端( 除了 C-c 字符外)。
- C-c C-c: 向 shell 进程发送 C-c 命令;
C-c C-q: C-c C-q Toggle the page-at-a-time feature (term-pager-toggle). 在 line和 char mode 都可以启用,当term 输出超过一页时会暂停,按 SPACE 继续。
term 模式下不支持 Control 开头的快捷键,例如 C-`, C-; 等。这是由于终端的限制,目前没有很好的解决办法。
如果打开多个 term,可以使用 M-x rename-buffer 命令重命名为有意义的名称, 或 M-x rename-uniquely 这样便于后续参考。
18.1 vterm #
Emacs term 默认是非交互式 shell,不会调用 ~/.bash_profle 文件,所以类似于 PS1 等环境变量需要设置在
=~/.bashrc=文件中。
安装了 vterm-toggle package 后,可以快捷地在当前 buffer、bottom buffer 或 side buffer 打开和关闭一个 vterm,定义的快捷键如下:
- C-`:为当前 buffer 打开一个 vterm;
- C-~:为当前 buffer 打开一个 vterm,并切换到当前工作目录;
- s-n: 切换到下一个 vterm;
- s-p:切换到前一个 vterm;
可以在打开的 term buffer 中按 Control-Return 快捷键,将自动切换到对应 buffer 的目录。
M-x projectile-run-vterm 在 projectile 级别打开一个 vterm(多次执行该命令打开的都是同一个 vterm buffer)
- C-c C-t
- 开启 copy mode 。当前 buffer 处于 readonly 状态,可以使用 emacs 各种指令进行操作,最后如果有选择的区域,按Enter 进行拷贝,没有选中的区域则则拷贝最后一行。
- C-c C-n 或者 C-c C-p
- 在命令行历史记录中跳转到上一个命令或下一个命令, 匹配的正则表达式为:
- C-l
- clear 屏幕
M-x projectile-run-vterm 在 projectile 级别打开一个 vterm(多次执行该命令打开的都是同一个 vterm buffer)
-
在 TRAMP 模式下,执行 M-x vterm 命令,会打开一个远程 VTERM Buffer,而且INSIDE_EMACS 等环境变量都能正确配置。如果要打开本地 VTERM,需要先切换到本地Buffer。
-
vterm-toggle 如果报错 “tcsetattr: Interrupted system call”,则解决办法 参考, sleep 时间可能需要增加,直到不再报错即可;
除了 emacs 的配置外,需要配置在本地或远程 shell,实现目录和命令提示符追踪, bash、zsh 的配置可以参考 vterm 的github 文件。
对于 bash,创建 ~/.emacs_bashrc 文件,内容参考:
.emacs_bashrc。
- 重置 PS1 为标准的 unix 提示符,防止 tramp 判断失败;
- 如果 PS1 中使用 IP 来代替 hostname,否则 TRAMP 会因 hostname 无法解析而失败。需要在 /etc/hosts 中添加hostname 和 ip 的映射,而且只能返回一个 IP,否则 PS1显示不对;
$(hostname)和${HOSTNAME}返回的必须是 PS1 显示的主机名,否则 可能匹配失败,这时可以可以手动主机名;- 以上脚本保存到登录机器的
~/.emacs_bashrc文件中,vterm 会自动执行;
19 magit #
19.1 Core #
| C-x g | magit-status | 显示当前 buffer 对应的 git project status |
|---|---|---|
| C-x M-g | magit-dispatch | 在小的 buffer window 中显示当前可以执行的 magit 快捷键命令。 |
| C-c M-g | magit-file-dispatch | 在小的 buffer window 中显示可以对当前 file 执行的 magit 命令。 |
在 magit-status buffer 中,执行的命令与当前光标所在位置有关系,如在某一个 commit 上时,SPACE 会显示该 commit 的内容,d 会显示前后两个 commit 的差别:
- ? 或者 h:根据光标所在的 buffer,显示对应的帮助菜单。
- $:显示 git process 的输出内容窗口,用于 debug, 用 q 关闭 debug 窗口。
- k:discard:
- 当光标在 stage 位置时,丢弃 stage 和 worktree 中的内容。
- 当在 unstage 位置时,丢弃 worktree 的修改。
- 当在 untrack 位置时删除文件。
- v:reverse a changing to worktree, 可以是 staged 或者 commited.
- s: stage 当前的改动, 可以在 file 级别,也可以在 hunk 级别.
- S: 将所有 unstaged 的变动提交到 Stage
- u: unstage 当前的变动, 可以在 file 级别,也可以在 hunk 级别.
- U: unstage 所有的变动.
- g: 刷新 magit buffer.
C-SPACE:标记当前 file 或 hunk,然后用 n、p 移动,最后可以用 s、u 操作标记的区域。也可以用来在 Commit 或 log 列表中批量选中 commit,后续可以 apply 或 revert。
-
n/p: 在 section 或者 section 内部的 hunk 之间移动;
-
M-n/M-p: 在 slibling section 之间移动;
-
^:移动到 section 的上一级(不是 u,u 的含义是 unstage);
-
TAB 展开当前 section
-
C-TAB:循环展示当前 section 和它的 children;而 TAB 是直接展开所有 children 的内容。
-
Enter:访问当前 section 的文件
-
1-4:分别在当前 section 的 1-4 级之间之间展开
-
M 1-4: 分别在所有 section 的 1-4 级之间展开
-
!: 在当前工作目录或 git root 目录运行 git 或 shell 命令
-
C-g: 终止当前的 git 命令
C-c M-g: magit-file-dispatch 这个命令是针对当前文件的,可以:
-
stage、unstage、commit 当前文件;
-
Diff 和 diff 当前文件与其它 commit 或 master 的差别;其中 Diff 可以查看的更多样:
- dwim: 功能同 Diff range;
- Diff range: 提示输入比较的 commit ref,然后比较 workspace 当前文件与它的的差别;
- Diff paths: 提示输入两个路径的文件,然后显示他们的差别;
- Diff unstaged: 显示当前文件 unstaged changes;
- Diff staged:显示当前文件 staged changes;
- Diff worktree: 显示当前文件在 HEAD 和 working tree 之间的差别;
- Show commit: 显示某一个 commit 中当前文件的变更;
-
status(g): 整个 workspace 当前的状态(untracked、unstaged、staged 等状态文件)。
-
Log/log: 查看当前文件的历史 commit;其中 Log 功能更丰富:
- current: 展示当前文件在当前分支的历史 commit;
- other:展示当前文件在其它分支或 commit 中的更新情况;
- head: 展示在 HEAD 对应分支中,当前文件的历史 commit 情况;
- Local Branchs: 展示在所有本地分支中,当前文件的 commit 情况;
- all branchs: 除了所有本地分支外,也包括远程分支,当前文件的 commit 情况;
- all reference: 展示所有分支中当前文件的 commit 情况;
-
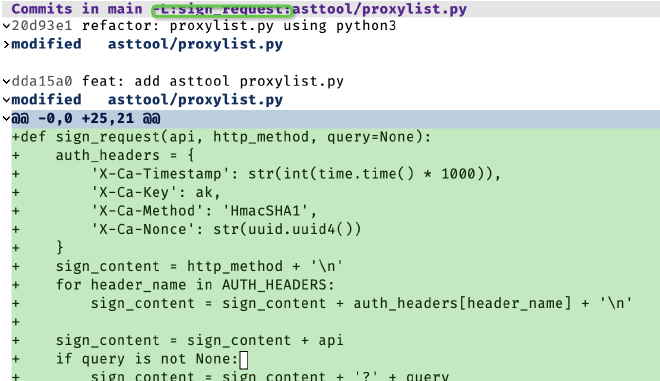
trace: 查看光标处所在函数或代码的修改历史(也可以选中区域),如下面的 main -L:sign_request 表示 main 分支的 sign_request 函数的修改历史:
19.2 Branch #
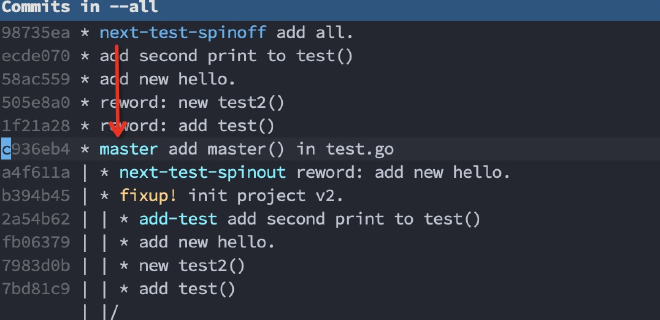
在 magit-log 页面,用蓝色表示当前所处的分支:
- b: branch/revision
- checkout 本地或 remote 分支,如果是本地分支则切换过去,如果是 remote 分支,则 HEAD 会变成 detached(因为它不会为 remote 分支创建本地分支)。指定的分支必须存在,不创建新分支。
- l: local branch
- checkout 本地或 remote 分支,如果是本地则切换过去。如果是远程,则本地创建创建一个同名的 track 分支(自动将本地分支 track remote 分支)。如果是一个新的分支名,则会提示它的 starting-point,并自动 track 这个分支。
- c: new branch
- Create and checkout BRANCH at branch or revision START-POINT. 创建并 checkout 到新的分支(并不设置 track remote 分支),如果当前分支有未提交的修改则失败。
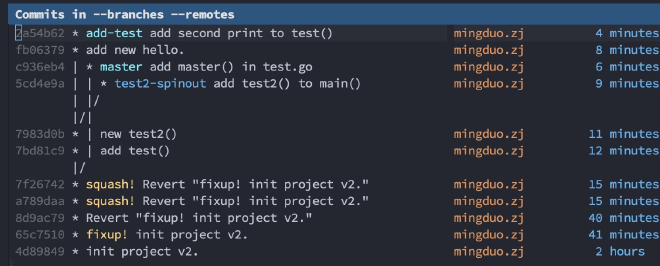
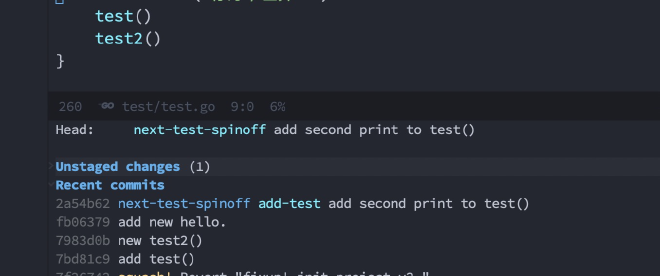
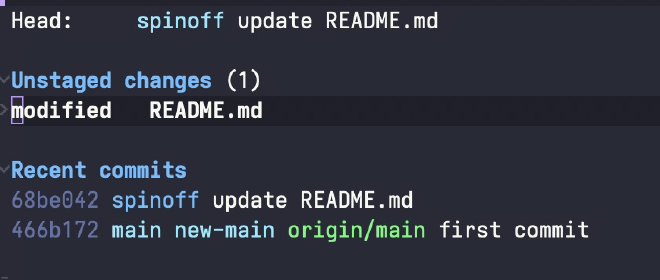
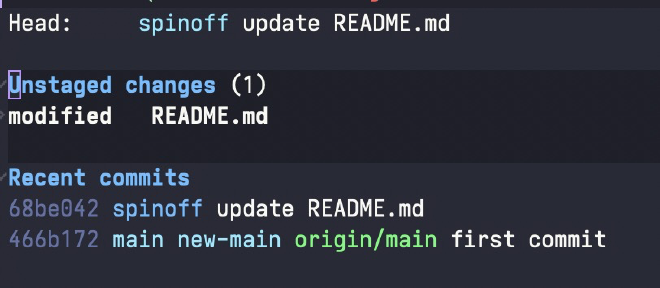
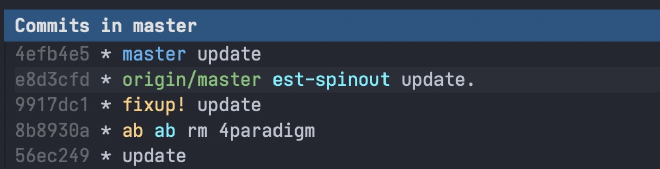
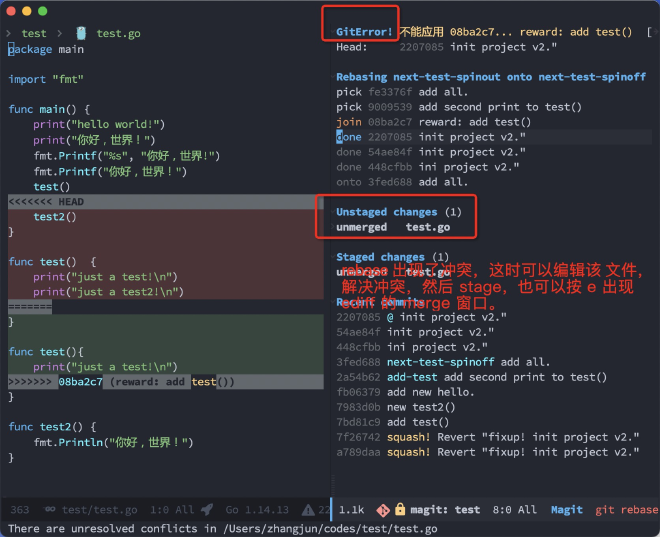
- s: new spin-off
- Create new branch from the unpushed commits.
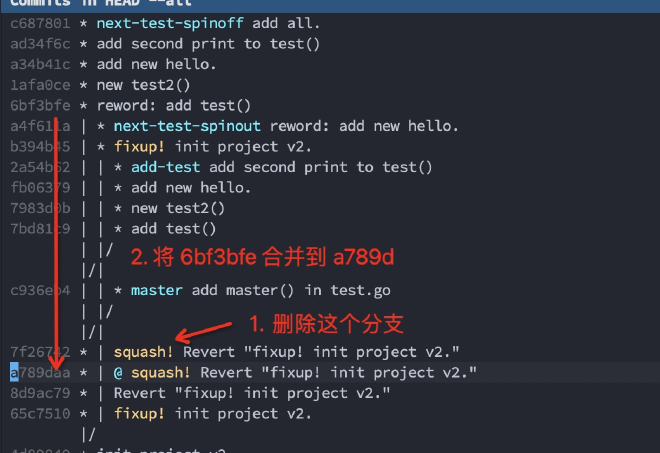
spin-off 是基于当前分支 checkout 一个新的分支,然后将旧的分支重置到上次和 upstream 同步的位置。如果旧的分支没有 upstream 或者没有 unpush 的 commit,则老分支不变。这非常适合在旧的 branch 上提交了一些 commit 但没有 push 到远程分支,想把这些改动转移到新的特性分支的情况:老分支未 commit 的改动将体现在新的分支中。例如:当前是 add-test 分支,并有一些 unstage 的修改,则 new spin-off 创建一个新的 next-test-spinoff 分支,并将 unstage 的内容保留到这个分支:
- n: new branch
- Create BRANCH at branch or revision START-POINT. 创建分支但是不 checkout。
- S: new spin-out
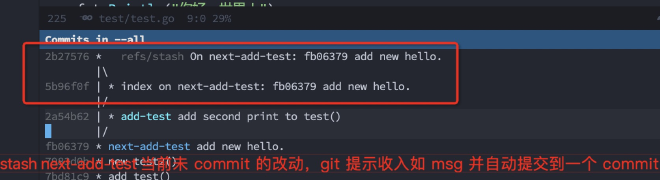
- 从 unpushed commits 位置创建新的分支,但是不 checkout,当前分支不变。如果当前分支有 uncommitted changes,则和 spin-off 类似,会 checkout 这个新的分支。
小技巧:
- 如果想基于历史 commit 创建一个 branch,可以先用 l l 展示当前分支 log,然后移动到目标 commit,再执行上述 branch 命令,则会提示以目标 commit 创建 branch。
19.3 Stash #
stash 用于暂存当前的变更。git stash 使用流程:
- git stash
- 保存当前工作进度,把暂存区和工作区的改动保存起来,然后当前是一个干净的工作区。
- git stash save ‘message…’
- 添加注释。
- git stash list
- 显示保存进度的列表。
git stash pop [–index] [stash_id] - git stash pop: 恢复最新的进度到工作区。git 默认会把工作区和暂存区的改动都恢复到工作区。 - git stash pop –index: 恢复最新的进度到工作区和暂存区。(尝试将原来暂存区的改动还恢复到暂存区) - git stash pop stash@{1}: 恢复指定的进度到工作区。stash_id 是通过 git stash list 命令得到的。通过 git stash pop 命令恢复进度后,会删除当前进度。
- git stash apply [–index] [stash_id]
- 除了不删除恢复的进度之外,其余和 git stash pop 命令一样。
- git stash drop [stash_id]
- 删除一个存储的进度。如果不指定 stash_id,则默认删除最新的存储进度。
- git stash clear
- 删除所有存储的进度。
magit 提供了 stash 和 snapshot 两种选择: https://emacs.stackexchange.com/a/22482
对于 snapshot,magit 会创建一个 WIP commit,当前 working tree 内容不变。
Both the “stash” and “snapshot” variants create the same stash objects. The difference is that when you create
a snapshot, then the stashed changes are not removed from the files in the working tree and/or the
index. (Just like when you take a snapshot of your friends having a good time - that doesn’t cause them to
disappear either ;-)
This is intended as a backup mechanism of sorts. Say you are performing some complicated refactoring and you just tested and the modified code still appears to work but you are not done yet. Now would be a good time to create a snapshot, so that you have something to go back to if you mess it up later.
Of course you could just create a temporary "wip" commit, right on the branch you are working on, to
accomplish the same. That’s usually what I do.
And you can also automate the process of recording work-in-progress by enabling the Wip modes. I do have these modes enabled as a safety net, but I still create wip commits directly on the current branch or create a snapshot. Those are easier to work with than the wip refs.
Note that Magit comes with its own stash implementation written in Elisp. That was necessary to implement the snapshot variants and the worktree-only and index-only stash variants. Git doesn’t provide any of these variants.
19.4 Commit #

修改当前 HEAD:
- a Amend
- add the staged changes to HEAD and edit its commit message
- e Extend
- add the staged changes to HEAD without editing the commit message
- w Reword
- change the message of HEAD without adding the staged changes to it
修改历史 Commit(如果当前没有 stage 修改,则不做任何操作):
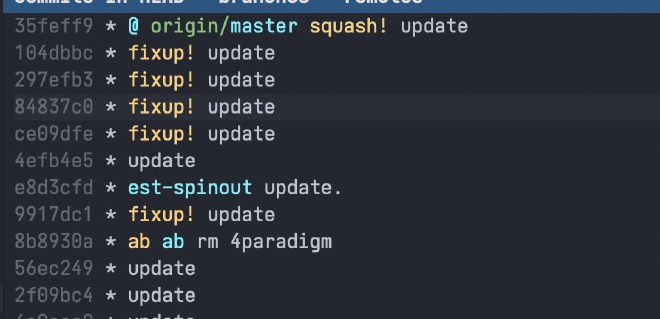
- f Fixup
- 选择一个历史 commit,然后将当前 stage 的修改合并进去,创建一个新的 commit,commit msg 是 fixup! 前缀 + 选中的历史 commit msg;
- s Squash
- 选择一个历史 commit,然后将当前 stage 的修改合并进去,创建一个新的 commit,commit msg 是 squash! 前缀 + 选中的历史 commit msg;
- A Argument
- 和 s Squash 类似,也是创建一个 squash commit,但是可以修改 squash message.
效果如下:
后续通过 r i (interactive) 进行 rebase 前,打开 –autosquash 选项,这样会自动将 Commit 进行 fixup 或 squash:
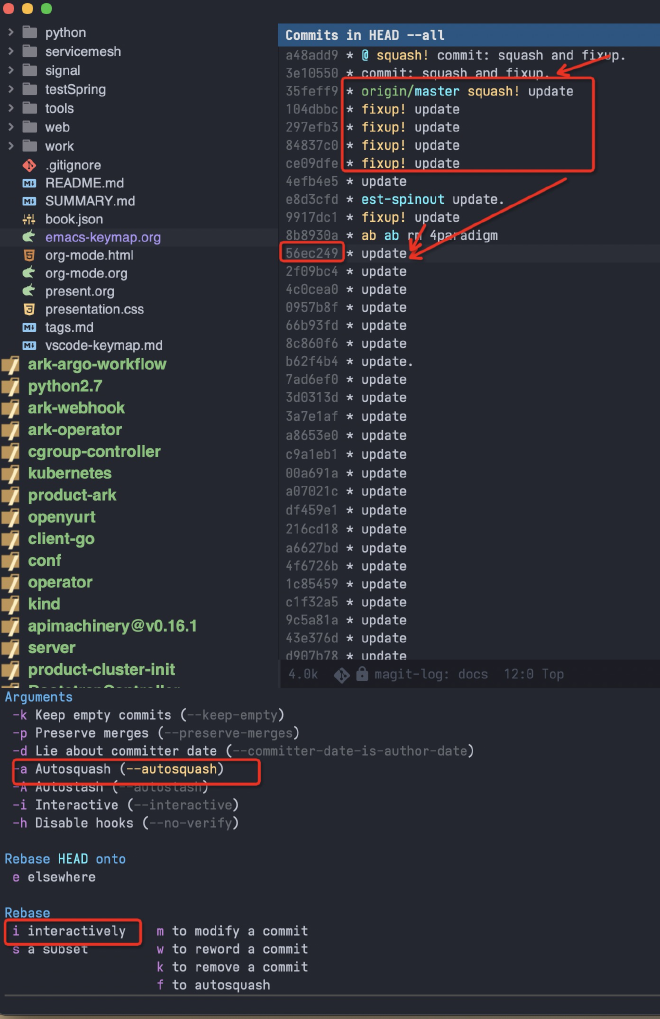
git 使用 fixup! 或 squash! 后的 msg 来匹配历史 commit,然后 rebase 时加到相应commit 的后面:
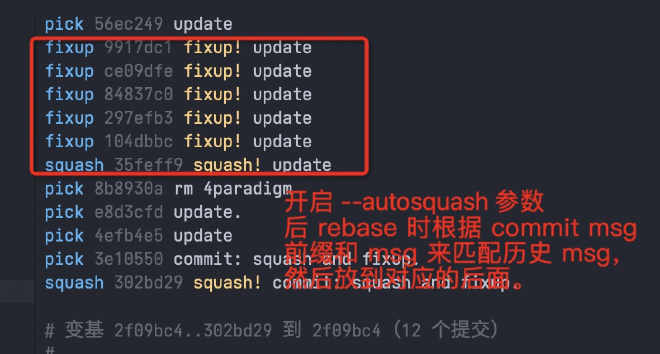
上面的 Fixup、Squash 还有 Instance 版本,它们是立即启动 rebase,将当前 stage 的内容自动 rebase 到选择的历史 commit 中:
- F:Instance fixup
- S:Instance squash
在提交 msg 编辑界面:
- C-c C-c:提交 commit
- C-c C-k:cancel commit
- M-p M-n:使用上一次或下一次的 commit message
19.5 Diff #
magit 模式是使用 Contex 模式来展示 diff 内容。如果想 side-by-side 则需要使用 ediff 模式。
- d p: 选择两个路径文件,然后比较内容
19.6 Ediff #
M-x ediff: 选择两个文件进行比较。
ediff 在一个单独的 frame 显示一个 ediff control panel,使用 C-x 5 o 切换到该 frame。
- ~
- rotate ediff window 的布局, 可以通过 buffer name 来判断各自显示的内容。
- |
- 在水平和垂直窗口布局间切换;
- m
- 最大化 frame,特别适合水平布局的情况;
- C-x 5 o
- 显示隐藏的 ediff panel;
- A/B/C
- 将 buffer a、b、c 设置为只读。
- ?
- 显示 ediff control panel 的帮助菜单,再次按 ? 会隐藏菜单。
- n、p
- 下一个或上一个 diff 位置。
- j
- 跳转到第一个 diff 位置。nj: n 为数字,表示跳转到第 n 个 diff 位置。
- g a/b/c
- 将视图定位到 a/b/c buffer,这样后续该 buffer 中的 diff 总是处于可见区域的中间位置。
- v、V
- 在当前 diff 位置上移或下移滚动,用于查看 diff 上下文信息。
- h
- 切换 highlight 的风格:
- 高亮所有 diff 区域;
- 只高亮当前 diff 区域;
- 使用 ascii 标识 diff 区域;
- |
- 在水平和垂直方向上切换当前显示的方式。
- </>
- 水平向左或向右滚动显示所有 buffer。
- #f
- 提示输出各 buffer 匹配的正则表达式,后续只显示匹配这些正则的 diff 区域。后续再次按 #f 取消选择。
#h ::和 #f 类似,但是隐藏匹配的 diff 预期。后续再次按 #h 取消隐藏。
- w a/b/c
- 将 buffer a、b、c 的内容保存到 新的文件 中。
- wd
- 将 buffer b 和 c 的 diff 内容保存到新的文件中。
- D
- 在单独的 buffer 中显示指定的两个 buffer 的 diff 差别。
- z
- 将当前 diff session 保存到后台,后续可以使用 M-x eregistry 命令查看暂存的 session,非常适合有多个 ediff session 的情况;
- q
- 终止 diff session。如果前面修改了 buffer 内容,会提示 save buffer。
- !
- 刷新 diff region,更新 diff 区域数量。
注:
- 如果 ediff panel frame 没有在单独的 frame 中显示,则可使用 C-x b 切换到该 buffer,然后使用 ? 来恢复。
- 在 macos 系统下,需要将 ns-use-native-fullscreen 和 ns-use-fullscreen-animation 设置为 nil,否则显示 ediff panel 时有问题。
- which-key 可能会导致 ediff 的 gX 命令 hang,这时可以发送 USR2 信号来重新激活 Emacs;
- update 2021.09.18: 下线 which-key,配置 (setq prefix-help-command #’embark-prefix-help-command) 后,可以使用 C-h 来显示匹配前缀的命令。
ediff 的 buffer 两种类型:
- diff view:两个 buffer;
- merge view:三个 buffer,第一个是 HEAD,第二个是 Index(Stage),第三个是 Workspace;
在 magit 的 unstage、staged 区域的某个 diff 上:
-
按 e:三窗口的 merge view。
-
按 E:
- u(show unstaged): 显示 unstaged 区域的文件与 HEAD 的差别。
- i(show staged): 显示 stage 区域的文件与 HEAD 的差别。
- w(show worktree):显示 workspace文件与 HEAD 的差别。
上面三个 show xxx,都是显示两个 buffer,A 为只读的 HEAD,b 为 unstage、staged 或 worktree 中的文件,可以实现用 index 或 commit 的内容恢复 workspace 的修改。
- E(dwim) 或者 s(staged): 和上面直接按 e 类似,显示三窗口的 merge view。
- c(show commit): 显示指定的 commit 的内容,两窗口 diff,指定一个 commit,然后 diff 它和上一次 commit 的差别。
- r(show range): 两窗口 diff,指定一个 commit,显示和当前 workspace 文件的差别,可以用于从历史恢复当前文件的变更。
三窗口 merge view:
- 第一个是 HEAD,只读状态;
- 第二个是 Index(Stage),可读写状态;
- 第三个是 Worktree,可读写状态。
可以修改 index 和 workspace 中的内容,实现将 workspace 内容(可以部分保存)保存到 index 的效果,或者将 index 或 HEAD 的修改保存到 Workspace的效果。
内容拷贝:
- 两窗口的情况:a、b:a 表示把 a buffer diff 内容拷贝到 b,反之亦然。
- 三窗口的情况:ab、ac、bc、cb:将前一个 buffer 当前 diff 区域拷贝到第二个 buffer。
- a buffer 是 HEAD 的内容,不能修改,所以没有 ba、ca。
内容恢复:
- ra、rb、rc:将对应 buffer 当前 diff 区域的内容恢复到该 buffer 最开始的内容。
merge: 出现三个窗口,上面两个是冲突的版本,最下面是合并后的版本,可以将 A 或 B 的内容拷贝到 C,退出时提示保存,从而解决冲突。
magit-find-file:指定一个文件的 revision,可以查看该文件的内容。
19.7 Fetch #
- fa:将 remote 仓库的所有 branch、tag 等拉取到本地;
19.8 Push #
P:push ::
- p:push 到上游仓库
- u:另一个上游仓库
19.9 Log #
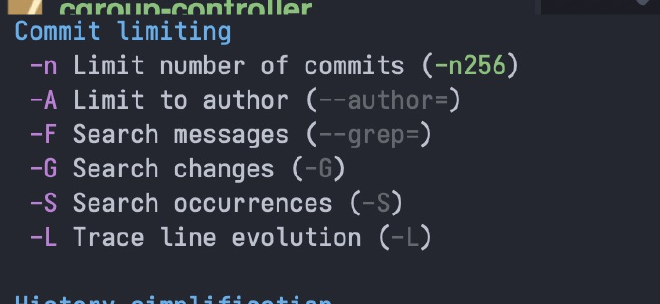
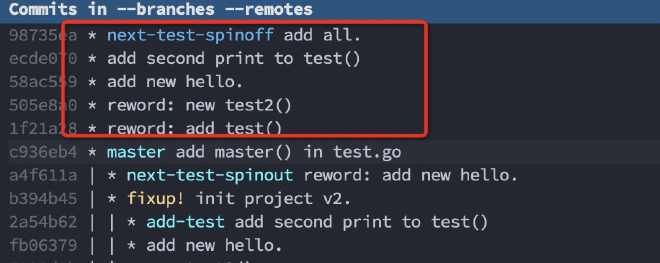
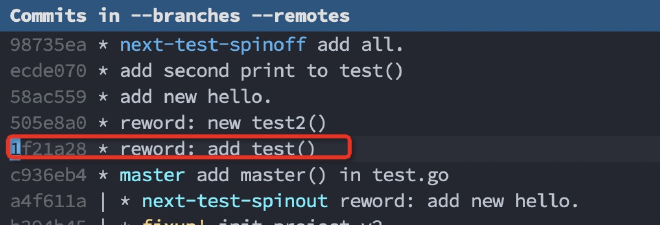
可以按作者、Commit Msg、修改的内容、 文件等条件搜索历史:
可以查看当前 branch、指定 branch 或所有 branch 的 commit log:
- SPACE: 显示当前 commit 的内容
- DELETE:反向显示当前 commit 的内容
- TAB:显示当前 commit 的内容
- Enter:显示当前 commit 的内容,并切换到 commit buffer 中,按 q 可以关闭该 buffer。
- +: 显示更多 commit
- -:显示更 少 commit
- C-c C-n:移动到当前 commit 的 parent commit
在查看 commit 内容 buffer (magit-revision) 可以使用
- M-[0-9]
- 来显示和隐藏变化内容:
- C-SPC
- 标记修改内容;然后用 n/p 来选中下一行或上一行;
鼠标放到某个修改位置,然后按 回车,可以查看该位置 commit 后的文件内容;然后按 n/p 可以切换到上一次 commit 或下一次 commit 后的文件内容。
L: 修改 log 显示的信息,如 singlestat、margin 等
小技巧:C-c M-g l 查看当前文件在 当前分支 的提交记录,这时按 l a 则可以看到当前文件在 所有分支 的提交记录,然后就可以按 A 或 a 来 Apply 某个 commit 到当前分支。
19.10 Merge #
- i: Dissolve(merge into): 将当前分支内容 merge 到其它分支,然后删除当前分支,并切换到 merge into 的分支:
- a: Absorb 将另一个 branch merge 进当前 branch,然后删除那个分支。
- s: squash merge 将指定分支的修改合并到当前分支,但是不创建 commit。注意:指定分支的多次 commit 内容会合并到当前 worktree,这样后续 commit 时,只会看到一次提交(而不管指定分支有多少次历史提交)。squash 的含义就是 merge 历史合并。在 rebase 时也会使用。
如果只是想把其它分支的 commit 应用到当前分支,除了 merge 外,还可以使用 Appply(A 或 a) 或 Cherry(Y)。
为了得到线性、干净的历史提交记录,在将当前分支 merge 到主干前,可以先将它 rebase 到主干分支(期间还可以修改历史提交记录),这样后续在 merge 时会得到一个线性的提交记录。
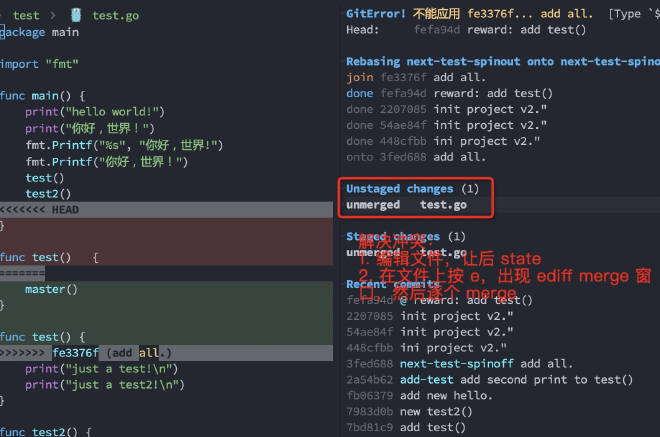
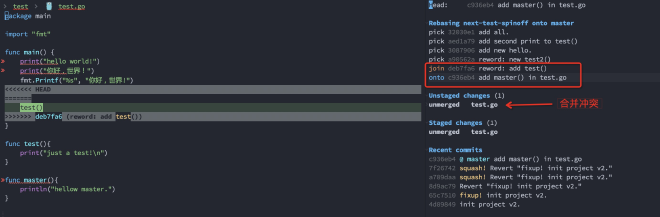
如果 merge 出现冲突,magit 会在 magit-status(C-x g) buffer 的 unstage 或 stage change section,而且行首有
unmerged 的字符串提示。可以在 unmerge 的位置按 k 丢弃 apply,或者按 e 使用 ediff 解决冲突。
19.11 Cherry&Apply #
Cherry 和 Apply 都是将其它 Commit merge 到到当前分支, 所以在执行相关命令之前需要先切换到要合并到的分支。
- Y (Cherries)
- 先输入 HEAD,再输入 UPSTREAM,显示 HEAD 可以 cherry pick 到
UPSTREAM 的 commit 列表,然后使用 Aa、AA 或 a 来选择性的 apply 到当前 branch。 需要先把当前 branch 切换到 UPSTREAM ,这样后续才能使用各种 Apply 命令。
- A 或 a(Apply)
- 是 Cherry 的快捷方式,用于将一个或多个 commit 快速应用到当前分支。
使用流程:
- Checkout the branch which you want to add the commit to, b b then select branch name, eg. master.
- Still in Magit, l a to open the log buffer and show log for all git references (commits, stashes, etc).
- Move the cursor to the commit you wish to cherry pick from.
A Atopick + stage + committo the currently checked-out branch.- Or use
Aa to pick and stage if you want toedit the change before committing itto the currently checked-out branch.
示例: 把 origin/Ark-v19.xR-zArm_fs 的部分 commit merge 到 origin/Ark-sm-kylin 分支中:
- Cherry head: 选择提供 commit 的分支 origin/Ark-v19.xR-zArm_fs;
- Cherry upstream 选择 Ark-sm-kylin;
- 出现 commit cherry pick 列表:
- 以 - 号开始的表示已经 pick 过;
- 以 + 号开始的表示没有 pick 过;

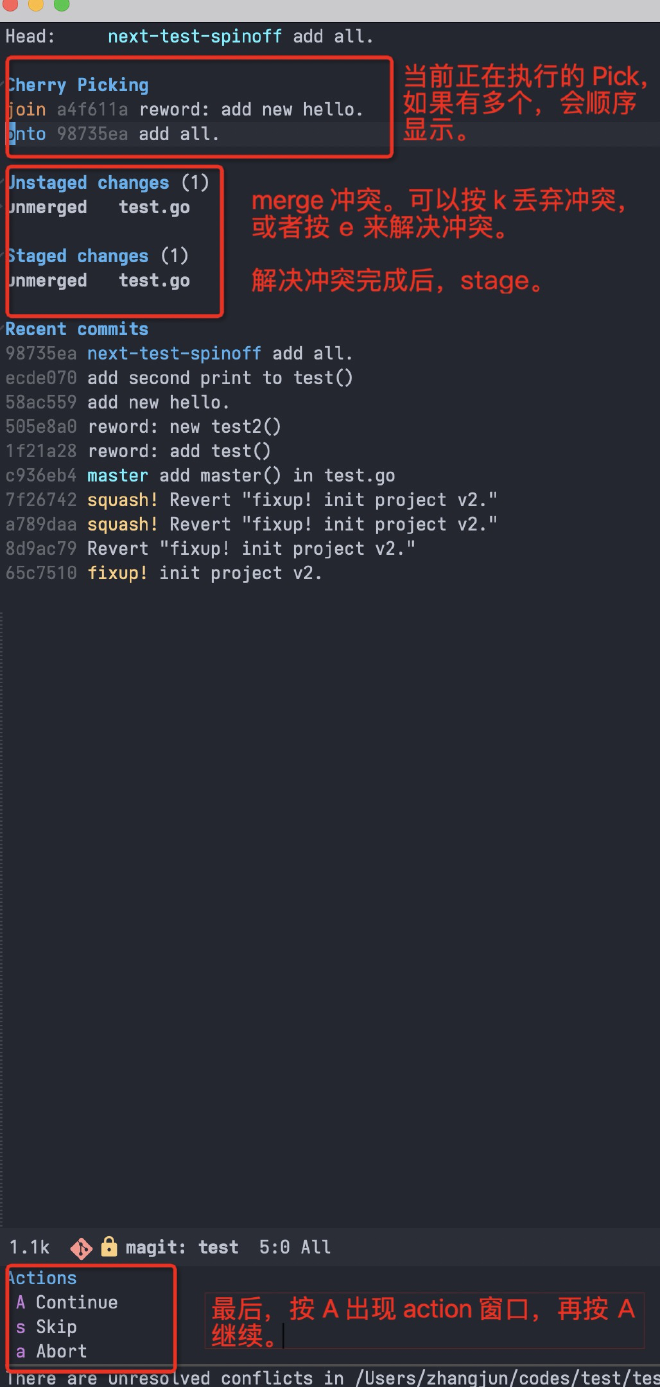
Cherry pick 冲突:
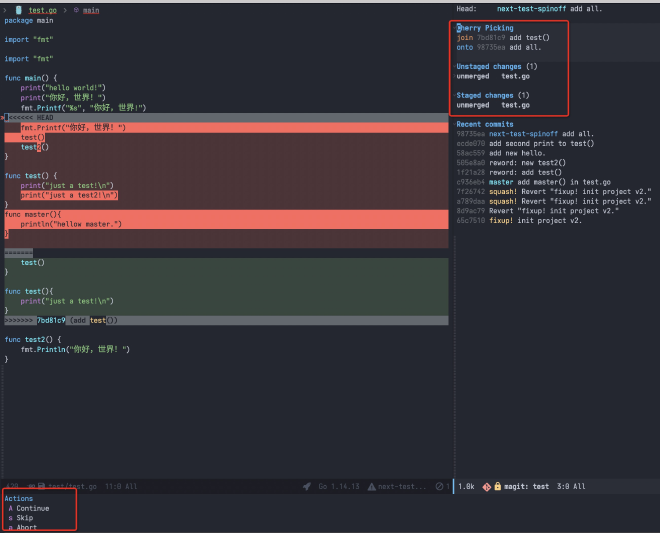
可以在 unmerge 的位置按 k 丢弃 apply,或者按 e 使用 ediff 解决冲突,然后按 A 继续、忽略或终止。
基本上,可以在 Magit 的所有 commit 上执行 AA 或 Aa 或 a 命令来 Apply 这个 commit 到当前 branch。可以使用 C-SPC 来选中多个 commits,然后批量 Apply 或其它操作。
A A:Pick(magit-cherry-copy, 为 pick+stage+commit):
- 将光标处的或者选中的多个 commit 拷贝到当前 branch,并提示 commit message,如果选中多个 commit,则直接 pick 它们,不提示编辑 commit msg。
A a 或者 a 命令 (magit-cherry-apply, 为 pick+stage):
- 将光标处或选中的 commit cherry apply 到当前分支,cherry apply 只是在 worktree 中 appy changes,
并不 commit,后续 commit 时默认使用当前的 commit msg。如果选中了多个 commit,则直接 apply。 - apply 有可能失败,这时 worktree 中会提示冲突,需要解决冲突并 stage 后按 A 继续;
下面这些命令都是将 commit apply 到 some branch,但是这些 commit 也会被从以前的分支移除,以前分支和当前分支都可能出现冲突,需要解决完冲突后才能继续:
- A h (magit-cherry-harvest)
- 将其它分支的 commit 合并到当前分支;
- A d (magit-cherry-donate)
- 将当前分支的 comit 合并到其它分支;
- A n (magit-cherry-spinout)
- 将当前分支的 commit 移动到一个新的分支,结束后当前分支不变;
- A s (magit-cherry-spinoff)
- 将当前分支的 commit 移动到一个新的分支,结束后新的分支会被 checkout;
在 cherrk-pick 进行的过程中,可以执行如下命令:
- A A (magit-sequence-continue)
- Resume the current cherry-pick or revert sequence.
- A s (magit-sequence-skip)
- Skip the stopped at commit during a cherry-pick or revert sequence.
- A a (magit-sequence-abort)
- Abort the current cherry-pick or revert sequence. This discards all changes made since the sequence started.
19.12 Reset #
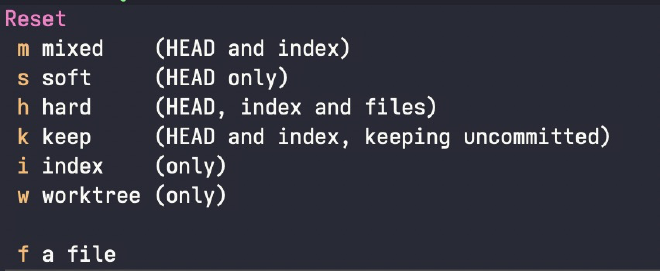
- m mixed:reset HEAD and index;
- s soft:reset HEAD Only;
- h hard:reset HEAD、index 和 files;
- k keep:reset HEAD 和 index,但是保存 uncommitted 的 files;
- i index only
- w worktree:只 reset worktree 内容到指定 commit,HEAD 和 index 不变(即提交历史不变,已经 stage 但为 commit 的内容还在,但是 unstage 的内容会被 reset);
- f a file:reset file 到某个 commit;
mixed、soft 命令 reset HEAD 或 index 后,worktree 内容不变,即 reset 到的 commit 之后的变更都还在 worktree 的 unstaged 区域中:
但 hard 命令将 HEAD、index 和 worktree 都 reset 到指定 commit 的状态(丢失 commit 以后的变更)。
先切换到要 reset 的分支,然后按 X (reset), 选择 h(reset 所有内容),然后输入要 reset 到的 commit 位置:
-
指定 log 中显示的 7 位 commitid;
-
或者相对 commit,如 HEAD~1、HEAD~2;
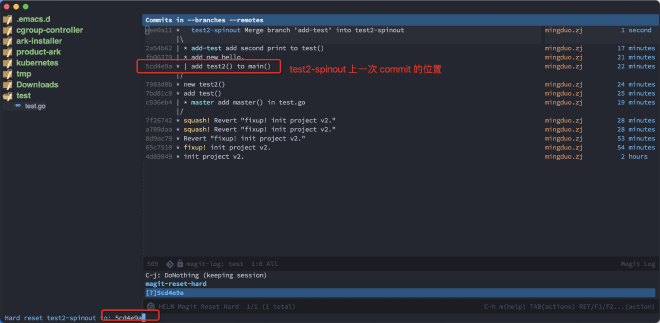
全局快捷键 x(magit-reset-quickly) 将当前分支的 HEAD 和 index reset 到指定的 Commit,该 Commit 之后的更新保存到 worktree 的 unstated 区域中:
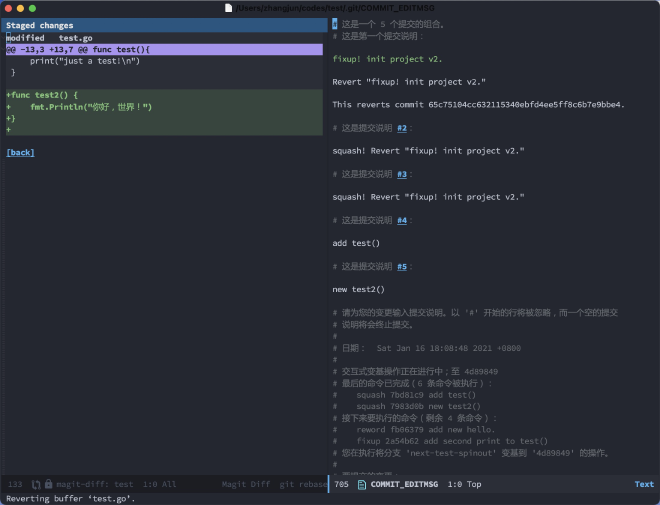
19.13 Revert #
Revert 是创建一个相反的 Commit 来达到清除某次提交全部或部分变更的效果。
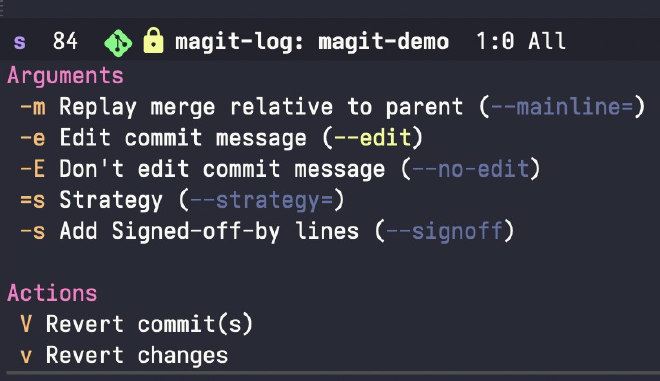
使用场景:
- Revert 某个 Commit:在 log 中选择某个 commit,然后按 V V,提示 revert 某个commit,然后出现 commit 界面,自动填充 commit msg:Revert xxx;
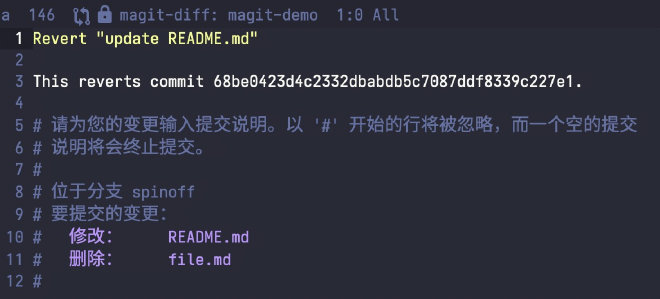
- Revert 某个 Commit 中的个别 change:可以在 commit 的 change list 中选择每个change,然后按 V v(Revert),自动创建一个可以 revert commit change 的修改,并 stage 保存到 worktree 中,提示 Revert 进行中,可以按 A 选择
action 来继续,终止; V v 有
全局快捷键 v。
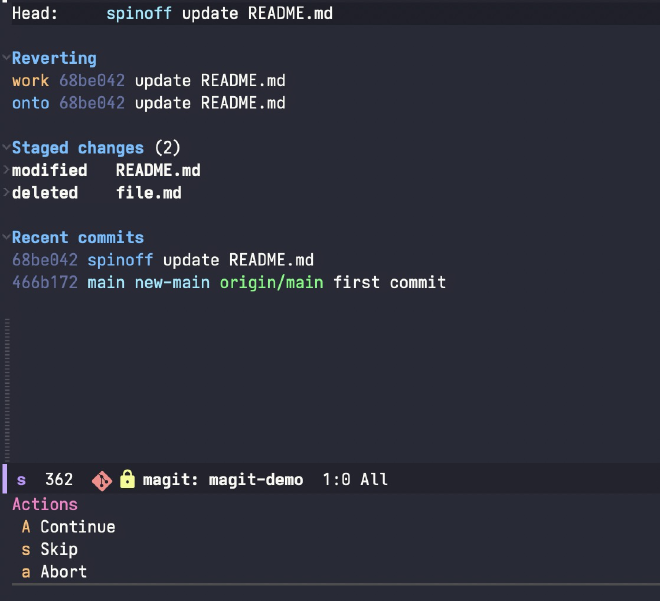
在 Revert 的过程中,由于会创建一个 Revert Change,可能与当前 worktree 的内容冲突,这时 Revert 会暂停,需要手动解决冲突后继续(也可以按 A 然后选择 abort 中断Revert 过程):
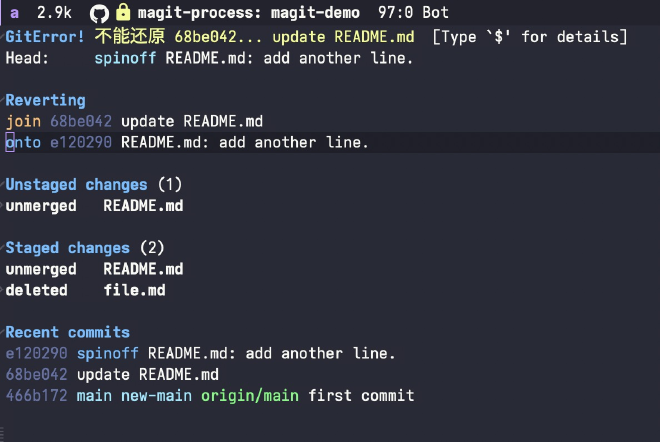
解决冲突后,如果 stage 不为空,则 A A 会创建一个 Revert Commit。如果 stage 为空,则说明没有需要 commit 的内容,这时可以 A a(abort) 或 A s(skip) 结束 Revert 过程。
19.14 Rebase #
Rebase 原理,以将 feature1 分支 rebase 到 master 为例:
- git 把 feature1 分支里面的每个 commit 取消掉;
- 把上面的操作临时保存成 patch 文件,存在 .git/rebase 目录下;
- 把 feature1 分支 HEAD 指向最新的 master 分支;
- 把上面保存的 patch 文件应用到 feature1 分支上;(由于以master分支为 base,应用的时候可能会有冲突)。后续,在 master 分支里 merge feature1 分支时,可以fast-forward,得到一个线性的提交历史。
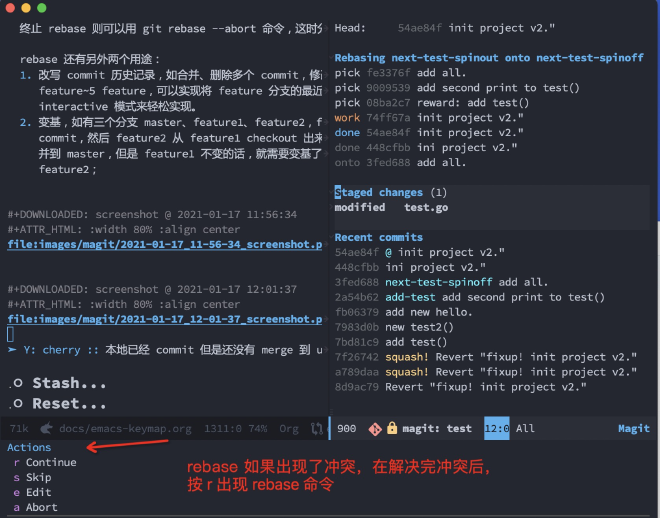
rebase 冲突的时候会暂停,需要解决冲突后 git add,然后用 git rebase –continue 来继续 rebase,如果要终止 rebase 则可以用 git rebase –abort 命令,这时分支会回到rebase 前的状态。
rebase 另外两个用途:
- 改写 commit 历史记录,如合并、删除多个 commit,修改 commit 的顺序、message 等。如 git rebase feature~5 feature,可以实现将 feature 分支的最近 5 次提交合并为一个。这可以使用 rebase 的interactive 模式来轻松实现。
- 变基,如有三个分支 master、feature1、feature2,feature1 从 master checkout 出来,做了几次commit,然后 feature2 从 feature1 checkout 出来,也做了几次提交。如果希望将 feature2 的修改合并到 master,但是 feature1 不变的话,就需要变基了,即用命令 git rebase –onto master feature1 feature2;
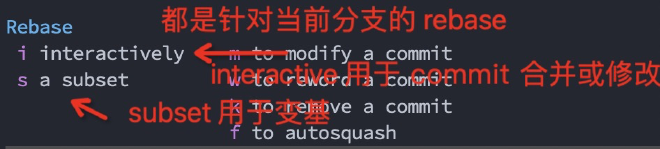
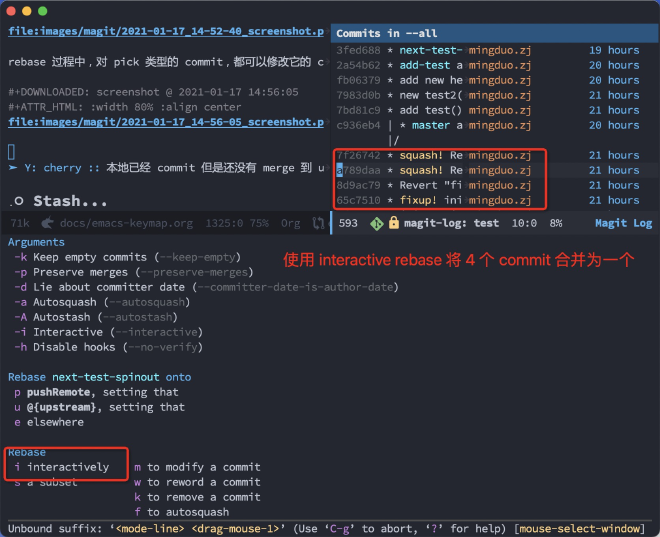
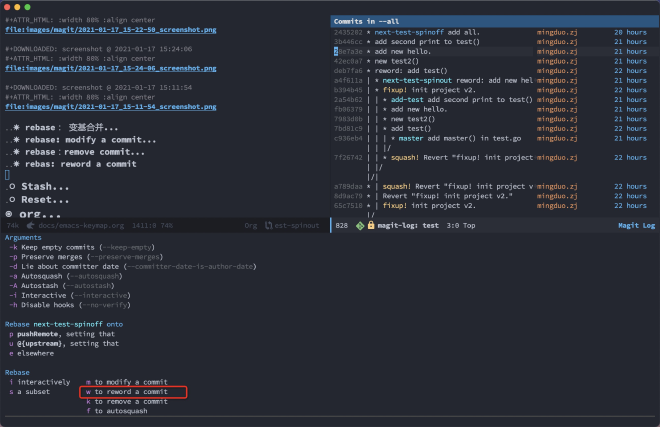
rebase(r):
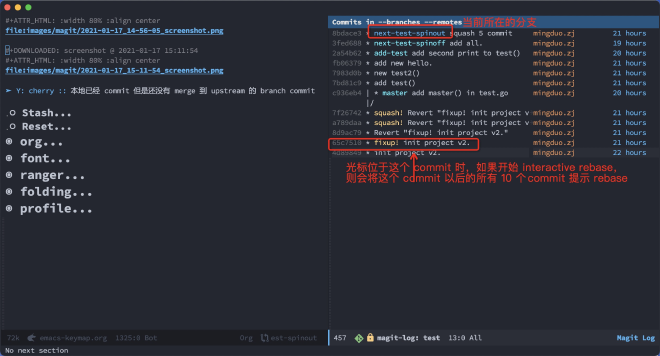
- i: interactively: 交互式 rebase,在当前分支 commit history 中选择一个 commit,然后交互式的 rebase 从该 commit 开始的后续 commit。用于修改对当前分支提交历史。
- s: a subset: 选择一个 target newbase,然后在当前分支选择一个 START commit,将START 到 HEAD 的 commit 都 rebase 到 newbase 上。用于变基合并。
如果当前 commit 已经 push 到远程仓库,则后续执行 rebase 操作后,需要 force push到原仓库,否则会 push 失败。
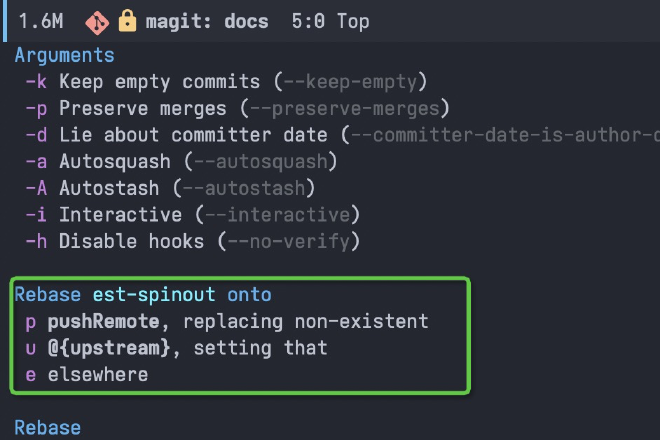
19.14.1 rebase on 其它分支-全部 #
按 r e,然后选择将当前分支 rebase 到的其它分支,这会将当前分支的所有 commit rebase 到其它分支:
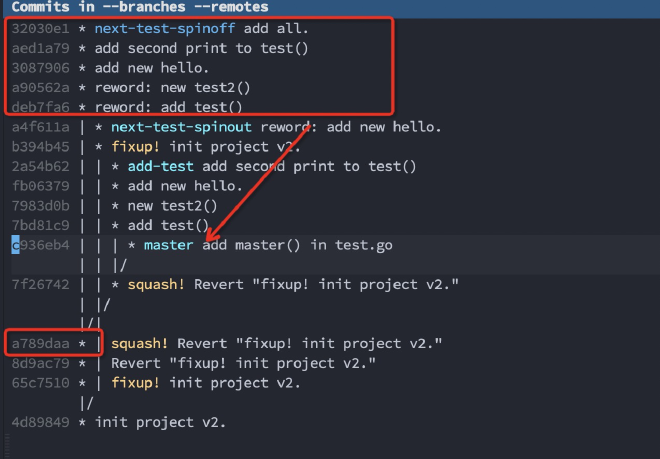
19.14.2 rebase on 其它分支-部分 #
使用 l a 命令,定位到要 rabase onto 的分支 commit,然后执行 r s(subset) 命令,选择要 rebase onto 的分支 commit 位置:
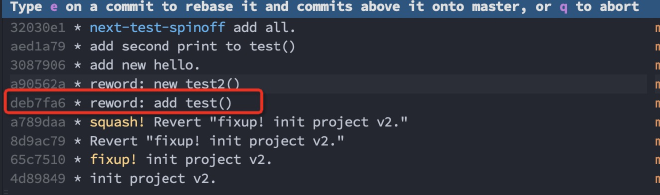
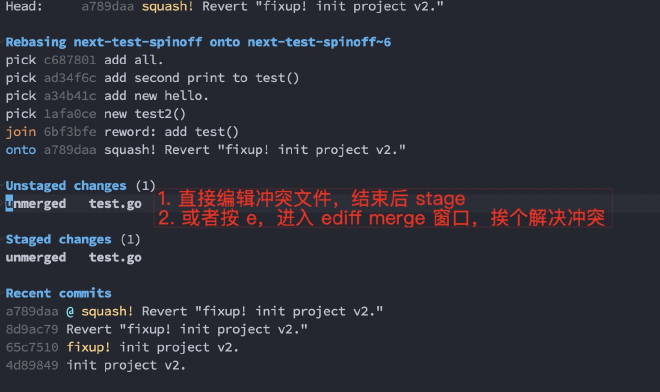
选择当前分支的 start commit,例如 deb7,然后按 e,这时从这个 commit 开始到 HEAD的 commit 都会rebase 到第一步的新 base 上:
出现了合并冲突:
解决冲突后,按 A r 继续 rebase:

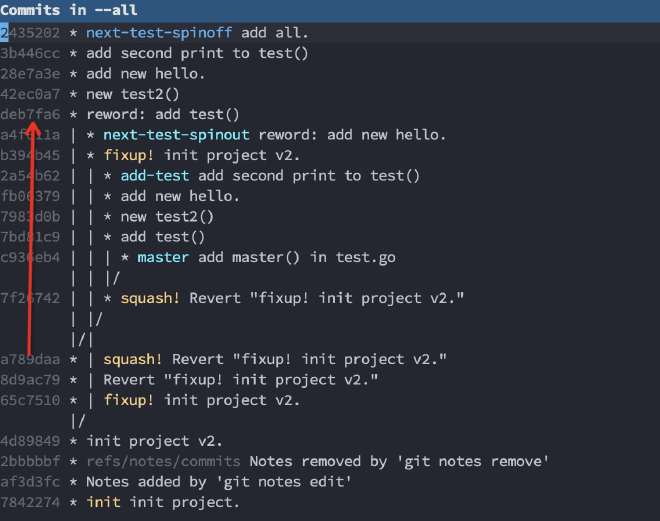
结束后,可以看到当前分支已经 rebase 到了 master 分支上了:
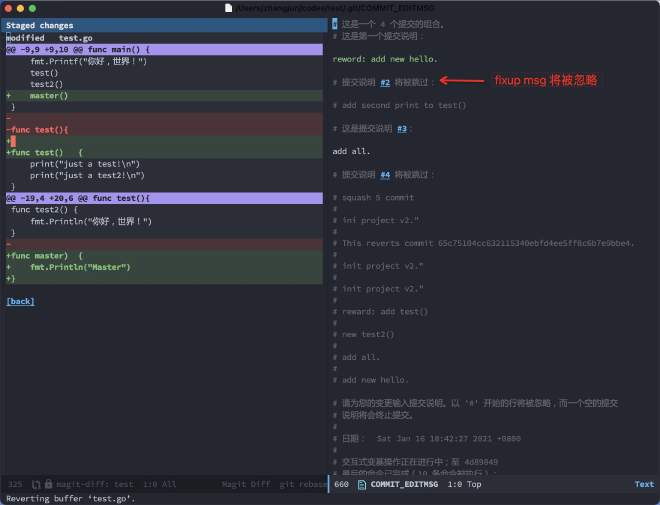
19.14.3 rebase 修改历史 #
通过 rebase interactive 实现当前分支 commit 合并、删除、修改、msg 修改。
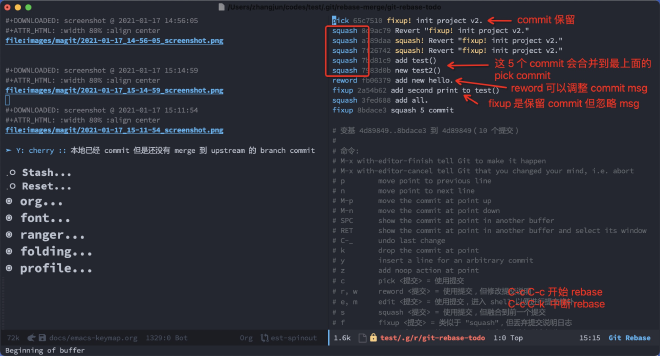
- pick = use commit
- reword = use commit, but edit the commit message
- edit = use commit, but stop for amending
- squash = use commit, but meld into previous commit
- fixup = like “squash”, but discard this commit’s log message
- exec = run command (the rest of the line) using shell
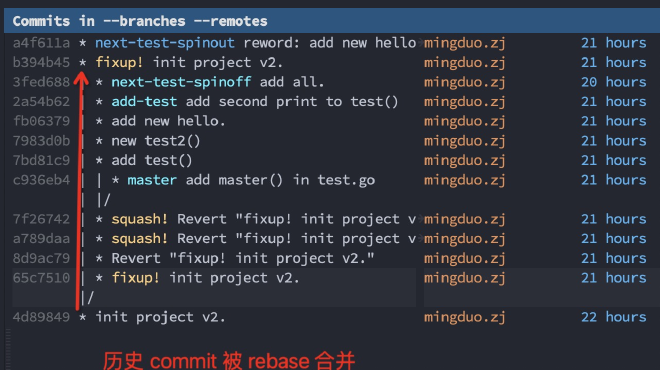
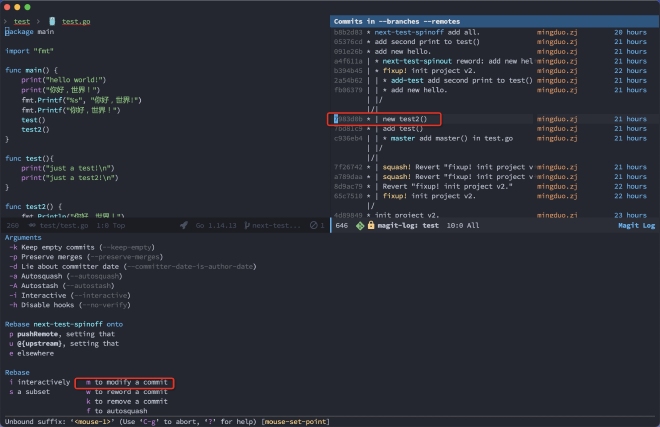
例如将下面红框中的 5 个 commit 合并为 2 两个:
首先将光标移动到 start commit,然后输入 r i(interactive):
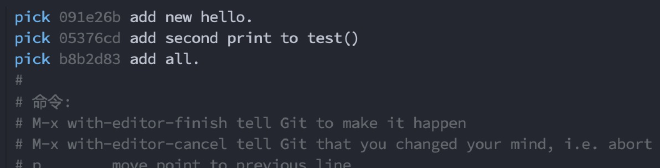
修改历史 commit 的 rebase 方式(从旧到新),结束后 按 C-c C-c 开始:
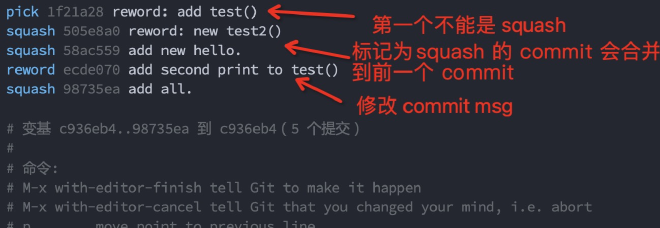
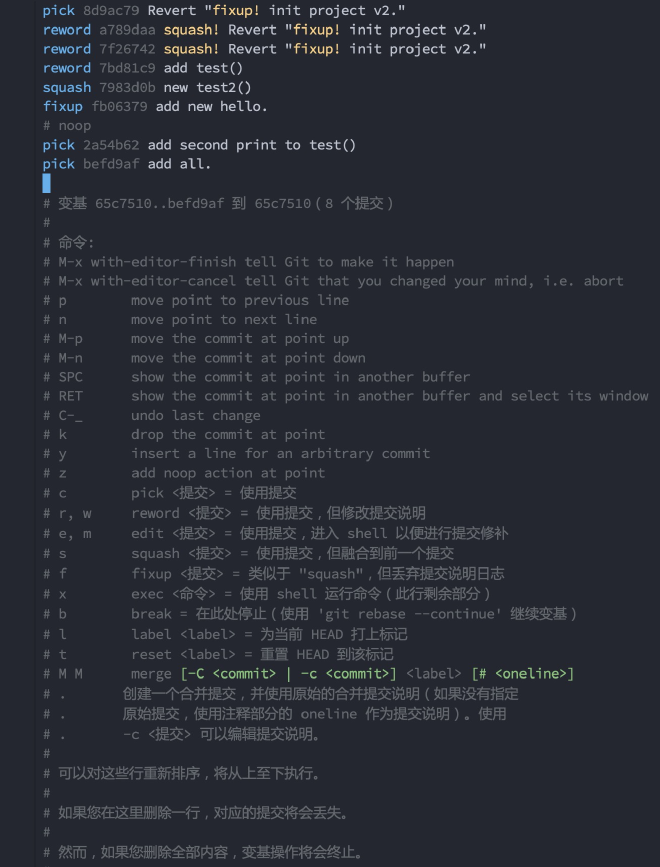
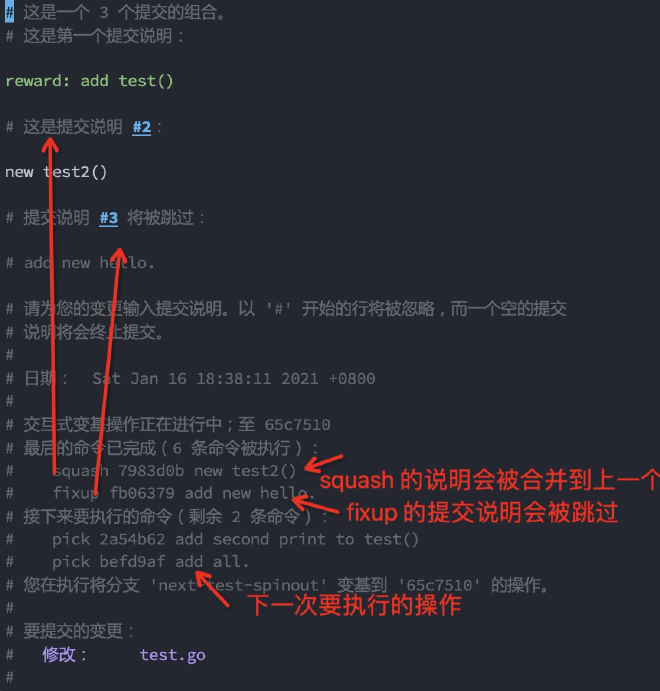
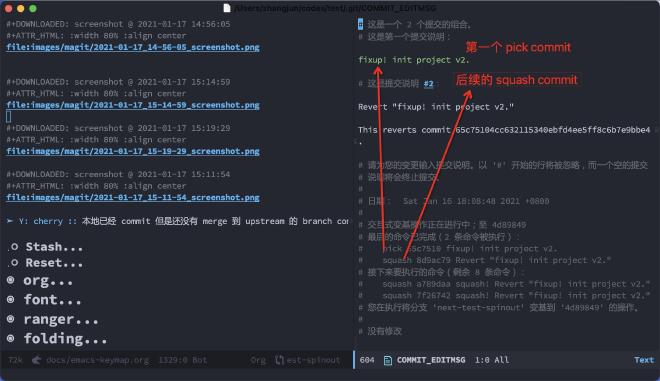
rebase 过程中,对 pick 类型的 commit,都可以修改它的 commit message:
19.14.4 rebase: modify a commit #
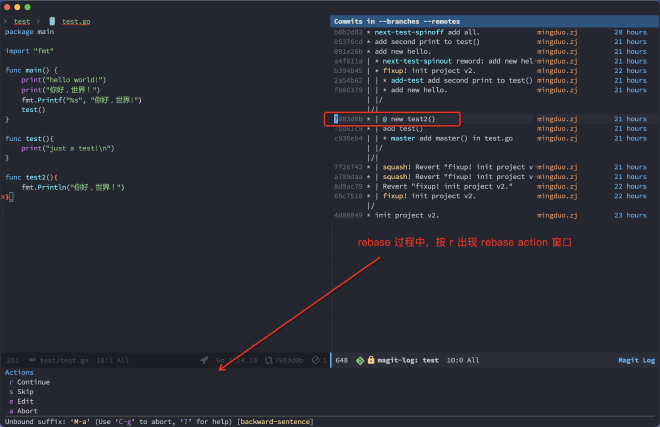
这时将 worktree 恢复到 7983d0b,可以修改文件和内容:
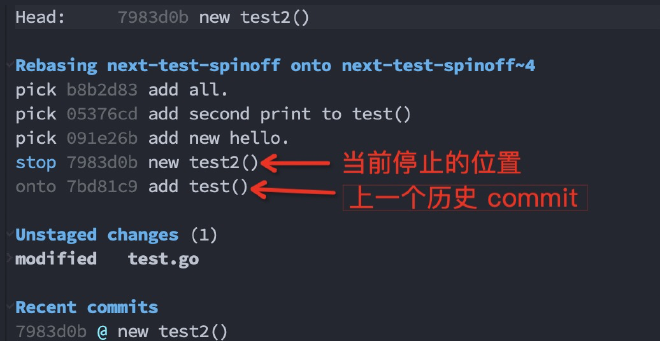
只有 stage 修改后的内容,才能继续 rebase。
如果按 e(edit),则出现当前分支到 HEAD 位置的 rebase 界面,可以调整后续 commit的 rebase 行为。
19.14.5 rebase:remove commit #
删除一个 commit 时,会将该 commit 后面的 commit 合并到前一个 commit,这时可能会出现冲突(因为删除后面的 commit 还可能含有被删除 commit 涉及的变更):
提示合并冲突:
删除 commit 结束:
19.14.6 rebase: reword a commit #
用于修改一个 commit 的 message,选择当前分支的某个 commit( rebase 操作的都是当前分支的 commit,其它分支的不行):
修改的 commit 即以后的 commit 都会以 rebase 的方式重新提交。
19.15 Refers #
y:show refers,查看本地或 remote 所有的 branch、tags 等信息。
在分支上,执行 k 命令可以用来删除 branch,使用 b checkout 新的分支,使用空格查看commit diff。
20 org #
20.1 实践 #
org-mode 在 export 时会忽略 comment 内容:
- 以 # 开头的行
- 以 #+ 开头的行, 行首可以有空格;
所以 org-mode 使用 #+ 来配置 org-mode 的一些特性。
In-buffer settings start with ‘#+’, followed by a keyword, a colon, one or more spaces, and then a word for
each setting. Org accepts multiple settings on the same line. Org also accepts multiple lines for a
keyword. This manual describes these settings throughout. A summary follows here.
C-c C-c activates any changes to the in-buffer settings. Closing and reopening the Org file in Emacs also
activates the changes.
- ‘#+ARCHIVE: %s_done::’
- Sets the archive location of the agenda file. The corresponding variable is org-archive-location.
- ‘#+CATEGORY’
- Sets
the category of the agenda file, which applies to the entire document. - ‘#+FILETAGS: :tag1:tag2:tag3:’
- Set tags that
all entries in the file inherit from, including the top-level entries. - ‘#+LINK: linkword replace’
- Each line specifies
one abbreviation for one link. Use multiple ‘LINK’ keywords for more, see Link Abbreviations. The corresponding variable is org-link-abbrev-alist. - ‘#+PRIORITIES: highest lowest default’
- This line sets the limits and the default for the priorities. All three must be either letters A–Z or numbers 0–9. The highest priority must have a lower ASCII number than the lowest priority.
- ‘#+PROPERTY: Property_Name Value’
- This line sets a default inheritance value for entries in the current buffer, most useful for specifying the allowed values of a property.
- ‘#+SETUPFILE: file’
- The setup file or a URL pointing to such file is for additional in-buffer settings. Org loads this file and parses it for any settings in it only when Org opens the main file. If URL is specified, the contents are downloaded and stored in a temporary file cache. C-c C-c on the settings line parses and loads the file, and also resets the temporary file cache. Org also parses and loads the document during normal exporting process. Org parses the contents of this document as if it was included in the buffer. It can be another Org file. To visit the file—not a URL—use C-c ’ while point is on the line with the file name.
- ‘#+STARTUP’
- 配置第一次打开文件时生效的配置。
20.2 ‘#+STARTUP:’ #
参考 17.8 Summary of In-Buffer Settings
STARTUP 只支持有限的配置类型,其它如 toc 等配置是不支持的。
Startup options Org uses when first visiting a file.
The first set of options deals with the initial visibility of the outline tree. The corresponding variable for global default settings is org-startup-folded with a default value of showeverything.
- ‘overview’ Top-level headlines only.
- ‘content’ All headlines.
- ‘showall’ No folding on any entry.
- ‘show2levels’ Headline levels 1-2.
- ‘show3levels’ Headline levels 1-3.
- ‘show4levels’ Headline levels 1-4.
- ‘show5levels’ Headline levels 1-5.
- ‘showeverything’ Show even drawer contents.
Dynamic virtual indentation is controlled by the variable org-startup-indented 150.
- ‘indent’ Start with Org Indent mode turned on.
- ‘noindent’ Start with Org Indent mode turned off.
Dynamic virtual numeration of headlines is controlled by the variable org-startup-numerated.
- ‘num’ Start with Org num mode turned on.
- ‘nonum’ Start with Org num mode turned off.
配置 num 后会自动给 headerline 添加编号。
Aligns tables consistently upon visiting a file. The corresponding variable is org-startup-align-all-tables with nil as default value.
- ‘align’ Align all tables.
- ‘noalign’ Do not align tables on startup.
Shrink table columns with a width cookie. The corresponding variable is org-startup-shrink-all-tables with nil as default value.
When visiting a file, inline images can be automatically displayed. The corresponding variable is org-startup-with-inline-images, with a default value nil to avoid delays when visiting a file.
- ‘inlineimages’ Show inline images.
- ‘noinlineimages’ Do not show inline images on startup.
inlineimages 会自动显示 inline image.
Logging the closing and reopening of TODO items and clock intervals can be configured using these options (see variables org-log-done, org-log-note-clock-out, and org-log-repeat).
- ‘logdone’ Record a timestamp when an item is marked as done.
- ‘lognotedone’ Record timestamp and a note when DONE.
- ‘nologdone’ Do not record when items are marked as done.
- ‘logrepeat’ Record a time when reinstating a repeating item.
- ‘lognoterepeat’ Record a note when reinstating a repeating item.
- ‘nologrepeat’ Do not record when reinstating repeating item.
- ‘lognoteclock-out’ Record a note when clocking out.
- ‘nolognoteclock-out’ Do not record a note when clocking out.
- ‘logreschedule’ Record a timestamp when scheduling time changes.
- ‘lognotereschedule’ Record a note when scheduling time changes.
- ‘nologreschedule’ Do not record when a scheduling date changes.
- ‘logredeadline’ Record a timestamp when deadline changes.
- ‘lognoteredeadline’ Record a note when deadline changes.
- ‘nologredeadline’ Do not record when a deadline date changes.
- ‘logrefile’ Record a timestamp when refiling.
- ‘lognoterefile’ Record a note when refiling.
- ‘nologrefile’ Do not record when refiling.
Here are the options for hiding leading stars in outline headings, and for indenting outlines. The
corresponding variables are org-hide-leading-stars and org-odd-levels-only, both with a default setting nil
(meaning ‘showstars’ and ‘oddeven’).
- ‘hidestars’ Make all but one of the stars starting a headline invisible.
- ‘showstars’ Show all stars starting a headline.
- ‘indent’ Virtual indentation according to outline level.
- ‘noindent’ No virtual indentation according to outline level.
- ‘odd’ Allow only odd outline levels (1, 3, …).
- ‘oddeven’ Allow all outline levels.
To turn on custom format overlays over timestamps (variables org-put-time-stamp-overlays and
org-time-stamp-overlay-formats), use:
- ‘customtime’ Overlay custom time format.
The following options influence the table spreadsheet (variable constants-unit-system).
- ‘constcgs’ ‘constants.el’ should use the c-g-s unit system.
- ‘constSI’ ‘constants.el’ should use the SI unit system.
To influence footnote settings, use the following keywords. The corresponding variables are
org-footnote-define-inline, org-footnote-auto-label, and org-footnote-auto-adjust.
- ‘fninline’ Define footnotes inline.
- ‘fnnoinline’ Define footnotes in separate section.
- ‘fnlocal’ Define footnotes near first reference, but not inline.
- ‘fnprompt’ Prompt for footnote labels.
- ‘fnauto’ Create ‘1’-like labels automatically (default).
- ‘fnconfirm’ Offer automatic label for editing or confirmation.
- ‘fnadjust’ Automatically renumber and sort footnotes.
- ‘nofnadjust’ Do not renumber and sort automatically.
To hide blocks on startup, use these keywords. The corresponding variable is org-hide-block-startup.
- ‘hideblocks’ Hide all begin/end blocks on startup.
- ‘nohideblocks’ Do not hide blocks on startup.
打开时是否隐藏 Block.
The display of entities as UTF-8 characters is governed by the variable org-pretty-entities and the keywords
- ‘entitiespretty’ Show entities as UTF-8 characters where possible.
- ‘entitiesplain’ Leave entities plain.
These lines (several such lines are allowed) specify the valid tags in this file, and (potentially) the
corresponding fast tag selection keys. The corresponding variable is org-tag-alist.
- ‘#+TAGS: TAG1(c1) TAG2(c2)’
These lines set the TODO keywords and their interpretation in the current file. The corresponding variable is org-todo-keywords.
- ‘#+TODO:’
- ‘#+SEQ_TODO:’
- ‘#+TYP_TODO:’
20.3 Global and local cycling #
-
TAB:循环展开当前级别(光标必须位于 headerline)。
-
C-u TAB/Shift-TAB:循环展开
所有级别(光标可以位于任意位置)。 -
C-u C-u TAB (org-set-startup-visibility): 展示 buffer 起始可见性.
-
C-u C-u C-u TAB (outline-show-all): 展示所有内容。
-
C-c C-k (outline-show-branches): 显示 subtree 的所有 headings(包括 subtree heading), 但是不看它们的 body.
-
C-c TAB (outline-show-children): 展示 subtree 的所有 direct children 的内容.
-
C-c C-x b (org-tree-to-indirect-buffer): Show the current subtree in an indirect buffer. With a numeric prefix argument N, go up to level N and then take that tree
20.4 Initial visibility #
可以在文档的任意位置设置起始可见性:
#+STARTUP: overview
#+STARTUP: content
#+STARTUP: showall
#+STARTUP: showeverything
20.5 Motion #
- C-c C-n/p:header 间移动(不限 head 级别)
- C-c C-f/b:相同级别的 header 间移动
- C-c C-u:移动到上一级
20.6 Structure editing #
- M-RET (org-meta-return)
- 插入 header、item 或 row。在当前行前插入(光标位于行首),将行拆分(光标位于行中),在当前行尾插入(光标位于行尾)。如果光标没有位于 header、item 或 row,而是普通行,则在当前行插入 headline 或
item。
- 将变量
org-M-RET-may-split-line设置为 nil 时可以避免 line 被 split.
- 将变量
- C-u M-RET
- 在当前 subtree 后插入 headline。
- C-u C-u M-RET
- 在 parent subtree 后插入 headline。
- C-RET (org-insert-heading-respect-content)
- 在当前 subtree 后插入 headerline(等效为 C-u M-RET)
- M-S-RET (org-insert-todo-heading)
- 在当前行插入一个 same level 的 TODO headline 或 item。
- C-S-RET (org-insert-todo-heading-respect-content)
- 在当前 subtree 后面插入一个 TODO headline。
总结:如果要在当前行后插入 item 或 row,则用 M-RET ,C-RET 只是在当前 subtree 后插入一个 headerline;
- TAB (org-cycle)
- 在插入 headline 或 item 的前导符号时,第一次按 TAB 插入一个 child 层级,再按插入一个 parent 级别,直到 top 级别。
下面两个命令,只操作当前 headerline 行而不包含 subtree, 故不建议使用:
- M-LEFT (org-do-promote)
- Promote current heading by one level.
- M-RIGHT (org-do-demote)
- Demote current heading by one level.
- M-S-LEFT (org-promote-subtree)
- Promote the
current subtreeby one level. - M-S-RIGHT (org-demote-subtree)
- Demote the current subtree by one level.
- M-UP (org-move-subtree-up)
- Move
subtree up, i.e., swap with previous subtree of same level. - M-DOWN (org-move-subtree-down)
- Move subtree down, i.e., swap with next subtree of same level.
- C-c @ (org-mark-subtree)
- 标记光标所在的 subtree。
- C-c C-x C-w (org-cut-subtree)
- Kill subtree
- C-c C-x M-w (org-copy-subtree)
- Copy subtree to kill ring
- C-c C-x C-y (org-paste-subtree)
- Yank subtree from kill ring
- C-x n s (org-narrow-to-subtree)
- Narrow buffer to current subtree.
- C-x n b (org-narrow-to-block)
- Narrow buffer to current block.
- C-x n w (widen)
- Widen buffer to remove narrowing.
- C-c C-w (org-refile)
- Refile entry or region to a different location. See Refile and Copy.
- C-c ^ (org-sort)
- Sort same-level entries.
- C-c * (org-toggle-heading)
- Turn a normal line or plain list item into
a headline - C-c | (org-table-create-or-convert-from-region)
- 将当前 region 内容转换为表格。
20.7 Sparse Trees #
Sparse tree 显示匹配所在的 subtree 和它的父 tree headline;
- C-c / (org-sparse-tree)
- This prompts for an extra key to select a sparse-tree creating command.
- C-c / r or C-c / / (org-occur)
- Prompts for a regexp and shows a sparse tree with all matches.
- M-g n or M-g M-n (next-error)
- Jump to the next sparse tree match in this buffer.
- M-g p or M-g M-p (previous-error)
- Jump to the previous sparse tree match in this buffer.
20.8 Plain Lists #
- TAB (org-cycle)
- Items can be folded just like headline levels.
- M-RET (org-insert-heading)
- Insert new item at current level.
- M-S-RET
- Insert a new item with a
checkbox - C-c C-c
- If there is a checkbox (see Checkboxes) in the item line, toggle the state of the checkbox
- C-c -
- Cycle the entire list level through the different
itemize/enumeratebullets - C-c *
- Turn a plain list item into a
headline - C-c C-*
- Turn the whole plain list into a subtree of the current heading.
- S-LEFT / S-RIGHT
- This command also cycles
bullet styleswhen point is in on the bullet or anywhere in an item line - M-LEFT / M-RIGHT
- Promote or Demote current plain list level.
- C-c ^
Sort the plain list. Prompt for the sorting method: numerically, alphabetically, by time
20.9 Drawers #
test drawers
Sometimes you want to keep information associated with an entry, but you normally do not want to see it. For
this, Org mode has drawers.
You can also arrange for state change notes (see Tracking TODO state changes) and clock times (see Clocking
Work Time) to be stored in a ‘LOGBOOK’ drawer.
- C-c C-x d (org-insert-drawer)
- With an active region, this command puts the region inside the drawer
- C-c C-x p
- set property
- C-u C-c C-x d (org-insert-property-drawer)
- 插入 property drawer.
- C-c C-z
- Add a time-stamped note to the ‘LOGBOOK’ drawer.
property 是一组可扩展的属性集合,如 ID/CATEGORY 等,可用于设置 org-mode 的特性。
20.10 Blocks #
Org mode uses ‘#+BEGIN’ … ‘#+END’ blocks for various purposes from including source code examples. These
blocks can be folded and unfolded by pressing TAB in the ‘#+BEGIN’ line.
- C-c C-,
- 插入各种 Block;
设置环境变量 org-hide-block-startup 可以全局设置 block 在 startup 时是否 hide 或 show. 也可以单个文档来设置可见性:
#+STARTUP: hideblocks
#+STARTUP: nohideblocks
20.11 Built-in Table Editor #
Any line with ‘|’ as the first non-whitespace character is considered part of a table. Moreover, a line
starting with ‘|-’ is a horizontal rule.
- C-c | (org-table-create-or-convert-from-region)
- Convert the active region to table
- 如果每行至少包括一个 TAB, 则用 TAB 分割;
- 如果每行包含至少一个逗号,则时 CSV 分割;
- 否则,使用空格分割;
- C-u C-u C-u 前缀,会提示输入正则表达式来匹配分隔符。
- C-c C-c (org-table-align)
- Re-align the table without moving point.
- TAB (org-table-next-field)
- Re-align the table, move to the next field. Creates a new row if necessary.
- S-TAB (org-table-previous-field)
- Re-align, move to previous field.
- RET (org-table-next-row)
- Re-align the table and move down to next row. Creates a new row if necessary
- M-a
- org-table-beginning-of-field
- M-e
- org-table-end-of-field
- M-LEFT (org-table-move-column-left)
- Move the current column left.
- M-RIGHT (org-table-move-column-right)
- Move the current column right.
- M-S-LEFT (org-table-delete-column)
Killthe current column.- M-S-RIGHT (org-table-insert-column)
- Insert a new column at point position. Move the recent column and all cells to the right of this column to the right.
- M-UP (org-table-move-row-up)
- Move the current row up.
- M-DOWN (org-table-move-row-down)
- Move the current row down.
- M-S-UP (org-table-kill-row)
Killthe current row or horizontal line.- M-S-DOWN (org-table-insert-row)
Inserta new row above the current row. With a prefix argument, the line is created below the current one.- C-c - (org-table-insert-hline)
- Insert
a horizontal linebelow current row. With a prefix argument, the line is created above the current line. 插入一个水平线。 - C-c RET (org-table-hline-and-move)
- Insert a horizontal line below current row, and move point into the row below that line. 插入一个水平线,同时在水平线下方插入一行。
- C-c ^
- org-table-sort-lines
- C-c C-x M-w (org-table-copy-region)
- Copy a rectangular region from a table to a special clipboard.
- C-c C-x C-w (org-table-cut-region)
- Copy a rectangular region from a table to a special clipboard,
- C-c C-x C-y (org-table-paste-rectangle)
- Paste a rectangular region into a table.
- M-RET (org-table-wrap-region)
- Split the current field at point position and move the rest to the line below.
- C-c ` (org-table-edit-field)
- Edit the current field in a separate window.
- 当 org-table 因为 line word wrap 被隐藏时,C-c ` 命令就非常有用。
M-x org-table-export
- C-c TAB (org-table-toggle-column-width)
- 根据 column width shrink 或 expand 当前 column。
- C-u C-c TAB (org-table-shrink)
- Shrink all columns with a column width. Expand the others.
- C-u C-u C-c TAB (org-table-expand)
- Expand all columns.
| asdfa | asdfasdfasdfasdf | asdfasdfasdfa | adfasdfasdf |
|---|---|---|---|
| asdfa | asdfasdfas | asdfasdfa | asdfasdfa |
| asdfasdfa | asfasdfasdfasdfasdfasdf | asfasdfasdfasdfsadfasd | asdfasdfasdfasdfasdfa |
可以通过配置 #+STARTUP: shrink 来说设置文档级别的 table shrink 属性。
If you would like to overrule the automatic alignment of number-rich columns to the right and of string-rich
columns to the left, you can use ‘<r>’, ‘<c>’ or ‘<l>’ in a similar fashion. You may also combine alignment
and field width like this: ‘<r10>'
you can use a special row where the first field contains only /. The further fields can either contain ‘<’ to
indicate that this column should start a group, ‘>’ to indicate the end of a column, or ‘<>’ (no space between
‘<’ and ‘>’) to make a column a group of its own.
| N || N^2 | N^3 | N^4 || sqrt(n) | sqrt 4 | |—|—–|—–|—–|———|————| | 1 || 1 | 1 | 1 || 1 | 1 | | 2 || 4 | 8 | 16 || 1.4142 | 1.1892 | | 3 || 9 | 27 | 81 || 1.7321 | 1.3161 |
在 org-mode 外也可以使用 org table minior mode:
- M-x orgtbl-mode
20.12 Hyperlinks #
格式: [[LINK][DESCRIPTION]] or [[LINK]]
To also edit the invisible LINK part, use C-c C-l with point on the link.
A link that does not look like a URL—i.e., does not start with a known scheme or a file name— refers to the current document . You can follow it with C-c C-o when point is on the link, or with a mouse click
5 种内部链接:
CUSTOM_IDproperty- element name;
- dedicated target
- #+Name keyword
- radio target
Org provides several refinements to internal navigation within a document. Most notably, a construct
like [[#my-custom-id]] specifically targets the entry with the ‘CUSTOM_ID’ property set to
‘my-custom-id’. Also, an internal link looking like ‘[[*Some section]]’ points to a headline with the name ‘Some section’
- C-c C-x p(org-set-property)
- 插入一个 CUSTOM_ID Property.
如果一个链接地址并不是 URL 的形式,就会作为当前文件内部链接来处理。最重要的一个例子是 20.12, 它会链接到 CUSTOM_ID 属性是 “my-custom-id” 的项。
When the link does not belong to any of the cases above, Org looks for a dedicated target: the same string in double
angular brackets, like ‘<<My Target>>’.
- dedicated target 是在链接目的地定义一个用两个 < 和 > 包围的字符串,例如 , 然后在文档的其他地方插入一个 LINK 值为相同字符串的链接如 1
If no dedicated target exists, the link tries to match the exact name of an element within the buffer. Naming is done,
unsurprisingly, with the ‘NAME’ keyword:
#+NAME: My Target
| a  | table      |
|----+------------|
| of | four cells |
Radio Targets: 不需要特别设置一个 link, 而是在文档的任意位置创建 <<< radio target>>>, 然后文档中任出现
radio
target 的位置都会变成链接,且链接到定义 radio target 的位置:
- org-mode 在打开文件时搜索,后续可以在 <<<>>> 位置 C-c C-c 来重新搜索。
self link text

<<<self link>>>
- C-c l
- org-store-link
- C-c C-l
- org-insert-link
- C-u C-c C-l
- insert a link to
a file. - C-c C-l (with point on existing link)
- edit the link and description parts of the link.
- C-c C-o (org-open-at-point)
- 打开链接(使用 browse-url-at-point 来打开 URL);
- C-c % (org-mark-ring-push)
- Push the current position onto the Org mark ring, to be able to return easily.
- C-c & (org-mark-ring-goto)
- Jump back to a recorded position. A position is recorded by the commands following internal links, and by C-c %.
C-c C-x C-n (org-next-link) / C-c C-x C-p (org-previous-link)
file 链接类型:
[[file:~/code/main.c::255]]
[file:~/xx.org::My Target]]
[[file:~/xx.org::*My Target]]
[[file:~/xx.org::#my-custom-id]]
[[file:~/xx.org::/regexp/]]
[[attachment:main.c::255]]
[[file:::find me]]
安装 org-mac-link 包后,可以从各种 Mac 应用(如 finder/浏览器)获取 org-mode 链接。
TODO 20.13 TODO Items #
插入 TODO:
- C-c C-t (org-todo)
Rotatethe TODO state of the current item among- C-u C-c C-t (org-todo)
- Prompt for
a note and record a the timeof the TODO state change - S-M-RET (org-insert-todo-heading)
- Insert a new TODO entry below the current one.
改变 TODO 状态:
- S-RIGHT/S-LEFT
- Select the following/preceding TODO state, similar to cycling
- M-LEFT/M-RIGHT 是改变当前 headline 的级别
- C-c / t (org-show-todo-tree)
- 在稀疏树中显示 TODO 项。将 buffer 折叠,但是会显示 TODO 项和它们所在的层次的标题。
- C-c a t (org-todo-list)
- 显示全局 TODO 列表。从所有的议程文件中收集 TODO 项到一个缓冲区中。
- 执行 M-x org-agenda-file-to-front 将当前文件添加到 org-agenda 关注的文件列表中。
改变 TODO 的状态会触发标签改变。查看选项 org-todo-state-tags-triggers 的描述获得更多信息。
缺省只有 TODO 和 DONE 两个 keywords, 可以通过定义 org-todo-keywords 来扩展多个/多组 keywords:
- “|” 用来分割 TODO 和 DONE 两种类型的 keywords, 如果没有配置, 则最后一个为 DONE 类型;
- keywords 后面括号中字符为快捷键, 在 C-c C-t 中可以快速选择, 按 SPC 清除 keywords;
(setq org-todo-keywords
      '((sequence "TODO(t)" "|" "DONE(d)")
        (sequence "REPORT(r)" "BUG(b)" "KNOWNCAUSE(k)" "|" "FIXED(f)")
        (sequence "|" "CANCELED(c)")))
跟踪 TODO 状态改变:
- !: with timestamp;
- @: note with timestamp;
- @/!: 进入该状态时记录 note, 离开该状态时记录 timestamp;
(setq org-todo-keywords
      '((sequence "TODO(t)" "WAIT(w@/!)" "|" "DONE(d!)" "CANCELED(c@)")))
文件级别的 TODO:
#+TODO: TODO(t) | DONE(d)
#+TODO: REPORT(r) BUG(b) KNOWNCAUSE(k) | FIXED(f)
#+TODO: | CANCELED(c)
#+TODO: TODO(t) WAIT(w@/!) | DONE(d!) CANCELED(c@)
subtree 级别的 TODO:
* TODO Log each state with only a time
  :PROPERTIES:
  :LOGGING: TODO(!) WAIT(!) DONE(!) CANCELED(!)
  :END:

* TODO Only log when switching to WAIT, and when repeating
  :PROPERTIES:
  :LOGGING: WAIT(@) logrepeat
  :END:

* TODO No logging at all
  :PROPERTIES:
  :LOGGING: nil
  :END:
20.14 Priorities #
- C-c , (org-priority)
- Set the priority of the current headline.
- S-UP (org-priority-up) / S-DOWN (org-priority-down)
- 设置优先级.
org-mode 默认定义了 ABC 三级优先级, 可以通过变量来重新定义范围: org-priority-highest, org-priority-lowest, and org-priority-default.
文档级别的优先级定义:
#+PRIORITIES: A C B
#+PRIORITIES: 1 10 5
20.15 Breaking Down Tasks into Subtasks #
It is often advisable to break down large tasks into smaller, manageable subtasks. You can do this by creating
an outline tree below a TODO item, with detailed subtasks on the tree46. To keep an overview of the fraction
of subtasks that have already been marked as done, insert either ‘[/]’ or ‘[%]’ anywhere in the
headline. These cookies are updated each time the TODO status of a child changes, or when pressing C-c C-c on
the cookie. For example:
* Organize Party [33%]
** TODO Call people [1/2]
*** TODO Peter
*** DONE Sarah
** TODO Buy food
** DONE Talk to neighbor
20.16 Checkboxes #
Every item in a plain list (see Plain Lists) can be made into a checkbox by starting it with the
string ‘[ ]’. This feature is similar to TODO items (see TODO Items), but is more
lightweight. Checkboxes are not included into the global TODO list, so they are often great to split
a task into a number of simple steps. Or you can use them in a shopping list.
[/]或[%]分别表示统计数量和比例;
task status [3/4]
- [-] call people
[33%]- Peter
- Sarah
- Sam
- order food
- think about what music to play
- talk to the neighbors
- C-c C-c (org-toggle-checkbox)
- 改变 checkbox 状态;
- M-S-RET (org-insert-todo-heading)
- Insert a new item with a checkbox
20.17 Tags Tags #
为交叉相关的信息提供标签和上下文,一个不错的方法是给标题分配标签。。每一个标题都能包含多个标签,它们位于标题的后面。标签可以包含字母,数字, ‘_’ 和 ‘@’ 。标签的前面和后面都应该有一个冒号,例如,“:work:”。可以指定多个标签,就像“:work:urgent:”。
标签默认是粗体并和标题具有相同的颜色, 可以使用 org-tag-faces 来为 TAG 定义不同的效果.
- C-c C-q (org-set-tags-command)
- Enter new tags for the current headline
- C-c C-c (org-set-tags-command)
- When point is in a headline, this does the same as C-c C-q.
标签具有大纲树的继承结构。如果一个标题具有某个标签,它的所有子标题也会继承这个标签。
org tags 默认是动态集合,即根据文档的 tag 来动态生成。可以通过变量 org-tag-alist 定义全局变量:
(setq org-tag-alist '(("@work" . ?w) ("@home" . ?h) ("laptop" . ?l)))
或者文件级别的 tags:
- 括号内的字符为快捷键,@ 没有特殊含义:
- {xx} 内的 tags 表示是排它的;
#+TAGS: @work(w)  @home(h)  @tennisclub(t)
#+TAGS: laptop(l)  pc(p)
#+TAGS: { @work(w)  @home(h)  @tennisclub(t) }  laptop(l)  pc(p)
如果是定义 org-tag-alist 来定义排它,则需要使用 :startgroup 和 :endgroup:
(setq org-tag-alist '((:startgroup . nil)
                      ("@work" . ?w) ("@home" . ?h) ("@tennisclub" . ?t)
                      (:endgroup . nil)
                      ("laptop" . ?l) ("pc" . ?p)))
tag 支持分组:使用 [GROUP: subtag …] 语法:
#+TAGS: [ Control : Context Task ]
#+TAGS: [ Persp : Vision Goal AOF Project ]
#+TAGS: { Context : @Home @Work @Call } ;; 排它性分组
或则使用 :startgrouptag/:grouptags 来定义分组和组下的 tags:
- 如果时排它性分组,则将 :startgrouptag/:grouptags 替换为 :startgroup/:endgroup
(setq org-tag-alist '((:startgrouptag)
                      ("GTD")
                      (:grouptags)
                      ("Control")
                      ("Persp")
                      (:endgrouptag)
                      (:startgrouptag)
                      ("Control")
                      (:grouptags)
                      ("Context")
                      ("Task")
                      (:endgrouptag)))
另外 tag 也支持 regexp 动态分组,subtag 名称正则必须位于 {xx} 中:
#+TAGS: [ Vision : {V@.+} ]
#+TAGS: [ Goal : {G@.+} ]
#+TAGS: [ AOF : {AOF@.+} ]
#+TAGS: [ Project : {P@.+} ]
一旦标签体系设置好,就可以用来收集相关联的信息到指定列表中。
- C-c \ 或 C-c / m
- 用匹配标签搜索的所有标题构造一个稀疏树。带前缀参数C-u时,忽略所有还是TODO行的标题。
- C-c a m
- 用所有议程文件匹配的标签构造一个全局列表。见第 10.3.3 节。
- C-c a M
- 用所有议程文件匹配的标签构造一个全局列表,但只搜索 TODO 项,并强制搜索所有子项(见变量 org-tags-match-listsublevels)。
这些命令都会提示输入字符串,字符串支持基本的逻辑语法, “+boss+urgent-project1”,是搜索所有的包含标签“boss”和“urgent”但不含“project1”的项;而 ““Kathy|Sally”,搜索标签包含“Kathy”或者“Sally”和项。搜索字符串的语法很丰富,支持查找TODO关键字、条目级别和属性。
20.18 Properties and Columns #
属性是一些与条目关联的键值对。它们位于一个名为 PROPERTIES 的特殊抽屉中。第一个属性都单独一行,键在前(被冒号包围),值在后。
* CD collection
** Classic
*** Goldberg Variations
    :PROPERTIES:
    :Title:     Goldberg Variations
    :Composer:  J.S. Bach
    :Artist:    Glenn Gould
    :Publisher: Deutsche Grammophon
    :NDisks:    1
    :END:
org-mode 预定义了一些特殊的 property:
- ‘ALLTAGS’
- All tags, including inherited ones.
- ‘BLOCKED’
- t if task is currently blocked by children or siblings.
- ‘CATEGORY’
- The category of an entry.
- ‘CLOCKSUM’
- The sum of CLOCK intervals in the subtree. org-clock-sum, must be run first to compute the values in the current buffer.
- ‘CLOCKSUM_T’
- The sum of CLOCK intervals in the subtree for today.org-clock-sum-today must be run first to compute the values in the current buffer.
- ‘CLOSED’
- When was this entry closed?
- ‘DEADLINE’
- The deadline timestamp.
- ‘FILE’
- The filename the entry is located in.
- ‘ITEM’
- The headline of the entry.
- ‘PRIORITY’
- The priority of the entry, a string with a single letter.
- ‘SCHEDULED’
- The scheduling timestamp.
- ‘TAGS’
- The tags defined directly in the headline.
- ‘TIMESTAMP’
- The first keyword-less timestamp in the entry.
- ‘TIMESTAMP_IA’
- The first inactive timestamp in the entry.
- ‘TODO’
- The TODO keyword of the entry.
快捷键:
- C-c C-x p (org-set-property)
- C-c C-c s (org-set-property)
- C-c C-c d (org-delete-property)
- Create a sparse tree based on the value of a property. T
- C-c / m or C-c \ (org-match-sparse-tree)
- Create a global list of tag/property matches from all agenda files.
- Create a global list of tag matches from all agenda files, but check only TODO items and force checking of subitems (see the option org-tags-match-list-sublevels).
The outline structure of Org documents lends itself to an inheritance model of properties: if the parent in a
tree has a certain property, the children can inherit this property. Org mode does not turn this on by
default, because it can slow down property searches significantly and is often not needed. However, if you
find inheritance useful, you can turn it on by setting the variable org-use-property-inheritance.
Org mode has a few properties for which inheritance is hard-coded, at least for the special applications for
which they are used:
- COLUMNS
- The ‘COLUMNS’ property defines the format of column view (see Column View). It is inherited in the sense that the level where a ‘COLUMNS’ property is defined is used as the starting point for a column view table, independently of the location in the subtree from where columns view is turned on.
- CATEGORY
- For agenda view, a category set through a ‘CATEGORY’ property applies to the entire subtree.
- ARCHIVE
- For archiving, the ‘ARCHIVE’ property may define the archive location for the entire subtree (see Moving a tree to an archive file).
- LOGGING
- The ‘LOGGING’ property may define logging settings for an entry or a subtree (see Tracking TODO state changes).
20.19 Dates and Times #
SCHEDULED: DEADLINE:
:Effort: 15min
TODO 项可以标记上日期和/或时间, 带有日期和时间信息的特定格式的字符串在 Org 模式中称为时间戳。
日期和时间戳类型:
- Plain timestamp; Event; Appointment
- Timestamp with repeater interval
- Diary-style expression entries
- Time/Date range
- ,带重复的
range
- 必须使用两个 ‘–’ 练起来的时间戳(不能有空格)来表示。
- Inactive timestamp
日期操作:
- C-c . (org-time-stamp)
- 插入日期, 加 C-u 时插入
带时间的日期; - C-c ! (org-time-stamp-inactive)
- 插入不活跃的时间戳;
- C-c C-c
- Normalize timestamp, insert or fix day name if missing or wrong.
- C-c < (org-date-from-calendar)
- Insert a timestamp corresponding to point date in the calendar.
- C-c C-o (org-open-at-point)
- Access the agenda for the date given by the timestamp or -range at poin
- S-LEFT (org-timestamp-down-day) / S-RIGHT (org-timestamp-up-day)
- Change date at point by
one day. - S-UP (org-timestamp-up) / S-DOWN (org-timestamp-down)
- On the beginning or enclosing bracket of a timestamp, change its type
在提示输入日期时间时的快捷键:
- RET Choose date at point in calendar.
- mouse-1 Select date by clicking on it.
- S-RIGHT One day forward.
- S-LEFT One day backward.
- S-DOWN One week forward.
- S-UP One week backward.
- M-S-RIGHT One month forward.
- M-S-LEFT One month backward.
- > Scroll calendar forward by one month.
- < Scroll calendar backward by one month.
- M-v Scroll calendar forward by 3 months.
- C-v Scroll calendar backward by 3 months.
- C-. Select today’s date62
也可以直接输入日期和时间:
- 2022 01 22 12:30
- +2h, +2d, +2w
- 11:00-12:00, 短横杠两边不能有空格
- 11:00+2:11, 时间范围的时间只支持 HH:MM 格式;
重复任务:
- , 其中的 ‘+1m’ is a repeater, 支持 +/- 前缀和 y/m/w/d/h 后缀;
快捷键:
- C-c C-d (org-deadline)
- 设置一个
deadline时间戳. - C-c C-s (org-schedule)
- 设置一个计划时间戳, 可以加重复间隔, 如
- C-c / d (org-check-deadlines)
- Create a sparse tree with all deadlines that are either past-due, or which will become due within org-deadline-warning-days.
- C-c / b (org-check-before-date)
- Sparse tree for deadlines and scheduled items before a given date.
- C-c / a (org-check-after-date)
- Sparse tree for deadlines and scheduled items after a given date.
计时统计:
- C-c C-x C-i (org-clock-in)
- Start the clock on the current item (clock-in). This inserts the ‘CLOCK’
keyword together with a timestamp wrapped into a ‘LOGBOOK’ drawer.
- 加 C-u 前缀,则重历史计时任务中选中新的任务。这会自动停止当前计时任务,开始为新的条目计时。
- C-c C-x C-o (org-clock-out)
- 停止计时, 在 LOGBOOK 中添加计算本次消耗的时间记录。
- C-c C-x C-q (org-clock-cancel)
- 取消计时,不在 LOGBOOK 中添加本次时间记录。
- C-c C-x C-j (org-clock-goto)
- 跳转到当前正在计时的条目(只是跳转,不开始计时)。
- 加 C-u 前缀,则可以跳转到历史计时任务。
- C-c C-x C-x (org-clock-in-last)
- 返回上一次 closed 的 clocked item, 开始新的计时。
- 加 C-u 前缀可以选择一个历史的 clocked item.
- C-c C-x e (org-set-effort)
- Set the effort property of the current entry.
在当前 header添加一个 Effort 属性。不管当前 item 是否已开始计时,不在 modeline 显示 Effort 。- 时间格式是 hh:mm 或 mm,也可以指定单位如 10min;
- C-c C-x C-e (org-clock-modify-effort-estimate)
- Add to or set the effort estimate of the item currently
being clocked.
- 只能在已开始计时的 item 中使用。用于添加或设置当前 item 的 Effort 属性,同时在 modeline 显示该 Effort 属性。
- 时间格式是 hh:mm 或 mm,也可以指定单位如 10min, 或 +10min 的增量格式。
- C-c C-x C-d (org-clock-display)
- 在 headline 显示所有条目总的历史耗时。按 C-c C-c 可以关闭显示。
计时器:
- C-c C-x 0 (org-timer-start)
- 开始计时,在 modeline 显示一个计时器,不依赖于 clock-in 。
- C-c C-x ; (org-timer-set-timer)
- 开始一个
倒计时计时器:- 根据当前 item 的 Effort 属性,开始一个倒计时计时器。
- 如果没有设置 Effort 属性,则提示输入倒计时时间长度。
- 如果 Effort 的时间已经用完,则需要重新执行 C-c C-x e(org-set-effort)来为本次倒计时设置新的倒计时周期;
- 如果当前有 timer 在运行,则必须先 stop 它。
- C-c C-x , (org-timer-pause-or-continue)
- 暂停或继续计时器;
- C-c C-x _ (org-timer-stop)
- 停止计时器;
- C-c C-x . (org-timer)
- 插入一个当前计时器值。
20.20 Refiling and Archiving #
Refile command allows you to move an element of an Org file (and its children) to another location by doing a
narrowing search for the target location.
The main thing you can configure about Refile is where the target list comes from and how it is presented. By
default, Refile will assume that you’d like to move a node to one of the headings within the same Org buffer
(a top-level heading). 为了能够 refile 到其它文件的位置,可以配置 org-refile-targets 变量。
- C-c C-w (org-refile)
- Refile the entry or region at point.
- C-u C-c C-w
- Use the refile interface to jump to a heading.
- 跳转到 refile 文件的位置.
- C-u C-u C-c C-w (org-refile-goto-last-stored)
- Jump to the location where org-refile last moved a tree to.
- 跳转到上次 refile 到的文件位置.
- C-c M-w (org-refile-copy)
Copyingworks like refiling, except that the original note is not deleted.
Archive 是将 subtree 的内容移动到新的位置, 同时不再在 agenda 中显示. 默认的归档位置是当前文件同目录下,名为当前文件名后加 “_archive” 的文件, 也可以为文件设置特定的归档文件:
#+ARCHIVE: %s_done::
- C-c C-x C-a (org-archive-subtree-default)
- Archive the current entry using the command specified in the variable org-archive-default-command.
- C-c C-x C-s 或 C-c $ (org-archive-subtree)
- Archive the subtree starting at point position to the location given by org-archive-location.
- C-u C-c C-x C-s
- Check if any direct children of the current headline could be moved to the archive. 如果 subtree 有 TODO 则不能 archive.
- C-u C-u C-c C-x C-s
- As above, but check subtree for timestamps instead of TODO entries.
Internal archiving
If you want to just switch off—for agenda views—certain subtrees without moving them to a different file, you
can use the ‘ARCHIVE’ tag.
- 不会被展开;
- sparse tree 不会展示;
- agenda view 不会展示;
- archived tree 不会被 exported;
The following commands help manage the ‘ARCHIVE’ tag:
- C-c C-x a (org-toggle-archive-tag)
- Toggle the archive tag for the current headline. When the tag is set, the headline changes to a shadowed face, and the subtree below it is hidden.
- C-u C-c C-x a
- Check if any direct children of the current headline should be archived. To do this, check each subtree for open TODO entries. If none is found, the command offers to set the ‘ARCHIVE’ tag for the child. If point is not on a headline when this command is invoked, check the level 1 trees.
- C-c C-TAB (org-cycle-force-archived)
- Cycle a tree even if it is tagged with ‘ARCHIVE’.
- C-c C-x A (org-archive-to-archive-sibling)
- Move the current entry to the Archive Sibling. This is a sibling of the entry with the heading ‘Archive’ and the archive tag. The entry becomes a child of that sibling and in this way retains a lot of its original context, including inherited tags and approximate position in the outline.
20.21 Capture and Attachments #
-
包含 attachments 的 node 会被自动打上 ATTACH tag;
-
Display the capture templates menu.
-
Once you have finished entering information into the capture buffer
-
Finalize the capture process by refiling the note to a different place
-
Abort the capture process and return to the previous state.
org-mode 的 node 可以记录少量的数据, 也可以通过 link 的方式引用本地或远程的数据。对于大量的数据,可以使用 attachments 机制来保存。
attachments 是位于隶属于某个 node, org-mode Node 可以使用 ID 或 DIR Property 来关联 attachments.
-
缺省使用 ID 机制,保存在文件同级的 data/ 目录下;
-
The dispatcher for commands related to the attachment system.
- 如果要插入 attachment link,则 C-c C-l 时选择 attachment 类型的 schema 即可,org-mode 会自动补全文件路径。
20.22 org-protocol #
打开 MAC “脚本编辑器” ,写入如下内容,保存为 “EmacsClient-Org”,文件格式为 “应用程序”,保存到 /Applications 目录。
on open location this_URL
    do shell script "/usr/local/bin/emacsclient \"" & this_URL & "\" && open -a Emacs"
end open location
- 如果是自编译的 Emmacs, 则 emacsclient 位于 /usr/local/bin 目录下,否则位于 /Applications/Emacs 包中。
编辑 “/Applications/EmacsClient-Org.app/Contents/Info.plist” 文件,在 plist->dict 部分添加如下内容:
  <key>CFBundleURLTypes</key>
  <array>
    <dict>
      <key>CFBundleURLName</key>
      <string>org-protocol handler</string>
      <key>CFBundleURLSchemes</key>
      <array>
        <string>org-protocol</string>
      </array>
    </dict>
  </array>
然后执行命令:
xattr -r -d com.apple.quarantine /Applications/EmacsClient-Org.app
双击刚才保存到应用程序目录中的 EmacsClient-Org 程序图标,激活 org-proto 协议。
Emacs 开启 server 模式:
(server-start)
(require 'org-protocol)
新建一个浏览器书签,Location 内容如下,然后点击该书签,确认 Emacs 有反应:
javascript:location.href='org-protocol://store-link?url='+encodeURIComponent(location.href)+'&title='+encodeURIComponent(document.title)
- 在 Emacs 内按 C-c C-l 自动补全 URL 和 Title.
新建一个 capture template:
(require 'org-protocol)
(require 'org-capture)
(add-to-list 'org-capture-templates
             '("c" "Capture" entry (file+headline "~/docs/inbox.org" "Capture")
                  "* %^{Title}\nDate: %U\nSource: %:annotation\nContent:\n%:initial"
                  :empty-lines 1))
新建一个浏览器书签,内容如下:
javascript:location.href='org-protocol://capture?template=c'+'&url='+encodeURIComponent(window.location.href)+'&title='+encodeURIComponent(document.title)+'&body='+encodeURIComponent(window.getSelection())
20.23 Agenda Views #
The information to be shown is normally collected from all agenda files, the files listed in the variable
org-agenda-files. If a directory is part of this list, all files with the extension ‘.org’ in this directory are part of
the list.
- C-c [ (org-agenda-file-to-front)
- Add current file to the list of agenda files. The file is added to the front of the list. If it was already in the list, it is moved to the front. With a prefix argument, file is added/moved to the end.
- C-c ] (org-remove-file)
- Remove current file from the list of agenda files.
- C-’ / C-, (org-cycle-agenda-files)
- Cycle through agenda file list, visiting one file after the other.
- M-x org-switchb
- Command to use an Iswitchb-like interface to switch to and between Org buffers.
Commands in the Agenda Buffer: Motion
- n (org-agenda-next-line)
- Next line (same as DOWN and C-n).
- p (org-agenda-previous-line)
- Previous line (same as UP and C-p).
View/Go to Org file
- SPC or mouse-3 (org-agenda-show-and-scroll-up)
- Display the original location of the item in another window. With a prefix argument, make sure that drawers stay folded.
- L (org-agenda-recenter)
- Display original location and recenter that window.
- TAB or mouse-2 (org-agenda-goto)
- Go to the original location of the item in another window.
- RET (org-agenda-switch-to)
- Go to the original location of the item and delete other windows.
- F (org-agenda-follow-mode)
- Toggle Follow mode. In Follow mode, as you move point through the agenda buffer, the other window always shows the corresponding location in the Org file. The initial setting for this mode in new agenda buffers can be set with the variable org-agenda-start-with-follow-mode.
- C-c C-x b (org-agenda-tree-to-indirect-buffer)
- Display the entire subtree of the current item in an indirect buffer. With a numeric prefix argument N, go up to level N and then take that tree. If N is negative, go up that many levels. With a C-u prefix, do not remove the previously used indirect buffer.
- C-c C-o (org-agenda-open-link)
- Follow a link in the entry. This offers a selection of any links in the text belonging to the referenced Org node. If there is only one link, follow it without a selection prompt.
Change display
- A
- Interactively select another agenda view and append it to the current view.
- o
- Delete other windows.
- v d/w/m/y
- Switch to day view.
- v l or v L or short l (org-agenda-log-mode)
- Toggle Logbook mode. In Logbook mode, entries that were marked as done while logging was on (see the variable org-log-done) are shown in the agenda, as are entries that have been clocked on that day.
- v [ or short [ (org-agenda-manipulate-query-add)
- Include inactive timestamps into the current view. Only for weekly/daily agenda.
- f (org-agenda-later)
- Go forward in time to display the span following the current one. For example, if the display covers a week, switch to the following week. With a prefix argument, repeat that many times.
- b (org-agenda-earlier)
- Go backward in time to display earlier dates.
- . (org-agenda-goto-today)
- Go to today.
- j (org-agenda-goto-date)
- Prompt for a date and go there.
- J (org-agenda-clock-goto)
- Go to the currently clocked-in task in the agenda buffer.
- D (org-agenda-toggle-diary)
- Toggle the inclusion of diary entries. See Weekly/daily agenda.
- G (org-agenda-toggle-time-grid)
- Toggle the time grid on and off. See also the variables org-agenda-use-time-grid and org-agenda-time-grid.
- r (org-agenda-redo) / g
- Recreate the agenda buffer,
- C-x C-s or short s (org-save-all-org-buffers)
- Save all Org buffers in the current Emacs session, and also the locations of IDs.
Calendar commands
- c (org-agenda-goto-calendar)
- Open the Emacs calendar and go to the date at point in the agenda.
- c (org-calendar-goto-agenda)
- When in the calendar, compute and show the Org agenda for the date at point.
- i (org-agenda-diary-entry)
- Insert a new entry into the diary,
- M (org-agenda-phases-of-moon)
- Show the phases of the moon for the three months around current date.
- S (org-agenda-sunrise-sunset)
- Show sunrise and sunset times. The geographical location must be set with calendar variables, see the documentation for the Emacs calendar.
- C (org-agenda-convert-date)
- Convert the date at point into many other cultural and historic calendars.
- H (org-agenda-holidays)
- Show holidays for three months around point date.
Exporting Agenda Views
- C-x C-w (org-agenda-write)
- Write the agenda view to a file.
20.24 Markup for Rich Contents #
20.24.1 Paragraphs #
Paragraphs are separated by at least one empty line. If you need to enforce a line break within a paragraph,
use ‘\\’ at the end of a line.
VERSE Block 可用于保持内容的格式(换行、缩进、空白符等):
Great clouds overhead
Tiny black birds rise and fall
Snow covers Emacs
—AlexSchroeder
如果要引用别人的内容,可以用 QUOTE Block, 后续格式化输出时会自动在内容左右加缩进:
Everything should be made as simple as possible, but not any simpler —Albert Einstein
如果要居中内容,可以用 CENTER Block:
20.24.2 Emphasis and Monospace #
You can make words ‘*bold*’, ‘/italic/’, ‘_underlined_’, ‘=verbatim=’ and ‘~code~’, and, if you must,
‘+strike-through+’. Text in the code and verbatim string is not processed for Org specific syntax; it is
exported verbatim.
verbatim 和 code 的内容, org 不会做特殊语法解释, 即按输入原样输出。
To turn off fontification for marked up text, you can set org-fontify-emphasized-text to nil. To narrow down the list of
available markup syntax, you can customize org-emphasis-alist.
- C-c C-x \ (org-toggle-pretty-entities)
- This command formats sub- and superscripts in a WYSIWYM way.
20.24.3 Subscripts and Superscripts #
‘^’ and ‘_’ are used to indicate super- and subscripts. To increase the readability of ASCII text, it is not necessary,
but OK, to surround multi-character sub- and superscripts with curly braces. For example
The radius of the sun is R_sun = 6.96 x 10^8 m.  On the other hand, the radius of Alpha Centauri is R_{Alpha Centauri}
1.28 x R_{sun}.
You can set org-use-sub-superscripts in a file using the export option ‘^:’ (see Export Settings). For example,
‘#+OPTIONS: ^:{}’ sets org-use-sub-superscripts to {} and limits super- and subscripts to the curly bracket notation.
如果将 org-use-sub-superscripts 设置为 nil 或者在文件中配置 #+OPTIONS: ^:{} ,则 orgmode 将只使用 ^{} 或者 _{} 语法来表示上标或下标。
- C-c C-x \ (org-toggle-pretty-entities)
- This command formats sub- and superscripts in a WYSIWYM way.
20.24.4 Special Symbols #
You can use LaTeX-like syntax to insert special symbols—named entities—like ‘α’ to indicate the Greek letter, or ‘→’ to indicate an arrow.
特殊符号可以使用 \ + M-TAB 来自动补全。
Completion for these symbols is available, just type ‘\’ and maybe a few letters, and press M-TAB to see possible
completions. If you need such a symbol inside a word, terminate it with a pair of curly brackets. For example
Pro tip: Given a circle Γ of diameter d, the length of its
circumference is πd.
A large number of entities is provided, with names taken from both HTML and LaTeX; you can comfortably browse the
complete list from a dedicated buffer using the command org-entities-help.
20.24.5 Literal Examples #
You can include literal examples that should not be subjected to markup. Such examples are typeset in
monospace, so this is well suited for source code and similar examples. Example 的内容会用 等宽字体 排列。
Some example from a text file.
There is one limitation, however. You must insert a comma right before lines starting with either ‘*’, ‘,*’, ‘#+’ or ‘,#+’, as those may be interpreted as outlines nodes or some other special syntax. Org transparently strips these additional commas whenever it accesses the contents of the block.
- 可以先 region 选择内容, 然后 C-c C- e, 这时自动将 region 内 */#+ 开头的行添加逗号前缀。
* I am no real headline
For simplicity when using small examples, you can also start the example lines with a colon followed by a space. There may also be additional whitespace before the colon:
Here is an example
Some example from a text file.
对于代码,可以使用 SRC Block 并指定源码类型(major-mode name):
(defun org-xor (a b)
  "Exclusive or."
  (if a (not b) b))
在 SRC 行最后可以加 -n 参数,表示 export 时对源码加行号:
- -n 20 标识行号的开始序号;
- +n 表示继续 follow 上一个 SRC Block 加行号;
- +n 10 表示在上一个 SRC Block 的基础上加 10 再标记;
|
|
|
|
In literal examples, Org interprets strings like ‘(ref:name)’ as labels, and use them as targets for special hyperlinks
like ‘[[(name)]]’
You can also add a ‘-r’ switch which removes the labels from the source code. With the ‘-n’ switch, links to these
references are labeled by the line numbers from the code listing.
加了 -r 参数后, 格式化输出的代码内不出现 (ref:name) 的引用(防止语法错误),而是通过行号来引用。为了更直观显示引用的行号,可以加上 -n 参数,所以 -r -n 一般结合使用 。
However, you can use the ‘-i’ switch to also preserve the global indentation, if it does matter.
In line 1 we remember the current position. Line 2 jumps to point-min.
If the syntax for the label format conflicts with the language syntax, use a ‘-l’ switch to change the format,
for example
jump to or 5
如果 Example 或 SRC 内容比较长,可以用 C-c ' (org-edit-special) 来在另一个 buffer 中编辑内容。编辑结束后用 C-c ' 来保存, C-c C-k 来关闭。在这个 buffer 中,可以用 C-c l(org-store-link) 来为当前光标行添加 ref label, 然后用
C-c C-l 插入这个 ref 的链接, 这样不需要自己手动在代码中添加引用标记。
20.24.6 Images #
An image is a link to an image file118 that does not have a description part, for example:
./img/cat.jgp
If you wish to define a caption for the image (see Captions) and maybe a label for internal cross references
(see Internal Links), make sure that the link is on a line by itself and precede it with ‘CAPTION’ and ‘NAME’
keywords as follows:
,#+CAPTION: This is the caption for the next figure link (or table)
,#+NAME: fig:SED-HR4049
[[~./img/a.jpg]]
添加 CAPTION 后,html export 会在图片的下方显示 Figure 1: xxxx 的标题。
Such images (使用 [[xxx]] 格式的 image) can be displayed within the buffer with the following command:
- C-c C-x C-v (org-toggle-inline-images)
- C-c C-x C-M-v (org-redisplay-inline-images)
缺省情况下, org-mode 使用照片的实际宽度来显示,可以使用 #+ATTR_HTML :width 100 来指定照片显示的宽度:
- org-mode 在线显示照片需要编译时开启 imagemagick 特性, 检查方式:
(image-type-available-p 'imagemagick)
,#+ATTR_HTML: :alt my picture style=“float:left” :width 300px
Toggle the inline display of linked images. When called with a prefix argument, also display images that do have a link
description. You can ask for inline images to be displayed at startup by configuring the variable
org-startup-with-inline-images
The variable org-startup-with-inline-images can be set within a buffer with the ‘#+STARTUP’ options
‘inlineimages’ and ‘noinlineimages’.
20.24.7 Captions #
You can assign a caption to a specific part of a document by inserting a ‘#+CAPTION’ keyword immediately
before it:
#+CAPTION: This is the caption for the next table (or link)
| ... | ... |
|-----+-----|
Optionally, the caption can take the form:
#+CAPTION[Short caption]: Longer caption.
Even though images and tables are prominent examples of captioned structures, the same caption mechanism can
apply to many others —e.g., LaTeX equations, source code blocks. Depending on the export back-end, those may
or may not be handled.
20.24.8 Horizontal Rules #
A line consisting of only dashes, and at least 5 of them, is exported as a horizontal line.
20.24.9 Creating Footnotes #
A footnote is started by a footnote marker in square brackets in column 0, no indentation allowed. It ends at
the next footnote definition, headline, or after two consecutive empty lines. The footnote reference is simply
the marker in square brackets, inside text. Markers always start with ‘fn:’. For example:
The Org homepage [fn:1] now looks a lot better than it used to.
...
[fn:1] The link is: https://orgmode.org
Org mode extends the number-based syntax to named footnotes and optional inline definition. Here are the valid
references:
- named footnotes: 引用和定义相分离,定义位于变量 org-footnote-section 控制的
Footnotessection. - inline definition: 在引用的位置直接定义 footnote.
默认为 named 类型, 可以通过设置变量 org-footnote-define-inline 为 t 来使用 inline 类型。对于 inline 类型可以直接原地定义。
‘[fn:NAME]’
A named footnote reference, where NAME is a unique label word, or, for simplicity of automatic creation, a number.

‘[fn:: This is the inline definition of this footnote]’
An anonymous footnote where the definition is given directly at the reference point.

‘[fn:NAME: a definition]’
An inline definition of a footnote, which also specifies a name for the note.
- C-c C-x f
- The footnote action command.
- 不能在行首执行该命令,也就是不支持在行首插入 footnote;
- 当位于 footnote 定义或 mark 位置时, 相互跳转;
- C-u C-c C-x f
- 显示 footnote 操作 menu , 可以排序、重命名, 删除等;
- C-c C-c
- 在 footnote 定义和引用之间跳转。
- C-c C-o
- Footnote labels are also links to the corresponding definition or reference
20.25 Exporting #
Users can install libraries for additional formats from the Emacs packaging system. For easy discovery, these
packages have a common naming scheme: ox-NAME, where NAME is a format. For example, ‘ox-koma-letter’ for
koma-letter back-end. More libraries can be found in the ‘org-contrib’ repository.
The libraries responsible for translating Org files to other formats are called back-ends. Org ships with support for the following back-ends:
- ascii (ASCII format)
- beamer (LaTeX Beamer format)
- html (HTML format)
- icalendar (iCalendar format)
- latex (LaTeX format)
- md (Markdown format)
- odt (OpenDocument Text format)
- org (Org format)
- texinfo (Texinfo format)
- man (Man page format)
Org only loads back-ends for the following formats by default: ASCII, HTML, iCalendar, LaTeX, and ODT. Additional back-ends can be loaded in either of two ways: by configuring the org-export-backends
variable, or by requiring libraries in the Emacs init file. For example, to load the Markdown back-end, add
this to your Emacs config:
(require 'ox-md)
- C-c C-e (org-export)
- Invokes the export dispatcher interface.
Org exports the entire buffer by default. If the Org buffer has an active region, then Org exports just that region. Within the dispatcher interface, the following key combinations can further alter what is exported,
and how.
- C-a
- Toggle asynchronous export.
- C-b
- Toggle body-only export. Useful for excluding headers and footers in the export.
- C-s
- Toggle sub-tree export.
- C-v
- Toggle visible-only export.
20.25.1 Export Settings #+OPTIONS: #
Export options can be set: globally with variables; for an individual file by making variables buffer-local
with in-buffer settings. by setting individual keywords or specifying them in compact form with the ‘OPTIONS’
keyword; or for a tree by setting properties (see Properties and Columns). Options set at a specific level
override options set at a more general level.
In-buffer settings may appear anywhere in the file, either directly or indirectly through a file included
using ‘#+SETUPFILE: filename or URL’ syntax. Option keyword sets tailored to a particular back-end can be
inserted from the export dispatcher (see *note The Export Dispatcher::) using the ‘Insert template’ command by
pressing ‘#’. To insert keywords individually, a good way to make sure the keyword is correct is to type ‘#+’
and then to use ‘M-<TAB>’(1) for completion.
配置是通过各种 #+KEYWORD 来指定的, 可以按 M-TAB 自动补全 KEYWORD, 按 : M-TAB 来补全命令的参数。
The export keywords available for every back-end, and their equivalent global variables, include:
- ‘AUTHOR’
- The document author (user-full-name).
- ‘CREATOR’
- Entity responsible for output generation (org-export-creator-string).
- ‘DATE’
- A date or a time-stamp123.
- ‘EMAIL’
- The email address (user-mail-address).
- ‘LANGUAGE’
- Language to use for translating certain strings (org-export-default-language). With
‘#+LANGUAGE: fr’, for example, Org translates ‘Table of contents’ to the French ‘Table des matières’124.
- 对于中文,需要使用 zh-CN, 这时输出的 toc 标题才会是中文。
- ‘SELECT_TAGS’
- The default value is ‘(“export”)’. When a tree is tagged with
‘export’(org-export-select-tags), Org selects that tree and its subtrees for export. Org excludes trees with‘noexport’ tags, see below. When selectively exporting files with ‘export’ tags set, Org does not export any text that appears before the first headline. - ‘EXCLUDE_TAGS’
- The default value is ‘(“noexport”)’. When a tree is tagged with ‘noexport’ (org-export-exclude-tags), Org excludes that tree and its subtrees from export. Entries tagged with ‘noexport’ are unconditionally excluded from the export, even if they have an ‘export’ tag. Even if a subtree is not exported, Org executes any code blocks contained there.
- ‘TITLE’
- Org displays this title. For long titles, use
multiple ‘#+TITLE’ lines. - ‘EXPORT_FILE_NAME’
- The name of the output file to be generated. Otherwise, Org generates the file name based on the buffer name and the extension based on the back-end format.
- broken-links
- Toggles if Org should continue exporting upon finding a broken internal link. When set to mark, Org clearly marks the problem link in the output (org-export-with-broken-links).
- toc
- Toggle inclusion of the table of contents, or set the level limit (org-export-with-toc).
The ‘OPTIONS’ keyword is a compact form. To configure multiple options, use several ‘OPTIONS’ lines.
- 单个 OPTIONS 行中的各 option 用空格分开,option 使用 : 来分割可选的参数,例如:
#+OPTIONS: toc:2 date prop:t ^:nil
对于特定 exporter 模式,有对应的 BEGIN_EXPORT Block 和 ATTR:
#+BEGIN_EXPORT ascii
Org exports text in this block only when using ASCII back-end.
#+END_EXPORT

#+ATTR_ASCII: :width 10
OPTIONS 支持的 export 配置参数列表:
- '
- Toggle smart quotes (org-export-with-smart-quotes). Depending on the language used, when activated, Org treats pairs of double quotes as primary quotes, pairs of single quotes as secondary quotes, and single quote marks as apostrophes.
- *
- Toggle emphasized text (org-export-with-emphasize).
: Toggle conversion of special strings (org-export-with-special-strings).
- :
- Toggle fixed-width sections (org-export-with-fixed-width).
- <
- Toggle inclusion of time/date active/inactive stamps (org-export-with-timestamps).
- \n
- Toggles whether to preserve line breaks (org-export-preserve-breaks).
- ^
- Toggle TeX-like syntax for sub- and superscripts. If you write ‘^:{}’, ‘ab’ is interpreted, but the simple ‘a_b’ is left as it is (org-export-with-sub-superscripts).
- arch
- Configure how archived trees are exported. When set to headline, the export process skips the contents and processes only the headlines (org-export-with-archived-trees).
- author
- Toggle inclusion of author name into exported file (org-export-with-author).
- broken-links
- Toggles if Org should continue exporting upon finding a broken internal link. When set to mark, Org clearly marks the problem link in the output (org-export-with-broken-links).
- c
- Toggle inclusion of ‘CLOCK’ keywords (org-export-with-clocks).
- creator
- Toggle inclusion of creator information in the exported file (org-export-with-creator).
- d
- Toggles inclusion of drawers, or list of drawers to include, or list of drawers to exclude (org-export-with-drawers).
- date
- Toggle inclusion of a date into exported file (org-export-with-date).
- e
- Toggle inclusion of entities (org-export-with-entities).
- Toggle inclusion of the author’s e-mail into exported file (org-export-with-email).
- f
- Toggle the inclusion of footnotes (org-export-with-footnotes).
- H
- Set the number of
headline levels for export(org-export-headline-levels). Below that level, headlines are treated differently. In most back-ends, they become list items. - inline
- Toggle inclusion of inlinetasks (org-export-with-inlinetasks).
- num
- Toggle section-numbers (org-export-with-section-numbers). When set to number N, Org numbers only those headlines at level N or above. Set ‘UNNUMBERED’ property to non-nil to disable numbering of heading and subheadings entirely. Moreover, when the value is ‘notoc’ the headline, and all its children, do not appear in the table of contents either (see Table of Contents).
- p
- Toggle export of planning information (org-export-with-planning). “Planning information” comes from lines located right after the headline and contain any combination of these cookies: ‘SCHEDULED’, ‘DEADLINE’, or ‘CLOSED’.
- pri
- Toggle inclusion of priority cookies (org-export-with-priority).
- prop
- Toggle inclusion of property drawers, or list the properties to include (org-export-with-properties).
- stat
- Toggle inclusion of statistics cookies (org-export-with-statistics-cookies).
- tags
- Toggle inclusion of tags, may also be not-in-toc (org-export-with-tags).
- tasks
- Toggle inclusion of tasks (TODO items); or nil to remove all tasks; or todo to remove done tasks; or list the keywords to keep (org-export-with-tasks).
- tex
- nil does not export; t exports; verbatim keeps everything in verbatim (org-export-with-latex).
- timestamp
- Toggle inclusion of the creation time in the exported file (org-export-time-stamp-file).
- title
- Toggle inclusion of title (org-export-with-title).
- toc
- Toggle inclusion of the table of contents, or set the level limit (org-export-with-toc).
- todo
- Toggle inclusion of TODO keywords into exported text (org-export-with-todo-keywords).
- |
- Toggle inclusion of tables (org-export-with-tables).
20.25.2 Table of Contents #
org-mode 默认 export 时在第一个 headerline section 前插入 TOC, 包含所有级别的 headline.
- 配置变量 org-export-with-toc 为 nil , 或者设置 ‘#+OPTIONS: toc:nil’ 来关闭生成 TOC;
- 不能通过 #+STARTUP: toc:nil 来关闭或设置 TOC, 需要通过 ‘#+OPTIONS: toc:nil’ 来设置;
- 在需要插入 TOC 的位置配置 #+TOC: headlines 2;
The table of contents includes all headlines in the document. Its depth is therefore the same as the headline
levels in the file.
#+OPTIONS: toc:2          (only include two levels in TOC)
#+OPTIONS: toc:nil        (no default TOC at all)
可以为 headline 指定是否输出到 toc 中:
* Subtree not numbered, not in table of contents either
  :PROPERTIES:
  :UNNUMBERED: notoc
  :END:
Org normally inserts the table of contents directly before the first headline of the file. To move the table
of contents to a different location, first turn off the default with org-export-with-toc variable or with
‘#+OPTIONS: toc:nil'. Then insert ‘#+TOC: headlines N’ at the desired location(s).
#+OPTIONS: toc:nil
...
#+TOC: headlines 2
Use the ‘TOC’ keyword to generate list of tables—respectively, all listings—with captions.
- 只会 list 包含 #+CAPTION: 的 table/images/code 和 listing.
 #+TOC: listings
 #+TOC: tables
20.25.3 Include Files #
During export, you can include the content of another file. For example, to include your ‘.emacs’ file, you could use:
#+INCLUDE: "~/.emacs" src emacs-lisp
Inclusions may specify a file-link to extract an object matched by org-link-search126 (see Search Options). The ranges for ‘:lines’ keyword are relative to the requested element. Therefore,
#+INCLUDE: "./paper.org::*conclusion" :lines 1-20
- C-c ’ (org-edit-special)
- Visit the included file at point.
20.25.4 Comment 不会被导出 #
-
以‘#‘位于第 0 列的行会被看作注释, 不会被导出 。如果想要一个缩进的行也被作为注释,用
“#+”开头。所以,很多 file 级别的配置是类似于’#+KEYWORD:’ 的格式,例如 #+OPTEIONS:, #+AUTHRO:, #+ATTR_HTML: 等。 -
以 COMMENT 开头的 headline subtree 也不会被导出。
C-c ;: 插入一个 COMMENT subtree
-
COMMENT BLOCK 也不会被导出:
Lines starting with zero or more whitespace characters followed by one ‘#’ and a whitespace are treated as
comments and, as such, are not exported.
Likewise, regions surrounded by ‘#+BEGIN_COMMENT’ … ‘#+END_COMMENT’ are not exported.
Finally, a ‘COMMENT’ keyword at the beginning of an entry, but after any other keyword or priority cookie,
comments out the entire subtree. In this case, the subtree is not exported and no code block within it is
executed either128. The command below helps changing the comment status of a headline.
- C-c ; (org-toggle-comment)
- Toggle the ‘COMMENT’ keyword at the beginning of an entry.
20.25.5 各种 exporter 的通用惯例 #
XXX, 如 HTML, Exporter backend 识别的标记:
-
在线混合定义: inline syntax: ‘…’, 例如 和 bold text
-
单行定义: #+HTML: Literal HTML code for export
-
block: html export block(每一种 exporter 类型, 都有对应的 #+BEGING_EXPORT XXXX block):
All lines between these markers are exported literally
h1 标题
-
#+ATTR_XXX: XXX 相关的属性定义.
20.25.6 HTML Export #
‘C-c C-e h h’ (‘org-html-export-to-html’)
Export as HTML file with a ‘.html’ extension. For ‘myfile.org’, Org exports to ‘myfile.html’, overwriting without warning. ‘C-c C-e h o’ exports to HTML and opens it in a web browser.
HTML Exporter backend 识别的标记:
- inline syntax: ‘…’ bold text
- #+HTML: Literal HTML code for export
- htlmll export block(每一种 exporter 类型, 都有对应的 #+BEGING_EXPORT XXXX block):
All lines between these markers are exported literally
h1 标题
如果将变量 org-html-doctype-alist 设置为 html5, 且 org-html-html5-fancy 设置为t, 则 org 将任意 block 翻译为 html5 的 element:
#+BEGIN_aside
  Lorem ipsum
#+END_aside
输出为:
<aside>
  <p>Lorem ipsum</p>
</aside>
而:
#+ATTR_HTML: :controls controls :width 350
#+BEGIN_video
#+HTML: <source src="movie.mp4" type="video/mp4">
#+HTML: <source src="movie.ogg" type="video/ogg">
Your browser does not support the video tag.
#+END_video
输出为:
<video controls="controls" width="350">
  <source src="movie.mp4" type="video/mp4">
    <source src="movie.ogg" type="video/ogg">
      <p>Your browser does not support the video tag.</p>
</video>
Headlines are exported to ‘<h1>’, ‘<h2>’, etc. Each headline gets the ‘id’ attribute from ‘CUSTOM_ID’
property, or a unique generated value, see Internal Links.
Org files can also have special directives to the HTML export back-end. For example, by using ‘#+ATTR_HTML’
lines to specify new format attributes to <a> or <img> tags. This example shows changing the link’s title and
style:
#+ATTR_HTML: :alt my picture :style color:red;width:500px;height:600px;
file:~/Pictures/IMG_5648.jpeg
,#+ATTR_HTML: :alt my picture :style color:red;width:100px;height:100px;
| name | age | number |
|---|---|---|
| asdfa | asdfa | |
| asdf |
注意:#+ATTR_HTML 必须位于要设置的 html element 之前。
When the link in the Org file has no description, the HTML export back-end by default in-lines that image. For
example: ‘[[file:myimg.jpg]]’ is in-lined, while ‘[[file:myimg.jpg][the image]]’ links to the text, ‘the
image’. For more details, see the variable org-html-inline-images.
20.25.7 Publishing #
Org includes a publishing management system that allows you to configure automatic HTML conversion of projects composed of interlinked Org files.
20.26 Working with Source Code #
Users can control how live they want each source code block by tweaking the header arguments (see Using Header Arguments) for compiling, execution, extraction, and exporting.
For editing and formatting a source code block, Org uses an appropriate Emacs major mode that includes features specifically designed for source code in that language.
Org can extract one or more source code blocks and write them to one or more source files —a process known as tangling in literate programming terminology.
For exporting and publishing, Org’s back-ends can format a source code block appropriately, often with native syntax highlighting.
20.26.1 Structure of Code Blocks #
标准格式:
#+NAME: <name>
#+BEGIN_SRC <language> <switches> <header arguments>
  <body>
#+END_SRC
- ‘#+NAME: <name>’
- Optional. Names the source block so it
can be called, like a function, from other source blocks or inline code to evaluate or to capture the results. Code from other blocks, other files, and from table formulas (see The Spreadsheet) canuse the name to reference a source block. This naming serves the same purpose as naming Org tables. Org mode requires unique names. For duplicate names, Org mode’s behavior is undefined.- 如果要在其它 src block 中引用该 src block 的 results, 则必须要定义 #+NAME:, 而且要保证唯一。
<header arguments> 也可以是用 #+PROTERTY: header-args: <:config> <value> 等为整个文档或部分 subtree 配置生效。
20.26.2 Using Header Arguments #
org-mode src block 的缺省参数:
:session    => "none"   ;; 各 src block 是相互独力的
:results    => "replace"
:exports    => "code"   ;; export 时值输出 code 而不包含 results
:cache      => "no"
:noweb      => "no"
:hlines     => "no"
:tangle     => "no"     ;; 默认 src block 不写入文件;
org-mode SRC block 的 header 参数,可以通过 #+PROPERTY: 在全局配置生效,例如配置全局的 tangle 参数:
- header-args 可移植定要配置的[:LANGUAGE], 如 header-args:emacs-lisp 只对 emacs-lisp 生效,否则对文件中所有 src 类型生效。
#+AUTHOR: 张俊([email protected])
#+LASTMOD: 2023-01-19T20:01:00+0800
#+STARTUP: overview nohideblocks
;; 只对 emacs-lisp 有效, 所以其它 src type 还是按默认值
#+PROPERTY: header-args:emacs-lisp :tangle yes :results silent :exports code :eval no
或者只对 subtree 生效:
* sample header
  :PROPERTIES:
  :header-args:    :cache yes ;; 针对所有语言 src block
  :END:

** Subheading
  :PROPERTIES:
  :header-args:clojure:    :session *clojure-2*   ;; 针对 clojure 语言
  :END:
对于 src block, 除了可以在 #+begin_src 行上指定 header argument 外, 也可以使用一个或多个 #+header: 来指定多个参数, 这非常适合参数较多的情况:
#+NAME: named-block
#+HEADER: :var data1=1
#+BEGIN_SRC emacs-lisp :var data2=2
   (message "data1:%S, data2:%S" data1 data2)
#+END_SRC

#+RESULTS:
: data1:1, data2:2
20.27 Environment of a Code Block #
20.27.1 Passing arguments #
Use ‘var’ for passing arguments to source code blocks. The specifics of variables in code blocks vary by the
source language and are covered in the language-specific documentation. The syntax for ‘var’, however, is the
same for all languages. This includes declaring a variable, and assigning a default value.
The following syntax is used to pass arguments to code blocks using the ‘var’ header argument.
:var NAME=ASSIGN
NAME is the name of the variable bound in the code block body. ASSIGN is:
a literal value, such as a string, a number,a referenceto a table, a list, a literal example, another code block—with or without arguments—or the
results of evaluating a code block.
ASSIGN may specify a filename for references to elements in a different file, using a ‘:’ to separate the
filename from the reference.
:var NAME=FILE:REFERENCE ;; 除了 FILE 外,还有其它类型。
Here are examples of passing values by reference:
- table
- A table named with a ‘NAME’ keyword.
#+NAME: example-table | 1 | | 2 | | 3 | | 4 | #+NAME: table-length #+BEGIN_SRC emacs-lisp :var table=example-table (length table) #+END_SRC #+RESULTS: table-length : 4 - list
- A simple named list.
#+NAME: example-list - simple - not - nested - list #+BEGIN_SRC emacs-lisp :var x=example-list (print x) #+END_SRC #+RESULTS: | simple | list |Note that only
the top level listitems are passed along. Nested list items are ignored. - code block without arguments
A code block name, as assigned by ‘NAME’ keyword from the example above,optionally followed by parentheses.- 获取的是 src block 的执行结果。
    #+BEGIN_SRC emacs-lisp :var length=table-length()
      (* 2 length)
    #+END_SRC

    #+RESULTS:
    : 8
- 获取的是 src block 的执行结果。
- code block with arguments
- A code block name, as assigned by ‘NAME’ keyword, followed by parentheses and
optional arguments passed within the parentheses.
#+NAME: double #+BEGIN_SRC emacs-lisp :var input=8 (* 2 input) #+END_SRC #+RESULTS: double : 16 #+NAME: squared #+BEGIN_SRC emacs-lisp :var input=double(input=1) (* input input) #+END_SRC #+RESULTS: squared : 4 - literal example, or code block contents
- A code block or
literal example blocknamed with a ‘NAME’ keyword, followed bybrackets(optional for example blocks).- 对于 src block 获取的是 block 内容而非执行结果;
    #+NAME: literal-example
    #+BEGIN_EXAMPLE
      A literal example
      on two lines
    #+END_EXAMPLE

    #+NAME: read-literal-example
    #+BEGIN_SRC emacs-lisp :var x=literal-example[]
      (concatenate #'string x " for you.")
    #+END_SRC

    #+RESULTS: read-literal-example
    : A literal example
    : on two lines for you.
- 对于 src block 获取的是 block 内容而非执行结果;
Emacs lisp code can also set the values for variables. To differentiate a value from Lisp code, Org interprets
any value starting with ‘(’, ‘[’, ‘'’ or ‘`’ as Emacs Lisp code. The result of evaluating that code is then
assigned to the value of that variable. The following example shows how to reliably query and pass the file
name of the Org mode buffer to a code block using headers. We need reliability here because the file’s name
could change once the code in the block starts executing.
#+BEGIN_SRC sh :var filename=(buffer-file-name) :exports both
  wc -w $filename
#+END_SRC
20.27.2 Using sessions #
Two code blocks can share the same environment. The ‘session’ header argument is for running multiple source
code blocks under one session. Org runs code blocks with the same session name in the same interpreter
process.
- ‘none’
Default. Each code blockgets a new interpreter processto execute. The process terminates once the block is evaluated.- STRING
- Any string besides ‘none’ turns that string into the name of that session. For example,
‘:session STRING’names it ‘STRING’. If ‘session’ has no value, thenf the session namefff isderived from the source language identifier. Subsequent blocks with the same source code language use the same session. Depending on the language, state variables, code from other blocks, and the overall interpreted environment may be shared. Some interpreted languages support concurrent sessions when subsequent source code language blocks change session names.
Only languages that provide interactive evaluation can have session support. Not all languages provide this
support, such as C and ditaa. Even languages, such as Python and Haskell, that do support interactive
evaluation impose limitations on allowable language constructs that can run interactively. Org inherits those
limitations for those code blocks running in a session.
20.27.3 Choosing a working directory #
The ‘dir’ header argument specifies the default directory during code block execution. If it is absent, then
the directory associated with the current buffer is used. In other words, supplying ‘:dir DIRECTORY’
temporarily has the same effect as changing the current directory with M-x cd RET DIRECTORY, and then not
setting ‘dir’. Under the surface, ‘dir’ simply sets the value of the Emacs variable default-directory. Setting
‘mkdirp’ header argument to a non-nil value creates the directory, if necessary.
Setting ‘dir’ to the symbol attach or the string "'attach" will set ‘dir’ to the directory returned by
(org-attach-dir), set ‘:mkdir yes', and insert any file paths, as when using ‘:results file’, which are under
the node’s attachment directory using ‘attachment:’ links instead of the usual ‘file:’ links. Any returned
path outside of the attachment directory will use ‘file:’ links as per usual.
- 设置 :dir attach :results file :file outputs/myfile, 将在 attachement dir 下创建 outputs/myfile, 同时返回~</Users/zhangjun/docs/emacs/xx>~ 类型的 LINK. 如果 :file 的路径不在 attachement dir 下,则返回的 LINK 是
file:xxx;
For example, to save the plot file in the ‘Work/’ folder of the home directory— notice tilde is expanded:
- 如果指定了 :file xxx 参数, 则执行结果会写入文件。然后返回 file 链接。
#+BEGIN_SRC R :file myplot.png :dir ~/Work
  matplot(matrix(rnorm(100), 10), type="l")
#+END_SRC
To evaluate the code block on a remote machine, supply a remote directory name using Tramp syntax. For
example:
#+BEGIN_SRC R :file plot.png :dir /scp:[email protected]:
  plot(1:10, main=system("hostname", intern=TRUE))
#+END_SRC
Org first captures the text results as usual for insertion in the Org file. Then Org also inserts a link to
the remote file, thanks to Emacs Tramp. Org constructs the remote path to the file name from ‘dir’ and
default-directory, as illustrated here: [[file:/scp:[email protected]:/home/dand/plot.png][plot.png]];
例如:
kubectl get node
When ‘dir’ is used with ‘session’, Org sets the starting directory for a new session. But Org does not alter the directory of an already existing session.
- 如果 dir 和 session 一块使用,则 org-mode 在开始 session 时设置 dir, 后续不会再变。
Do not use ‘dir’ with ‘:exports results’ or with ‘:exports both’ to avoid Org inserting incorrect links to remote files. That is because Org does not expand default directory to avoid some underlying portability issues.
20.28 Evaluating Code Blocks #
A note about security: With code evaluation comes the risk of harm. Org safeguards by prompting for user’s permission before executing any code in the source block. To customize this safeguard, or disable it, see Code Evaluation and Security Issues.
20.28.1 How to evaluate source code #
Org captures the results of the code block evaluation and inserts them in the Org file, right after the code
block. The insertion point is after a newline and the ‘RESULTS’ keyword. Org creates the ‘RESULTS’ keyword if
one is not already there. More details in Results of Evaluation.
By default, Org enables only Emacs Lisp code blocks for execution. See Languages to enable other languages.
Org provides many ways to execute code blocks. C-c Cf-cf or C-c C-v e with the point on a code block142 calls
the org-babel-execute-src-block function, which executes the code in the block, collects the results, and
inserts them in the buffer.
By calling a named code block from an Org mode buffer or a table. Org can call the named code blocks from the
current Org mode buffer or from the “Library of Babel” (see Library of Babel).
The syntax for ‘CALL’ keyword is:
#+CALL: <name>(<arguments>)
#+CALL: <name>[<inside header arguments>](<arguments>) <end header arguments>
- ‘<name>’
- This is
the name of the code block(see Structure of Code Blocks) to be evaluated in the current document. If the block is located in another file,start ‘<name>’ with the file namefollowed by a colon. For example, in order to execute a block named ‘clear-data’ in ‘file.org’, you can write the following:#+CALL: file.org:clear-data() - ‘<arguments>’
- Org passes arguments to the code block using standard function call syntax. For example, a
‘#+CALL:’ line that passes ‘4’ to a code block named ‘double’, which declares the header argument ‘:var
n=2’, would be written as:
#+CALL: double(n=4)Note how this function call syntax is different from the header argument syntax. - ‘<inside header arguments>’
- Org passes inside header arguments
to the named code blockusing the header argument syntax. Inside header arguments apply to code block evaluation. For example,‘[:results output]’collects results printed to stdout during code execution of that block. Note how this header argument syntax is different from the function call syntax. - ‘<end header arguments>’
- End header arguments affect
the results returned by the code block. For example, ‘:results html’ wraps the results in a ‘#+BEGIN_EXPORT html’ block before inserting the results in the Org buffer.
20.28.2 Limit code block evaluation #
The ‘eval’ header argument can limit evaluation of specific code blocks and ‘CALL’ keyword. It is useful for
protection against evaluating untrusted code blocks by prompting for a confirmation.
- ‘yes’
- Org always evaluates the source code
without asking permission. - ‘never’ or ‘no’
- Org
never evaluates the source code. - ‘query’
- Org prompts the user for permission to evaluate the source code.
- ‘never-export’ or ‘no-export’
- Org does not evaluate the source code
when exporting, yet the user can evaluate it interactively. - ‘query-export’
- Org prompts the user for permission to evaluate the source code during export.
If ‘eval’ header argument is not set, then Org determines whether to evaluate the source code from the
org-confirm-babel-evaluate variable (see Code Evaluation and Security Issues).
20.28.3 Cache results of evaluation #
The ‘cache’ header argument is for caching results of evaluating code blocks. Caching results can avoid
re-evaluating a code block that have not changed since the previous run. To benefit from the cache and avoid
redundant evaluations, the source block must have a result already present in the buffer, and neither the
header arguments—including the value of ‘var’ references—nor the text of the block itself has changed since
the result was last computed. This feature greatly helps avoid long-running calculations. For some edge cases,
however, the cached results may not be reliable.
The caching feature is best for when code blocks are pure functions, that is functions that return the same
value for the same input arguments (see Environment of a Code Block), and that do not have side effects, and
do not rely on external variables other than the input arguments. Functions that depend on a timer, file
system objects, and random number generators are clearly unsuitable for caching.
A note of warning: when ‘cache’ is used in a session, caching may cause unexpected results.
When the caching mechanism tests for any source code changes, it does not expand noweb style references (see Noweb Reference Syntax).
The ‘cache’ header argument can have one of two values: ‘yes’ or ‘no’.
- ‘no’
- Default. No caching of results; code block evaluated every time.
- ‘yes’
- Whether to run the code or return the cached results is determined by
comparing the SHA1 hash value of the combined code block and arguments passed to it. This hash value is packed on the ‘#+RESULTS:’ line from previous evaluation. When hash values match, Org does not evaluate the code block. When hash values mismatch, Org evaluates the code block, inserts the results, recalculates the hash value, and updates ‘#+RESULTS:’ line.
In this example, both functions are cached. But ‘caller’ runs only if the result from ‘random’ has changed since the last run.
#+NAME: random
#+BEGIN_SRC R :cache yes
  runif(+1)
#+END_SRC

#+RESULTS[a2a72cd647ad44515fab62e144796432793d68e1]: random
0.4659510825295

#+NAME: caller
#+BEGIN_SRC emacs-lisp :var x=random :cache yes
  x
#+END_SRC

#+RESULTS[bec9c8724e397d5df3b696502df3ed7892fc4f5f]: caller
0.254227238707244
20.29 Results of Evaluation #
How Org handles results of a code block execution depends on many header arguments working together. The
primary determinant, however, is the ‘results’ header argument. It accepts four classes of options. Each code
block can take only one option per class:
- Collection
- For how the results should be collected from the code block;
- Type
- For which type of result the code block will return; affects how Org processes and inserts results in the Org buffer;
- Format
- For the result; affects how Org processes results;
- Handling
- For inserting results once they are properly formatted.
20.29.1 Collection #
指定 src block 的返回值类型: 函数返回值或返回码 vs stdout.
Collection options specify the results. Choose one of the options; they are mutually exclusive.
- ‘value’
- Default for most Babel libraries144.
Functional mode. Org gets the value by wrapping the code in a function definition in the language of the source block. That is why when using ‘:results value’, code should execute like a function and return a value. For languages like Python, an explicit return statement is mandatory when using ‘:results value’.Result is the value returned by the last statement in the code block.- 缺省值。函数模式, 返回 src block 最后一个语句的执行结果:
- 对于 python, 最后一条语句需要是 return 语句。
- 对于 shell, :results value 返回的是 exit code;
When evaluating the code block in a session (see Environment of a Code Block), Org passes the code to an interpreter running as an interactive Emacs inferior process. Org gets the value from the source code interpreter’s
last statement output. Org has to use language-specific methods to obtain the value. For example, from the variable _ in Ruby, and the value of .Last.value in R. - 缺省值。函数模式, 返回 src block 最后一个语句的执行结果:
- ‘output’
Scripting mode. Org passes the code to an external process running the interpreter. Org returns the contents ofthe standard output stream as text results.- 脚本模式, 将 src block 的 stdout 内容作为输出.
When using a session, Org passes the code to the interpreter running as an interactive Emacs inferior
process. Org concatenates any text output from the interpreter and returns the collection as a result.
示例: python:
#+NAME: many-cols
| a | b | c |
|---+---+---|
| d | e | f |
|---+---+---|
| g | h | i |

#+NAME: no-hline
#+BEGIN_SRC python :var tab=many-cols :hlines no
  return tab   # :results 默认 collection 是 value, 即函数返回值。对于 python, 最后一条语句需要是 return.
#+END_SRC

#+RESULTS: no-hline
| a | b | c |
| d | e | f |
| g | h | i |

#+NAME: hlines
#+BEGIN_SRC python :var tab=many-cols :hlines yes
  return tab
#+END_SRC

#+RESULTS: hlines
| a | b | c |
|---+---+---|
| d | e | f |
|---+---+---|
| g | h | i |
shell:
#+begin_src sh :results output
  echo PID: "$$"
#+end_src

#+RESULTS:
: PID: 19056

#+begin_src sh :results output
  echo PID: "$$"
#+end_src

#+RESULTS:
: PID: 19059
20.29.2 Type #
Type tells what result types to expect from the execution of the code block. Choose one of the options; they are mutually exclusive.
The default behavior is to automatically determine the result type. The result type detection depends on the code block language, as described in the documentation for individual languages. See Languages.
- ‘table’, ‘vector’
Interpret the results as an Org table. If the result is a single value, create a table with one row and one
column. Usage example: ‘:results value table’.
In-between each table row or below the table headings, sometimes results have horizontal lines, which are also
known as “hlines". The ‘hlines’ argument with the default ‘no’ value strips such lines from the input
table. For most code, this is desirable, or else those ‘hline’ symbols raise unbound variable errors. A ‘yes’
accepts such lines, as demonstrated in the following example.
#+NAME: many-cols
| a | b | c |
|---+---+---|
| d | e | f |
|---+---+---|
| g | h | i |

#+NAME: no-hline
#+BEGIN_SRC python :var tab=many-cols :hlines no ;; 不解释 hline, 所以输出没有包含 hline
  return tab
#+END_SRC

#+RESULTS: no-hline
| a | b | c |
| d | e | f |
| g | h | i |

#+NAME: hlines
#+BEGIN_SRC python :var tab=many-cols :hlines yes ;; 解释 hline, 所以输出包含 hline
  return tab
#+END_SRC

#+RESULTS: hlines
| a | b | c |
|---+---+---|
| d | e | f |
|---+---+---|
| g | h | i |
- ‘list’
- Interpret the results as an Org list. If the result is a single value, create a list of one element.
- ‘scalar’、 ‘verbatim’
Interpret literally and insert as quoted text. Do not create a table. Usage example: ‘:results value verbatim’.- ‘file’
- Interpret as a filename.
Save the results of execution of the code block to that file, then insert a link to it. You can control boththe filenameandthe descriptionassociated to the link.Org first tries to generate the filename from the value of the `‘file’` header argument and the directoryspecified using the
‘output-dir’header arguments. If ‘output-dir’ is not specified, Org assumes it is thecurrent directory.#+BEGIN_SRC asymptote :results value file :file circle.pdf :output-dir img/ size(2cm); draw(unitcircle); #+END_SRCIf ‘file’ header argument is missing, Org generates the base name of the output file from `the name of the code block`, and its extension from the `‘file-ext’` header argument. In that case, both the name and theextension are mandatory.
     #+name: circle
     #+BEGIN_SRC asymptote :results value file :file-ext pdf
       size(2cm);
       draw(unitcircle);
     #+END_SRC
The
‘file-desc’header argument defines the description (see Link Format) for the link. If ‘file-desc’ is present but has no value,the ‘file’ valueis used as the link description. When this argument is not present,the description is omitted. If you want to provide the ‘file-desc’ argument but omit the description, you can provide it with an empty vector (i.e.,:file-desc []).
By default, Org assumes that a table written to a file has TAB-delimited output. You can choose a different
separator with the ‘sep’ header argument.
The ‘file-mode’ header argument defines the file permissions. To make it executable, use ‘:file-mode (identity
#o755)’.
  echo "#!/bin/bash"
  echo "echo Hello World"
20.30 Babel #
如果执行 go 代码时出错,提示
Debugger entered--Lisp error: (wrong-number-of-arguments (1 . 1) 2)
generate-new-buffer(" *temp file*" t)
则可以删除 ob-go package, 然后重新下载和字节编译。
20.31 Org-Babel Cheat Sheet #
https://necromuralist.github.io/posts/org-babel-cheat-sheet/
Code Block Shortcuts
| Keys | Command | Effect |
|---|---|---|
| C-c C-c | org-babel-execute-src-block | Execute the code in the current block. |
| C-c ' | Open/close edit-buffer with mode set to match the code-block language. | |
| C-c C-v C-z | org-babel-switch-to-session | Open a python/ipython console (only works with :session) |
Buffer-wide Shortcuts
| Keys | Command | Effect |
|---|---|---|
| <s Tab | Create a code block. | |
| C-c C-v C-b | org-babel-execute-buffer | Execute all code blocks in buffer. |
| C-c C-v C-f | org-babel-tangle-file | Tangle all blocks marked to :tangle |
| C-c C-v C-t | org-babel-tangle | Seems like an alias for tangle file… |
Code Block Headers
This is the subset of headers/header values that I’m interested in right now.
Code to tangle The pattern I use to tangle (create an external code file) is:
- python as the language (since I’m not using it with an interactive session, no need for ipython)
- :noweb tangle is turned on from init.el so that I can substitute code defined elsewhere into the block
- :tangle <path to file>
  #+begin_src python :tangle literate_python/literate.py
    """A docstring for the literate.py module"""

    # imports
    import sys
    <<literate-main-imports>>

    # constants

    # exception classes

    # interface functions

    # classes


    <<LiterateClass-definition>>

    # internal functions & classes

    <<literate-main>>


    if __name__ == "__main__":
        status = main()
        sys.exit(status)
  #+end_src
Since I have :noweb tangle set, the substitions (e.g. ) don’t get expanded in HTML/Latex output (although they do when you create the python file).
  """A docstring for the literate.py module"""

  # imports
  import sys
  <<literate-main-imports>>
If you want to show the substitutions when exporting use :noweb yes in the header.
  """A docstring for the literate.py module"""

  # imports
  import sys
A named section
The noweb substitution above () worked because there was a named-section (defined here) that it could use:
  #+name: literate-main-imports
  #+begin_src python
    from argparse import ArgumentParser
  #+end_src
Update I now prefer to use :noweb-ref in the header instead of the separate #+name: block.
  #+begin_src python :noweb-ref literate-main-imports
    from argparse import ArgumentParser
  #+end_src
Results
The :results header argument declares how to handle what’s returned from executing a code block. There are
three classes of arguments and you can use up to one of each in the header.
Result Classes
| Class | Meaning |
|---|---|
| collection | How the results should be collected if there’s multiple outputs. |
| type | Declare what type of result the code block will return. |
| handling | How should results be handled. |
Collection Class
| Option | Meaning |
|---|---|
| value | (Default) Uses the value of the last statement in the block (python requires a return statement) |
| output | (:results output) Collects everything sent to stdout in the block. |
Type Class
| Option | Example | Meaning |
|---|---|---|
| table | :results value table | Return an org-mode table (vector) |
| scalar | :results value scalar | Return exactly the value returned (string) |
| file | :results value file | Return an org-mode link to a file |
| raw | :results value raw | Return as org-mode command |
| html | :results value html | Expect contents for #+begin_html |
| latex | :results value latex | Expect contents for #+begin_latex |
| code | :results value code | Expect contents for #+begin_src |
| pp | :results value pp | Expect code and pretty-print it |
Handling Class
| Option | Example | Meaning |
|---|---|---|
| silent | :results output silent | Don’t output in org-mode buffer |
| replace | :results output replace | (Default) Overwrite any previous result |
| append | :results output append | Append output after any previous output |
| prepend | :results output prepend | Put output above any previous output |
Exports This argument tells org-babel what to put in any exported HTML or Latex files.
| Option | Example | Meaning |
|---|---|---|
| code | :exports code | (default) The code in the block will be included in the export. |
| results | :exports results | The result of evaluating the code will be included. |
| both | :exports both | Include code and results in the file. |
| none | :exports none | Don’t include anything in the file. |
Running Tests Say there was another section in the document that tangled a test-file (named testliterate.py) to test our main source file. Once both are tangled you can run it in the document using sh as the language. The org-mode documentation shows a more complex version of this which builds a pass-fail table, but that’s beyond me right now.
   #+name: shell-run-pytest
   #+begin_src sh :results output :exports both
   py.test -v literate_python/testliterate.py
   #+end_src
============================= test session starts ==============================
platform linux -- Python 3.5.1+, pytest-3.0.5, py-1.4.32, pluggy-0.4.0 -- /home/cronos/.virtualenvs/nikola/bin/python3
cachedir: .cache
rootdir: /home/cronos/projects/nikola/posts, inifile:
plugins: faker-2.0.0, bdd-2.18.1
collecting ... collected 1 items

literate_python/testliterate.py::test_constructor PASSED

=========================== 1 passed in 0.06 seconds ===========================
Specific Block Cases Plant UML Besides setting the language to plantuml you need to specify and output-file path and set :exports results so that the actual plantuml code won’t be in the exported document but the diagram will.
ob-ipython The main thing to remember for ob-ipython is that you need to run it as a :session. I didn’t do it for most of the examples, but I’ve found since I first wrote this that using named sessions makes it a lot easier to work. Otherwise you might have more than one buffer with an org-babel document and they will be sharing the same ipython process, which can cause mysterious errors.
  # python standard library
  import os
When using pandas most of the methods produce values, but the info method instead prints to stdout so you have to specify this as the :results or it will popup a separate buffer with the output.
housing.info()
When you create figures, besides making sure that you use the %matplotlib inline magic, you also need to specify a file path where matplotlib can save the image.
figure = seaborn.countplot(x="ocean_proximity", data=housing)
Set Up Dependencies I’m using ob-ipython to use jupyter/ipython with org-babel so you have to install it (I used MELPA). In addition you need to install the python dependencies, the main ones being ipython and jupyter. Additionally, I use elpy (also from MELPA) which has its own dependencies. I think the easiest way to check and see what elpy dependencies you need is to install elpy (there’s two components, an emacs one you install from melpa and a python component you install from pip) then run M-x elpy-config to see what’s missing.
init.el Since I mentioned ob-ipython and elpy I’ll list what I have in my init.el file for elpy and org-babel.
;; elpy
(elpy-enable)
(setq elpy-rpc-backend "jedi")
(eval-after-load "python"
 '(define-key python-mode-map "\C-cx" 'jedi-direx:pop-to-buffer))
(elpy-use-ipython)
org-babel
;; org-babel
;;; syntax-highlighting/editing
(add-to-list 'org-src-lang-modes '("rst" . "rst"))
(add-to-list 'org-src-lang-modes '("feature" . "feature"))

;;; languages to execute/edit
(org-babel-do-load-languages
 'org-babel-load-languages
 '((ipython . t)
   (plantuml . t)
   (shell . t)
   (org . t)
   ;; other languages..
   ))

;;; noweb expansion only when you tangle
(setq org-babel-default-header-args
      (cons '(:noweb . "tangle")
            (assq-delete-all :noweb org-babel-default-header-args))
      )

;;; Plant UML diagrams
(setq org-plantuml-jar-path (expand-file-name "/usr/share/plantuml/plantuml.jar"))

;;; execute block evaluation without confirmation
(setq org-confirm-babel-evaluate nil)

;;; display/update images in the buffer after evaluation
(add-hook 'org-babel-after-execute-hook 'org-display-inline-images 'append)
Integrating with Nikola/Sphinx
20.32 其它 #
20.32.1 Regular Expressions #
Org, as an Emacs mode, makes use of Elisp regular expressions for searching, matching and filtering. Elisp
regular expressions have a somewhat different syntax then some common standards. Most notably, alternation is
indicated using ‘\|’ and matching groups are denoted by ‘\(…\)’. For example the string ‘home\|work’ matches
either ‘home’ or ‘work’.
For more information, see (emacs)Regular Expressions in Emacs.
20.32.2 Escape Character #
You may sometimes want to write text that looks like Org syntax, but should really read as plain text. Org may use a specific escape character in some situations, i.e., a backslash in macros (see Macro Replacement) and links (see Link Format), or a comma in source and example blocks (see Literal Examples). In the general case, however, we suggest to use the zero width space. You can insert one with any of the following:
- C-x 8 <RET> zero width space <RET>
- C-x 8 <RET> 200B <RET>
For example, in order to write ‘’ as-is in your document, you may write instead
[X[1,2]]
where ‘X’ denotes the zero width space character.
20.33 PDF #
使用 engrave-faces 替换 minted 做 block 的渲染,速度更快。
minted 依赖 pygements 包:
which pygmentize || brew install pygments
-
pygments 实现 Latex PDF 代码语法高亮;
-
minted 包提供代码语法高亮的功能(TexLive 默认安装), 它依赖 pygements 。
-
变量
org-latex-minted-langs列出 Emacs Major-Mode 与 minted 语言类型(pygmentize -L lexers)的关系, 如果两者一致(如 go-[mod] 和 go), 则不需要列出。 -
minted 的 fontfamily 只对预定义的 tt/courier/helvetica 有效。
21 font #
- 查看光标处字体:
M-x describe-char - 查看 emacs 支持的字体名称:
(print (font-family-list));
指定 font 方式:
-
a
Fontconfigpattern. Fontconfig patterns have the following form:fontname[-fontsize][:name1=values1][:name2=values2]...示例:
- Sarasa Mono Slab TC
- 等距更紗黑體 Slab TC
- 等距更紗黑體 Slab TC Light
- Sarasa Mono Slab TC Light:style=Light Italic,Italic
-
use a GTK font pattern. These have the syntax
fontname [properties] [fontsize]示例:
- Monospace Bold Italic 12
-
use an XLFD (X Logical Font Description).
-misc-fixed-medium-r-semicondensed--13-*-*-*-c-60-iso8859-1示例:
- --Iosevka SS14-normal-normal-expanded--14---*-m-0-iso10646-1
On X, Emacs recognizes two types of fonts: client-side fonts, which are provided by the Xft and Fontconfig libraries, and server-side fonts, which are provided by the X server itself.
For Xft and Fontconfig fonts, you can use the fc-list command to list the available fixed-width fonts, like
this: ; fc-list :spacing=mono fc-list:spacing=charcell
建议使用的字体:
- 2023.04.15 中英文统一使用字体:
laishulu/Sarasa-Term-SC-Nerd
- 中英文 (显示):更纱黑体 Sarasa Mono SC:
https://github.com/be5invis/Sarasa-Gothic
- 只安装解压包中的 sarasa-mono-sc 开头的字体。
- 文件名包含 slab 的字体文件表示英文字体是衬线格式。
- 中英文(显示):霞鹜文楷屏幕阅读版 LXGW WenKai Screen: https://github.com/lxgw/LxgwWenKai-Screen
- 中英文(PDF): Noto CJK SC: https://github.com/googlefonts/noto-cjk.git
- 英文字体:Fira Code : https://github.com/tonsky/FiraCode/wiki/Installing
- 中英文 (显示):更纱黑体 Sarasa Mono SC:
https://github.com/be5invis/Sarasa-Gothic
- Symbols 字体: Noto Sans Symbols 和 Noto Sans Symbols2: https://fonts.google.com/noto
- 花園明朝:HanaMinB: http://fonts.jp/hanazono/
- Emacs 默认后备字体:Symbola: https://dn-works.com/ufas/
Sarasa Term SC Nerd 字体是以 Sarasa Term SC 字体为基础,修改了 Nerd fonts 字体补丁程序,然后用该程序将 Nerd fonts 合并入 Sarasa Term SC, 再经过一些后处理,而最后形成的字体。该字体特别适合 简体中文用户在终端或者代码编辑器中使用。
- Sarasa 建议在终端环境中使用 Sarasa Term SC 字体,而非 Mono SC 字体, 因为 Mono 字体在终端环境中可能并不等宽。
思源字体是 Adobe 和 Google 合作的字体,用在 Google Android 设备中,称为 Noto 字体。
- 拉丁字体
- Noto Sans - 无衬线
- Noto Serif - 衬线
- Sarasa Term SC - 等宽(直接使用 Iosevka Term 会导致 emacs 中的蜜汁bug)
- 中文字体
- Noto Sans CJK SC (又称 思源黑体)
- Noto Serif CJK SC (又称 思源宋体)
等距更纱黑体 SC(Sarasa Mono SC) 是极少数做到中文和英文 2:1 严格对齐的字体,适合用来写代码, 以及 org mode 里中英文混合的表格对齐等。SC 涵盖了英文字体集, 所以中英文需要统一使用 SC 字体(Sarasa 或 Noto CJK SC) , 只有这样 cnfonts 才能真正解决表格对齐的问题。
中英文混排的问题:
- 在用 org-mode 显示表格时,如果字体不等宽,会导致表格不能对齐;
- 为了保证中英字体高度一致,需要使用缩放,但是只是对当前字号进行缩放;
- 缩放 buffer 时,字号发生了变化,以前的缩放因子就不再合适了,所以对不同的字号需要定义不同的缩放因子。也就是不同英文字号,需要有对应的中文字号与之匹配。
但是设置了等宽后,又存在中文和英文字体高度不一致的问题。emacs 字体等宽和等高不可兼得: http://baohaojun.github.io/blog/2012/12/19/perfect-emacs-chinese-font.html
21.1 Emacs 字体与字符集 #
来源于: http://idiocy.org/emacs-fonts-and-fontsets.html
我一直对 Emacs 的字体系统不甚了解。虽然字符集明显是我很多问题的解决方案,但是我一直没法搞明白怎么用它。我打算在这篇文章里记下在Emacs里设置字体的方法。
- 设置默认字体
看起来在Emacs里设置默认字体有不少途径,我用的是这个:
(set-face-attribute 'default nil :font "Droid Sans Mono")
这会修改默认字体集,从而为所有窗体设置字体。
- 设置后备字体
但是如果你在不同设备上用同一种字体配置,或者你选择的字体没有包括所有必需的字形呢?Emacs 默认会搜索所有字体直到找到一个包括了需要字形的字体,但是这个过程充满偶然,并且可能很慢。Emacs允许你指定后备字体。给默认字体集设置后备字体可以这么写:
(set-fontset-font t nil "Courier New" nil 'append)
第一个参数用 t 意味更新默认字体集。创建其他字体集并使用它们是可能的,但是我从没成功过。所以我倾向于直接改默认字体集。第二个参数指定字形范围,我们之后会提到。最后一个参数, ’append ,告诉Emacs添加这个字体到字符体集的末尾,所以这个字体会在其他字体集里的字体都搜索过了以后才被搜索到。你也可以用 ’prepend ,这会把字体放在字体集的开头,但依然在默认字体的后面。
- 为指定字形设置字体
回到第二个参数,指定字形范围的那个。你可以指定单独的字形、字形区间、字符集或者语言。
假设你想让😊用某个字体。
(set-fontset-font t ?😊 "Segoe UI Emoji")
或者你也可以指定区间。
(set-fontset-font t '(?😊 . ?😎) "Segoe UI Emoji")
你不能设置 ASCII 字符,Emacs 不允许。
- 为不同字符和语言设置字体
假设你处理很多泰语,但是你的默认字体不支持泰语,或者你就是很喜欢另一个字体的泰语字符的样子。查看 script-representative-chars 和 list-charset-chars 看看你想要的语言在不在里面,在的话就用那个名字。你也可以在一个字符上用 describe-char ,然后看 charset 或 script 项。
(set-fontset-font t 'thai "Noto Sans Thai")
这个会给Emacs极大的加速,因为Emacs不再需要跑遍几百个字体了。
如果你需要给泰语设置一个后备字体,只需要像之前一样。
(set-fontset-font t 'thai "Leelawadee UI" nil 'append)
这个的缺点是,如果你在没有你指定的字体的机器上用同样的配置,Emacs不会像之前一样搜索可用的字体,Emacs会直接给你一堆方块。不过不要担心,我们可以通过font-spec强迫Emacs搜索。
(set-fontset-font t 'thai (font-spec :script 'thai) nil 'append)
你可以把随便什么放在 font-spec 的调用里,然后Emacs就会搜索字体,找出合适的。你也完全可以用 font-spec 指定一个字体。
所以现在我们完整的泰语配置看起来像这样:
(set-fontset-font t 'thai "Noto Sans Thai")
(set-fontset-font t 'thai "Leelawadee UI" nil 'append)
(set-fontset-font t 'thai (font-spec :script 'thai) nil 'append)
注意你只能在某各字符区间已经有了字体配置的时候后附(append)或前置(prepend)字体,这也符合常理。一开始我以为我是往一个大的字体列表后面添加我的后备字体,而不是往一系列字体列表中的一个后面添加字体。这导致我无法理解为啥配置没有效果。
- 如何检查一个字体是否已经安装
与其依赖后备字体,你可以在使用一个字体之前检查这个字体是否已经安装。过程简单直接,因为所有已安装的字体都在 font-family-list 2 里,你可以直接查看列表:
(member "Noto Sans" (font-family-list))
6 附录
我为一些语言写了后备到Noto字体的基本配置,试图提高 Emacs 的 Hello file( C-h h )的速度。因为这些字体本身没有后备字体,如果我在没有这些字体的机器上用这个配置,那么我只会看见一地方块。但是这个估计能给你的配置一个起点。
(set-face-attribute 'default nil :font "Droid Sans Mono")
;; Latin
(set-fontset-font t 'latin "Noto Sans")

;; East Asia: 你好, 早晨, こんにちは, 안녕하세요
;;
;; Make sure you use the right font. See
;; https://www.google.com/get/noto/help/cjk/.
;;
;; This font requires "Regular". Other Noto fonts dont.
;; ¯\_(ツ)_/¯
(set-fontset-font t 'han "Noto Sans CJK SC Regular")
(set-fontset-font t 'kana "Noto Sans CJK JP Regular")
(set-fontset-font t 'hangul "Noto Sans CJK KR Regular")
(set-fontset-font t 'cjk-misc "Noto Sans CJK KR Regular")

;; South East Asia: ជំរាបសួរ, ສະບາຍດີ, မင်္ဂလာပါ, สวัสดีครับ
(set-fontset-font t 'khmer "Noto Sans Khmer")
(set-fontset-font t 'lao "Noto Sans Lao")
(set-fontset-font t 'burmese "Noto Sans Myanmar")
(set-fontset-font t 'thai "Noto Sans Thai")

;; Africa: ሠላም
(set-fontset-font t 'ethiopic "Noto Sans Ethiopic")

;; Middle/Near East: שלום, السّلام عليكم
(set-fontset-font t 'hebrew "Noto Sans Hebrew")
(set-fontset-font t 'arabic "Noto Sans Arabic")

;;  South Asia: નમસ્તે, नमस्ते, ನಮಸ್ಕಾರ, നമസ്കാരം, ଶୁଣିବେ,
;;              ආයුබෝවන්, வணக்கம், నమస్కారం, བཀྲ་ཤིས་བདེ་ལེགས༎
(set-fontset-font t 'gujarati "Noto Sans Gujarati")
(set-fontset-font t 'devanagari "Noto Sans Devanagari")
(set-fontset-font t 'kannada "Noto Sans Kannada")
(set-fontset-font t 'malayalam "Noto Sans Malayalam")
(set-fontset-font t 'oriya "Noto Sans Oriya")
(set-fontset-font t 'sinhala "Noto Sans Sinhala")
(set-fontset-font t 'tamil "Noto Sans Tamil")
(set-fontset-font t 'telugu "Noto Sans Telugu")
(set-fontset-font t 'tibetan "Noto Sans Tibetan")
Footnotes: 1 Emacs默认的后备字体是 Symbola,所以最好安装上这个以免Emacs遍历所有字体 2 如需更多信息,查看 Xah Lee的字体配置页 3 更全的 noto font 配置: https://gist.github.com/alanthird/7152752d384325a83677f4a90e1e1a05
;; Provided by Sebastian Urban
;; More information at https://idiocy.org/emacs-fonts-and-fontsets.html
(set-fontset-font "fontset-default" 'adlam "Noto Sans Adlam")
(set-fontset-font "fontset-default" 'anatolian "Noto Sans Anatolian Hieroglyphs")
(set-fontset-font "fontset-default" 'arabic "Noto Sans Arabic")
(set-fontset-font "fontset-default" 'aramaic "Noto Sans Imperial Aramaic Regular")
(set-fontset-font "fontset-default" 'armenian "Noto Sans Armenian")
(set-fontset-font "fontset-default" 'avestan "Noto Sans Avestan")
(set-fontset-font "fontset-default" 'balinese "Noto Sans Balinese")
(set-fontset-font "fontset-default" 'bamum "Noto Sans Bamum")
(set-fontset-font "fontset-default" 'batak "Noto Sans Batak")
(set-fontset-font "fontset-default" 'bengali "Noto Sans Bengali")
(set-fontset-font "fontset-default" 'brahmi "Noto Sans Brahmi")
(set-fontset-font "fontset-default" 'buginese "Noto Sans Buginese")
(set-fontset-font "fontset-default" 'buhid "Noto Sans Buhid")
(set-fontset-font "fontset-default" 'burmese "Noto Sans Myanmar")
(set-fontset-font "fontset-default" 'canadian-aboriginal "Noto Sans Canadian Aboriginal")
(set-fontset-font "fontset-default" 'carian "Noto Sans Carian")
(set-fontset-font "fontset-default" 'chakma "Noto Sans Chakma")
(set-fontset-font "fontset-default" 'cham "Noto Sans Cham")
(set-fontset-font "fontset-default" 'cherokee "Noto Sans Cherokee")
(set-fontset-font "fontset-default" 'cjk-misc "Noto Sans CJK SC Regular")
(set-fontset-font "fontset-default" 'coptic "Noto Sans Coptic Regular")
(set-fontset-font "fontset-default" 'cuneiform "Noto Sans Cuneiform")
(set-fontset-font "fontset-default" 'cypriot-syllabary "Noto Sans Cypriot")
(set-fontset-font "fontset-default" 'deseret "Noto Sans Deseret")
(set-fontset-font "fontset-default" 'devanagari "Noto Sans Devanagari")
(set-fontset-font "fontset-default" 'egyptian "Noto Sans Egyptian Hieroglyphs Regular")
(set-fontset-font "fontset-default" 'ethiopic "Noto Sans Ethiopic")
(set-fontset-font "fontset-default" 'georgian "Noto Sans Georgian")
(set-fontset-font "fontset-default" 'glagolitic "Noto Sans Glagolitic")
(set-fontset-font "fontset-default" 'gothic "Noto Sans Gothic")
(set-fontset-font "fontset-default" 'gujarati "Noto Sans Gujarati")
(set-fontset-font "fontset-default" 'gurmukhi "Noto Sans Gurmukhi")
(set-fontset-font "fontset-default" 'han "Noto Sans CJK SC Regular")
(set-fontset-font "fontset-default" 'han "Noto Sans CJK TC Regular" nil 'append)
(set-fontset-font "fontset-default" 'hangul "Noto Sans CJK KR Regular")
(set-fontset-font "fontset-default" 'hanunoo "Noto Sans Hanunoo")
(set-fontset-font "fontset-default" 'hebrew "Noto Sans Hebrew")
(set-fontset-font "fontset-default" 'inscriptional-pahlavi "Noto Sans Inscriptional Pahlavi")
(set-fontset-font "fontset-default" 'inscriptional-parthian "Noto Sans Inscriptional Parthian")
(set-fontset-font "fontset-default" 'javanese "Noto Sans Javanese")
(set-fontset-font "fontset-default" 'kaithi "Noto Sans Kaithi")
(set-fontset-font "fontset-default" 'kana "Noto Sans CJK JP Regular")
(set-fontset-font "fontset-default" 'kannada "Noto Sans Kannada")
(set-fontset-font "fontset-default" 'kayah-li "Noto Sans Kayah Li")
(set-fontset-font "fontset-default" 'kharoshthi "Noto Sans Kharoshthi")
(set-fontset-font "fontset-default" 'khmer "Noto Sans Khmer")
(set-fontset-font "fontset-default" 'lao "Noto Sans Lao")
(set-fontset-font "fontset-default" 'lepcha "Noto Sans Lepcha")
(set-fontset-font "fontset-default" 'limbu "Noto Sans Limbu")
(set-fontset-font "fontset-default" 'linear-b "Noto Sans Linear B")
(set-fontset-font "fontset-default" 'lisu "Noto Sans Lisu")
(set-fontset-font "fontset-default" 'lycian "Noto Sans Lycian")
(set-fontset-font "fontset-default" 'lydian "Noto Sans Lydian")
(set-fontset-font "fontset-default" 'malayalam "Noto Sans Malayalam")
(set-fontset-font "fontset-default" 'mandaic "Noto Sans Mandaic")
(set-fontset-font "fontset-default" 'meetei-mayek "Noto Sans Meetei Mayek")
(set-fontset-font "fontset-default" 'mongolian "Noto Sans Mongolian")
(set-fontset-font "fontset-default" 'tai-lue "Noto Sans New Tai Lue Regular")
(set-fontset-font "fontset-default" 'nko "Noto Sans NKo Regular")
(set-fontset-font "fontset-default" 'ogham "Noto Sans Ogham")
(set-fontset-font "fontset-default" 'ol-chiki "Noto Sans Ol Chiki")
(set-fontset-font "fontset-default" 'old-italic "Noto Sans Old Italic Regular")
(set-fontset-font "fontset-default" 'old-persian "Noto Sans Old Persian Regular")
(set-fontset-font "fontset-default" 'old-south-arabian "Noto Sans Old South Arabian Regular")
(set-fontset-font "fontset-default" 'old-turkic "Noto Sans Old Turkic")
(set-fontset-font "fontset-default" 'oriya "Noto Sans Oriya")
(set-fontset-font "fontset-default" 'osage "Noto Sans Osage")
(set-fontset-font "fontset-default" 'osmanya "Noto Sans Osmanya")
(set-fontset-font "fontset-default" 'phags-pa "Noto Sans Phags Pa")
(set-fontset-font "fontset-default" 'phoenician "Noto Sans Phoenician")
(set-fontset-font "fontset-default" 'rejang "Noto Sans Rejang")
(set-fontset-font "fontset-default" 'runic "Noto Sans Runic")
(set-fontset-font "fontset-default" 'samaritan "Noto Sans Samaritan")
(set-fontset-font "fontset-default" 'saurashtra "Noto Sans Saurashtra")
(set-fontset-font "fontset-default" 'shavian "Noto Sans Shavian")
(set-fontset-font "fontset-default" 'sinhala "Noto Sans Sinhala")
(set-fontset-font "fontset-default" 'sinhala-archaic-number "Noto Sans Sinhala")
(set-fontset-font "fontset-default" 'sundanese "Noto Sans Sundanese")
(set-fontset-font "fontset-default" 'syloti-nagri "Noto Sans Syloti Nagri")
;;(set-fontset-font "fontset-default" 'syriac "Noto Sans Syriac Eastern")
(set-fontset-font "fontset-default" 'syriac "Noto Sans Syriac Estrangela")
;;(set-fontset-font "fontset-default" 'syriac "Noto Sans Syriac Western")
(set-fontset-font "fontset-default" 'tagalog "Noto Sans Tagalog")
(set-fontset-font "fontset-default" 'tagbanwa "Noto Sans Tagbanwa")
(set-fontset-font "fontset-default" 'tai-le "Noto Sans Tai Le")
(set-fontset-font "fontset-default" 'tai-tham "Noto Sans Tai Tham")
(set-fontset-font "fontset-default" 'tai-viet "Noto Sans Tai Viet")
(set-fontset-font "fontset-default" 'tamil "Noto Sans Tamil")
(set-fontset-font "fontset-default" 'telugu "Noto Sans Telugu")
(set-fontset-font "fontset-default" 'thaana "Noto Sans Thaana")
(set-fontset-font "fontset-default" 'thai "Noto Sans Thai")
(set-fontset-font "fontset-default" 'tibetan "Noto Sans Tibetan")
(set-fontset-font "fontset-default" 'tifinagh "Noto Sans Tifinagh")
(set-fontset-font "fontset-default" 'ugaritic "Noto Sans Ugaritic")
(set-fontset-font "fontset-default" 'vai "Noto Sans Vai")
(set-fontset-font "fontset-default" 'yi "Noto Sans Yi")

(set-fontset-font "fontset-default" 'symbol "Noto Color Emoji")
(set-fontset-font "fontset-default" 'symbol "Symbola" nil 'append)
22 dired #
dired-async-do-copy 支持 TRAMP,可以异步快速将本地或远程 dired 中选择的文件拷贝到本地或远程。
打开 dired:
- C-x d: dired
- C-u C-x d:指定 dired 的显示方式,即传递给 ls 的参数,如 -lR。
- C-x 4 d: dired-other-window
- C-x 5 d: dired-other-frame
- C-x C-j: dired-jump, 跳转到到当前文件的 dired.
- C-x 4 C-j:
- C-x 5 C-j:
显示目录下的文件列表:
- C-x C-d dir-or-pattern RET:list directory;
- C-u C-x C-d dir-or-pattern RET:list directory verbosly;可以指定 wild char pattern。
复制文件路径:
- w: 复制当前文件路径;
- 0w: 复制当前文件绝对路径
查看文件:
| f、e、v | 在当前 dired buffer 中打开文件 |
|---|---|
| o | 其它窗口查看文件 |
| C-o | 其它窗口查看文件,光标位于 dired 中 |
| j (dired-goto-file) | 跳转到指定文件或目录 |
% 开头的都是和正则表达式相关的命令(类比 C-M-% 的 Query Replace Regexp):
| %m | 根据文件名称正则标记 |
|---|---|
| m | 标记当前行文件 |
| %g | 根据文件内容标记(不递归) |
| %C | 根据正则标记要拷贝的文件 |
| %R、%r | 根据正则要移动的文件 |
| %d | 根据正则匹配要删除的文件文件名 |
| %& | 删除标记垃圾文件 |
| %u | 文件名大写 |
| %l | 文件名小写 |
| % R from RET to RET | 支持正则分组和 \n 形式的引用 |
| % C from RET to RET | |
| % H from RET to RET | |
| % S from RET to RET |
- \& 匹配原正则匹配的整个内容,\N 匹配第 N 个分组的内容。
* 开头的都是按照类型标记文件:
| ** | 标记可执行文件 |
|---|---|
| *@ | 标记链接文件 |
| */ | 标记目录文件 |
| *s | 标记当前子目录中的所有文件 |
| * C-n、* C-p | 移动到下一个标记或上一个标记文件 |
| *% regexp、%m regexp | 按正则标记文件名 |
标记时可以将文件或目录隐藏,这样他们就不会被标记:
| k | dired-do-kill-lines | 隐藏当前标记的文件 |
|---|---|---|
| C-u k | 隐藏当前 subdir | |
| ‘$’ | dired-hide-subdir | 显示或隐藏当前子目录 |
| M-$ | dired-hide-all | 显示或隐藏所有目录 |
目录和子目录:
| i | dired-maybe-insert-subdir | 在当前 buffer 插入子目录 |
|---|---|---|
| a | dired-find-alternate-file | 先 kill Dired buffer, 然后访问当前文件或目录(不建议使用) |
| C-u i | 插入子目录时指定子目录的文件展示方式(ls 的参数) | |
| s | dired-sort-toggle-or-edit | 修改文件的展示和排序方式 |
| C-u s | 按照文件名或修改时间排序 | |
| M-{、M-} | dired-prev-marked-file | 在标记的文件间移动 |
| < 、> | 在目录间移动 | |
| C-M-n | 下一个子目录 | |
| C-M-p | 上一个子目录 | |
| C-M-u | 上一级子目录 | |
| C-M-d | 当前目录的第一个子目录 | |
| ‘^’ | dired-up-directory | 移动到上一级目录 |
i 会设置 mark, 所以可以使用 C-u C-SPC 跳转到上次的位置。
搜索和替换:
| A | 在标记的文件或目录(递归)搜索文件内容 |
|---|---|
| Q | 在标记的文件或目录(递归)查询替换文件内容 |
递归查询的内容在 xref Buffer 中显示,可以执行如下命令:
- n、p:移动
- g: 刷新
- q: 关闭
- C-o: 其它窗口显示
- r pattern RET replacement RET: Perform interactive query-replace on references that match pattern (xref-query-replace-in-results), replacing the match with replacement.
在标记的或当前文件上执行 shell 命令:
| X、! | 同步执行命令 | |
|---|---|---|
| & | 异步执行命令 |
如果标记了多个文件,则:
- 如果命令行中包括 *,而且前后都有空格,则将空格分隔的标记文件列表替换命令行中的 *;
- 如果想使用没有特殊含义的 *,可以在 * 后面添加”",这样就打破了上面的前后都有空格的约束;
- 如果命令行中包括 ? 且前后都有空格,则一次传给命令一个文件,用文件名替换命令行中的 ?;
- 否则一次传给命令一个文件,且将文件名添加到命令行尾部;
其它:
| ~ | 删除标记备份文件 | |
|---|---|---|
| # | 删除标记备份文件 | |
| d | 删除文件 | |
| l、g | 刷新 buffer | |
| t | 当前 buffer 标记和未标记切换 | |
| + | 创建目录 | |
| w | 拷贝文件名称, 0w 表示拷贝文件完整路径,C-uw 表示相对路径 | |
| = | 比较光标文字文件和输入的另一个文件 | |
| u | 不标记文件 | |
| U | 不标记所有文件 | |
| C new | 拷贝文件 | |
| D | 立即删除文件 | |
| R new | 重命名文件 | |
| H new | 建立硬链接 | |
| S new | 建立软链接 | |
| M modespec | ||
| G newgroup | ||
| O newowner | ||
| T timestamp | ||
| C-u k | 从 Buffer 中删除当前目录中当前行及后续行文件 |
递归搜索目录文件,然后通过 dired 形式展示:
- M-x find-grep-dired
- 按照文件内容查找,然后显示在 dired buffer 中;
- M-x find-name-dired
- 按照文件名查找,然后显示在 dired buffer 中;
- M-x find-dired
- 最通用的形式,可以指定 find 的参数,来实现按照文件名或内容来查找;
Wdired(Writeable dired):在 Dired Buffer 中按 C-x C-q,然后可以对文件名进行编辑,移动(但是类型、用户、大小和时间等是只读的)。结束后 C-c C-c 保存,C-c C-k 丢弃修改。
-
M-x grep
-
M-x grep-find
-
M-! find
-
M-x ffap
-
M-x make-directory
-
M-x delete-directory
-
M-x copy-directory:递归拷贝
-
M-x delete-file
-
M-x move-file-to-trash
-
M-x copy-file
-
M-x rename-file
-
M-x make-symbolic-link
-
M-x set-file-modes
-
M-x write-region
-
M-x append-to-file
-
M-x make-symbolic-link
23 tab-bar #
tar-bar 的快捷键是 C-x t 开头的前缀:
- t (other-tab-prefix)
- 在下一个新的 tab 中显示下一个 command 的 buffer;
C-r (find-file-read-only-other-tab) :
C-f (find-file-other-tab) :
f (find-file-other-tab) :
b (switch-to-buffer-other-tab) :
- r (tab-rename)
- 重命名当前 tab 的名称,然后一直不会变。
- d (dired-other-tab)
- 在新的 tab 中显示 dired 内容。
自定义的 tab 快捷键:
- s-[ / s-]
- 下一个或上一个 tab;
- s-0
- 关闭当前 tab;
- s- 1-9
- 在 tab 1-9 之间快速切换;
在当前 frame window 的配置历史中跳转, 既可以还原当前窗口的历史布局又可以还原光标的位置:
- (global-set-key (kbd “C-s-j”) ’tab-bar-history-back)
- (global-set-key (kbd “C-s-k”) ’tab-bar-history-forward)
24 vertico #
vertico 基于默认完成提供一个高性能且简约的垂直完成 UI 系统。vertico 经过复用内置设施系统,vertico 实现了与内置Emacs 补全的完全兼容命令和完成表。vertico 仅提供完成 UI,但旨在高度灵活,可扩展和模块化。
- 如果要插入不存在的对象,例如新建一个 file 或 buffer, 可以使用
M-RET快捷键(vertico-exit-input); - beginning-of-buffer, minibuffer-beginning-of-buffer -> vertico-first
- end-of-buffer -> vertico-last
- scroll-down-command -> vertico-scroll-down
- scroll-up-command -> vertico-scroll-up
- next-line, next-line-or-history-element -> vertico-next
- previous-line, previous-line-or-history-element -> vertico-previous
- forward-paragraph -> vertico-next-group
- 也即可以使用 M-} 来选择候选者列表中的下一个分组,例如不同的 file 或 project。
- backward-paragraph -> vertico-previous-group
- exit-minibuffer -> vertico-exit
- kill-ring-save -> vertico-save
- M-RET -> vertico-exit-input
- TAB -> vertico-insert
25 consult #
M-s 绑定 (search-map)使用 # 分割的两段式匹配, 第一段为正则表达式, 例如: #regexps#filter-string, 输入的必须时Emacs 正则表达式, consult 再转换为对应 grep/ripgrep 正则表达式。多个正则表达式使用空格分割,必须都需要匹配。如果要批评空格,则需要使用转移字符。filter-string 是对正则批评的内容进行过滤,支持 orderless 风格的匹配字符串列表。例如: #\(consult\|embark\): Search for “consult” or “embark” using grep. Note the usage of Emacs-style regular expressions.
buffer 操作: consult-buffer (-other-window, -other-frame): Enhanced version of switch-to-buffer
with support for virtual buffers. Supports live preview of buffers and narrowing to the virtual
buffer types. You can type f SPC in order to narrow to recent files. Ephemeral buffers can be shown
by pressing SPC - it works the same way as switch-buffer. Supported narrowing keys:
- b Buffers (consult-buffer)
- SPC Hidden buffers
- * Modified buffers
- f Files (Requires recentf-mode, consult-recent-file)
- r File registers
- m Bookmarks (C-x r b, consult-bookmark)
- p Project (C-x p b, consult-project-buffer): 显示 project 相关的 buffers 和 files。
编辑相关操作:
- (“M-y” . consult-yank-from-kill-ring): 从 kill-ring 中选择要 yank 的内容;
- (“M-Y” . consult-yank-pop): 从 kill-ring 选择内容替换紧接着的上一次 yank 的结果,如果上一次不是 yank 操作,则从 kill-ring 中选择要 yank 的内容;
寄存器相关操作:方便临时保存各种内容 region/point/file/window/frame
- (“M-’” . consult-register-store):
- 保存 point/file/window/frame 类型的寄存器;
- 如果选中了 region, 可以将 region 内容保存 copy/append/prefix 到指定寄存器;
- (“C-M-’” . consult-register): 加载和选择寄存器;
imenu 相关操作:
- (“M-g i” . consult-imenu): 显示当前 buffer 的 imenu 条目;
- (“M-g I” . consult-imenu-multi): 显示当前 project 的各 buffer 的 imenu 条目;
Mark 相关操作:方便快速跳转到历史位置
- (“M-g m” . consult-mark): 跳转到当前 buffer mark ring
- (“M-g k” . consult-global-mark): 调转到全局 mark ring
line 相关操作:
- (“M-g g” . consult-goto-line): 相比 emacs 原生 emacs goto-line 的主要优势是支持预览;
- (“M-g M-g” . consult-goto-line)
- (“M-s l” . consult-line): 预览匹配的行;
- (“M-s L” . consult-line-multi): 预览 project 的 buffer, 加了 Prefix 后预览所有 buffer;
- (“M-s o” . consult-multi-occur): 替换 multi-occur, 支持选择多个 buffer 的过滤;
- (“M-s k” . consult-keep-lines): filter buffer, buffer 被修改为过滤后的内容;
- (“M-s f” . consult-focus-lines): 临时隐藏不匹配过滤条件的行,再次使用 C-u M-s f 显示隐藏的行;
Grep 和 Find: 支持异步搜索和实时过滤
- consult-grep, consult-ripgrep, consult-git-grep: 根据正则表达式搜索文件内容;
- consult-find, consult-locate: 根据正则表达式搜索文件名称;
- 默认在当前 project 搜索,加 C-u 前缀,可以指定搜索目录。
两级搜索模式,用 # 来标识开始和结束,例如 #regexp1 regexp2#consult:
- 第一级:支持 – 来分割搜索正则表达式和传递给 grep/riggrep/find 的参数,例如:#defun – –invert-match#;
- 第二级:使用空格分割的 orderless 补全过滤风格,这部分补全字符串不传递给 grep/ripgrep/find, 纯粹是 orderless buffer 过滤;
- 第一级用空格分隔多个 regexp, 它们之间是 AND 关系,空格本身可以用 \ 转义, 正则表达式使用 Emacs regexp 语法,consult 自动转换为 grep/ripgrep/find 的正则语法;
M-s e (consult-isearch): consult 列出 search history,可以选择一个搜索。在isearch 过程中可以使用 M-e、 M-s e 切换到 consult-isearch 来选择搜索历史;在使用 minibuffer 时,M-r、M-s 用于对 minibuffer history 进行搜索,consult 提供了实时预览功能。
Compilation:
- M-g f:显示 flycheck 错误;
- M-g e:显示 Compilation 错误;
("C-c m" . consult-mode-command) : 显示 mode 相关的命令。
26 embark #
embark 用于 minibuffer 或当前 buffer 选中的内容提供一个快捷操作命令(一般是单字符命令)embark-act(快捷键 C-;):
- In the minibuffer, the target is the current best completion candidate.
- In the Completions buffer the target is the completion at point.
- In a regular buffer, the target is the region if active, or else the file, symbol or URL at point.
Embark Collect:在通用的 Embark collect buffer 中对一批候选对象、搜索结果列表等进行操作。
- embark-collect-snapshot(S):在 Embark Collect Buffer 中显示候选情况,不更新 Buffer 内容;
- embark-collect-live(L):根据候选情况,实时更新 Embark Collect Live Buffer 中的内容;
Embark Collect Buffer 类似于 dired, you can mark and unmark candidates with m and u, you can unmark all marked
candidates with U or toggle the marks with t. In an Embark Collect buffer embark-act-all is bound to A and
will act on all currently marked candidates if there any, and will act on all candidates if none are marked.
- 使用方式:先使用 Embark Collect 来收集候选者,使用 mark 标记多个候选者,然后使用 A 来对候选者执行操作。
Embark Export(E):根据当前候选者的不同(可以使用 b/f/m SPC 来缩小类型范围),将结果显示在不同的 Buffer 中:
- Dired: 如果候选者是文件,则将结果显示到 Dired Buffer 中;
- Embark Export Ibuffer: 如果候选者是 Buffer;
- Embark Export Grep: 对 consult-grep、consult-git-grep、consult-ripgrep 等搜索结果进行 export 时,进入 Embark
Export Grep 模,可以使用
C-c C-p切换到wgrep模式,然后对结果进行批量编辑; - Embark Export Occur: consult-line 的结果会被 export 到 occur-mode
关于 Collect 和 Export 的使用选择,优选 Export, 因为他能根据候选者的类型 export 到合适的 buffer 类型中。
在显示 Act 的时候,除了按列出的快捷键外,还可以:
- C-;
- 切换 Act 类型;
- C-h
- 使用 Minibuffer 候选菜单来选择 Action;
Embark’s default configuration has actions for the following target types: files, buffers, symbols, packages, URLs, bookmarks, and as a somewhat special case, actions for when the region is active. You can read about the
default actions and their keybindings on the GitHub project wiki.
- 可以将光标放置到 URL 位置,然后执行 C-; 在弹出的快捷键列表中按 b, 则会打开 URL 。
- embark-insert: 将当前候选内容(如文件名、Buffer 名称等)插入到光标处。
- embark-copy-as-kill: 将当前候选内容保存到剪切环,后续可以用于粘贴;
- embark-become(B):将当前执行的命令替换为另一个(输入内容不变)。如当前正在执行switch-to-buffer 命令,但是想切换到 find-file,则可以使用该命令。在执行 B action后,可以直接输入其它命令,或者使用 embark-become 提供的快捷键;
各种缺省的 Actions: https://github.com/oantolin/embark/wiki/Default-Actions
27 dash #
dash: 生成自定义 docset
- clone https://github.com/wuudjac/godocdash 代码库,然后将其中的 runGoDoc() 去掉;
- 先手动前一个 godoc http 服务器: godoc -http=:6061
- 在项目源码目录中执行 godocdash -name XXX 命令来生成目录名为 XXX 的 docset;
- 然后再 dash Docsets 中导入自定义 docset:
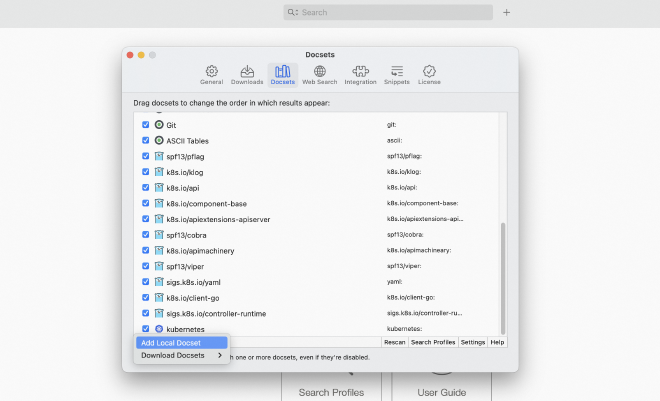
dash 设置 search profile, 实现根据关键字聚合搜索一组 docsets:
- 点击 dash 的搜索栏左侧, 然后创建一个 k8s profile;
- 指定激活关键字 k8s:, 后续在搜索关键字中输入后会自动只查找该 profile 的 docsets 列表;
- 在 docsets 列表中添加 K8S 相关的 docset;
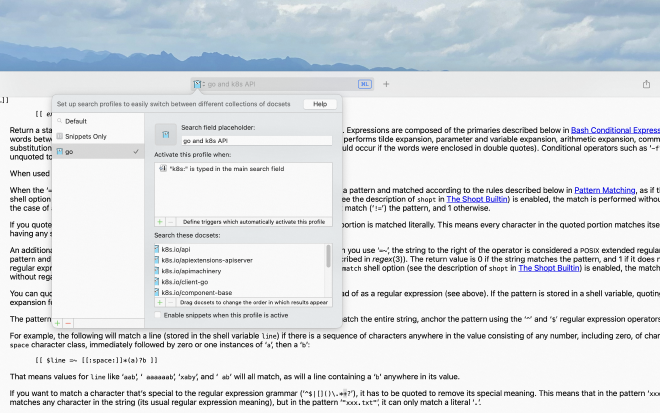
在 dash settins 窗口的 Docsets 中,也可以为各个 docset 指定 keyword, 后续可以在搜索窗口中使用 keyword: 来搜索指定的 docset.
- 相比 search profile, 这种方式一次只能搜索一个 docset;
- 可以和 search profile keyword 相同, dash 会同时搜索。
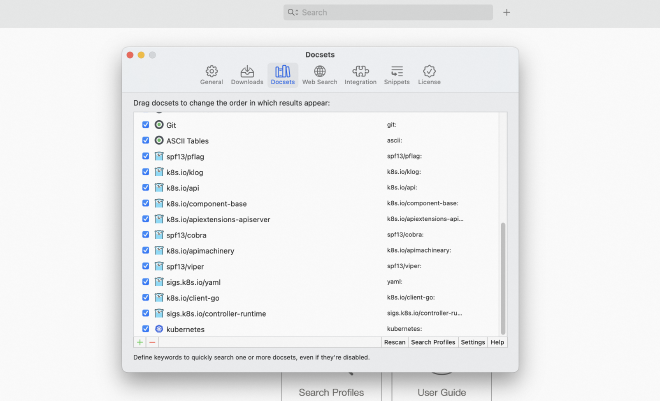
dash user guide: https://kapeli.com/dash_guide#docsetKeywords
使用 dash 查看 API 文档:
- M-x dash-at-point:指定 search profile keyword 或 docset keyword (格式 xx:), 然后 fuzzy 模糊搜索。
- 或者在 raycast store 中安装 dash 插件,然后就可以在 raycast 中来搜索了。
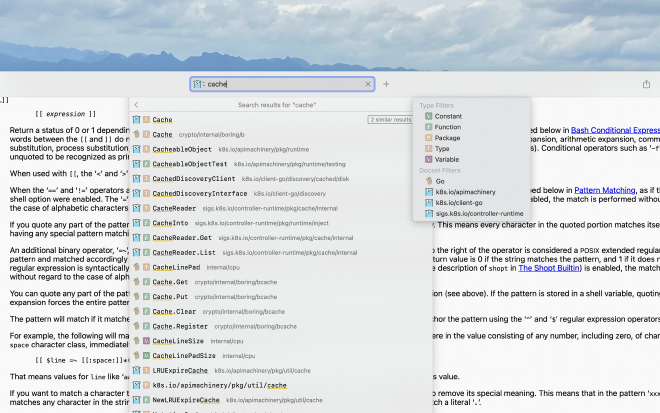
28 citre #
Etags: GNU Emacs comes with two ctags utilities, etags and ctags, which are compiled from the same
source code. Etags generates a tag table file for Emacs, while the ctags command is used to create a
similar table in a format understood by vi. They have different sets of command line options: etags
does not recognize and ignores options which only make sense for vi style tag files produced by the
ctags command.
- etags 和 ctags 都是来自于同一个项目的源码,但是 etags 为 emacs 生产 tag table,而 ctags 为 vi 生成 tag table。
- etags 生成的文件名称为
TAGS, ctags 命令生成的文件名称为tags,GNU global 的 gtags 命令生成的文件名称为GTAGS;
Exuberant Ctags: written and maintained by Darren Hiebert until 2009, was initially distributed with Vim, but
became a separate project upon the release of Vim 6. It includes support for Emacs and etags
compatibility. Exuberant Ctags includes support for over 40 programming languages with the ability to add
support for even more using regular expressions.
- 最开始随 vim 发布,后续支持 emacs 的 etags。
Universal Ctags: is a fork of Exuberant Ctags, with the objective of continuing its development. A few parsers
are rewritten to better support the languages.
- Universal Ctags 是 Exuberant Ctags 的 fork 版本。
GNU Global 内置了 5 种语言解析器,包括 C/Yacc/JAVA/assembly, 其他 25 种语言使用 Pygments + Universal Ctags 解析器插件来支持的。
citre 是基于 TAGS 文件的代码浏览工具,支持 集成使用 GNU global TAGS 文件,创建和更新 global GTAGS 文件(~/.cache/gtags/):
- M-x citre-global-create-database
- M-x citre-global-update-database
$ ls -l ~/.cache/gtags/Users/zhangjun/go/src/github.com/kubernetes/kubernetes/
total 122M
-rw-r--r-- 1 zhangjun 7.9M  6  8 10:50 GPATH
-rw-r--r-- 1 zhangjun  89M  6  8 10:50 GRTAGS  # reference tags
-rw-r--r-- 1 zhangjun  26M  6  8 10:50 GTAGS   # tags
$
注意以下两个命令创建的 ctags 文件,而非 global tag 文件,不支持 references,不建议使用:
- M-x citre-create-tags-file
- M-x citre-update-tags-file
如果误使用了上面的命令创建 ctags 文件(项目有 .tags/ 目录或 .tags 或 tags 文件),则后续使用 xref-find-references 会 hang,需要删除。
使用 citre:
- M-x citre-jump-to-reference, which reuses the citre-jump UI;
- M-x citre-peek-references, equivalent to citre-peek;
- M-x citre-ace-peek-references, equivalent to citre-ace-peek;
- M-x citre-peek-through-references, equivalent to citre-peek-through.
- M-x citre-ace-peek 使用 ace 来 peek 查看指定的符号定义或函数签名。
- M-x citre-peek 查看当前光标处符号的定义或函数签名。
执行 s-? (citre-peek-reference) 支持如下快捷键:
- M-n, M-p: Next/prev line.
- M-N, M-P: Next/prev definition.
- M-l j: Jump to the definition. (跳转到当前预览的位置定义,同时 peek window 继续显示)
- M-l p:M-x citre-peek-through, 在 peek window 中选择一个 symbol,然后跳转到定义。
- C-g: Close the peek window.
通过 peek through 打开多个多个 function definition 后,citre 会在 peek window 下方记录 peek history,可以使用 <left>/<right> 来移动 history,当前的位置用 [func] 方括号来表示。
可以使用 C-l 来调整 peek window 的位置。
对于开启了 citre-mode 的 buffer,citre 会向 xref-backend-functions 中添加 citre-xref-backend, 所以后续使用 imenu/xref-find-references/xref-find-definitions 时会使用 citre 提供的输入。同时 xref 和 consult 结合, 可以使用consult 来预览 xref 的结果:
;; 使用 consult 来预览 xref 的引用定义和跳转。
(setq xref-show-xrefs-function #'consult-xref)
(setq xref-show-definitions-function #'consult-xref)
综合的效果:执行 xref-find-references/xref-find-definitions 时会使用 consult 来预览 citre 提供的候选者。
在 citre-jump(M-.) 的弹出时 buffer 中可以使用正则语法对候选者进行过滤, 例如:
something kind:^member$ kind:^macro$ input:.c$
28.1 citre 和 lsp-bridge 协作 #
由于 lsp-bridge mode map 将 M-./M-,/M-? 等 xref 相关命令绑定到自己的 lsp-bridge 相关函数,但是当 lsp-bridge 的补全、跳转等不可用时,需要使用 citre-mode 的 xref 集成特性的化,就需要使用 M-x xref-xxx 等命令。这时可以在project root 目录创建一个 .dir-locals.el 文件来为项目所有文件关闭 lsp-mode:
;;; Directory Local Variables
;;; For more information see (info "(emacs) Directory Variables")

;;; disable lsp-mode and enable ggtags-mode
((nil . ((eval . (lsp-bridge-mode -1)))
      ))
为了方便输入,可以在 ~/.emacs.d/snippets/prog-mode 下创建一个名为 disable-lsp-bridge 的 snippet,后续可以使用M-x consult-yasnippet 来快速在 .dir-locals.el 文件中插入 snippet 文件内容。
# -*- mode: snippet -*-
# name: disable-lsp-bridge
# key: dlspb
# --
;;; Directory Local Variables
;;; For more information see (info "(emacs) Directory Variables")

;;; .dir-locals.el
;;; disable lsp-mode and enable ggtags-mode
((nil . ((eval . (lsp-bridge-mode -1)))
      ))
通过上面的 .dir-locals.el 机制来在项目级别关闭 lsp-bridge 后,M-./M-,/M-? 恢复绑定到 consult-xref 来跳转和预览。
29 workflow #
安装 SwitchKey 来为 Mac 程序设置输入法, 如将 Emacs 设置系统输入法为英文: https://github.com/itsuhane/SwitchKey
- 为 switch-to-buffer 添加 after advice , 如果切换到的 buffer 是 vterm 类型, 则设置输入法为 nil, 即英文模式。
magit:
- clone 项目: M-x magit-clone 指定 URL 和本地保存路经(自动创建中间目录);
- 优先使用 C-c M-g 和 C-x M-g,其次是 C-x g, 前两个都是弹出一个小 buffer 来展示可执行的命令;
- checkout 分支:C-x M-g -> b -> l(local branch)
- 查看远程分支和 tag: C-x M-g -> y(reference), 移动到对应 remote branch 或 tag 上,按 b -> l 即可 checkout 出对应分支;
- 历史提交搜索: C-x M-g -> l -> -G 搜索提交的内容 -F 搜索提交的 Message 。
- 查看选择区域的历史提交记录: C-c M-g l: 通过 -Lstart,end 来实现的。
git 全局忽略文件:
- 编辑 ~/.gitconfig 文件, 添加全局忽略的文件列表:
.DS_Store .vscode Thumbs.db .idea - 执行命令: git config –global core.excludesfile ~/.gitignore
查看当前 buffer 能使用的快捷键:C-h b
consult 搜索:
- 项目中按照文件名搜索: M-s d (consult-find)
- 项目中按照文件内容搜索:M-s g 或 G 或 r (本地+TRAMP),默认 5 个字符开始,可以添加 # 后缀来触发立即搜索,如 #gr#;
- 如果加了 C-u 前缀,可以
指定搜索目录。
注意:
- 不建议使用 projectile 的 C-c pf 和 project 的 C-x p f, 因为它们都是先列出所有文件,然后再过滤。 consult-find 是异步搜索,不用先列出所有文件,性能更好。
- 建议系统安装 fd,这样速度最快。fd 和 rg 都提供了 gnu 和 musl 版本的二进制,其中 musl 是静态链接版本,优先使用。gnu 在 centos 上存在 glibc 版本问题。
- consult-find 不支持 preview, 可以通过 Embark Collect Buffer 来展示, 然后使用 o 或 C-o 来预览。
- orderless 支持在第二个 # 后使用复杂的搜索表达式(第一个 # 后只能用空格分割的关键字),如
#emacs# !screen org$ - 如果加 C-u 前缀,可以
指定搜索目录。
consult 搜索结果进行批量编辑:
- 需要安装 wgrep 和 embark-consult 包;
- consult-line -> embark-export to occur-mode buffer -> occur-edit-mode for editing of matches in buffer.
- consult-grep -> embark-export to grep-mode buffer -> wgrep for editing of all matches.
- embark-export(快捷键 E) 根据 buffer 类型自动输出到 occur-mode 或 grep-mode buffer 中。
- consult-line: occur-mode
- consult-grep/ripgrep: grep-mode
- 在 grep-mode 中可以使用 wgrep-mode 来批量编辑:
- C-x C-p (wgrep-change-to-wgrep-mode): 将 grep-mode 切换到 wgrep-mode;
- C-c C-c: wgrep-finish-edit: 结束批量编辑,并保存;
- C-c C-k: wgrep-abort-changes: 中止批量编辑;
- embark-collect-live 或 embark-collect-snapshot 只是 collet 当前 minibuffer 到新的 buffer 中,需要按 e 才能再次 export 到 embark-export;
查看文件结构(如 go 文件中的定义、声明等)
- M-g i (consult-imenu)
代码快速浏览/导航
- C-M-a C-M-e: 按照函数跳转
- C-M-d C-M-u: 深入或跳出到当前层次
- C-M-n C-M-p: 按照列表或括号前进,非常实用
- C-M-f C-M-b: 按照语法前进,粒度比 C-M-n/p 小
- M-g l:快速跳转到指定行
- C-’: 输入两个字符,快速跳转
dired:
- C-u s: 传入 ls 命令参数,调整文件显示样式;
- C-x C-j: dired-jump, 查看当前 buffer 文件所在的目录。
快速选中符号
- M-@:多按几次选择;
- C-M-SPC:选择光标处 sexp
快速 go 代码测试:
- M-x go-playground: 自动创建一个临时的 go 项目,可以被 lsp-bridge 代码补全支持;
- 编码结束后,使用 C-RET 或 M-RET 来运行测试,会在一个 “compilation” buffer 中显示编译结果:
- C-RET: 直接运行 go run*.go 命令;
- M-RET: 自定义 go 命令和参数;
*compilation* 编译结果 buffer 快捷键:
- M-n/M-p: 下一个或上一个编译错误;
- M-}/M-{: 下一个或上一个编译出错的文件;
- RET: 跳转到当前光标所在的出错的文件位置;
- C-o: 显示光标所在的出错的文件位置(但是不跳转到文件);
- C-c C-f: 是否开启 follow file;
- g: 重新编译;
- C-c C-k: 中止当前正在运行的 compilation 命令;
- q: 关闭 compilation window;
查看 API 文档:
- 打开 Dash, 然后输入 search profile keyword 或者 docset keyword 来限定查找范围;
- 如果是 go 项目, 则可以本地生成 docset 然后导入;
- 或者使用 godoc -http=:6061 来在项目目录起一个go doc server;
代码片段(yasnippet):
- C-c y(consult-yasnippet): 预览当前 buffer mode 的支持的 snippet 。
- 用 consult-yasnippet 过滤 snippet, 当输入完整的 yasnippet 快捷键后,按 TAB 触发 expand 。
- M-x yas-new-snippet:创建新的 snippet。
- 将 snippet 安装到 fundamental-mode 下,则可以在所有 major-mode 中使用。
- vterm buffer: 安装了 vterm-extra 包后,C-c C-e 可以创建一个命令行编辑 buffer, 在里面插入 snippet 后, C-c C-c 就可以粘贴到 vterm 中;
SSH 配置
- 多跳远程拷贝文件:
https://unix.stackexchange.com/a/327821(需要 openssh 7.3 以上版本才支持):
scp -i ~/.ssh/u20_id_rsa -oProxyJump=root@u20,[email protected]:50022 prep.log [email protected]:/tmp - 本地 ~/.ssh/config 需要配置关闭 host key checking, 否则可能目标 IP 重复而校验失败:
  Host *
    ControlMaster auto
    ControlPath ~/.ssh/master-%r@%h:%p
    ControlPersist 120m
    ServerAliveInterval 10
    ServerAliveCountMax 60
    TCPKeepAlive no
    StrictHostKeyChecking no
    UserKnownHostsFile=/dev/null
远程开发:
- 设置 TRAMP process-environment 如 (setenv “VTERM_TRAMP” “true”),这样可以在远程 shell 的 initrc 文件中做针对性的初始化配置,如设置 PS1、vterm、fzf 等相关初始化,参考: .emacs_bashrc。
- 如果设置 tramp-default-method 为 ssh,则不管文件打下都用 ssh 传输(先 base64 编码再传输),非常影响大文件参数效率。当为默认的 scp 时:
- 小于 tramp-inline-compress-start-size (* 1024 8) 的文件使用 base64 转码后传输;
- 大于 tramp-inline-compress-start-size (* 1024 8) 但是小于tramp-copy-size-limit ,先用 gzip 压缩,然后 base64 转发传输;
- 大于 tramp-copy-size-limit 的文件用 scp 传输(省去了 base64 和 gzip 的过程,非常快)
- scp 不支持 ssh ProxyJump;
- 当不涉及多 hop 来 Dired 远程机器时,使用
/scp:而非/ssh:来打开远程文件或目录,大大提高文件传输效率。 - 远程拷贝文件:
- 将 dired-dwim-target 设置为 t,这样并列打开两个 Dired buffer(本地和远程)时,dired 会自动将 target 设置为另一个 dired directory(而非默认的本地 dired)。
- 远程文件路径使用 /scp: 前缀(而非 /ssh:);
- 使用命令
M-x dired-async-do-copy(而非M-x copy-file),异步拷贝文件。
- projectile 在 TRAMP 模式下,有性能问题,可以通过如下 hook 关闭:
;; Disable projectile on remote buffers ;; https://www.murilopereira.com/a-rabbit-hole-full-of-lisp/ ;; https://github.com/syl20bnr/spacemacs/issues/11381#issuecomment-481239700 (defadvice projectile-project-root (around ignore-remote first activate) (unless (file-remote-p default-directory 'no-identification) ad-do-it)) - 取而代之的:
- 使用 find-file-in-project package 来进行远程目录文件名称的搜索。
- 使用 C-s r(consult-rg) 来按照文件内容搜索。
- 或者使用 deadgrep<f5> 来按照文件内容搜索:
- 如果搜索结果 Deadgrep Buffer 中文件内容太多,可以使用 M-g i (consult-imenu)来快速的在多个文件中跳转。
- 在 vterm buffer 中也可以使用 C-x C-f 命令来查找当前 shell 所在的目录,但是需要将 /-: 修改为 /ssh: 否则可能会提示 scp method 不支持 multi hop 的登录。
30 调试 #
查看系统配置(支持)的 feature: C-h v system-configuration-features
调试技巧:
- M-x apropos-library: 查看 elisp 文件中的函数
- M-x view-lossage:显示最近执行的按键和命令;(C-h l)
- M-x open-dribble-file: 将按键 Event 写入指定的文件;
- (recent-keys)
- M-x toggle-debug-on-error
- M-: (message xxx)
- M-x debug-on-entry XXX: 在调用 XXX 函数时自动 debug;
- M-x cancel-debug-on-entry XXX: 取消运行时调试
- M-x list-process: 查看进程列表;
- (benchmark-run 70000 (expand-file-name “foo.txt”))
测试 package 或 function:
- M-x elp-instrument-package: 测试某个 pacage
- M-x elp-instrument-function: 测试某个 function
- M-x elp-instrument-list: 测试 function list
- M-x elp-results: 查看结果
最小化调试环境:
- 写一个最小化测试 elisp 文件;
- 用 emacs -Q 启动 Emacs;
- 启动后,执行 M-x load-file 或者 M-x load-library 来加载上一步创建的最小 elisp 文件;
- 也可以一步完成:
emacs -Q --debug-init -l init.el
- 也可以一步完成:
可以在终端里启动 GUI Emacs,传入命令行参数:
$ /Applications/Emacs.app/Contents/MacOS/Emacs -Q --debug-init -l my-debug.el
- 命令行通过 -l 指定的文件是 在 after-init-hook 之后,emacs-startup-hook 之前执行的,所以文件中需要 emacs-startup-hook,否则 after-init-hook 因已经过了,绑定的 hook 不会执行。
手动加载 elisp 文件验证:
emacs -Q
M-: (add-to-list 'load-path "mypath")
M-x load-file vterm.el
M-x vterm
write something
<left>
And C-h k <left> shows:
或者通过 load-library 加载 package:
M-x package-initialize
M-x load-library XXX
;; init-emacs.el
;; emacs -Q -l init-emacs.el

(setq package-enable-at-startup nil)
(setq package-archives
      '(("melpa-cn" . "http://mirrors.tuna.tsinghua.edu.cn/elpa/melpa/")
        ("org-cn"   . "http://mirrors.tuna.tsinghua.edu.cn/elpa/org/")
        ("gnu-cn"   . "http://mirrors.tuna.tsinghua.edu.cn/elpa/gnu/")))

(package-initialize)

(require 'cl-lib)
(defvar my/packages '(use-package counsel quelpa-use-package))

(defun my/packages-installed-p ()
  (cl-loop for pkg in my/packages
        when (not (package-installed-p pkg)) do (cl-return nil)
        finally (cl-return t)))

(unless (my/packages-installed-p)
  (message "%s" "Refreshing package database...")
  (package-refresh-contents)
  (dolist (pkg my/packages)
    (when (not (package-installed-p pkg))
      (package-install pkg))))

(require 'use-package)
(require 'quelpa-use-package)

(use-package counsel
  :config
  (global-set-key (kbd "M-x") 'counsel-M-x)
  (global-set-key (kbd "C-x C-f") 'counsel-find-file)
  (global-set-key (kbd "C-h f") 'counsel-describe-function)
  (global-set-key (kbd "C-h v") 'counsel-describe-variable))
;; https://gist.github.com/redguardtoo/8a0c781c6796f9cd55cb724117f4f359
;; A minimum .emacs to test Emacs plugins
(show-paren-mode 1)
(eval-when-compile (require 'cl))

;; test elisps download from internet here
(setq test-elisp-dir "~/test-elisp/")
(unless (file-exists-p (expand-file-name test-elisp-dir))
    (make-directory (expand-file-name test-elisp-dir)))

(setq load-path
      (append
        (loop for dir in (directory-files test-elisp-dir)
              unless (string-match "^\\." dir)
              collecting (expand-file-name (concat test-elisp-dir dir)))
        load-path))

;; package repositories
(require 'package)
(add-to-list 'package-archives '("melpa" . "http://stable.melpa.org/packages/") t)
(package-initialize)

;; ==== put your code below this line!
;;
https://github.com/emacs-lsp/lsp-mode/blob/master/scripts/lsp-start-plain.el
;;; lsp-start-plain.el --- LSP mode quick starter      -*- lexical-binding: t; -*-

;; Copyright (C) 2018 Ivan Yonchovski

;; Author: Zhu Zihao <[email protected]>
;; Keywords: languages

;; This program is free software; you can redistribute it and/or modify
;; it under the terms of the GNU General Public License as published by
;; the Free Software Foundation, either version 3 of the License, or
;; (at your option) any later version.

;; This program is distributed in the hope that it will be useful,
;; but WITHOUT ANY WARRANTY; without even the implied warranty of
;; MERCHANTABILITY or FITNESS FOR A PARTICULAR PURPOSE.  See the
;; GNU General Public License for more details.

;; You should have received a copy of the GNU General Public License
;; along with this program.  If not, see <https://www.gnu.org/licenses/>.

;;; Commentary:

;; This file is a helper to start a minimal lsp environment.
;; To use this, start your Emacs with "emacs -q" and load this file.

;; It will install `lsp-mode', `lsp-ui' with their dependencies to start a
;; minimal lsp environment.

;; And it forces Emacs to load `.el' files rather than `.elc' files
;; for more readable backtrace.

;;; Code:

(require 'package)

(setq debug-on-error t
      no-byte-compile t
      package-archives '(("melpa" . "https://melpa.org/packages/")
                         ("gnu" . "https://elpa.gnu.org/packages/"))
      package-user-dir (expand-file-name (make-temp-name "lsp-tmp-elpa")
                                         user-emacs-directory)
      custom-file (expand-file-name "custom.el" package-user-dir))

(let* ((pkg-list '(lsp-mode lsp-ui yasnippet lsp-java lsp-python-ms lsp-haskell helm-lsp lsp-treemacs dap-mode lsp-origami lsp-dart company flycheck lsp-pyright
                            ;; modes
                            rust-mode php-mode scala-mode dart-mode clojure-mode typescript-mode)))

  (package-initialize)
  (package-refresh-contents)

  (mapc (lambda (pkg)
          (unless (package-installed-p pkg)
            (package-install pkg))
          (require pkg))
        pkg-list)

  (yas-global-mode)
  (add-hook 'prog-mode-hook 'lsp)
  (add-hook 'kill-emacs-hook `(lambda ()
                                (delete-directory ,package-user-dir t))))

(provide 'lsp-start-plain)
;;; lsp-start-plain.el ends here
30.1 TRAMP 调试技巧 #
https://www.murilopereira.com/how-to-open-a-file-in-emacs/
打开一个 TRAMP buffer:
(setq remote-file-buffer
      (find-file-noselect
       (concat "/ssh:mpereira@remote-host:"
               "/home/mpereira/linux/kernel/time/jiffies.c")))
;; => #<buffer jiffies.c>
(shell-command-to-string "hostname")
;; => "macbook"

default-directory
;; => "/Users/mpereira/.emacs.d/

(ffip-project-root)
;; => "/Users/mpereira/.emacs.d/
(with-current-buffer remote-file-buffer
  (shell-command-to-string "hostname"))
;; => "remote-host"

(with-current-buffer remote-file-buffer
  default-directory)
;; => "/ssh:mpereira@remote-host:/home/mpereira/linux/kernel/time/"

(with-current-buffer remote-file-buffer
  (ffip-project-root))
;; => "/ssh:mpereira@remote-host:/home/mpereira/linux/"

(with-current-buffer remote-file-buffer
  (shell-command-to-string "fd --version"))
;; => "fd 8.1.1"

(with-current-buffer remote-file-buffer
  (executable-find "fd" t))
;; => "/usr/bin/fd"

(with-current-buffer remote-file-buffer
  (shell-command-to-string "pwd"))
;; => "/home/mpereira/linux/kernel/time"

(with-current-buffer remote-file-buffer
  (shell-command-to-string "fd --extension c | wc -l"))
;; => 28

(with-current-buffer remote-file-buffer
  (shell-command-to-string "fd . | head"))
;; => Kconfig
;;    Makefile
;;    alarmtimer.c
;;    clockevents.c
;;    clocksource.c
;;    hrtimer.c
;;    itimer.c
;;    jiffies.c
;;    namespace.c
;;    ntp.c

(with-current-buffer remote-file-buffer
  (ffip-project-root))
;; => "/ssh:mpereira@remote-host:/home/mpereira/linux/"

(with-current-buffer remote-file-buffer
  (shell-command-to-string "pwd"))
;; => "/home/mpereira/linux/kernel/time"

(with-current-buffer remote-file-buffer
  (let ((default-directory (ffip-project-root)))
    (shell-command-to-string "pwd")))
;; => /home/mpereira/linux

(with-current-buffer remote-file-buffer
  (let ((default-directory (ffip-project-root)))
    (shell-command-to-string "fd --extension asm --extension s --exec-batch cat '{}' | wc -l")))
;; => 373663

(with-current-buffer remote-file-buffer
  (let ((default-directory (ffip-project-root)))
    (shell-command-to-string "fd --extension c --extension h | xargs cat | wc -l")))
;; => 27088162
(defun my-project-find-file (&optional pattern)
  "Prompt the user to filter, scroll and select a file from a list of all
project files matching PATTERN."
  (interactive)
  (let* ((default-directory (ffip-project-root))
         (fd (executable-find "fd" t))
         (fd-options "--color never")
         (command (concat fd " " fd-options " " pattern))
         (candidates (split-string (shell-command-to-string command) "\n" t)))
    (ivy-read "File: "
              candidates
              :action (lambda (candidate)
                        (find-file candidate)))))

(with-current-buffer remote-file-buffer
  (my-project-find-file "jif"))
-
just a footnote ↩︎